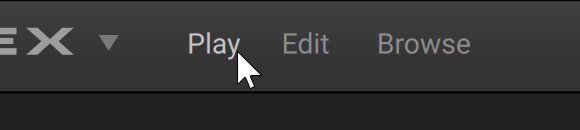
Play view
The Play view of Massive X offers intuitive tools to quickly generate custom evolving sounds using the presets from your libraries and Expansions.
Massive X’s Play view lets you quickly load a preset, play with its most important parameters, and create evolving sounds by morphing between four variations of the preset, either manually or automatically following a predefined curve.
Click Play in the Header to open the Play view.
The Play view contains the following areas:
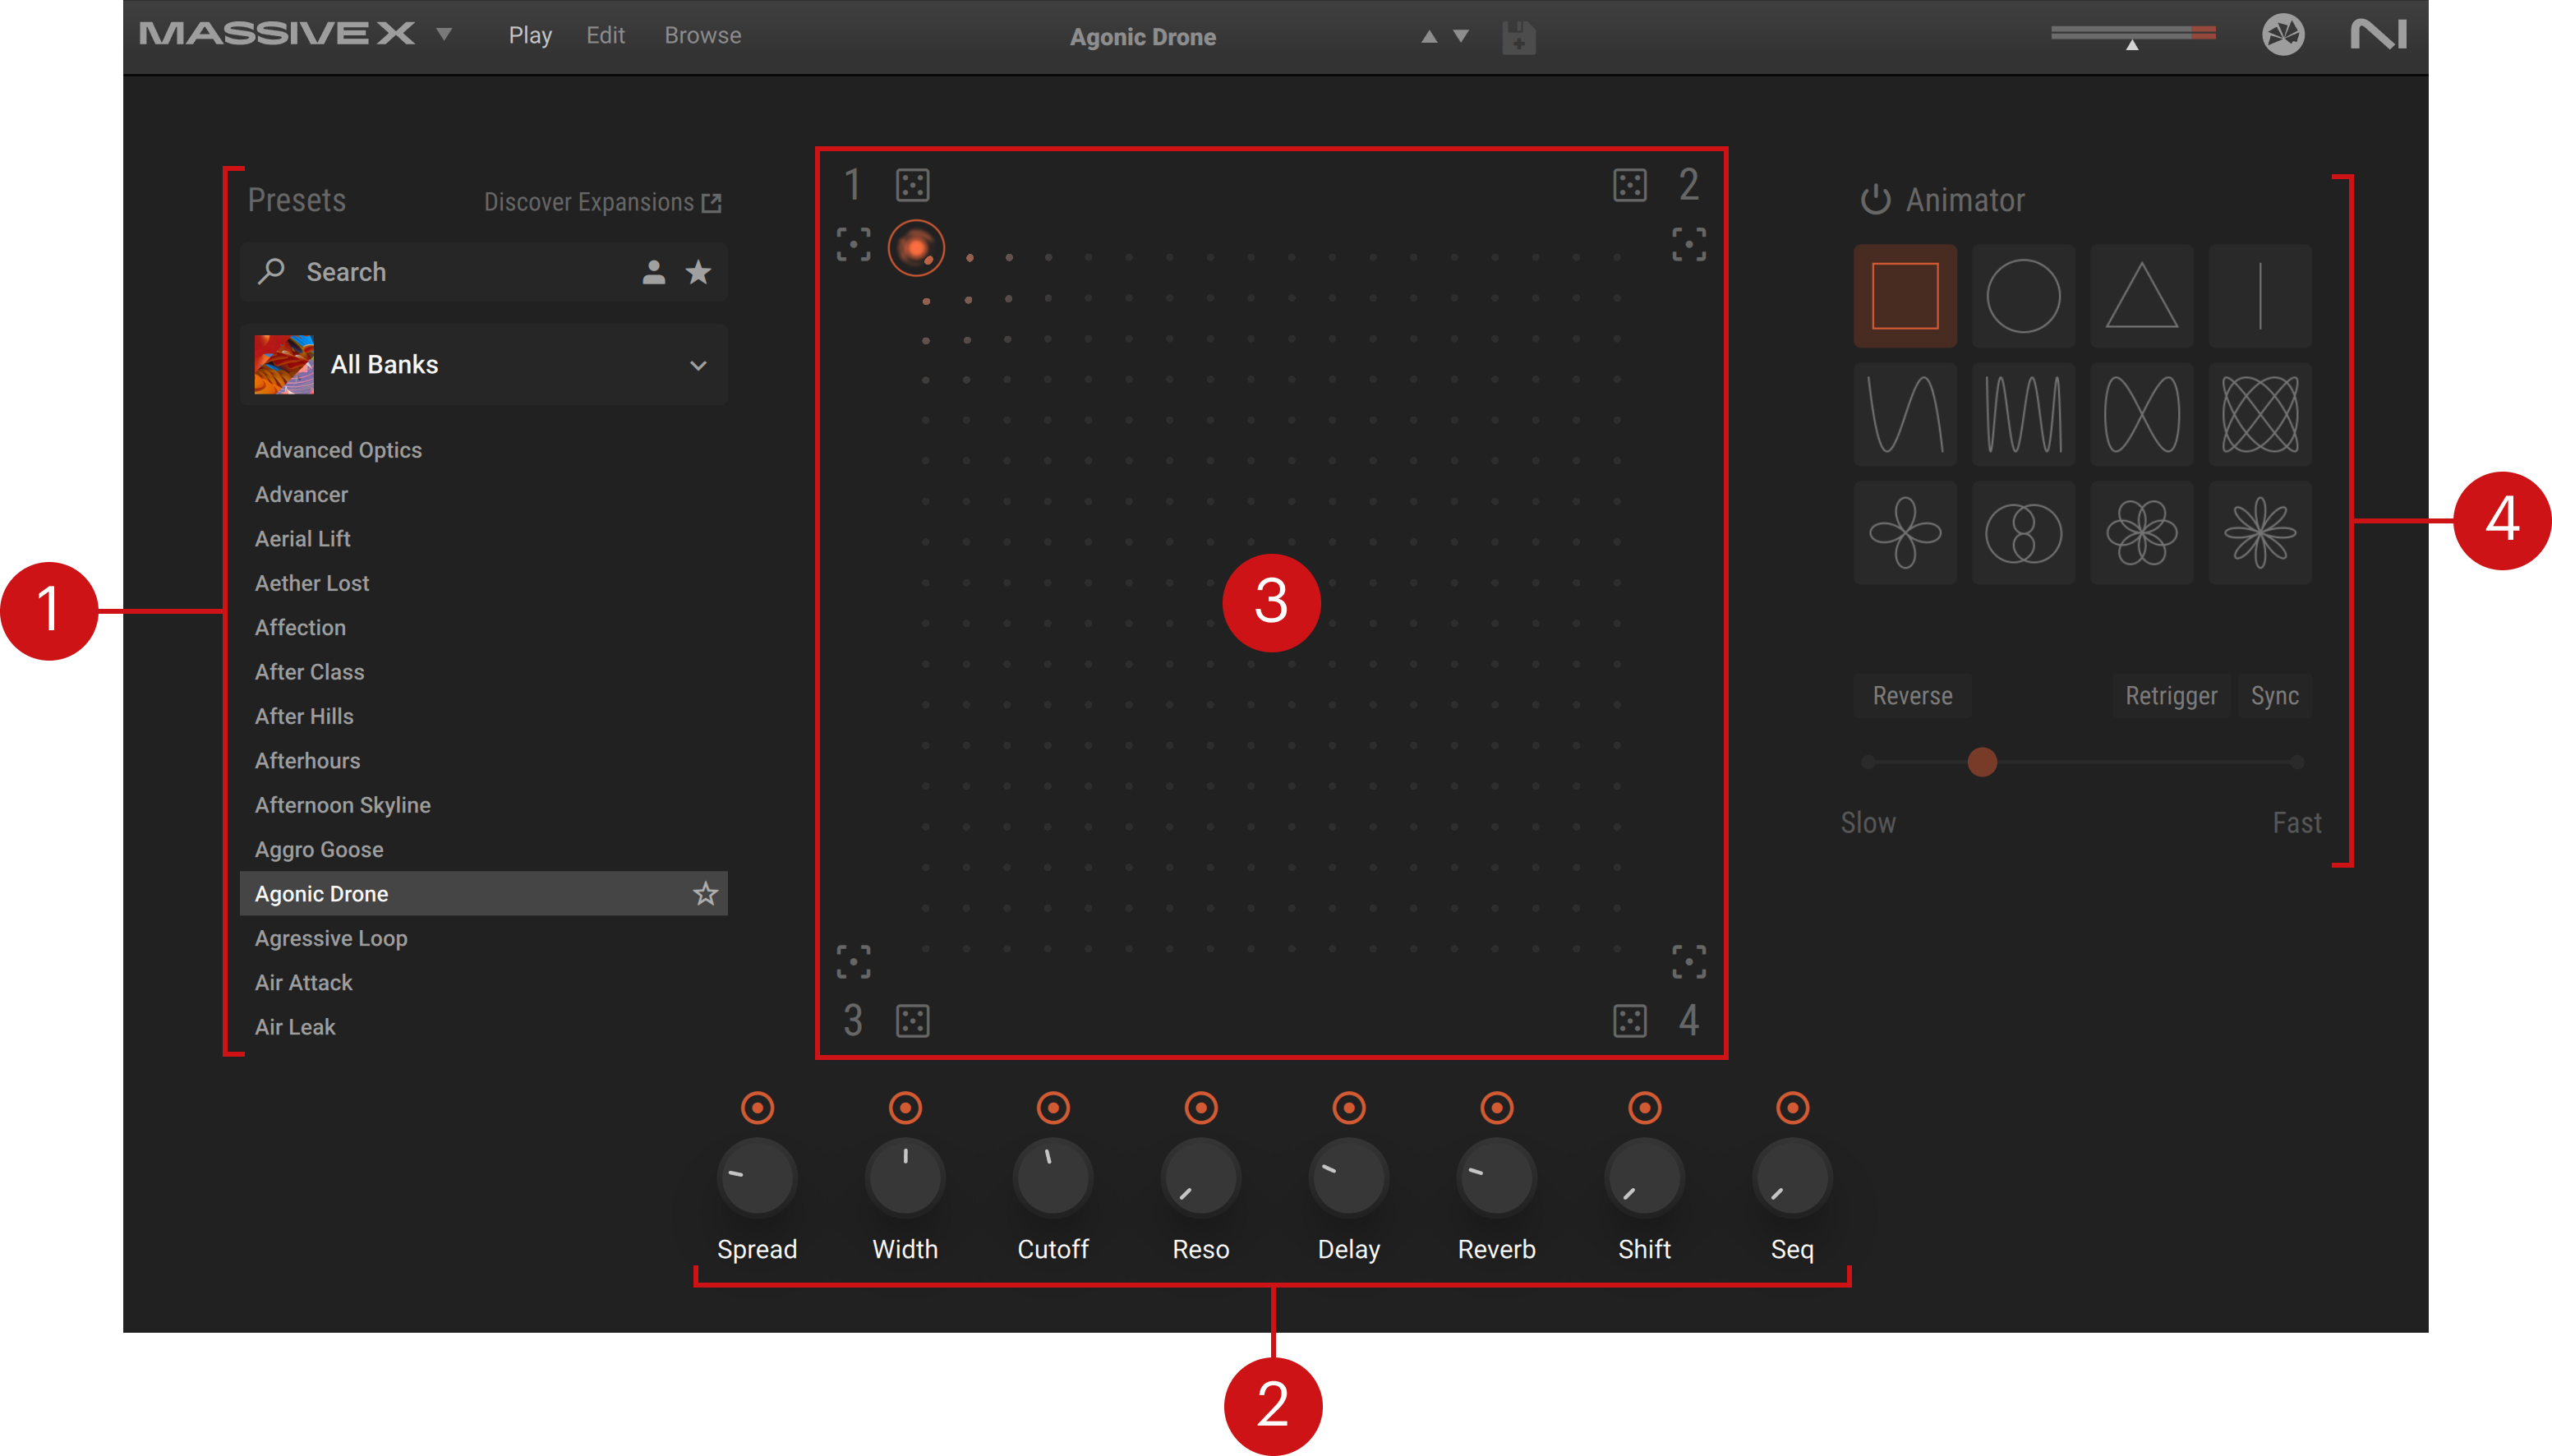
Side pane browser: Lets you quickly search and load presets from your libraries and Expansions. Refer to Side pane browser.
Macros 1–8: Provides access to the first eight Macros. Refer to Macros 1–8 in the Play view.
Morpher: Adjusts the morphing between four different snapshots of the preset, each snapshot containing another set of values for the Macros 1–8. Refer to Morpher.
Animator: Configures an automatic morphing between the snapshots. Refer to Animator.
Side pane browser
The side pane browser provides a reduced version of the full Browser available in the Browse view. You can use it to quickly browse and load presets without leaving the Play page.
The side pane browser contains the following elements:
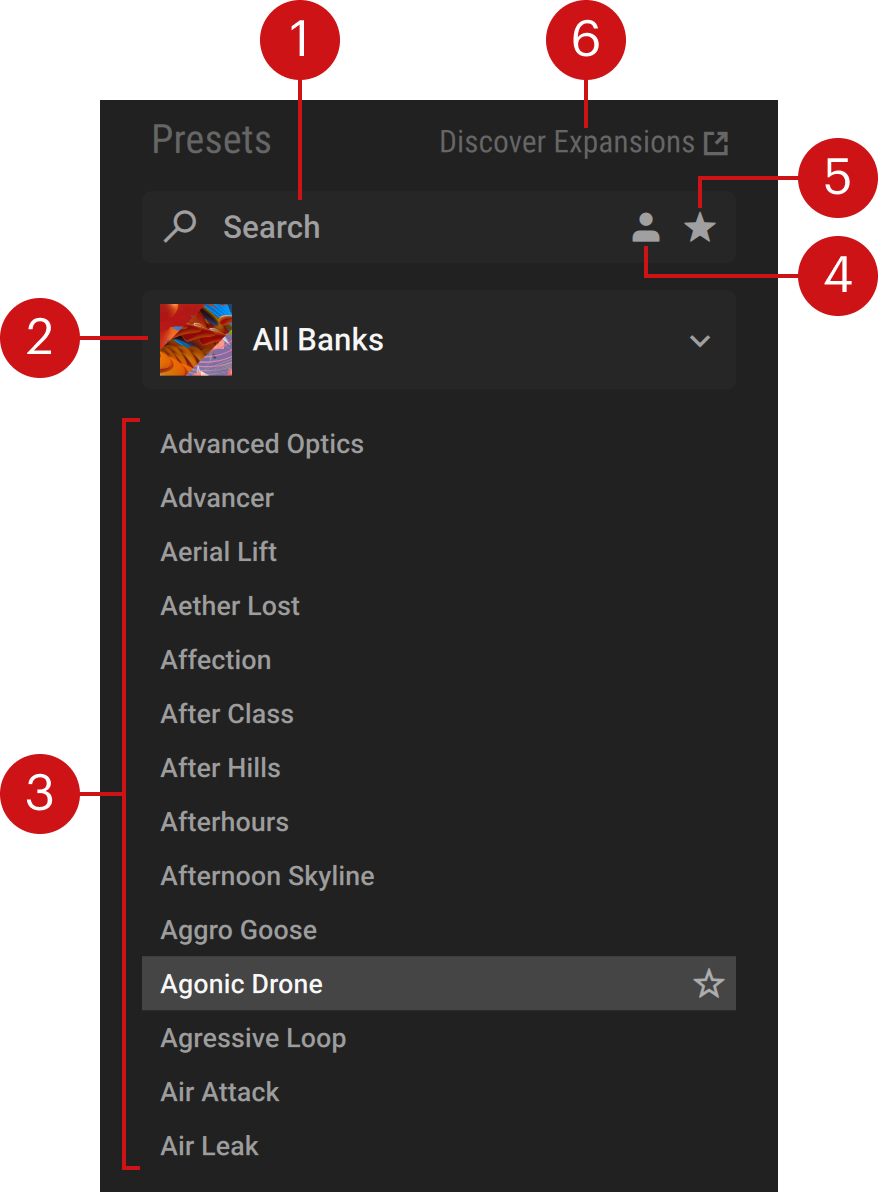 |
Search field: Filters the presets in the Results list according to the text entered in the field. The search engine considers the preset name, author, Character and Sound Type tags, and product name.
Product selector: Displays the selected factory library or Expansion. Clicking the product name opens a menu where you can select another product from the factory libraries and Expansions installed on your computer. Selecting a product filters the Results list with the relevant presets. You can also select All Banks at the top of the menu to show the presets from all your products. The selected entry is synchronized between the side pane browser and the Browser.
Results list: Displays the presets corresponding to your search criteria. The presets are listed in alphabetical order and the selected preset is highlighted. You can click a preset to load it. As you hover over any preset with your mouse, a star icon appears on the right: If you click the star, the preset is set as Favorite and its star lights up. Clicking a lit star will remove the preset from your Favorites.
User Content button: Filters by user content. When activated, the Results list only shows user presets. When deactivated, the Results list only shows presets from your factory libraries and Expansions. For more information on user presets, refer to Using presets. The state of this User Content button is synchronized between the side pane browser and the Browser.
Favorites button (star icon): Filters the presets in the Results list by Favorite tags. You can assign the Favorite tag to any preset in the Results list, creating quick access to a custom collection of your most beloved presets sounds.
Discover Expansions link: Opens the Massive X Expansions page on the Native Instruments website.
Macros 1–8 in the Play view
The eight Macro knobs at the bottom of the Play view represent the first eight Macros of the loaded preset.
Note
Macros are shortcuts assigned to single or multiple parameters of Massive X. They are specific to each preset. In the full version of Massive X, you can customize the Macro assignments. Macros also give you access to host automation and MIDI control. For more information, refer to Macros.
 |
For each Macro, the following elements are available:
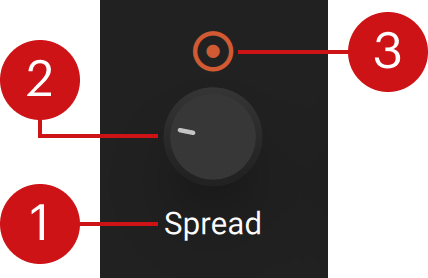 |
Macro label: Describes the Macro’s purpose or controlled parameter(s).
Macro knob: Adjusts the Macro value, which in turn affects the value(s) of the controlled parameter(s). As you hover over the knob with your mouse, the current value appears below. You can click the knob and drag your mouse vertically to change the Macro value, or double-click the knob to reset it to its default position.
Morph switch: When this is on (default state), the Macro knob is linked to the Morpher above: The knob value depends on the position of the Morpher cursor. If you deactivate the Morph switch, the Macro knob stays unaffected as the Morpher cursor moves. For example, if a Macro is controlling the global amount of reverb, you could deactivate its Morph switch to keep the same amount of reverb while morphing other parameters.
Morpher
The Morpher lets you define four distinct sets of values for the Macros 1–8, called Macro snapshots, and morph some or all the Macro values between these four snapshots. The Morpher shows a square field in which each corner represents one snapshot. The position of the Morpher cursor in the field determines the Macro values according to how far the cursor is from each corner.
The Morpher contains the following elements:
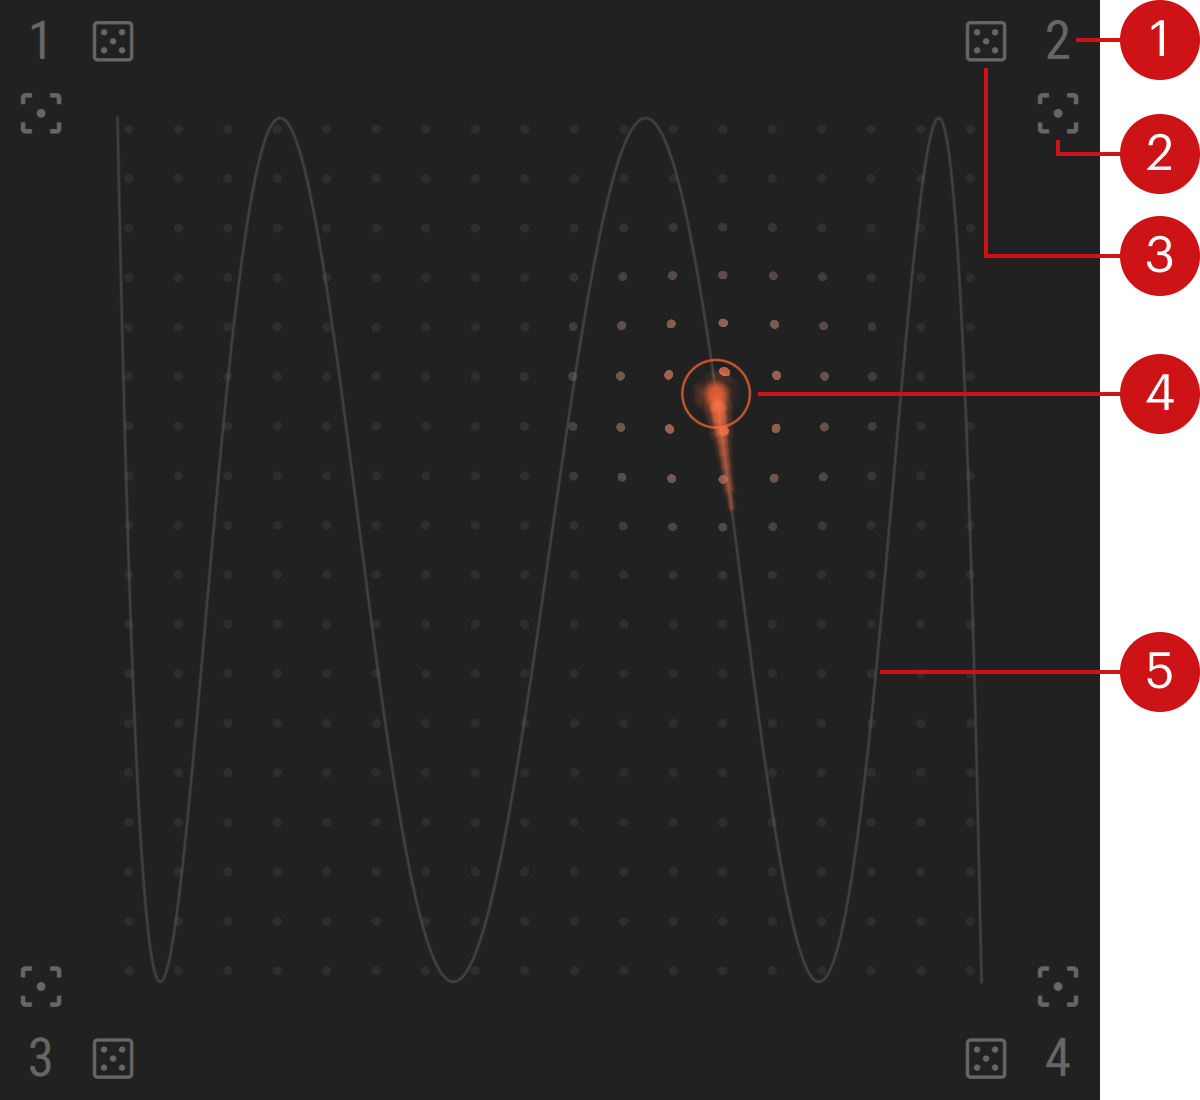 |
Recall Snapshot button (1–4): When you click the snapshot number 1–4 the Morpher cursor jumps to that corner and the Macros with an active Morph switch take the values of this snapshot.
Store Snapshot button (focus icon): Stores the current values of the eight Macro knobs into this snapshot. The Morpher cursor additionally jumps to that corner. From now on, these Macro values will be recalled each time you click this snapshot number, and they will be used as reference when calculating the morphing values relatively to this corner.
Randomize Snapshot button (dice icon): Stores random values for the eight Macro knobs into this snapshot. The Morpher cursor additionally jumps to that corner. From now on, these Macro values will be recalled each time you click this snapshot number, and they will be used as reference when calculating the morphing values relatively to this corner.
Morpher cursor: Defines the morphing values of the Macros whose Morph switch is on. These values are computed from the respective distances between the Morpher cursor and each corner: The closer a corner, the closer the values will be to the snapshot in that corner. For example:
With the Morpher cursor in the top left corner, the Macro values are set to the values of snapshot 1.
With the Morpher cursor halfway between the top right and bottom right corners, the Macro values are set halfway between the values of snapshot 2 and snapshot 4.
With the Morpher cursor in the middle of the field, the Macro values are set to the average values of the four snapshots.
You can click and drag the Morpher cursor with your mouse to manually morph the sound, or you can click anywhere in the field to let the Morpher cursor jump to that position. You can also automate the movement of the Morpher cursor using the Animator. In addition, you can control the cursor using MIDI or host automation.
Trail: When the Animator is on, the selected trail appears in the field to indicate the path followed by the Morpher cursor. When the Animator is off, no trail is displayed.
Note
When you click the Store Snapshot or Randomize Snapshot button in a corner, the snapshot stores new values for all eight Macros, no matter whether their Morph switches are on or off. The Morph switches’ on/off states only specify which Macros will follow the morphed values.
Controlling the Morpher using MIDI or host automation
You can control the position of the Morpher cursor from a MIDI keyboard/controller or using host automation in your DAW by assigning the cursor’s horizontal (x axis) and vertical (y axis) positions.
Since the Morpher cursor modifies the values of the Macros 1–8, which are also available for host automation, you can choose which parameter changes will be exposed to your DAW when you move the Morpher cursor. This is done using the Morpher Automation entry from the Settings menu in the Massive X Header.
 |
The following modes are available:
X/Y only (default setting): When you move the Morpher cursor, only the changes in the cursor position (horizontal and vertical) will be reported to your DAW.
Macros only: When you move the Morpher cursor, only the resulting changes in the Macro values will be reported to your DAW.
X/Y and Macros: When you move the Morpher cursor, both cursor position and the resulting changes in the Macro values will be reported to your DAW.
No automation: When you move the Morpher cursor, no parameter change will be reported to your DAW.
Note
These modes only affect the automation recorded when you move the Morpher cursor. Regardless of the mode selected here, your manual adjustments to the Macro knobs themselves will be reported to your DAW.
Animator
The Animator lets you automate the movement of the cursor in the Morpher, and thereby automate the morphing of the Macro values.
The Animator contains the following elements:
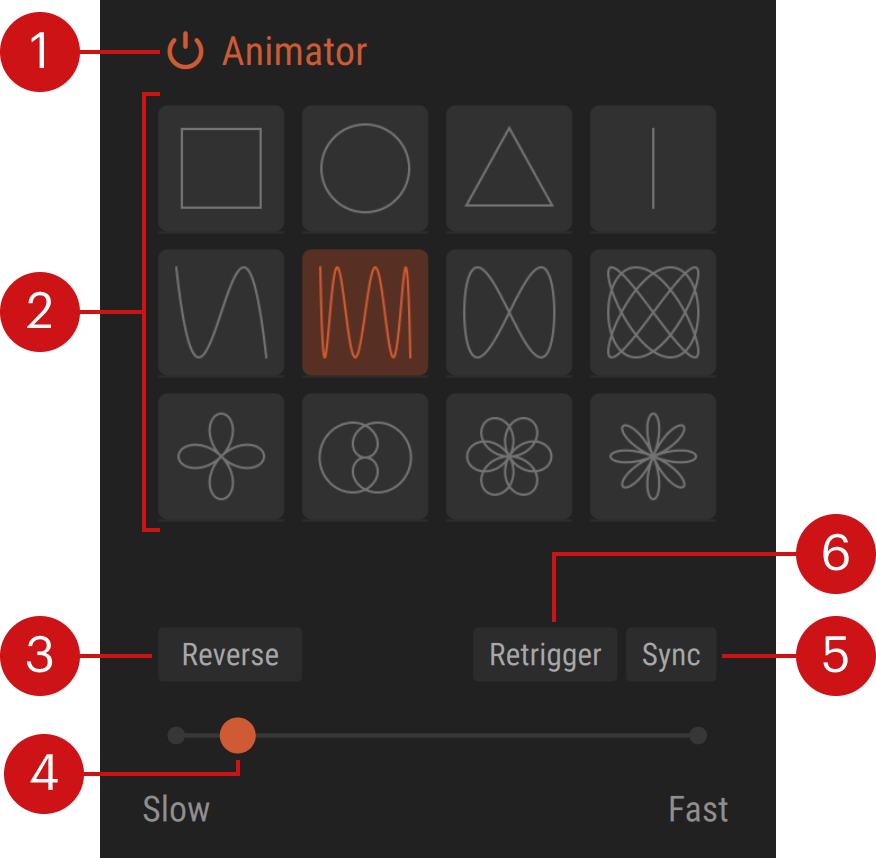 |
Animator on/off switch: Activates or deactivates the Animator. When the switch is off, the whole Animator area is grayed out, and you can still adjust its settings but they will not affect the Morpher cursor until you reactivate the Animator. When the Animator is on, the Morpher cursor moves automatically and you cannot change its position by dragging it with the mouse.
Trail selector: Selects the trail followed by the Morpher cursor.
Reverse: Lets the Morpher cursor run in the opposite direction.
Rate slider: Adjusts how fast the Morpher cursor runs on the trail. When Sync is off, you can set the cursor speed anywhere between Slow and Fast. When Sync is on, you can adjust the cursor speed as the number of bars it takes to travel along the full trail: The available values range from 16 bars (slowest rate) to 1/8 bar (fastest rate).
Sync: When Sync is off, the Morpher cursor runs at its own pace. When Sync is on, the Morpher cursor is synchronized with the transport in your DAW as follows:
When Retrigger is off, the rate of the Morpher cursor is set relative to the tempo in your DAW, and its position on the trail is linked to the song position in your DAW. The cursor runs only when the playback is on in your DAW.
When Retrigger is on, the rate of the Morpher cursor is set relative to the tempo in your DAW. The cursor is always running, no matter if the playback is on or off in your DAW.
Retrigger: When Retrigger is on, the Morpher cursor restarts from the beginning of the trail for each new note. When Retrigger is off, the cursor position is not affected by the new notes.