Insert effects
The Insert Effects in Massive X include modules that can be added to the polyphonic voice structure, including distortion and additional oscillators.
There are two different effects sections available in Massive X; Insert Effects and Stereo Effects. Insert Effects can be used as parts of the polyphonic voice structure, while Stereo Effects are used on the voice mix at the final stage of the signal chain. This chapter will cover the Insert Effects section, including all available modules, their respective controls and suggestions for best use.
Selecting where to place the Insert Effects in the signal chain is done via the Routing page. The three Insert Effects are represented by circular icons (A, B, C).
 |
Individually, they can be placed anywhere in the voice structure. They can also be chained together, or inserted separately on any sound source. Where you choose to place the effect in the signal path will have significant impact on the final sound and the way the effect behaves. These crucial sonic differences will become obvious as you experiment with different routing options and effects combinations.
The following section provides an overview of the Insert Effects section:
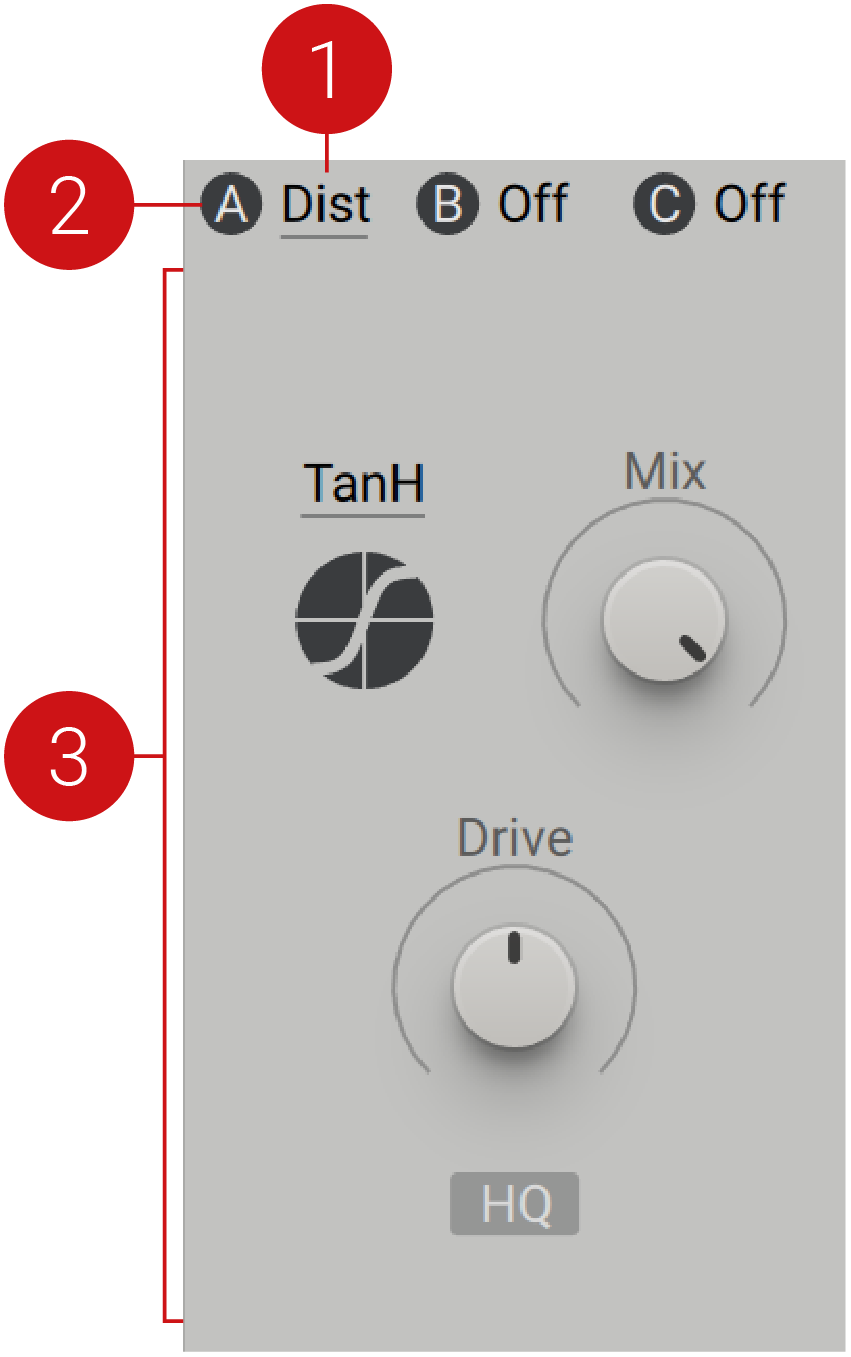 |
Insert Effect On/Off: Switches the Insert Effect on and off. Use this switch to bypass the effect for A/B comparison. The icon can also be found on the Insert Effect module on the Routing page.
Insert Effect Menu: Selects an Insert Effect for the respective slot. Three slots are available, called A, B, and C. The effect panel on display is highlighted with an underline. You can show the other effect panels by clicking on the corresponding Insert Effect menu.
Parameter Controls: This area hosts a range of buttons and knobs that control different parameters of the effect. Each Insert Effect has a different selection of controls that relate to its behavior and operation.
Anima
Anima can be used to enhance oscillator signals by altering their frequency content. The results range from subtle colorization to harmonic transformations that are achieved by adding new sidebands in the frequency spectrum.
As an experimental derivative of effects like comb filters and flangers, its internal structure involves a unique combination of delay lines, audio rate modulation, and feedback. Similar to tuned comb filters, Anima tracks the MIDI pitch of the instrument. This way, it can be tuned relative to the pitch of the input signal, allowing you to explore a range of interesting sounds.
Anima contains the following parameters and controls:
 |
Pitch: Adjusts the center frequency of the tuned delay lines in Anima's internal structure.
Mix: Blends between the input signal and the effect signal. Turn the control fully left to bypass the effect, or right to mix in the effect. Anima is commonly used with high to maximum Mix settings.
FB: Adjusts the amount of feedback in Anima's internal structure. Anima is commonly used with high to maximum FB settings.
+/-: Selects one of two routing modes of the effect and (+) and (-). A positive polarity setting is represented by the (+) icon and is the default setting. Press the icon to change to a negative polarity (-). Each of the two modes features a unique set of signal polarities within Anima's internal structure. This parameter has a strong influence on the overall sound character of the effect.
Smear: Adjusts the distribution of tuned delay lines around the center frequency as set with Pitch.
Amount: Adjusts the amount of internal modulation applied to the tuned delay lines.
Rate: Sets the rate of the internal modulation oscillator.
Fast/Slow: Selects one of two basic modes (Slow, Fast). When Slow is selected, the internal modulation oscillator runs at LFO rates. This produces sounds reminiscent of a comb filter combined with vibrato. When Fast is selected, the internal modulation oscillator runs at audio rates, relative to the instrument's MIDI pitch. This produces interesting harmonic transformations by adding new sidebands in the frequency spectrum, similar to frequency modulation or phase modulation.
Bass Enhancer
The Bass Enhancer is module is a specialized bass enhancement effect that brings presence and drive to low frequency content. The X-Freq control adjusts the cutoff frequency of the crossover filter, splitting the signal into high and low bands. This allows you to apply saturation and compression to the low band, whilst leaving the high band unaffected.
The Bass Enhancer contains the following parameters and controls:
 |
X-Freq: Adjusts the cutoff frequency in a range of 40 Hz to 200 Hz. Frequency content below the cutoff frequency is amplified.
Mix: Blends between the input signal and the effect signal. Turning the control from left to right mixes in the effect signal.
Gain: Adjusts the input level in a range of -15 dB to +15 dB.
Level: Adjusts the output level in a range of -6 dB to +6 dB.
Boost: Activates the internal saturation stage, adding harmonics to the signal.
Bit Crusher
The Bit Crusher degrades a signal by reducing the bit depth, which is the number of bits used to represent amplitude in digital audio. A high bit depth results in an accurate representation of a signal, while a low bit depth adds noise and distortion. This can be used for lo-fi effects ranging from subtle noise textures to extreme distortion that turns any signal into clicks and pulses.
The Bit Crusher contains the following parameters and controls:
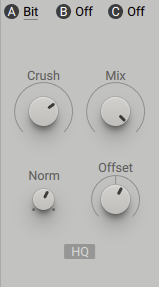
Crush: Adjusts the bit depth and therefore the strength of the bit reduction effect. By turning the control fully left, the lowest number of bits is used, resulting in the strongest effect. By turning the control fully right, the highest number of bits is used, closely resembling the input signal.
Mix: Blends between the input signal and the effect signal. Turn the control fully left to bypass the Bit Crusher, or turn right to mix in the effect. Turning the control fully right results in a wet only signal.
Offset: Adds an offset to the input signal, making it asymmetric. This can be used to create variations of the basic bit reduction effect.
Norm: Subtracts the input signal from the effect signal, making the bit reduction effect more pronounced.
HQ: Activates high quality anti-aliasing. By default, HQ is deactivated. Press the HQ button for less harsh, smooth lo-fi results.
Distortion
This module offers different nonlinear distortion functions that are especially useful for polyphonic sound design. Nonlinear distortion is produced when the output of a signal is not exactly proportional to the input signal, generating harmonics. The Distortion provides five modes for different nonlinear functions, Mix and Drive controls and a HQ button that activates high quality anti-aliasing. Unlike the Stereo Effects' Nonlinear Lab module, the Distortion does not offer internal memorizing, loading or cabinet simulation.
The Distortion contains the following parameters and controls:
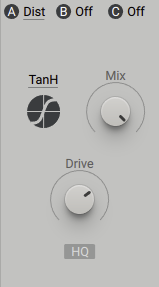 |
Mode: Selects one of five modes that offer different nonlinear functions (tanH, hypB, sin C, H.clip, Rectify). Each mode is visually represented below the Mode selector.
Mix: Blends between the input signal and the effect signal. Turn the control fully left to bypass the effect, or right to mix in the distortion.
Drive: Controls how hard the saturation stages are driven, from subtle to extreme.
HQ: Enables antialiasing in order to improve the audio quality of the nonlinear functions.
Note
Enabling HQ introduces half a sample latency, which can cause phase artifacts when mixed with the original signal. This can also have consequences when used in feedback loops created with audio routing.
Folder
Sitting somewhere between saturation and hard sync effect, the Folder starts to fold, or copy, the waveform of the input signal when driven with high pre-amplification settings. The sonic results are varied and dependant on the input signal, the selected Mode and the Drive and Offset settings. Four modes (Sinus, Triangle, Wrap, Spiky) determine the character of the folding, from smooth to distinctly rough. The harmonic repetitions can to create sounds reminiscent of hard sync-style effects, which you can incorporate subtly with low Mix settings, or turn up for an intense, brutal sound. The Folder can also share sonic correlations to phase modulation sounds. This is achieved most effectively by combining a sinus input signal with Sinus mode .
The Folder contains the following parameters and controls:
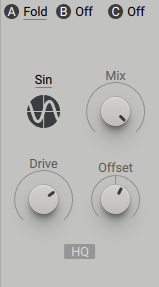 |
Mode: Select one of four modes (Sinus, Triangle, Wrap, Spiky). The wave of each mode is visually represented below the Mode selector.
Mix: Blends between the input signal and the effect signal. Turn the control fully left to bypass the effect, or turn right to mix in the effect.
Drive: Pre-amplifies the signal before it reaches the folding algorithm.
Offset: Shifts the operating point of the algorithm.
HQ: Activates high quality anti-aliasing. By default, HQ is deactivated. Press the HQ button to turn on anti-aliasing.
Frequency Shifter
The Frequency Shifter shifts the frequency of the incoming signal. Unlike a pitch shifter, the Frequency Shifter is able to create inharmonic partials from a sound comprised of harmonic partials, adding a metallic character to your sound. A Shepard phaser effect can be achieved when slow modulation and feedback is applied, with the Mix control set to 50%.
The Frequency Shifter contains the following parameters and controls:
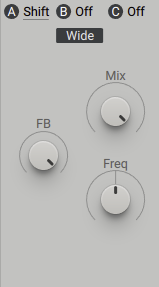 |
Range: Selects one of two frequency ranges (Wide, Narrow). Wide makes the Frequency Shifter operate over a wide frequency range, useful for achieving wild and animated sounds. The Narrow setting provides good control for relatively small shifting factors. This range is scaled with the Freq control.
Mix: Blends between the input signal and the effect signal. Turn the control fully left to bypass the effect, or right to mix in the effect.
Freq: Shifts the partials of a signal. In centre position, the effect is neutral. Turning the control right shifts the partials upwards, and turning left shifts the partials downwards. Due the nature of the algorithm, partials can be reflected upwards again, if the downshifted partials are exceeding zero hertz. The encoder itself behaves in a nonlinear manner, resulting in a finer resolution around the centre.
FB: Adjusts the amount of feedback. When this control is turned up, the output of the Frequency Shifter is reflected back in to the input, creating a Shepard flanger effect.
Insert Oscillator
The Insert Oscillator (OSC) is an independent source for three classic synth waveforms; Sine, Sawtooth, and Pulse, which can be used in addition to the main Wavetable Oscillators. When used simultaneously over the three Insert Effects slots and alongside the two Wavetable Oscillators, it expands to a five oscillator synthesizer. These Insert Oscillators can also be phase locked to either Wavetable Oscillator, creating a classic Sub Oscillator. The Insert Oscillator is one of the most powerful tools in the Insert Effects, greatly expanding the potential of the Massive X synth engine.
The Insert Oscillator contains the following parameters and controls:
 |
Mode: Selects the waveform of the oscillator (Sine, Saw, Pulse). Sine and Saw modes offer a phase shift control while Pulse mode offers control over PW (pulse width).
Invert: Inverts the polarity of the waveform. When the button is activated, the waveform is flipped.
Pitch Mode: Selects one of three modes (Keytrack, Fix, Ratio) that determines the response of the oscillator in relation to incoming MIDI pitch. In Keytrack mode, the pitch is locked to the main MIDI pitch. Ratio mode multiplies or divides the MIDI pitch in relation to the ratio setting. For example, a ratio of 3 adjusts the pitch to 3 times the frequency, producing the 3rd harmonic. Fix mode sets the fixed tuning of the oscillator, disregarding the incoming MIDI pitch. This mode displays MIDI note numbers, with the default set to 60 (middle C).
Pitch: Adjusts the tuning of the oscillator in semitones and cents. The Pitch can be modulated by routing a modulation source to either of the two modulation slots below, allowing you to produce vibrato and arpeggio effects.
Lock: Enables you to lock the pitch to one of the main Wavetable oscillators. When inactive, the pitchbox is shown, providing Massive X’s standard oscillator tuning. When the Lock button is active, settings for Ratio and the Sync source are provided.
Lock Ratio: Selects one of four ratios (1:1, 1:2, 1:3, 1:4) that determines the Tune Ratio in relation to the chosen Source oscillator. At 1:1, the Insert oscillator runs at exactly the same pitch as the Source oscillator. With a 1:2, the Insert oscillator is 1 octave lower (-12 semitones). 1:3 runs the Insert oscillator at 1/3 of the speed, equating to approximately 1 octave and a fifth lower (-19 semitones). At 1:4, the Insert oscillator runs 2 octaves lower (-24 semitones).
Pitch Source: Selects if the pitch should be locked to Wavetable oscillator 1 or 2. The Ratio cannot be modulated as it is hard-locked to the Source oscillator, but modulation can be applied to the Insert oscillator’s Phase/PW parameter.
Phase/PW: The label and functionality of this control changes according to the selected mode. Sine and Sawtooth modes offer a Phase offset control, allowing you to phase shift the oscillator. The Phase control is used to set the Phase relationship between oscillators when locked to the Wavetable oscillators or if the Engine is set to resetting behaviour on the Voice page. When Pulse is selected, the Phase control switches to PW, which adjusts the width of the Pulse wave. When set to the center value, a square wave is produced. Adjusting the PW control makes the Pulse wave asymmetric, introducing even harmonics that create a thinner sound. Applying modulation to the PW parameter is a classic technique used to add dynamism to a waveform, known as PWM (pulse width modulation).
Mix: Blends between the input signal and the independently delivered waveform. Turn the control fully left to bypass the effect, or turn right to mix in the waveform. The Mix control has the same functionality across all modes.
PM Oscillator
The Phase Modulation oscillator features a sine wave oscillator that can be Phase modulated by it's input signal and placed anywhere in the voice structure. The rich phase modulated audio signal can be mixed in with the original input. Combining the three Insert Effects with the two Wavetable oscillators, creates the potential for a seven operator FM synth.
Complex Wavetable oscillators can be used to modulate the operators, or the operators can be used to phase modulate the Wavetable oscillators via the Aux bus. You can even combine it with filters, ring modulation or any other Insert Effects. With flexible routing, you can achieve cross-feeding of operators or phase feedback chains within itself.
The PM Oscillator contains the following parameters and controls:
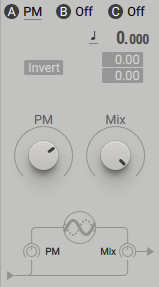 |
Invert: Inverts the polarity of the waveform. When the button is activated, the waveform is flipped.
Pitch Mode: Selects one of three modes (Keytrack, Fix, Ratio) that determines the response of the oscillator in relation to incoming MIDI pitch. In Keytrack mode, the pitch is locked to the main MIDI pitch. Ratio mode multiplies or divides the MIDI pitch in relation to the ratio setting. For example, a ratio of 3 adjusts the pitch to 3 times the frequency, producing the 3rd harmonic. Fix mode sets the fixed tuning of the oscillator, disregarding the incoming MIDI pitch. This mode displays MIDI note numbers, with the default set to 60 (middle C).
Pitch: Adjusts the tuning of the oscillator in semitones and cents. The Pitch can be modulated by routing a modulation source to either of the two modulation slots below, allowing you to produce vibrato and arpeggio effects.
PM: Adjusts the Phase Modulation amount. This works as an amplifier for the incoming signal added to the sine oscillator’s phase.
Mix: Blends between the input signal and the sine operator signal. Turn the control fully left to bypass the effect, or turn right to mix in the waveform.
Ring Modulator
Ring modulators mix the frequencies of two different waveforms, and output the sum and difference of the frequencies present in each. This process of ring modulation produces a signal rich in partials. Neither original signals are prominent in the final output, allowing you to transform your signal.
The Ring Modulator offers a Sine wave oscillator that can be used to ring modulate any input signal. This can be freely placed into the voice structure via the Routing page like any other Insert effect. Using ring modulation with one of the main oscillators, when the two frequencies are not harmonically related, can create metallic or bell-like sounds.
The Ring Modulator contains the following parameters and controls:
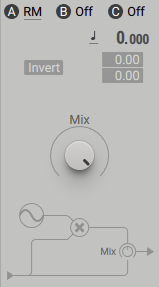 |
Invert: Inverts the polarity of the waveform. When the button is activated, the waveform is flipped.
Pitch Mode: Selects one of three modes (Keytrack, Fix, Ratio) that determines the response of the oscillator in relation to incoming MIDI pitch. In Keytrack mode, the pitch is locked to the main MIDI pitch. Ratio mode multiplies or divides the MIDI pitch in relation to the ratio setting. For example, a ratio of 3 adjusts the pitch to 3 times the frequency, producing the 3rd harmonic. Fix mode sets the fixed tuning of the oscillator, disregarding the incoming MIDI pitch. This mode displays MIDI note numbers, with the default set to 60 (middle C).
Pitch: Adjusts the tuning of the oscillator in semitones and cents. The Pitch can be modulated by routing a modulation source to either of the two modulation slots below, allowing you to produce vibrato and arpeggio effects.
Mix: Blends between the input signal and the sine waveform. Turn the control fully left to bypass the effect, or turn right to mix in the waveform.
Sample and Hold
The Sample and Hold module provides the opportunity for classic Sample and Hold effects. The internal oscillator samples the incoming signal, holding this value until the next sample is taken. This effect results in a ‘stepped’ quantized audio signal. The oscillator itself is not heard directly, but can be tuned in the same way as the other oscillators. The Sample and Hold effect can be used to create a range of different distortion effects. Try setting low Pitch values to recreate the sounds of old digital synthesizers. For classic sample rate reduction, Key Tracking must be deactivated.
The Sample and Hold module contains the following parameters and controls:
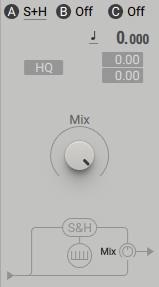 |
HQ: When deactivated, the effect operates in a typical way with a clear digital character. When activated, a high quality algorithm treats the steps in the waveform caused by downsampling, producing an analog sound.
Pitch Mode: Selects one of three modes (Keytrack, Fix, Ratio) that determines the response of the oscillator in relation to incoming MIDI pitch. In Keytrack mode, the pitch is locked to the main MIDI pitch. Ratio mode multiplies or divides the MIDI pitch in relation to the ratio setting. For example, a ratio of 3 adjusts the pitch to 3 times the frequency, producing the 3rd harmonic. Fix mode sets the fixed tuning of the oscillator, disregarding the incoming MIDI pitch. This mode displays MIDI note numbers, with the default set to 60 (middle C).
Pitch: Adjusts the tuning of the oscillator in semitones and cents. The Pitch can be modulated by routing a modulation source to either of the two modulation slots below, allowing you to produce vibrato and arpeggio effects.
Mix: Blends between the input signal and the delayed signal. Turn the control fully left to bypass the effect, or turn right to mix in the delayed signal.
Track Delay
Track Delay operates unlike a standard delay effect. The module provides two basic modes of operation. In Key Track mode the input signal can be shifted in relation to MIDI pitch, and mixed with the original signal, in an inverted or normal manner. For example, a saw input can be transformed into a square wave by phase shifting the signal by 180 degrees and subtracting the inverted mix from the input. Modulating the Phase results in true PWM (pulse width modulation), and this can be adapted to any input signal as WM. Fix mode can be used to mimic pickup effects, placing the pickup on a virtual string. Track Delay can also be used as a polyphonic chorus effect.
The Track Delay contains the following parameters and controls:
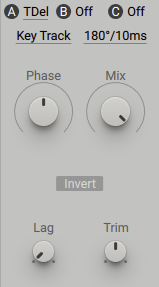 |
Modes: Selects one of two modes (Key Track, Fix) that define the main operating mode. In Key Track mode, the delay time is locked to the main MIDI pitch. In Fixmode, the delay time is not locked to the main MIDI pitch and operates in the time domain. The range is determined by the Range menu.
Range: Selects one of three options for each of the two operating modes (180°/10msec, 360°/50msec, 720°/150msec) phase degree/milliseconds.
Phase: Adjusts the Phase when Key Track mode is selected. In Fix mode, it determines the delay time.
Mix: Blends between the input signal and the delayed signal. Turn the control fully left to bypass the effect, or right to mix in the delay signal. Center position is recommended. At this position, the Trim encoder can be used to control the center level.
Invert: Switches between Normal and Invert to determine how the delayed signal is mixed. An Inverted polarity is recommended.
Lag: Adjusts the smoothing of delay time changes.
Trim: When the Mix encoder is set to center position, the Trim knob controls the center level.
Utility
This module helps you correct, level out, or finalize your sound. If a sound is too bright, too bass heavy, too loud or soft, this is the tool to use. It is especially effective when used in conjunction with the Tracker, as well as in Feedback scenarios, where it can be used together with the Comb filter to create an overblown flute and similar effects. This enables you to scale the amplitude in order to produce a balanced sound over the range of the keyboard. The filters have no nonlinearities or resonance, resulting in a clean and neutral sound.
The Utility contains the following parameters and controls:
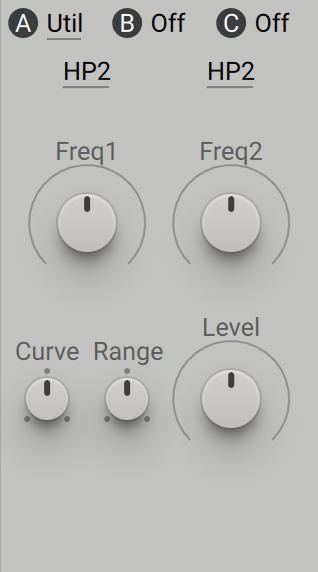 |
Filter Type: Two menus that offer four filter types (HP1, HP2, LP1, LP2) to select from. If you use two LP2 filters with the same settings you will achieve a 4-pole filter characteristic.
Freq: Determines the cutoff frequency for the corresponding filters.
Level: Sets the volume of the VCA (voltage controlled amplifier). Two controls determine the behavior of the VCA:
Range: Defines the maximal amplification factor that can be achieved with the VCA. Turning the control from fully counter-clockwise to centre position provides a range from 1% to 100%. Turning Range from the center position to fully right provides a maximum of 500%.
Curve: Bends the response character of the VCA. At centre position, the VCA behaves linearly. This is the default setting for this module. Turned fully left, it produces a strong bend with the amplification factor rising exponentially towards the end. At full right position, it bends strongly in the opposite way, so the amplification factor rises logarithmically towards the end.