Wavetable oscillators
At the heart of Massive X are two powerful wavetable oscillators. Their functionality and underlying synthesis technique is explained here.
Two Wavetable oscillators form the basis for sound generation in Massive X. These oscillators produce sound from digitally sampled, single-cycle waveforms arranged in a table known as a wavetable. Scanning through the different waveforms in the table gives you access to a wide range of tones and sound colors that can be used in various musical forms.
Wavetable synthesis operates on a two-dimensional axis. On the x-axis, playback of the individual waveforms occurs. This playback, or readout, is controlled by the internal phase of the oscillator, which follows the pitch of incoming MIDI notes. The y-axis represents the wavetable itself, and the different waveforms that are stacked one above the next. Scanning the different waveforms along the y-axis produces variations in harmonic content. By modifying the readout of the waveform, you can create intricate timbral variations in our sound.
The beauty and power of wavetable synthesis becomes most evident when modulation is introduced to scan the table of waveforms. This process can be triggered by an envelope or modulated by an LFO, as well as manually altered with a controller. The dynamic results of this morphing is a defining sonic character in this style of synthesis. Wavetable synthesis inherently facilitates complex combinations of different waveforms, and this sonic potential is further enhanced with the Wavetable Modes, which dramatically impact that readout of the wavetable. The modes also determine the available controls and menus, significantly altering the behavior of the oscillator.
The Wavetable oscillators are defined by the selected wavetable and the wavetable mode. A diverse collection of wavetables has been crafted to cover a broad range of end uses, from more typical waveforms and PWM to FX and Harmonics. To start exploring the Wavetable oscillators, browse through the wavetables in the Wavetable Menu and experiment using these with the different Wavetable Modes.
Scanning through the waveforms included in the wavetable is done using the Wavetable Position control. Turning this knob scans through the waveforms included in the selected wavetable, the result of which is graphically displayed on the control. Intricate sweeping effects can be achieved by routing a modulation source to the Wavetable Position knob, producing a waveform that is constantly morphing and evolving.
The Wavetable oscillators can be used to replicate the timbre and articulation of acoustic instruments, or to shape new and abstract sounds. Complex drones, shimmery pads, abrasive leads and percussion can all be crafted using the oscillators as the core building block. When combined with the extensive modulation and routing options found in Massive X, alongside the PM/Aux bus, noise sources, effects, and Modulators, the potential is unbounded.
Wavetable oscillators overview
This section provides an overview of the Wavetable oscillators. Controls for Wavetable oscillator 1 are numbered below, and these controls are mirrored for Wavetable oscillator 2.
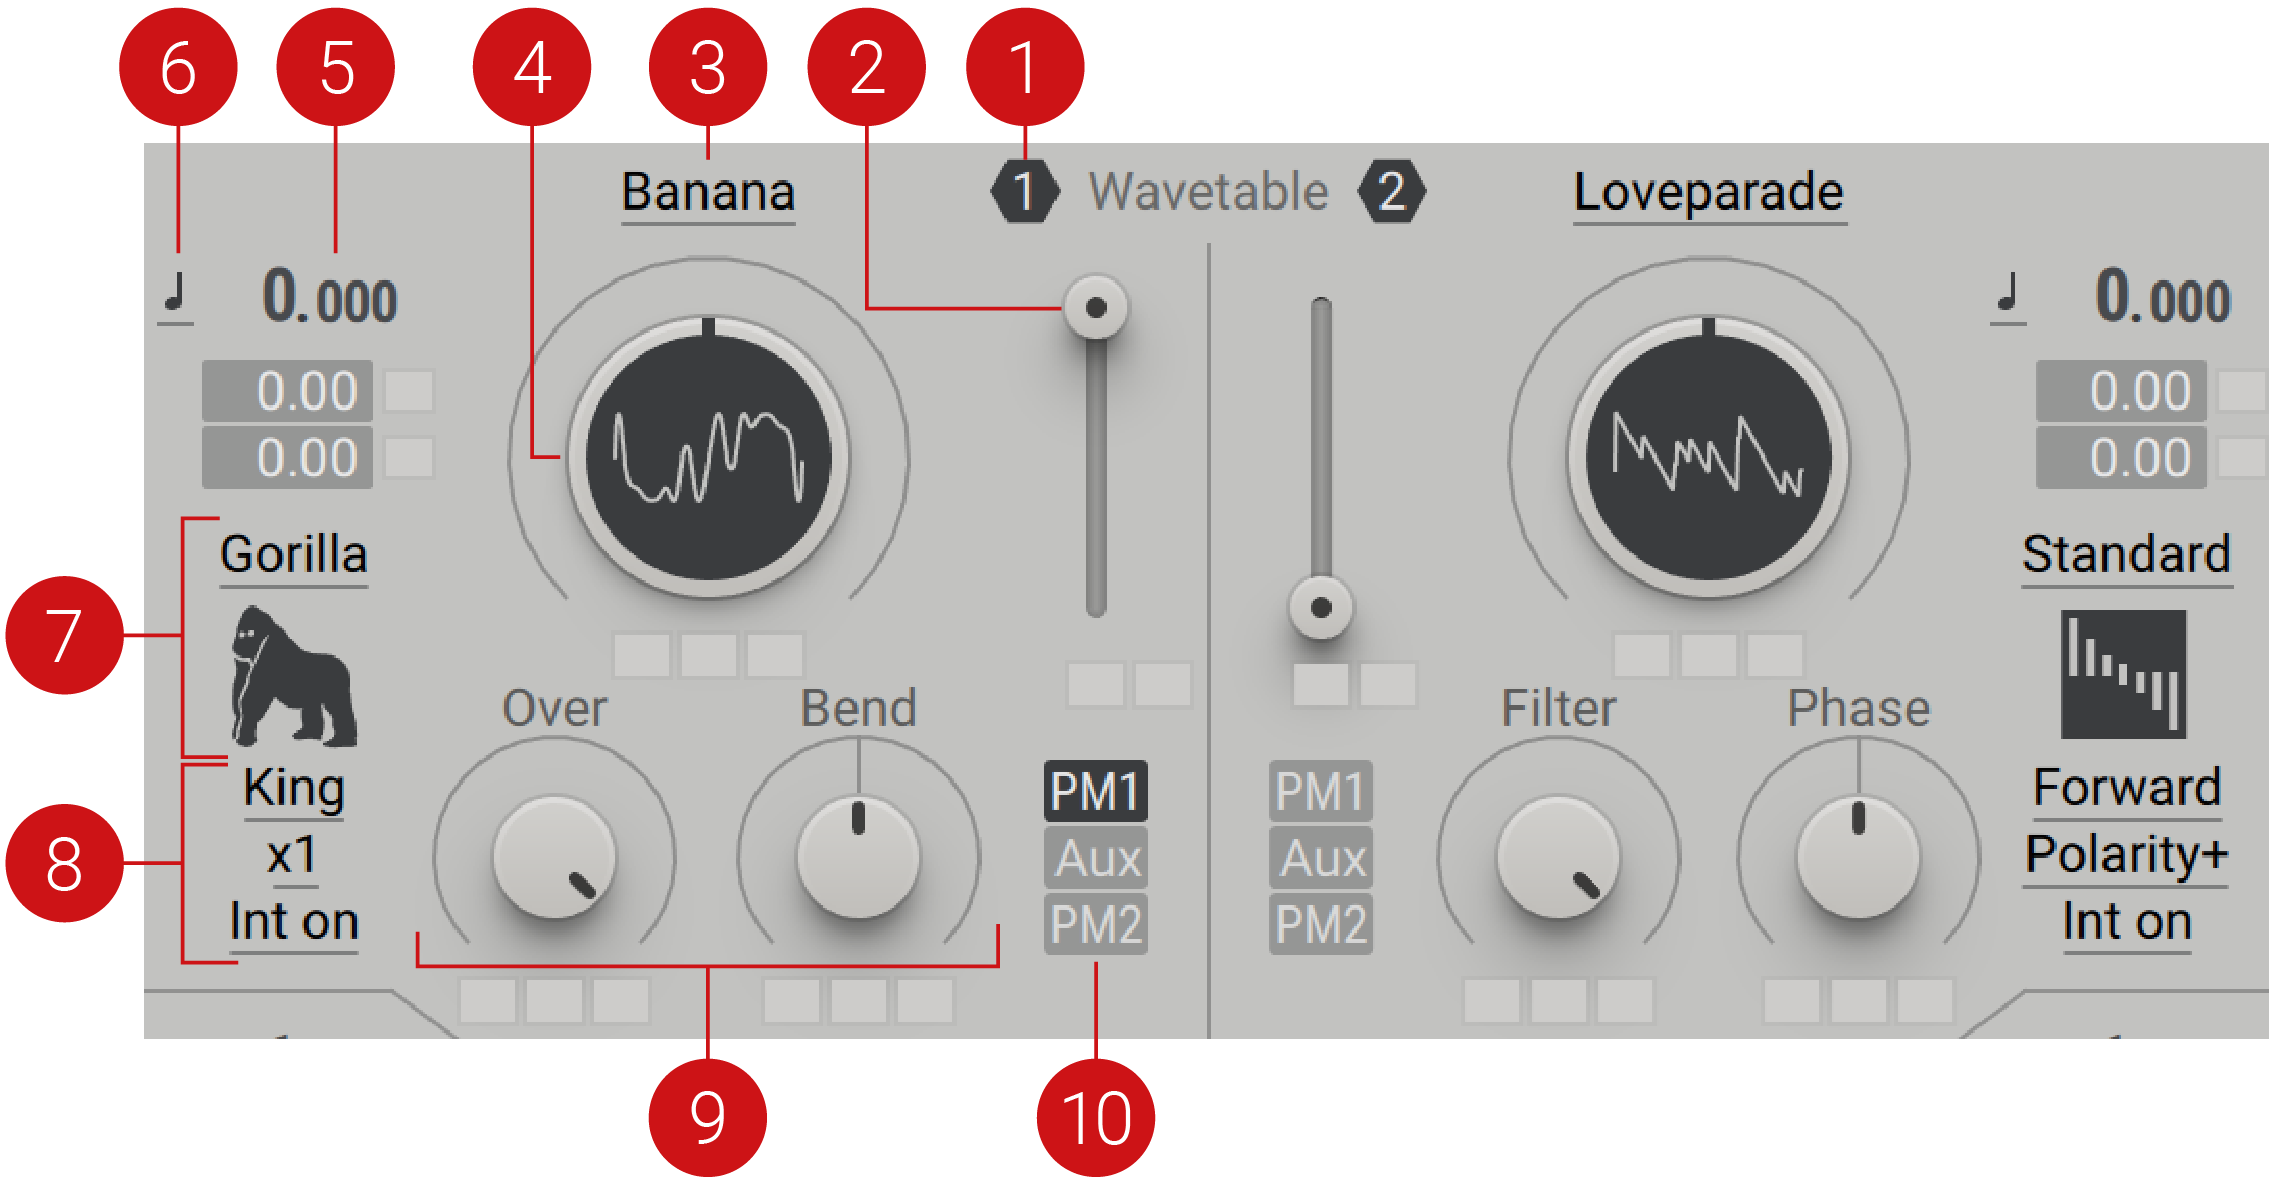 |
Oscillator On/Off: Switches the Wavetable oscillator on or off. The icon can also be found on the Wavetable oscillator module on the Routing page.
Level: Adjusts the output volume of the Wavetable oscillator.
Wavetable Menu: Opens a menu with available wavetables. The categories are presented on the left and the individual wavetables on the right. Hover over the Wavetable menu to expose arrows that allow you to browse up and down through the wavetables, without opening the menu. For more information on the wavetable categories, refer to Wavetables menu.
Wavetable Position: Scans through the waveforms included in the selected wavetable. The individual waveforms represented in each table range from 2-128. Changes in the waveform are visually represented.
Pitch: Adjusts the tuning of the oscillator in semitones and cents. The Pitch can be modulated to produce vibrato and arpeggio effects by assigning a modulation source to either of the two modulation slots below.
Pitch Mode: Selects one of three modes (Keytrack, Fix, Ratio) that determines the response of the oscillator in relation to incoming MIDI pitch.
Keytrack mode, locks the pitch to the main MIDI pitch.
Ratio mode multiplies or divides the MIDI pitch in relation to the ratio setting. For example, a ratio of 3 adjusts the pitch to 3 times the frequency, producing the 3rd harmonic.
Fix mode sets the fixed tuning of the oscillator, disregarding the incoming MIDI pitch. This mode displays MIDI note numbers, with the default set to 60 (middle C).
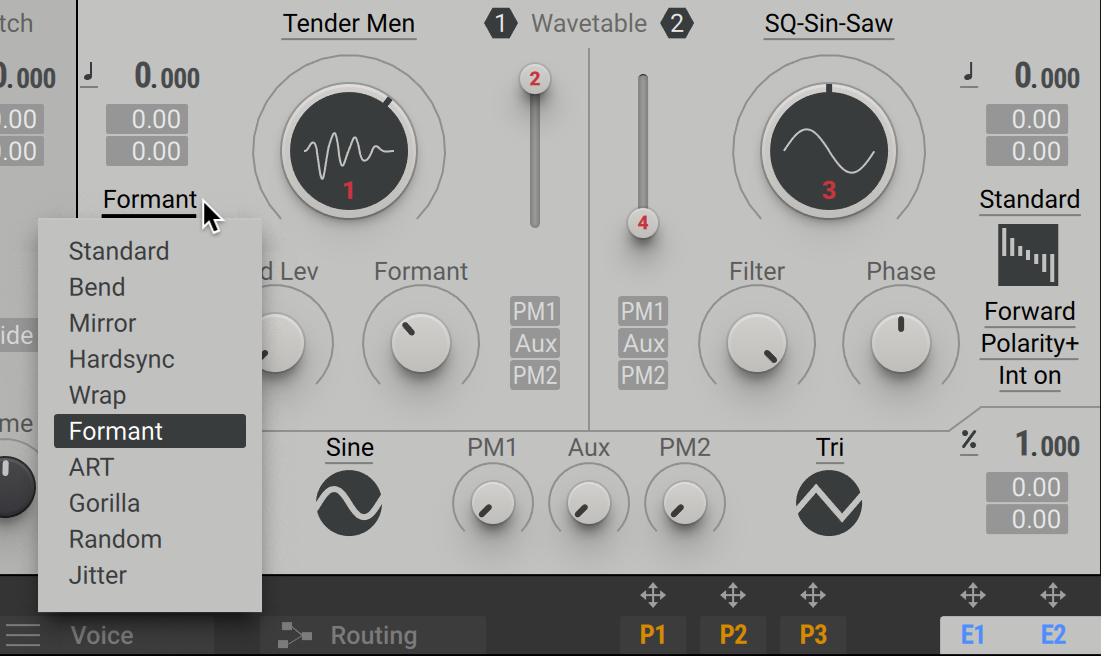
Wavetable Modes: Selects one of ten operating modes (Standard, Bend, Mirror, Hardsync, Wrap, Formant, ART, Gorilla, Random, Jitter), which determine the readout of the wavetables. For more information, refer to Wavetable modes.
Wavetable Mode settings: Menus and switches that vary, depending on the mode selected. Each mode has a specific set of menus and switches that directly relate to its operation. For more information on the settings relating to each specific mode, refer to Wavetable modes.
Wavetable Mode controls: Two control knobs that vary, depending on the selected Wavetable mode. Each mode has two knobs controls that directly relate to its operation. For more information on the controls relating to each mode, refer to Wavetable modes.
PM Aux Assignment: When activated, the Phase Modulation oscillators and/or Aux input are assigned to the corresponding Wavetable oscillator. For more information on the PM/Aux bus, refer to Phase modulation.
Wavetables menu
The wavetables in Massive X are grouped in to 11 categories (Basics, Operators, Harmonics, Additive + FM, Monster, Drift, Filter, Formant, FX, Mixed, Remastered) to help streamline your search, and provide you with an idea of proposed use-cases.
The wavetables are not strictly separated, and they can serve as the starting point for various kinds of sound design. However, the sonic content of some wavetables makes them more suitable in certain use cases than in others. For example, some wavetables are best suited for sounds based on subtractive synthesis, while others are specifically designed to be used for phase modulation. In some cases, the wavetables are not particularly exciting on their own, but work well in combination with other wavetables or specific wavetable modes. Experimenting with all controls is the best way to really understanding how the wavetable relates to the respective wavetable mode. For more information, refer to Wavetable modes.
The Wavetable menu contains the following categories:
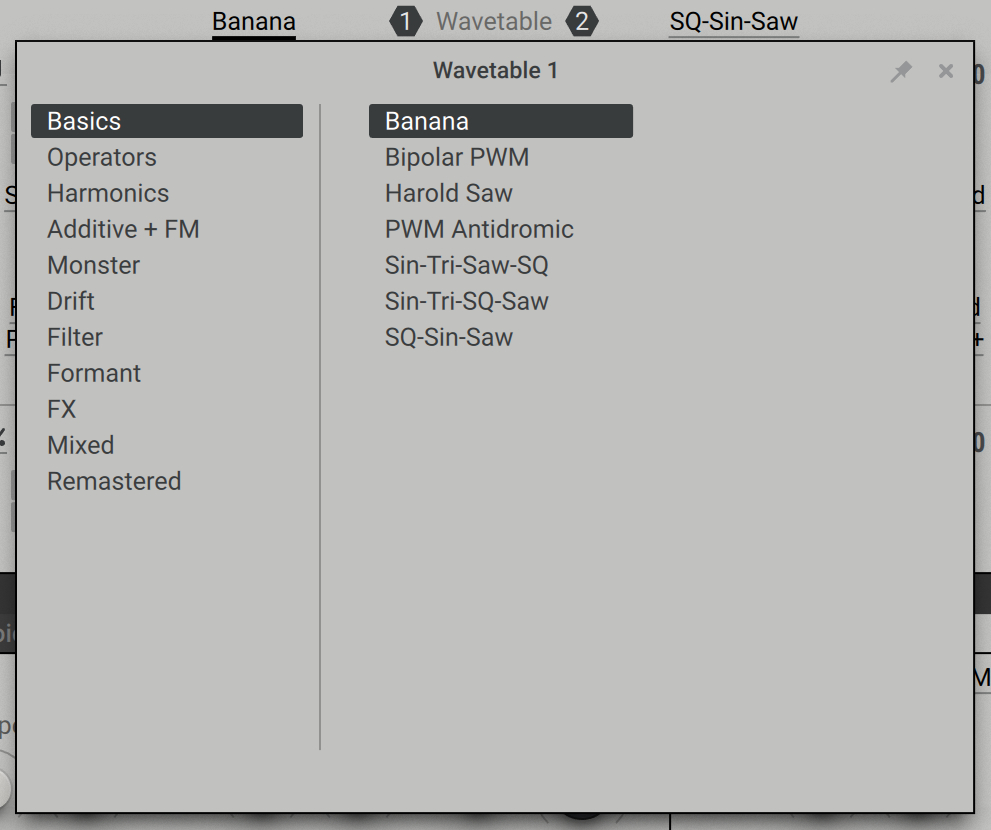 |
Basics
These wavetables do not have a distinct character, and serve as the basis for subtractive synthesis. The most basic table, SQ-SIN-SAW, is a good starting point for any type of synthesis. Basics also consists of some classic analog waveforms, including PWM (pulse width modulation). The Banana wavetable is especially designed for Gorilla mode, and produces its best results with modulation applied to the mode's Over and Bend controls. Wavetables found in the Basics category are well suited for classic analog synth sounds.
Operators
Operator wavetables are specifically made to be used for phase modulation, but they can also add body to a layered sound. WM (width modulation) is provided in wavetables that contain only few harmonics, allowing for a more dynamic and animated sound.
Harmonics
These wavetables feature a specific effect that emphasizes the harmonic series when scanning through the wavetable. They combine well with subtle filtering or EQ, and produce interesting results when applying modulation to the wavetable position.
Additive + FM
Wavetables in this category feature sounds typically associated with additive or FM synthesis. They are ideal for producing cold, shimmery, metallic, or glassy sounds.
Monster
As the name suggests, Monster wavetables have a particularly brutal tone and a strong character. They combine well with EQ, unisono and distortion. With additional phase modulation, or when used with modes like Bend or Mirror, even more aggressive timbres can be achieved. Applying modulation to the wavetable position with a sawtooth or triangle LFO creates the wobble sounds synonymous with EDM or dubstep. To tame these sounds, you can use clean filters like SV Parallel or SV Serial. The included wavetables named Gorilla can produce a similar effect as the Gorilla mode when scanning through the wavetable. All content in this category is usually played in the low to very low register.
Drift
These wavetables provide hard transients that work well with subtractive filtering, from standard and more complex PWM wavetables, to newly invented tables with the Drift feature. The tables create the illusion of multiple, slightly detuned oscillators beating against each other, allowing you to achieve a drifting effect with only one oscillator. To use this feature, apply a slowly moving triangle LFO to the wavetable position and alter the Rate of the LFO to produce the illusion of oscillator drift.
Filter
Wavetables that mimick filter sounds, including BP (band-pass) and LP (low-pass) options, are featured in this category. They combine well with EQ, unisono and distortion. Scanning through the wavetable emulates the effect of adjusting a filter's cutoff frequency at high resonance. This can produce similar sounding results to the wavetables in the Harmonics category. Due to the similarity of the effect, it is best to avoid combined these wavetables with resonant filters. Rather, they can effectively replace a resonant filter in the sound, while adding capabilities beyond normal filters.
Formant
These wavetables mimic characteristics of the human voice and can be used for creating vowel sounds. They work particularly well in Formant Capture mode. The vowel sounds become especially distinguished when modulation is applied to the Wavetable Position. Each wavetable has a different sweet spot that can be brought to life with the right modulation. Experiment with the modulation rate to emphasize human-like articulations and achieve nuanced vocalisms. Some of these wavetables are based on voice recordings, which were then transformed into wavetables.
FX
FX wavetables produce complex sound colors. They are suitable for sound effects rather than standard oscillator sounds, and can be used to add shimmer and texture to layered sounds. When transposed down drastically and used without pitch tracking, they can serve as noise generators without distinct pitch. You can use them to emulate environmental resonances, or to create inharmonic bell sounds. These wavetables are most effective with strong modulation applied to the Wavetable Position.
Mixed
Mixed wavetables are made up of a variety of highly unrelated waveforms, with differing sonic palettes. As such, they do not morph smoothly like most typical wavetables, but can be used to create interesting stepping effects.
Remastered
These wavetables are legacy content from the original Massive, which have been remastered for Massive X.
Wavetable modes
The Wavetable oscillator operates in one of ten different modes (Standard, Bend, Mirror, Hardsync, Wrap, Formant, ART, Gorilla, Random, Jitter), which determines the readout of the wavetables and hence the behaviour of the Wavetable oscillator. The modes have a significant impact on sound and are essential to unlocking the full potential for sound design using Massive X. Every mode features two dedicated parameters for real time manipulation and additional settings to define the behaviour.
 |
Standard mode
The default Wavetable mode is Standard. Similar to Spectrum mode in original Massive, the Filter control is used to reduce the higher frequency harmonics heard in the selected waveform. By scanning through the set of band-limited waveforms that are usually assigned to specific pitches, a low-pass filtering effect is achieved. The function is similar to a low-pass filter cutoff, although the algorithm behind it is different from a standard filter design. When this filter is applied to a square wave it gradually becomes a sine wave, i.e. only the fundamental of the sine wave remains.
Standard mode contains the following parameters and controls:
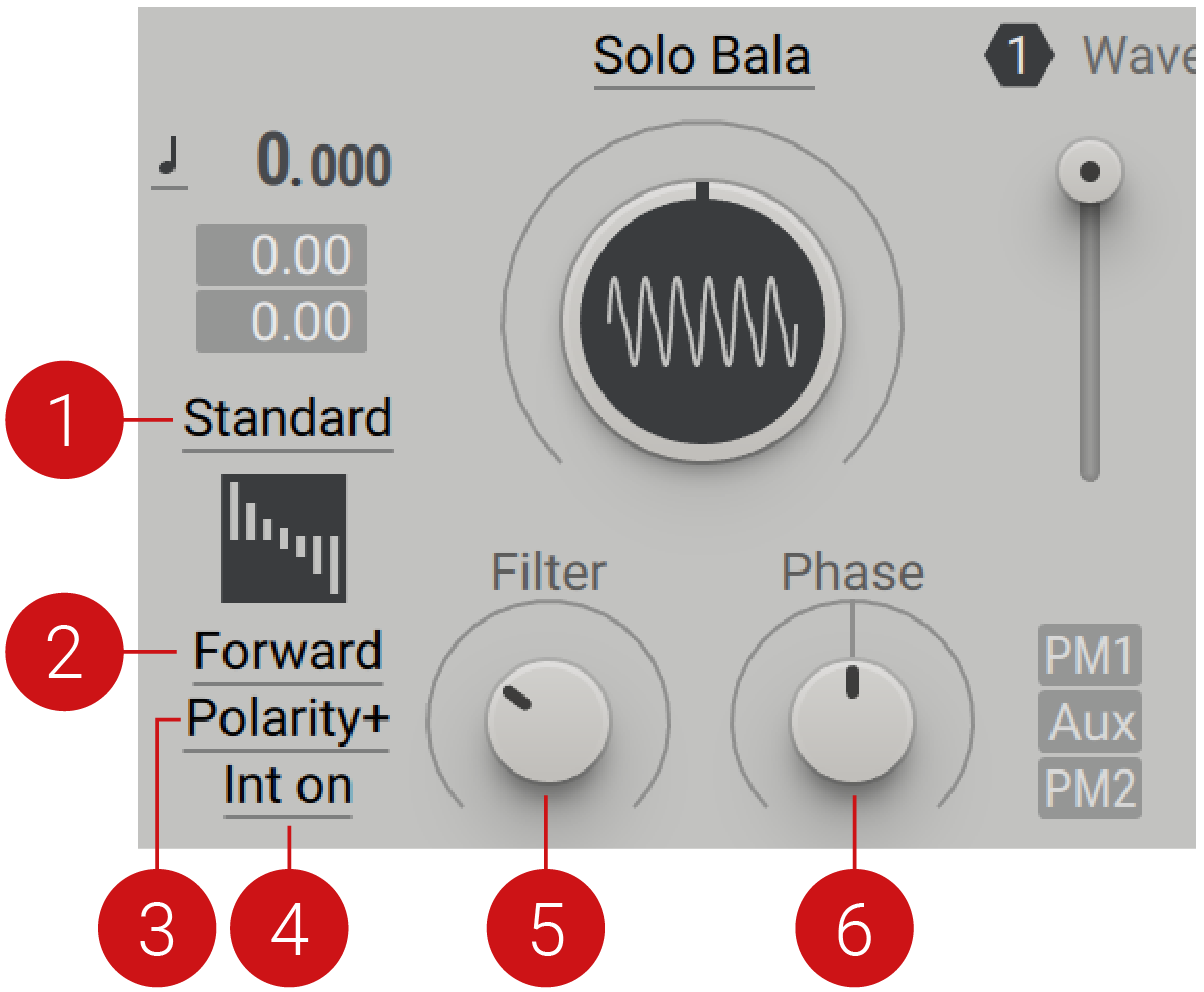 |
Wavetable modes: Selects from a menu of ten operating modes that determine the readout of the wavetables.
Phase Direction: Switches between two settings (Forward, Backward) which determine how the waveform is read out.
Polarity +/-: Switches from positive to negative polarity, meaning the waveform is flipped.
Internal Phase On/Off: When Int on is selected, the engine uses the main phase. Selecting Int off fixes the oscillator frequency at 0 Hz, bypassing the main phase and turning the oscillator into a waveshaper. The shaper must be used in conjunction with the PM oscillators or the PM Aux bus. The level of the PM oscillator and/or Aux input determines the amount of waveshaping, and the Wavetable Position and Filter parameters control the shape function.
Filter: Reduces the high frequency harmonics of the selected waveform. The effect is similar to adjusting the cutoff frequency of a low-pass filter.
Phase: Adjusts the oscillator phase.
Tip
Presets like Amber Chapel demonstrate a classic organ sound. Analogica produces a classic analog saw sound.
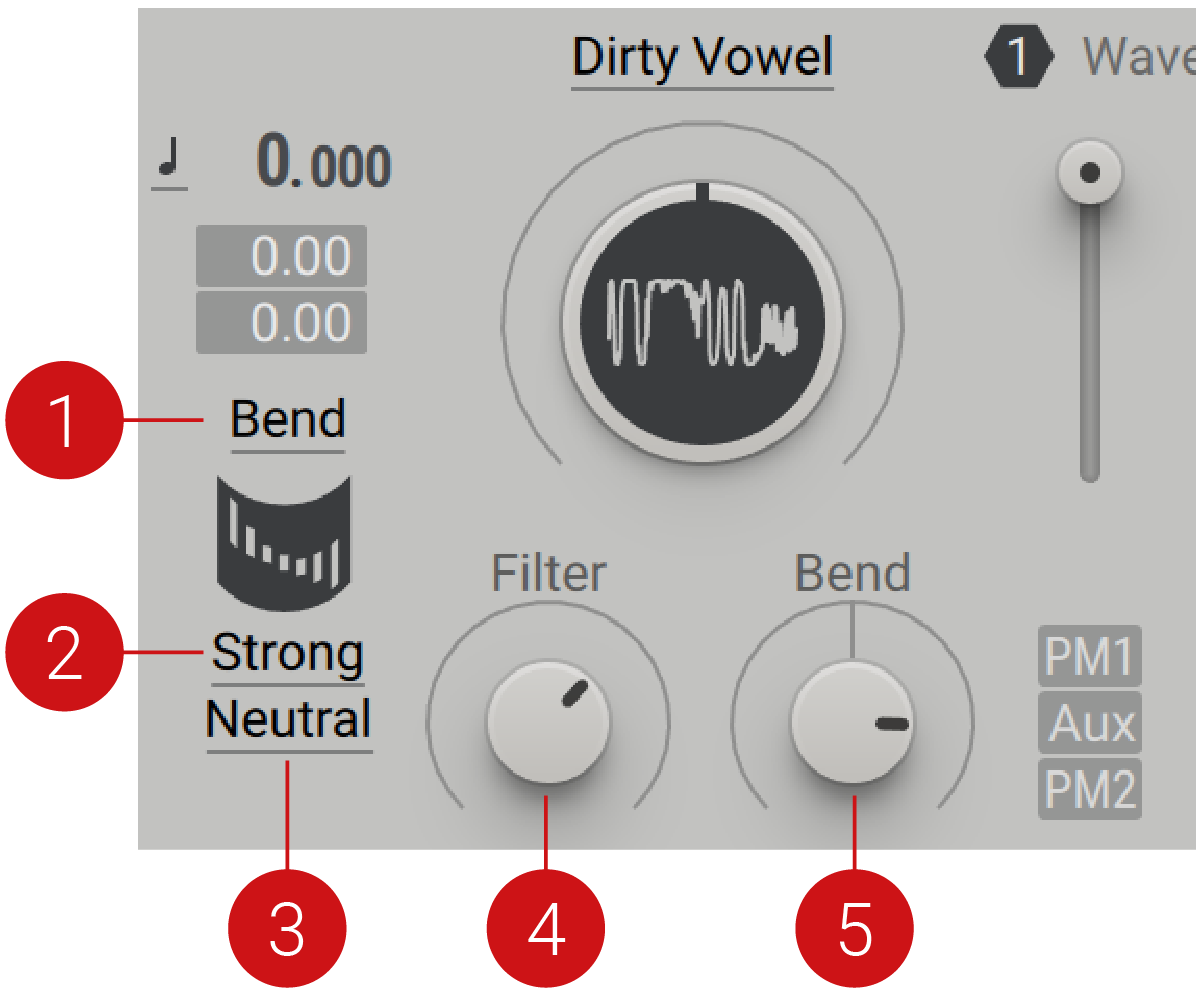
Bend mode
In Bend mode, the readout curve of the wavetables can be shaped. You can raise and lower the readout speed depending on the position within the wavetable. Some parts of the waveform are compressed and other parts are expanded, as determined by the Bend, Strength and Direction parameter settings. Up-down mode can be used to create a hollow, square-like sound.
Bend mode contains the following parameters and controls:
 |
Wavetable modes: Selects from a menu of ten operating modes that determines the readout of the wavetables.
Bend Curve: Selects one of three settings (Strong, Medium, Gentle) that change the bend curve. With a Strong setting, the bending curve is significantly altered. Medium produces a less strong curve. With a Gentle setting the bend curve is more subtle, operating like the +/- Bend mode in Massive.
Direction: Selects one of three settings (Neutral, Up-Down, For-Back) that determine how the waveform is read out. With a Neutral setting, no directional change is applied and the waveforms are unaltered when played. Up-Down inverts every second cycle of the waveform. Flipping every second cycle cuts out all even harmonics (2, 4, 6, 8 etc.), meaning you cannot produce these harmonics with this setting. For-Back (Forward-Backwards) reads out every second cycle of the waveform backward. If the waveform is perfectly symmetrical, this has the same affect as Up-Down mode.
Filter: Reduces the high frequency harmonics of the selected waveform. The effect is similar to adjusting the cutoff frequency of a low-pass filter.
Bend: Bends the phase by accelerating and decelerating the readout of the waveform.
Tip
Start with presets like Alkaline State or Alpha Ape for a basic introduction to this mode. The Anaphylaxis preset showcases Bend mode, in combination with wavetables from the Monster category, producing a hollowed out square. The Andean Air preset demonstrates how to produce a breathy, hollowed instrument sound using two Operator wavetables in Bend mode.
Mirror mode
Mirror mode reads the wavetable back and forth. It has no sub menus. Exceeding a certain Ratio will force the waveform to be folded, producing a hard sync-style sound.
Mirror mode contains the following parameters and controls:
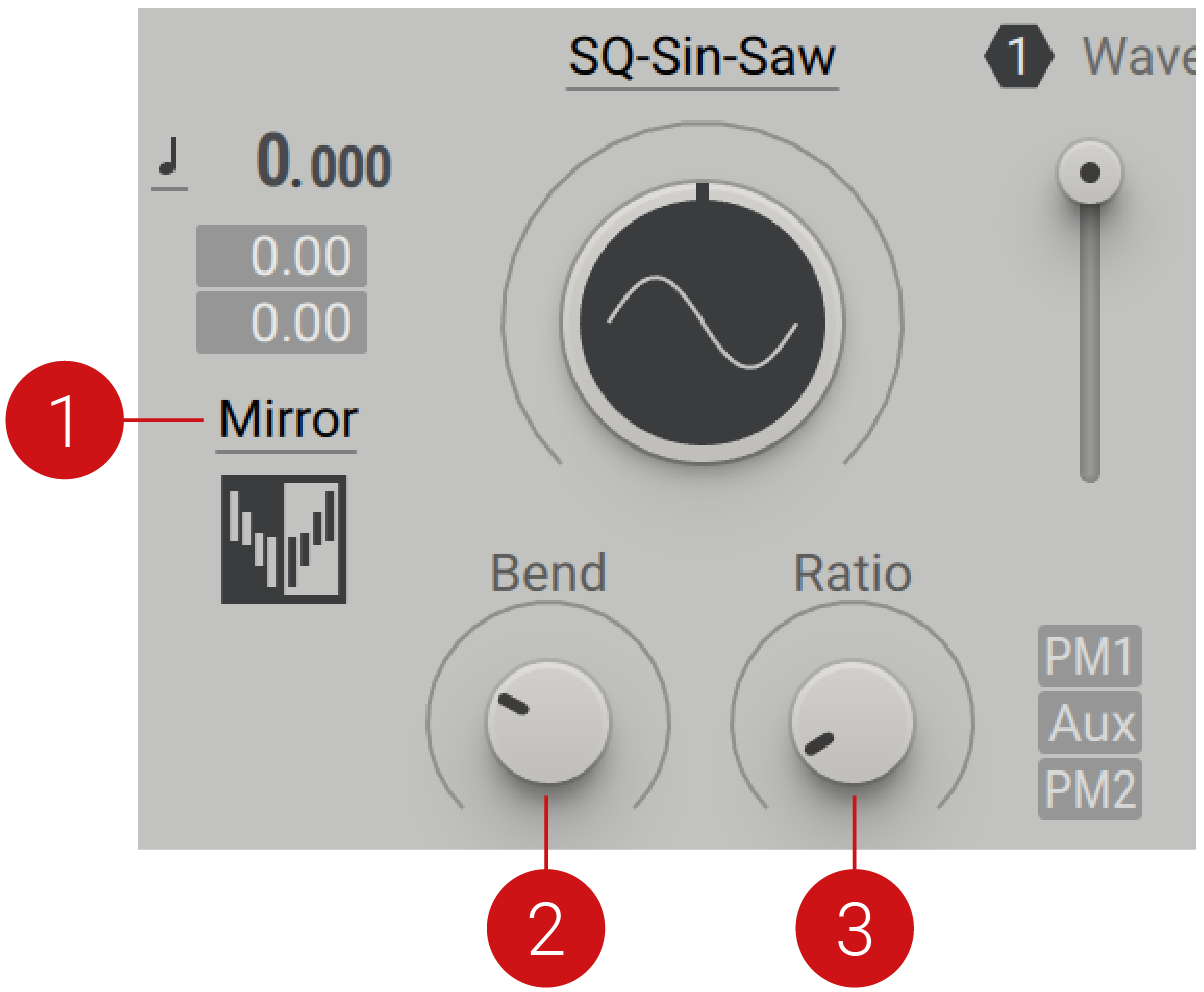 |
Wavetable mode: Selects from a menu of ten operating modes that determines the readout of the wavetables.
Bend: Bends the phase by accelerating and decelerating the readout of the waveform.
Ratio: Controls the depth ratio of the mirrored phase. You can successively change the range of mirroring, and even force it to folding, where the sonic results will enter hard-sync territory.
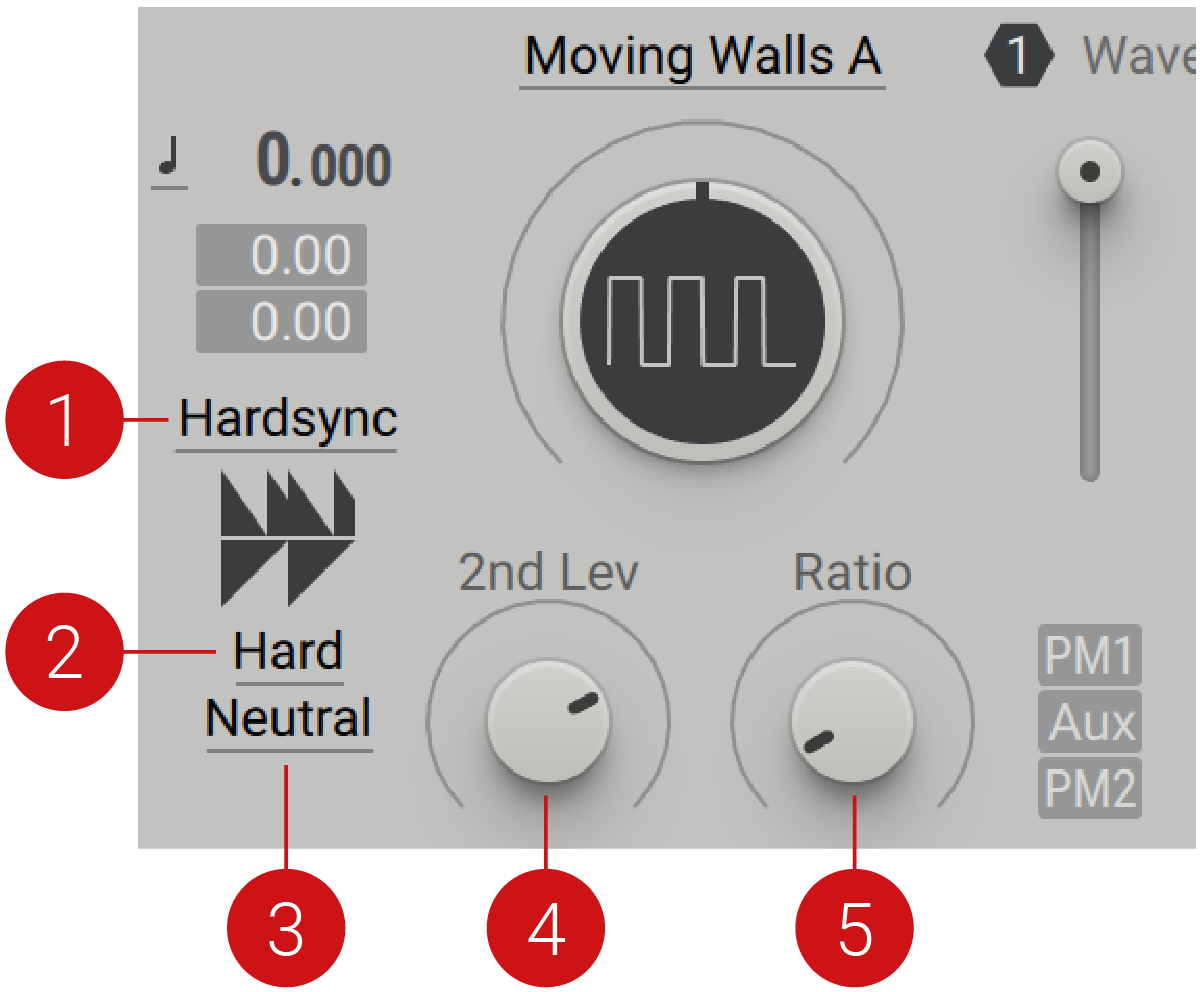
Hardsync mode
Hardsync mode offers the classic hard sync sound, as well as other variations of this effect. Unlike with traditional analog synthesizers, no second oscillator is required to reset and achieve the effect. This mode produces a completely different sound to a standard wavetable readout. You can use the other Wavetable oscillator to add body to the sound. Alternatively, you can use the Insert oscillator with a sawtooth or square waveform in Lock mode. With a high amount setting, the sound is likely to be sharp. Soft and Grain settings can be used to smooth the reset; options that are not possible with classic analog hard sync.
Hardsync mode contains the following parameters and controls:
 |
Wavetable modes: Selects from a menu of ten operating modes that determines the readout of the wavetables.
Window: Selects one of three settings (Hard, Soft, Grain). Hard applies no smoothing window to the resetted waveform, resulting in the typical rolling sound of classic hard sync. Soft fades out the waveform before the reset occurs, producing a rounder and more even sound. This setting creates a smoother and softer sound sound, with a less exaggerated quality. Grain has an even softer effect, producing a very round waveform that fades in and out at the start of each sync. The resetting is completely smoothed out, resulting in a sound with less bite. With a round waveform, Grain is the same as the Formant mode found in Massive.
Direction: Selects one of three settings (Neutral, Up-Down, For-Back) that determines how the waveform is read out. With a Neutral setting, no directional change is applied and the waveforms are unaltered when played. Up-Down inverts every second cycle of the waveform. Flipping every second cycle cuts out all even harmonics (2, 4, 6, 8 etc.), meaning you cannot produce these harmonics with this setting. For-Back (Forward-Backwards) reads out every second cycle of the waveform backward. If the waveform is perfectly symmetrical, this has the same affect as Up-Down mode.
2nd level knob: Controls the amplitude of every second resetted repetition of the cycle. Turning the knob fully left will produce the sound at an octave lower.
Ratio knob: Sets the frequency ratio of the inaudible sync oscillator, which is used to reset the main oscillator.
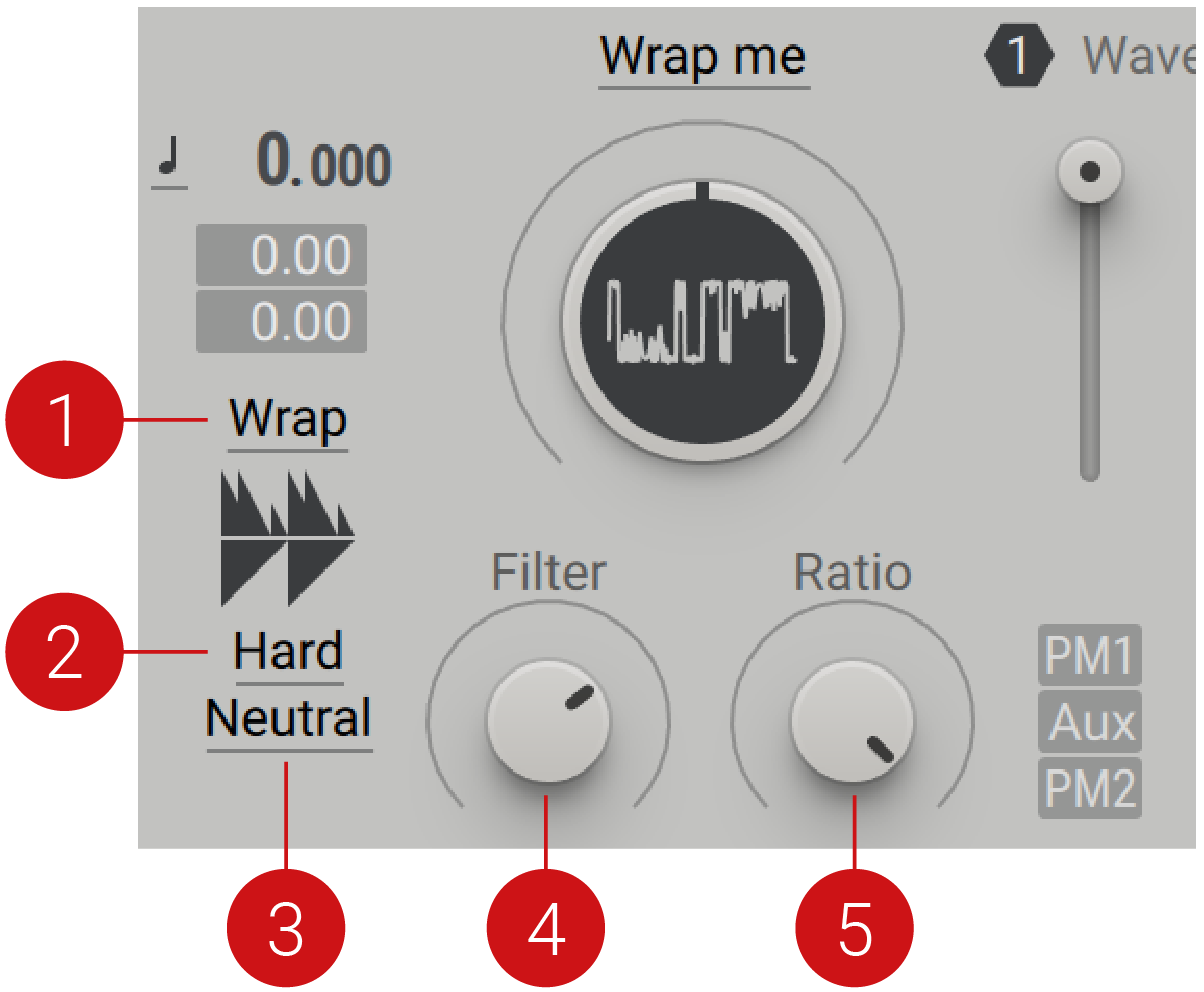
Wrap mode
Wrap mode is close to Hardsync mode, the difference between the two becomes evident when modulation is applied. When modulated, Hardsync mode will create more pitch artefacts. Starting in the centre it can create a ramp, cutting when it reaches the boundaries of the waveform.
Wrap mode contains the following parameters and controls:
 |
Wavetable modes: Selects from a menu of ten operating modes that determines the readout of the wavetables.
Window: Selects one of three sub-settings (Hard, Soft, Grain). The Hard setting applies a very subtle smoothing window to the end and start point of the fundamental cycle. Depending on the waveform, this results in the typical sound of classic hard sync. Soft applies a smoother window and Grain applies the smoothest window.
Direction: Selects one of three settings (Neutral, Up-Down, For-Back) that determines how the waveform is read out. With a Neutral setting, no directional change is applied and the waveforms are unaltered when played. Up-Down inverts every second cycle of the waveform. Flipping every second cycle cuts out all even harmonics (2, 4, 6, 8 etc.), meaning you cannot produce these harmonics with this setting. For-Back (Forward-Backwards) reads out every second cycle of the waveform backward. If the waveform is perfectly symmetrical, this has the same affect as Up-Down mode.
Filter: Reduces the high frequency harmonics of the selected waveform. The effect is similar to adjusting the cutoff frequency of a low-pass filter.
Ratio: Sets the frequency ratio of the inaudible sync oscillator, which is used to reset the main oscillator.It operates in a centered way, so that the cycle-multiplications take place from the center of the cycle, equally to the left and right.
Tip
Presets like Ample Wob highlights the hard-sync style effect, when Wrap mode is combined a with a square waveform.
Formant Capture mode
Formant mode manipulates the waveform in such a way that the amplitude of the signal does not change over altering pitches. This provokes an unusual sonic experience, by creating the impression that the waveform remains static over different pitches. Essentially, the sound is initially corrected so that it works as a static formant, erasing the original ‘Mickey Mouse’ effect. A Formant control then offers the ability to reintroduce the Mickey Mouse effect, independent from pitch.
Each wavetable is imprinted with an extra metadata called Formant Center, which informs the engine where the original table was made. Formant mode uses only one specialised windowing algorithm, rather than two overlapping grains (as used in PSOLA Synthesis), for a clearer sound and lower CPU load.
This mode is most effective when a strong formant is present in the wavetable itself, hence it does not work so well with sine, sawtooth or square waveforms. Wavetables found in the Formant category are especially suited to Formant Capture Mode. These wavetables mimic characteristics of the human voice and can be used specifically for creating vowel sounds.
Formant Capture mode contains the following parameters and controls:
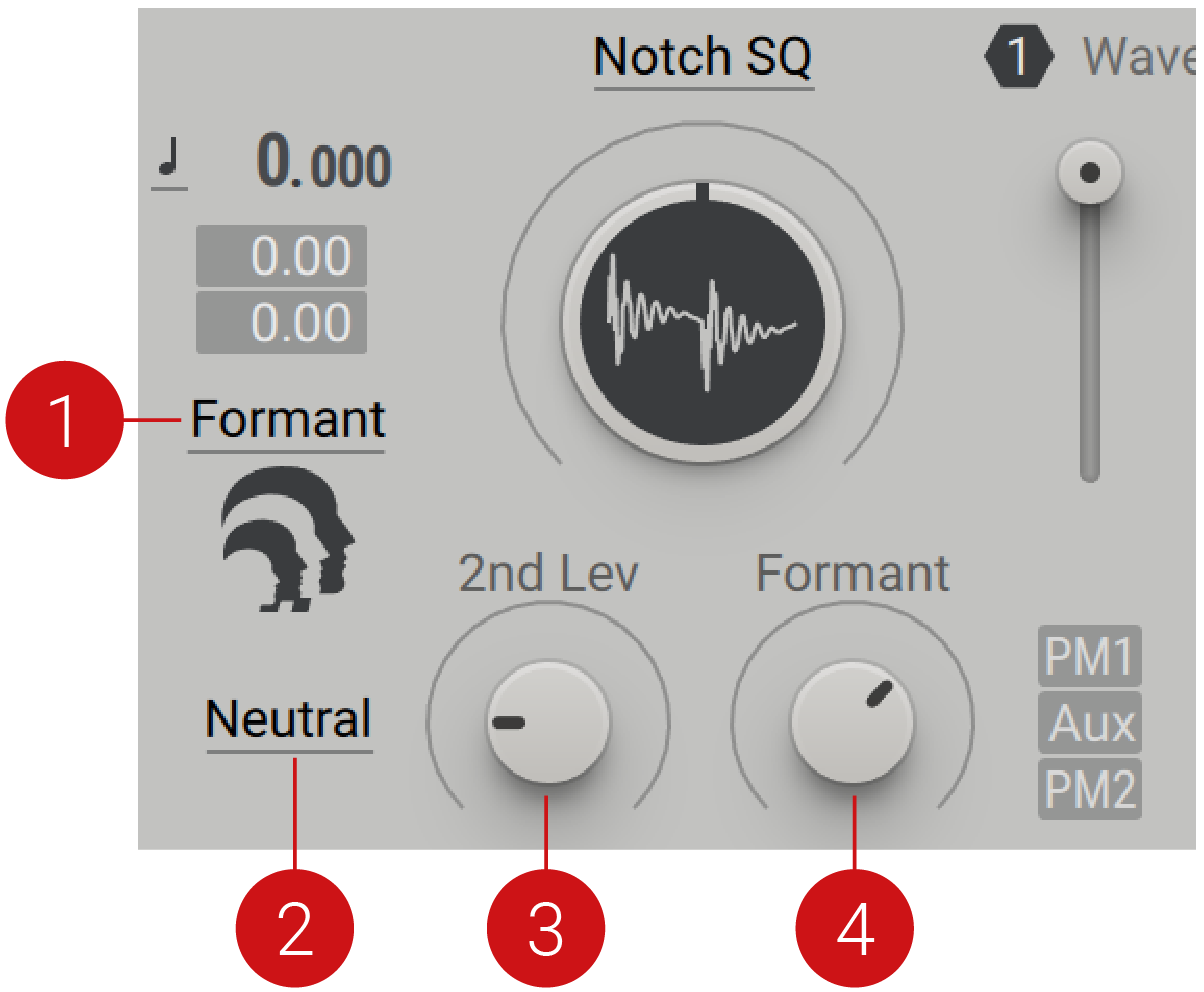 |
Wavetable modes: Selects from a menu of ten operating modes that determines the readout of the wavetables.
Direction: Selects one of three settings (Neutral, Up-Down, For-Back) that determine how the waveform is read out. With a Neutral setting, no directional change is applied and the waveforms are always played one after the other. Up-Down inverts every second fundamental cycle of the waveform. For-Back (Forward-Backwards) reads out every second fundamental cycle of the waveform backwards.
2nd Level: Controls the amplitude of the second repeat of the waveform. Turning the knob fully left will produce the sound an octave lower.
Formant: This knob reintroduces the formant, or the ‘Mickey Mouse’ effect.
Tip
To get started, try the Talkative SQ waveform with the 2nd Level control turned fully left. Combine this with an SVF Parallel or Groain filter and adjust the filter Cutoff and the Wavetable Position to find a vocal sound that speaks to you. Apply an LFO to each control and experiment with with the modulation Rate and Amount. For a more subtle vocal effect, check out the Android preset that combines wavetables from the Formant and Basic categories.
ART mode
ART (Artificial Resonance Technology) mode utilises hard sync techniques and windowing to mimic a resonant filter. The basic idea for this mode was to create filters without filters. In contrast to standard analog modelling, the numerical approach of creating filters without filter, means that more unusual filtering options can be explored. ART mode provides you with some of the fundamental sound principles of a filter, closely replicating a high resonating bandpass filter sweep. It combines this with the possibilities of a traditional wavetable scanning oscillator to create new variations of filtering sound, also expanding into the artificial filter territories that a real filter cannot achieve. This mode relies on modulation for the most effective and interesting results. It is the only mode where the FU-DB sub-mode can be found.
For a basic introduction to ART mode, start with a sine waveform in the Wavetable oscillator and a high Width setting. Turn the Pitch control, aiming to produce some realistic filter sweeps. Switch to a square waveform and note how much more aggressive the sound instantly becomes.
ART mode contains the following parameters and controls:
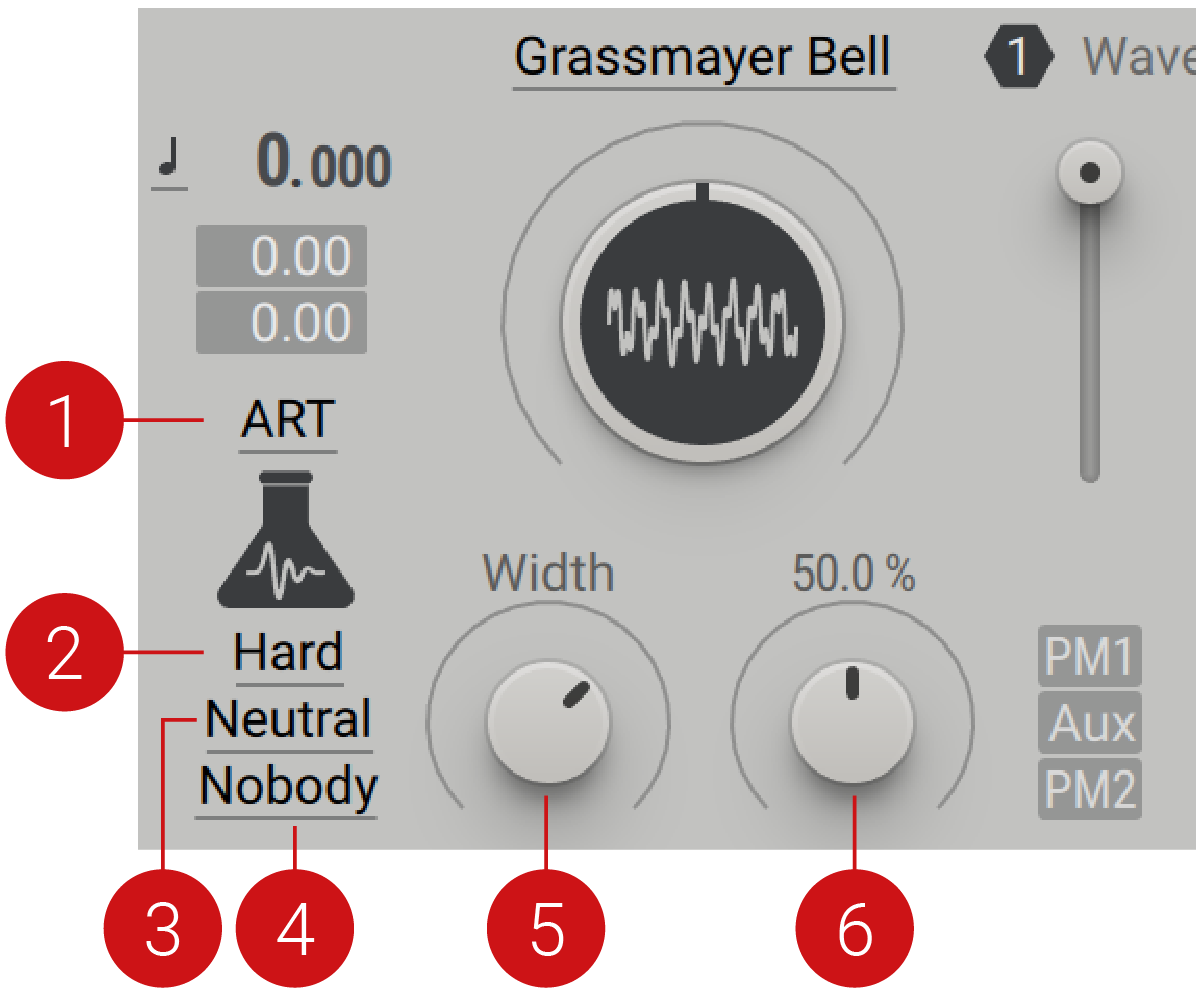 |
Wavetable modes: Selects from a menu of ten operating modes that determine the readout of the wavetables.
Window Selects from three strength settings (Hard, Bity, Soft) that influence the shape of the impulse envelope. Hard is the most aggressive setting, creating a sharp sound. Soft is smooth sounding and the least aggressive setting. Bity has a balanced character and is a good starting point. The differences in the three modes can best be heard with low Pitch settings.
Direction: Selects one of three settings (Neutral, Up-Down, For-back) that determine how the waveform is read out. With a Neutral setting, no directional change is applied and the waveforms are always played one after the other. Up-Down inverts every second cycle of the waveform. By flipping every second cycle, all even harmonics (2, 4, 6, 8 etc.) are cut out, meaning you cannot produce harmonics with this setting. For-Back (Forward-Backwards) reads out every second cycle of the waveform backwards. This setting will sound the same if the waveform is perfectly symmetrical. FU-DB (Forwards Upwards - Downwards Backwards) combines Up-down and For-back.
Body: Selects one of two settings (Body, Nobody), which determine if the response of an artificial body is applied to the sound. When Body is active, this response adds bass to the sound. When Nobody is selected, you have the excitation response of an artificial filter.
Width knob: Narrows or widens the envelope, mimicking the resonance impulse. The effect is similar to adjusting the resonance amount of a normal filter.
Pitch knob: Adjusts the frequency of the artificial resonance, similar to the cutoff frequency on an analog filter.
Tip
The signature filtering effect that is described above, is best demonstrated in presets like Alpine Digital, BAMX2 and Golden Child.
Gorilla mode
Gorilla mode is for the vulgar and obscene! It is an aggressive sounding mode that produces uniquely exaggerated results. Input waveforms with minimal spectral complexity are most effective, as this mode already creates a high number of harmonics in the frequency spectrum.
Gorilla mode contains the following parameters and controls:
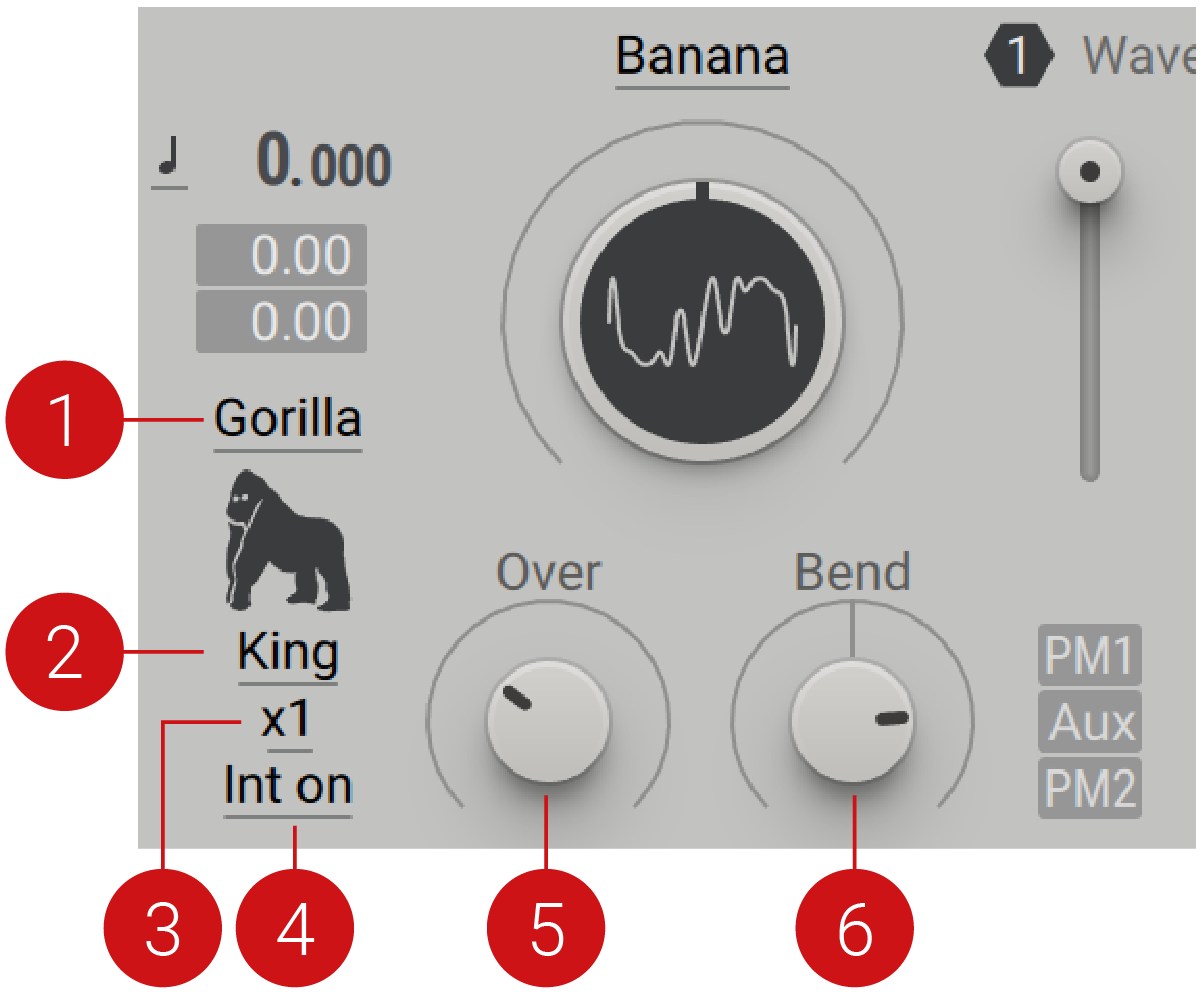 |
Wavetable modes: Selects from a menu of ten operating modes that determines the readout of the wavetables.
K!ngs: Selects one of three settings (King, Kong, Kang), which determines the type of bend applied to the phase to achieve sonic variations. King is the cleanest sounding option, providing the classic screaming sound. Kang provides medium bending for a dirtier sound. Kong has maximal bending for the dirtiest sound.
Ratio: Selects one of six ratios (x1, x2, x3, x4, x5, x6) that changes the frequency ratio of a second internal oscillator phase. This control has a strong impact on the overall ‘hybrid color’ of the sound. A ratio of x2 is recommended to achieve the prime Gorilla sound.
Internal Phase On/Off: When Int on is selected, the engine uses the main phase. Selecting Int off fixes the oscillator frequency at 0 Hz, bypassing the main phase and turning the oscillator into a waveshaper. In this instance, the main phase is replaced by the phases provided by the modulation oscillators, which can be used to make the sound inharmonic. The shaper must be used in conjunction with the PM oscillators or the PM Aux bus. The level of the PM oscillator and/or Aux input determines the amount of waveshaping, and the wavetable position and filter parameters control the shape function. Using the main phase should be the standard option for this mode.
Over knob: Controls the strength of the mode. Turn the knob right to introduce more of the ‘Gorilla’ effect.
Bend knob: Creates the formants together with the Over control. For the best effect, the Over and Bend controls should be modulated together.
Tip
To get started, try the 'Banana' waveform with a x2 ratio setting, and a modulation source applied to both the Over and Bend controls.
Random mode
A special mode that is dedicated to creating unusual noise sounds. This mode uses two internal randomizers which are applied to the signal in several ways. Random mode is even more extreme than the effect created in Jitter mode.
Random mode contains the following parameters and controls:
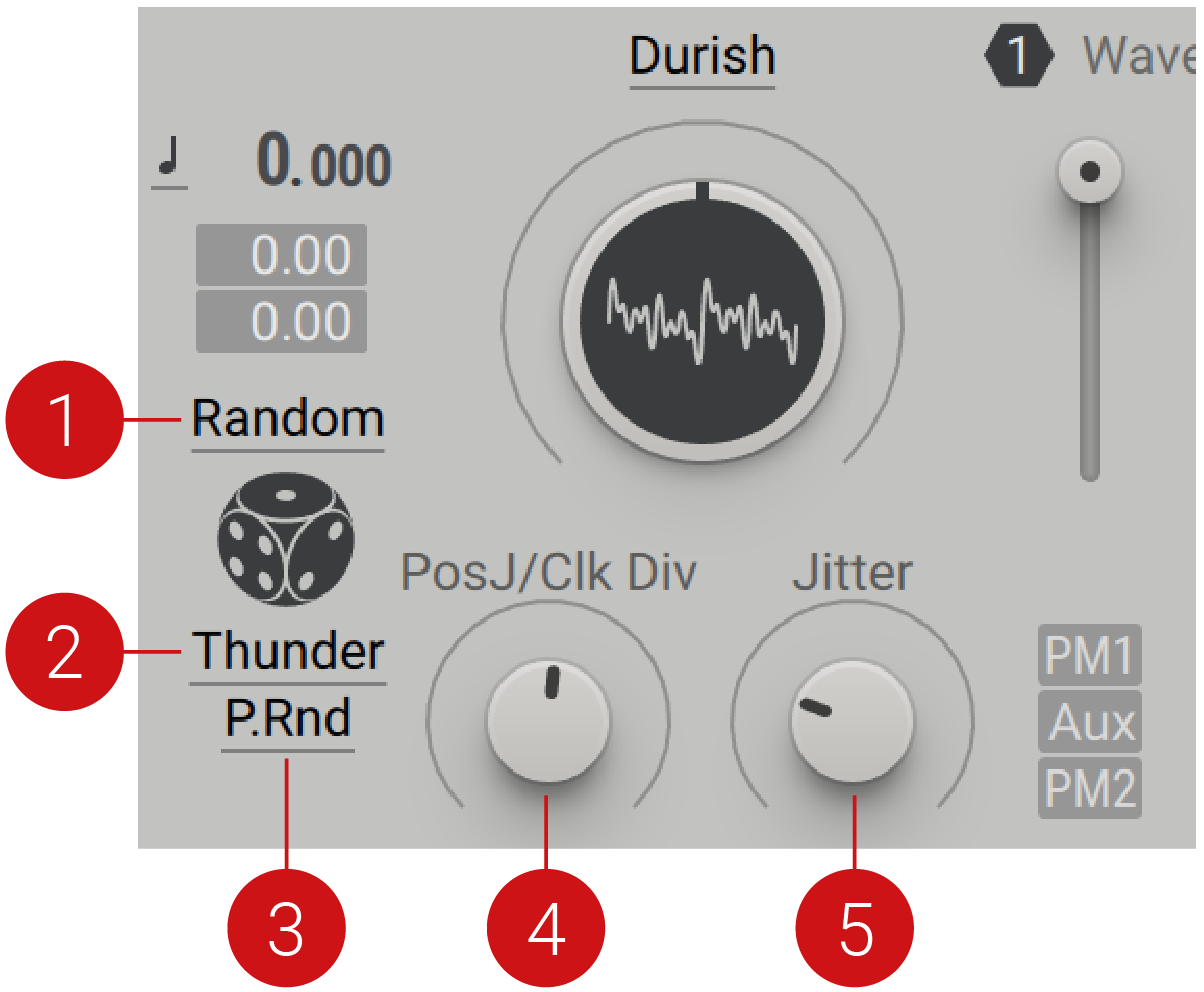 |
Wavetable modes: Selects from a menu of ten operating modes that determines the readout of the wavetables.
Mode: Selects one of three modes (Fluid, Thunder, Divide) that determine the behaviour of the Pos J/Clk Div and Jitter controls. The sonic outcome is highly dependant on the selected mode. In Fluid mode, the PosJ/Clk Div randomizes the wavetable position reader and the Jitter knob changes the amount of randomization applied to the oscillator’s fundamental frequency. In Thunder mode, the PosJ/Clk Div randomizes the position and also downclocks the position of the randomizer. The Jitter knob randomizes frequency independently to the Position Jitter control. In Divide mode, the PosJ/Clk Div downclocks the Jitter ́s frequency randomizer. It does not add or subtract a random deviation on each cycle, but for example, only every 10th cycle. The Jitter knob changes the amount of randomization applied to the oscillator’s fundamental frequency.
P.Rnd (Pitch Random): Selects between two modes (Pitch Random, Pitch Switch). When P.Rnd is selected, randomization is applied every cycle, depending on the Jitter rate. The pitch setting determines if it will play faster or slower. P. Switch makes static, quantized deviations, rather than random speed deviations.
Position Jitter/Clock Divide knob: Depending on the selected Mode, this knob operates in different ways, relating to the wavetable position readout and the down clocking of the internal randomizers.
Jitter knob: Changes the amount of randomization applied to the oscillator ́s fundamental frequency. Frequency randomization is only happening synchronous to the start of a wave cycle. The effect ranges from subtle jitter to total sound destruction.
Jitter mode
Jitter mode introduces random deviations at the end of each cycle, making the signal read out faster or softer. This mode is most effective with a harmonically sparse waveform, like those found in the Basics category. Jitter mode adds a glittery quality to these simple waveforms. The effect can become harsher and more intense as the Jitter strength is increased.
Jitter mode contains the following parameters and controls:
 |
Wavetable modes: Selects from a menu of ten operating modes that determines the readout of the wavetables.
Jitter Rate: How often the signal is flipped, every time a cycle is done. This allows you to spread out the randomization so that it does not sound too busy. J1: Every cycle, randomization is applied J2: Every 32 cycle J3: Every 128 cycle
P.Rnd (Pitch Random): Selects between two modes (Pitch Random, Pitch Switch). When P.Rnd is selected, randomization is applied every cycle, depending on the Jitter rate. The pitch setting determines if it will play faster or slower. P. Switch makes static, quantized deviations, rather than random speed deviations.
Filter knob: Reduces the high frequency harmonics of the selected waveform. The effect is similar to adjusting the cutoff frequency of a low-pass filter.
Jitter knob: Adjusts the strength of the effect from soft to strong. You can create noise by combining high pitch with a high Jitter setting.
Tip
To get started, try the preset Aerial List to hear a Drift wavetable producing a classic 80s television show sound. The Ancient Strings preset showcases a more subtle shimmer effect, when paired with a Drift wavetable in Standard mode.
Phase modulation
Phase modulation is a synthesis technique used in classic FM (frequency modulation) synthesizers. One oscillator works as the carrier, while a second oscillator is used to modulate the phase of the signal. The final waveform is the resulting summation of the two oscillators, and the harmonic overtones and undertones that are created as the waves rise and fall in combination. Phase modulation creates rich harmonic sounds that can be used for a range of sonic tasks, including plucked basses, digital pianos, bells, and abstract soundscapes. In Massive X, phase modulation is incorporated into the synth engine in a variety of ways.
 |
Massive X contains two PM oscillators and an additional Aux input. Each of these sources can be assigned to one or both of the Wavetable oscillators. The PM oscillators offer six variations on sine and triangle waveforms, which are used solely to modulate the phase of the Wavetable oscillators. From pure sine and triangle waves to variations of each, these waveforms have minimal harmonic spectral content that makes them ideal as a modulator signal.
Three Pitch modes produce distinct results, each suited to a range of different end uses. In Ratio mode, the pitch of the PM oscillator can be used to raise or lower the pitch in octaves. Key Track mode allows you to set the pitch in relation to the main pitch, and is useful for producing thick bass sounds, and metallic highs. Fix mode is particularly effective for percussive sounds that require no pitch.
The PM Aux bus opens up the ability for phase modulation in Massive X. Via the Routing page, any source in the signal path can be used to apply phase modulation to the Wavetable oscillators. This allows for phase modulation feedback or cross-modulation from other sound sources in Massive X. For more information on setting up the PM Aux bus in the Routing section, refer to PM Aux bus.
Phase Modulation oscillators
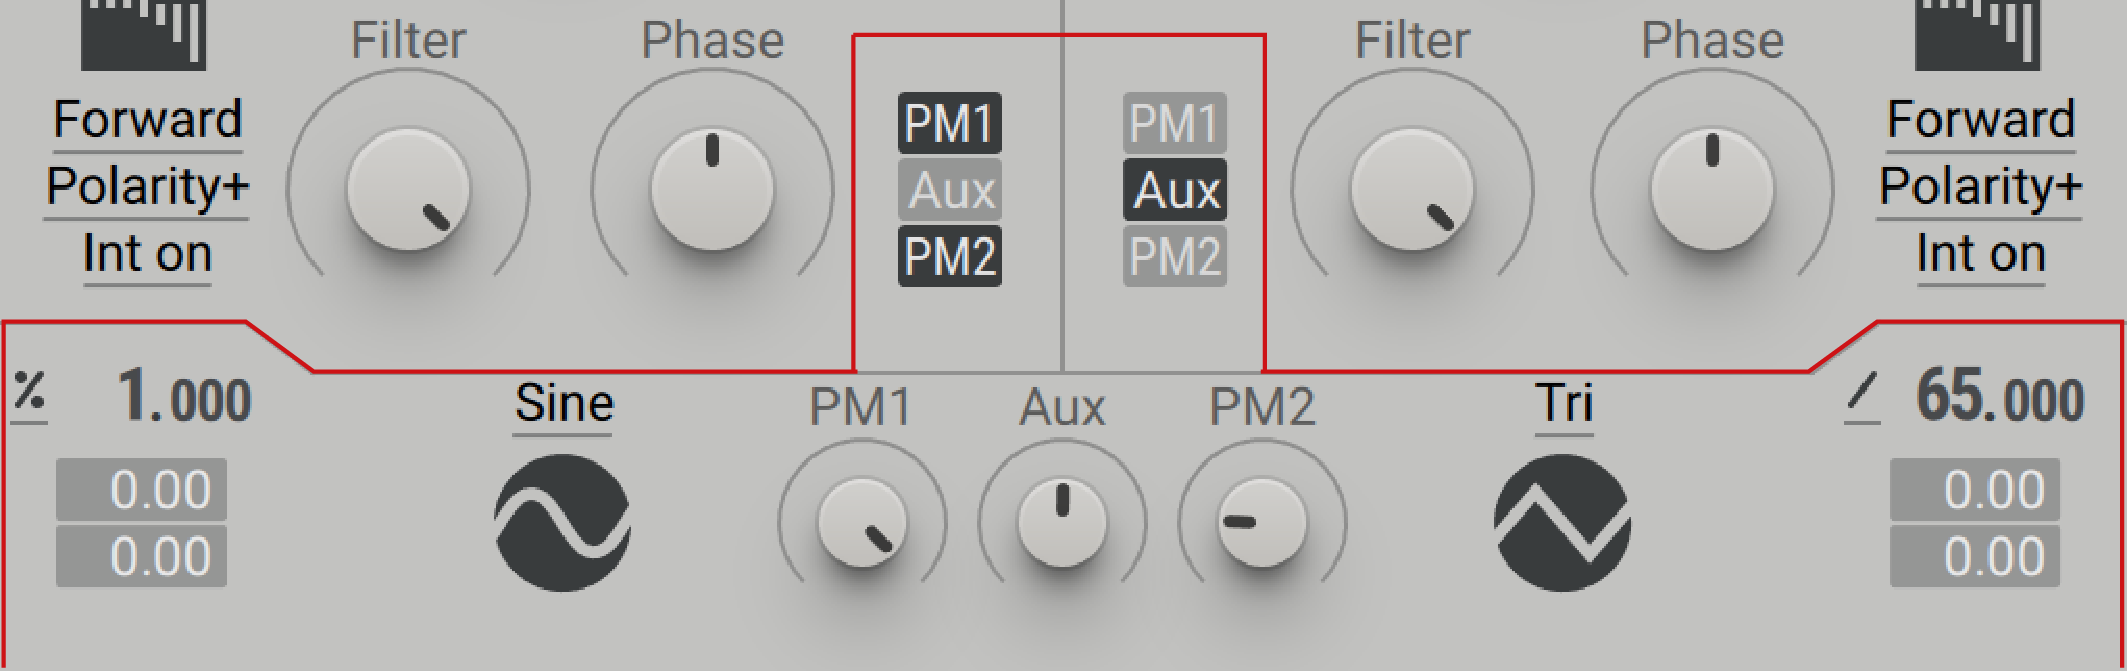
This section provides an overview of the PM oscillators. Controls for PM1 are numbered below, and these controls are mirrored for PM2:
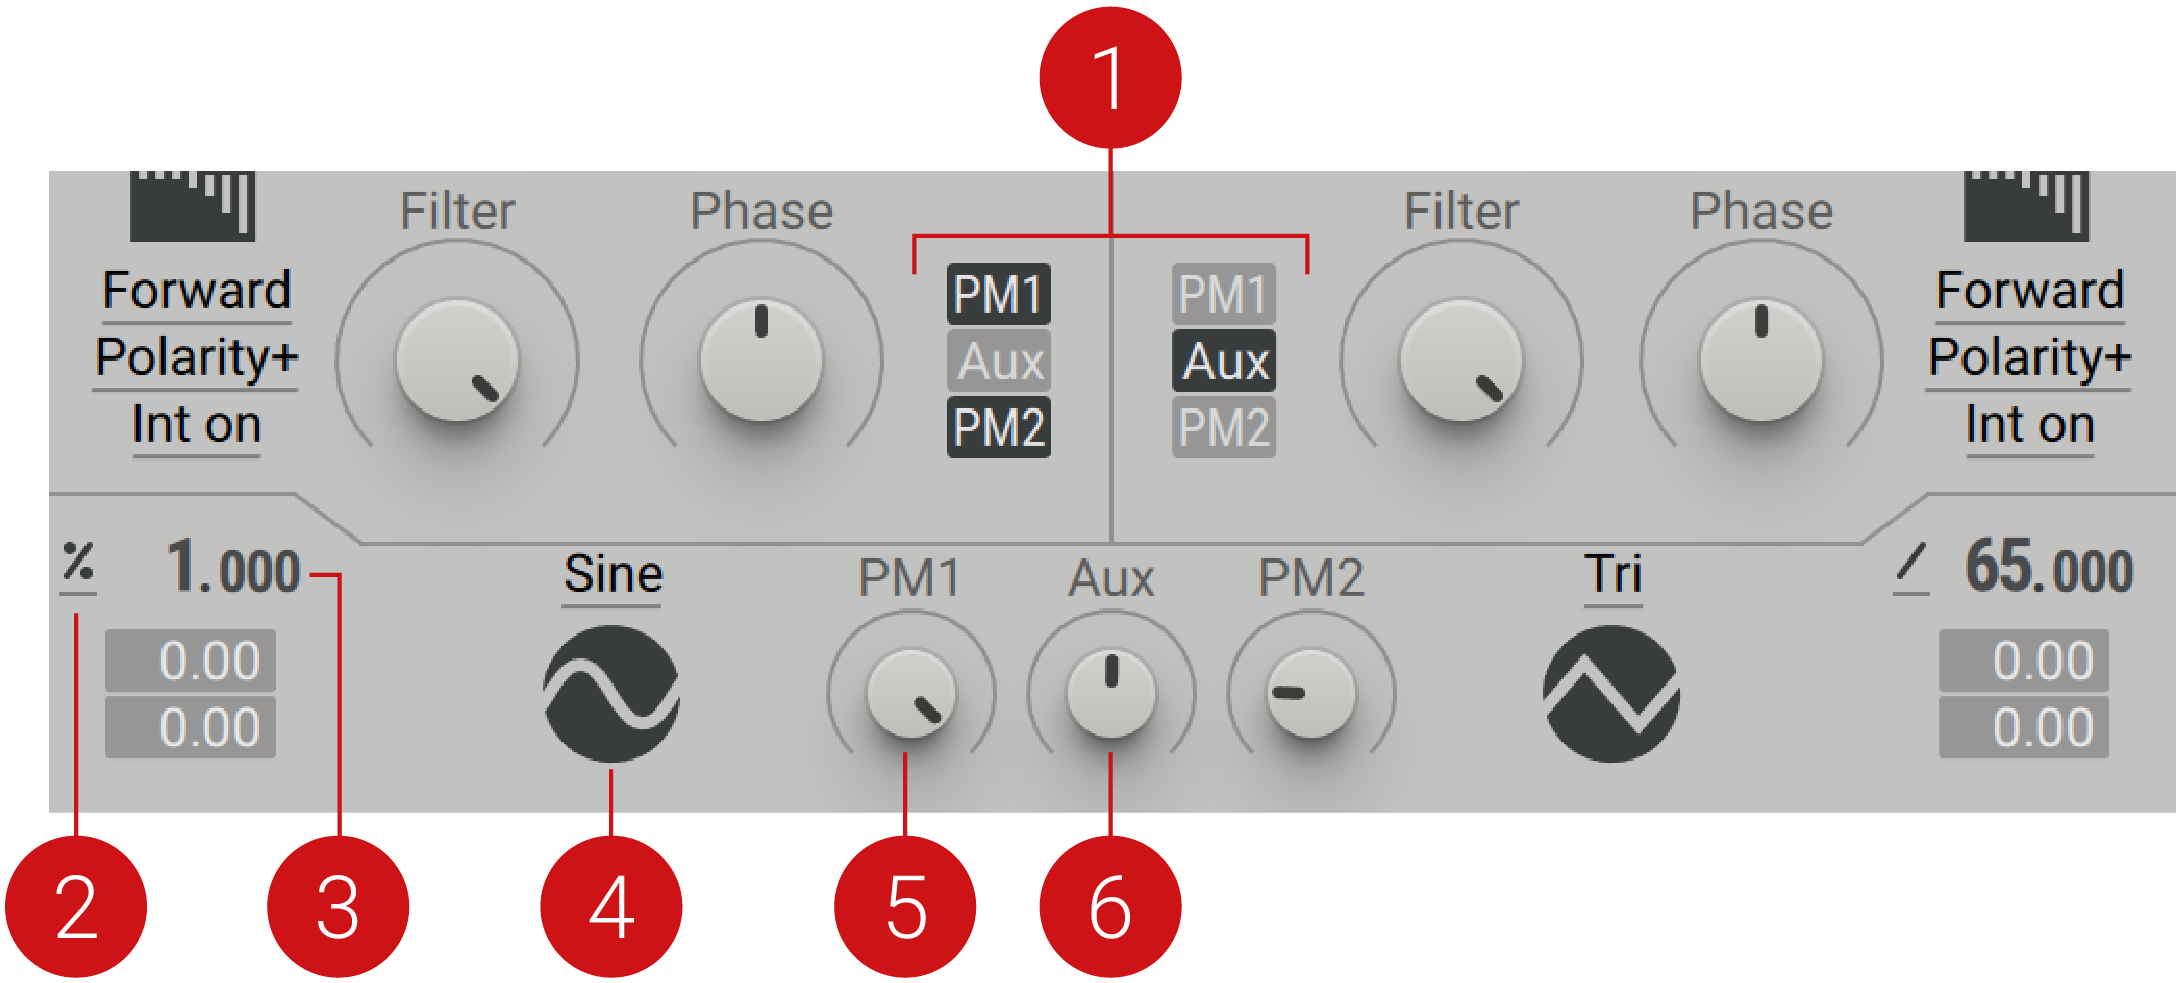 |
PM Aux Assignment: Assigns the PM oscillators and/or Aux input to the corresponding Wavetable oscillator. Click the button to activate the assignment.
Pitch Mode: Selects one of three modes (Keytrack, Fix, Ratio) that determines the response of the PM1 oscillator in relation to incoming MIDI pitch.
In Keytrack mode, the pitch is locked to the main MIDI pitch.
Ratio mode multiplies or divides the MIDI pitch in relation to the ratio setting. For example, a ratio of 3 adjusts the pitch to 3 times the frequency, producing the 3rd harmonic.
Fix mode sets the fixed tuning of the oscillator, disregarding the incoming MIDI pitch. This mode displays MIDI note numbers, with the default set to 60 (middle C).
Pitch: Adjusts the tuning of the PM1 oscillator in semitones and cents. The Pitch can be modulated by assigning a modulation source to either of the two modulation slots, and setting the amount of modulation below.
PM1 menu: Selects from six waveforms (Sine, Tri, TriB1, TriB2, TriB3, SinN) that sets the waveform type for the PM oscillator. The selected wave cycle is visually illustrated below the menu.
PM1 amount: Adjusts the amount of phase modulation applied from the PM oscillator to the Wavetable oscillators. This control can be modulated by assigning a modulation source to either of the two modulation slots below the knob. The modulation slots are displayed a source is selected.
Aux amount: Adjusts the amount of phase modulation applied from the PM Aux bus to the Wavetable oscillators. The PM Aux bus makes the phase modulation inputs of the Wavetable oscillators accessible from the Routing page. Any source can be routed to the PM Aux bus, and used to apply phase modulation to the oscillators. For more information, refer to PM Aux bus.
PM Aux bus
The Auxiliary bus offers an additional input for phase modulation, accessed from the Routing page. This input source can be assigned to one or both oscillators. The Aux bus allows phase modulation or cross-modulation to be applied to the Wavetable oscillators from various sources within Massive X. Any sound source can be routed to the phase modulation inputs of the oscillators.
The PM Aux bus has a dedicated module in the Routing page and additional controls on the panel of the Wavetable oscillators:
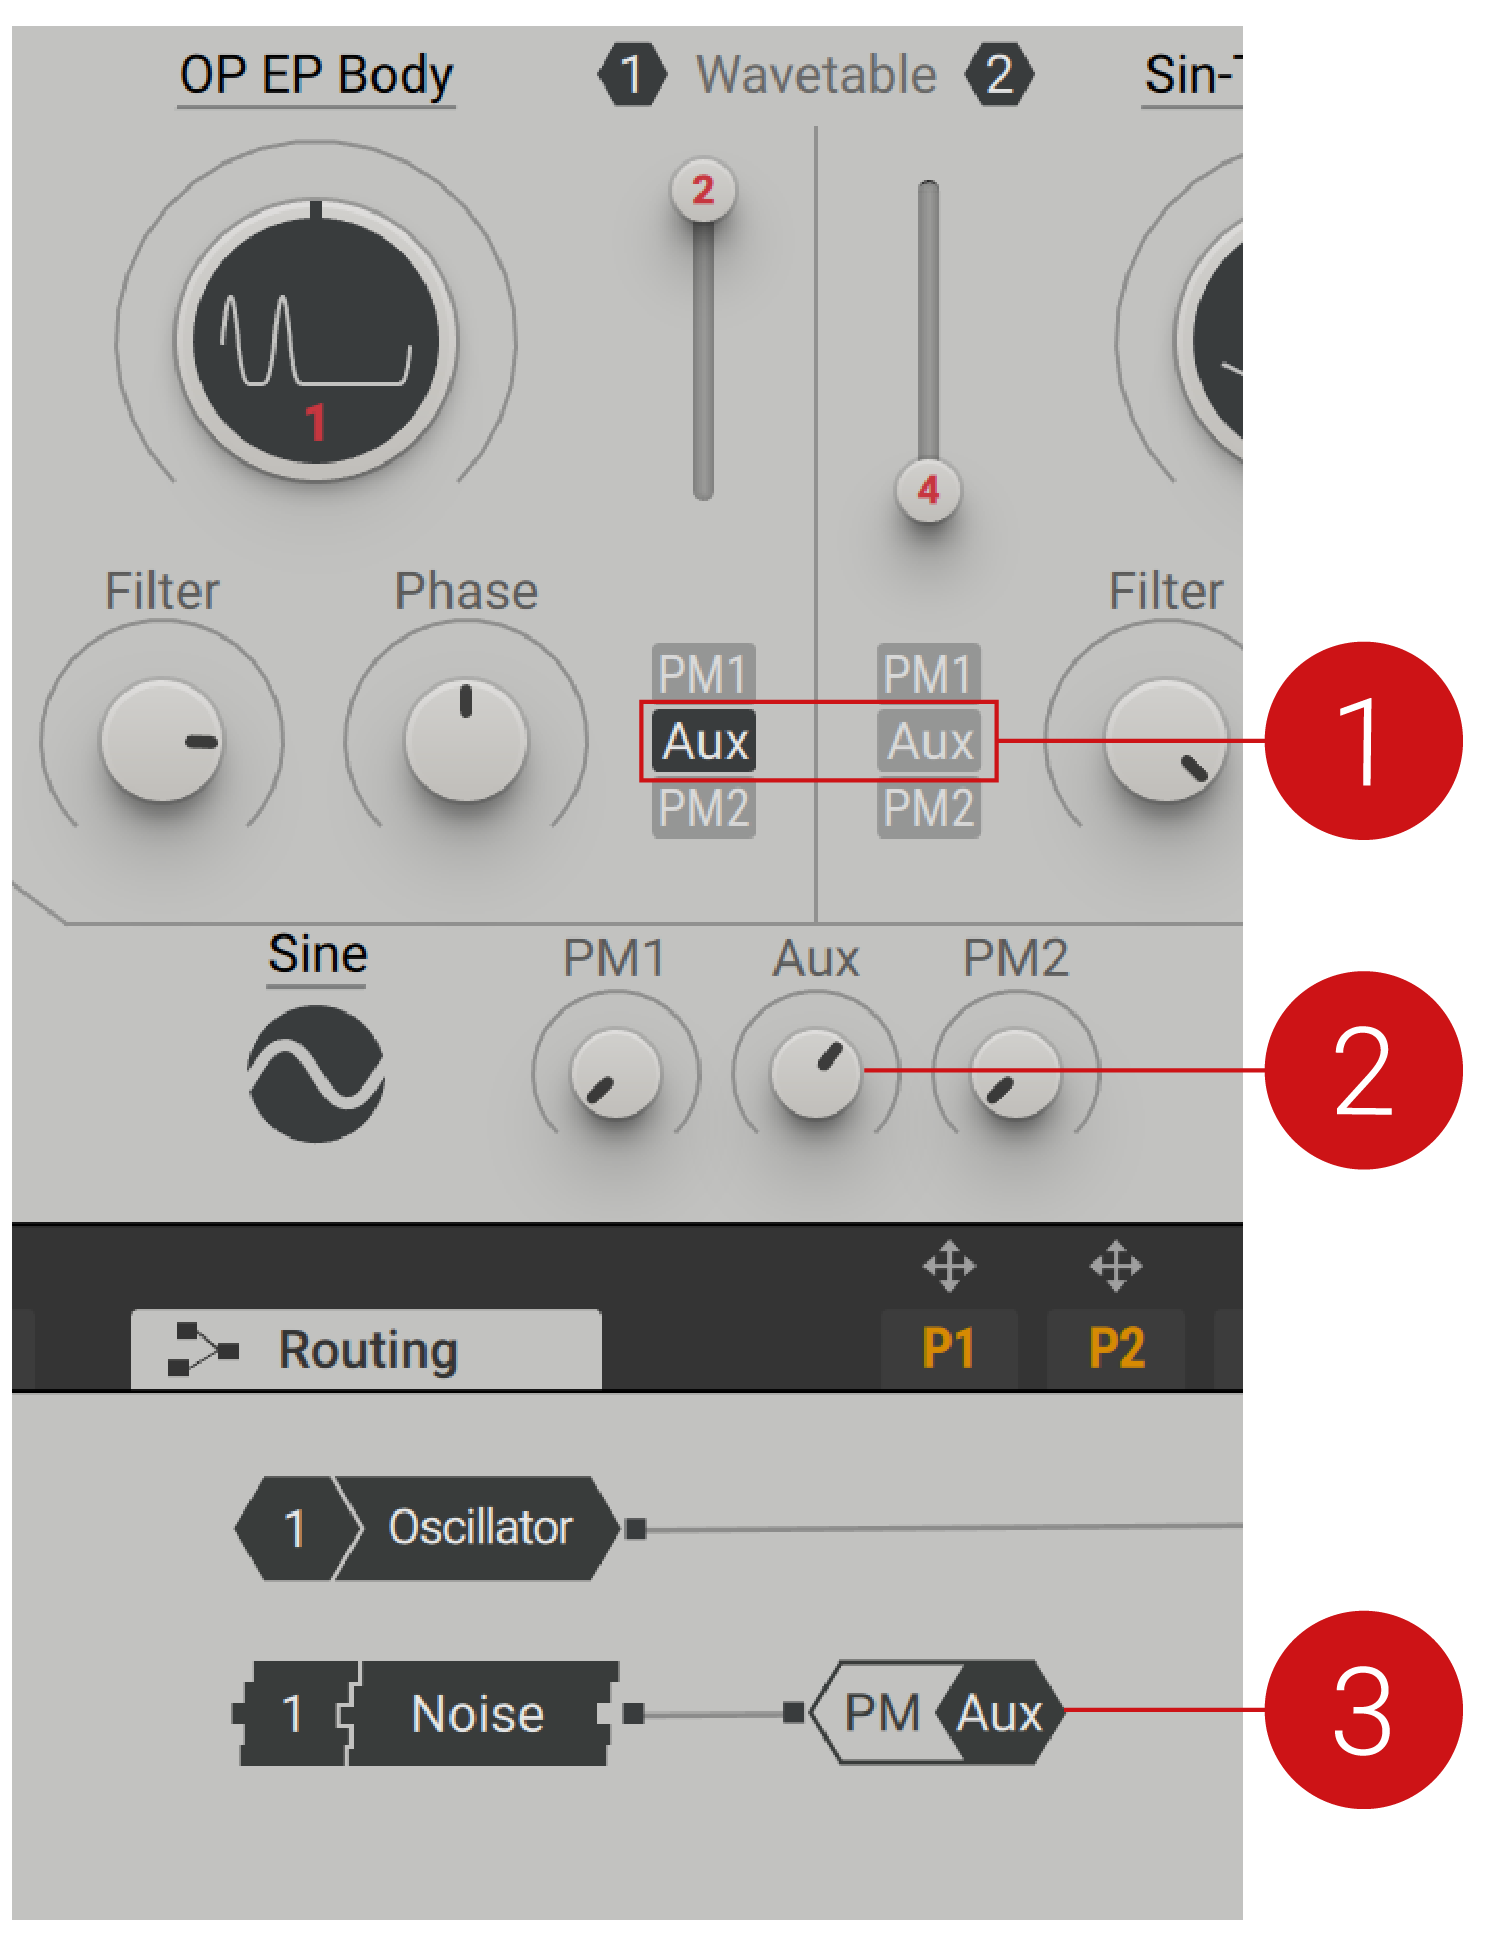 |
Aux Assignment: When activated, the signal received at the input of the PM Aux bus (in the Polyphonic Area of the Routing page) is assigned to the corresponding Wavetable oscillator.
Aux Modulation Amount: Adjusts the amount of phase modulation applied from the PM Aux bus to the Wavetable oscillators.
PM Aux Bus: This module features a single input that sends signals to the phase modulation function of the Wavetable oscillators. It can be connected to the generators and processors in the Routing page.
Routing
The flexibility in routing enables you to use the PM Aux bus to experiment with noise, feedback, and effects to achieve cross-feeding of operators or phase feedback chains within itself. For more information, refer to Routing.
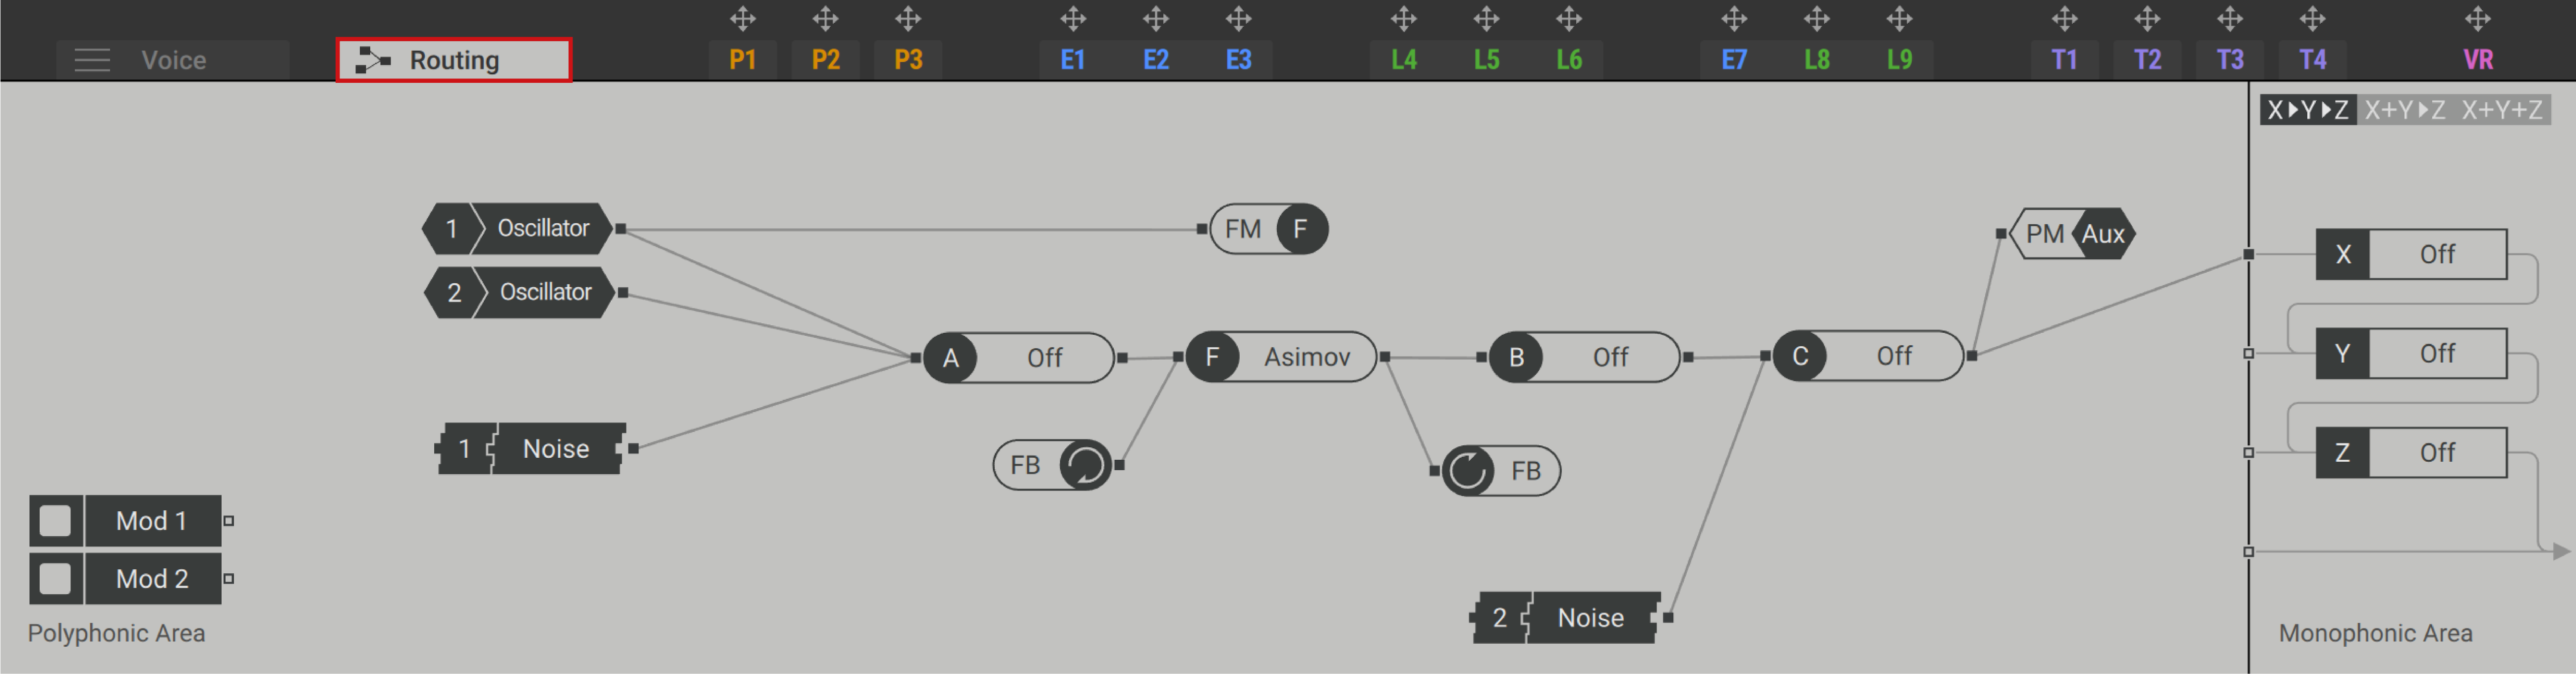
To assign an input source to the Aux bus:
Select preset Init - Massive X, found in the Quickstart category.
Open the Routing page. This preset offers pre-configured routing based on subtractive synthesis with Wavetable oscillators. By default, this preset has the output of the PM Aux module patched to the input of the Insert Effect C, shown in the screenshot below.
Assign a source module to the Aux bus by clicking on the output of the source module, then clicking on the input of the PM Aux module.
In the PM Aux bus assignment section, enable Aux for Wavetable oscillator 1.
The source module is assigned to the PM Aux us. Play notes and adjust the Aux Amount control to hear the effect of the phase modulation of the Wavetable oscillator.
Tip
To start off, try assigning an Effects or Noise module to the PM Aux input. These are good starting points to explore other sonic possibilities for phase modulation using the PM Aux module. For examples of how Noise and Effects can be used in the PM Aux bus, check out the presets Noise Sub, Crown Alloy, and Woozie, found in the Mallet Instruments category.