Trackers
Massive X's four Trackers are modulation sources that provide deep functionality for advanced MIDI control.
The four Trackers are modulation sources that provide deep functionality for advanced keyboard tracking. They map incoming MIDI control data like pitch and velocity to modulation that you can apply to any parameter. This enables you to exactly define how your sound responds to the MIDI input.
The Tracker's Tracking view allows you to view and create curves and offset values that represent the relationship between the MIDI input and the modulation produced by the Tracker. Each Tracker can be used with one of five available sources: Note Pitch, Velocity On, Velocity Off, Gate, and Inverse Gate.
As an example, you can use Note Pitch to define the response of your sound to the pitch values of incoming MIDI notes. When setting the Tracker's curve to a linear, rising ramp, it can be applied to parameters for standard keyboard tracking, meaning low notes produce low parameter values, and high notes produce high parameter values. In this case, the values produced by each MIDI note increase linearly across the keyboard, from left to right. By changing the Tracker's curve from a linear, rising ramp to other shapes or even adding irregular offsets to it, you can break up this relationship. For instance, inverting the curve to a falling ramp would result in high parameter values when playing low notes and vice versa, or adding extreme offsets to specific notes would produce high parameter values only when playing the corresponding keys.
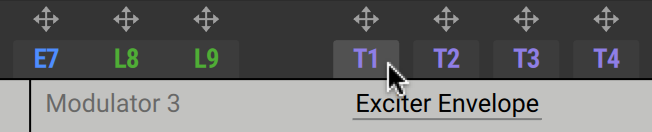
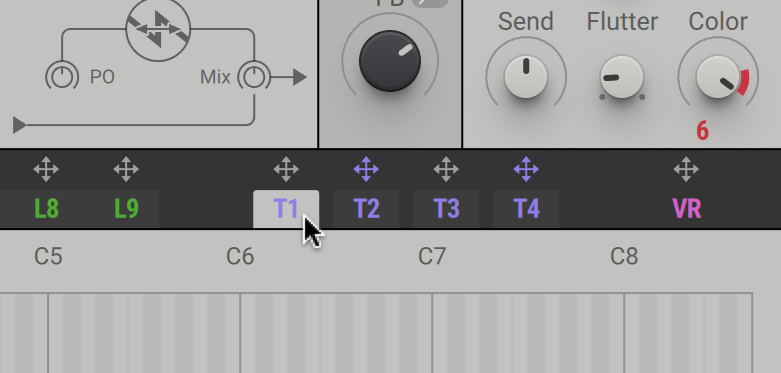
You can access and assign the Trackers in the Editor via the Navigation Bar using the tabs labeled T1–T4. For information about assigning the Trackers to parameters, refer to Assigning modulation.
Tip
Learn how to use the Tracker in the following tutorials:
Using the Tracker to apply filter tracking to a sound: In this tutorial, you learn how to use the Tracker's Curve mode for advanced filter tracking.
Using the Tracker to create delay time variations in a sound: In this tutorial, you learn how to use the Tracker's Offset mode for recalling defined parameter values.
Trackers overview
This section provides an overview of the Tracker’s features, including the Tracking view, the Source options, and the Edit modes.

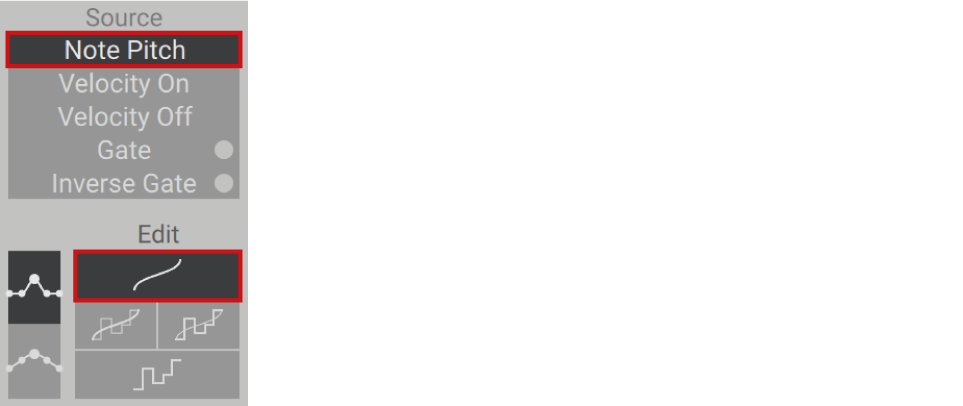
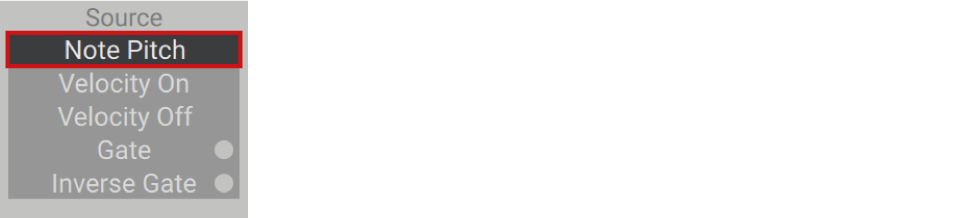
Source: Selects the type of MIDI control data processed with the Tracker. The following sources are available:
Note Pitch is the MIDI note value. This option retains the pitch value until another note is played. Use this source if you want to track the pitch of the notes.
Velocity On is standard, note-on velocity. This option retains the velocity value until another note is played. Use this source if you want to track the velocity of the notes.
Velocity Off is note-off velocity. This option retains the velocity value until another note is released. Use this source if you want to track the note-off velocity of the notes.
Gate is standard, note-on velocity. This option resets the velocity value to 0 when a note is released. Use this source if you want to track the velocity of the notes you are playing, but only for as long as a note is held.
Inverse Gate is note-off velocity. This option resets the velocity value to 0 when another note is played. Use this source if you want to track the note-off velocity of the notes you are playing, but only for as long as no other note is played.
Tip
This is useful for controlling envelope parameters when a note is released without affecting the notes that follow.
Level: Sets the output level of modulation produced by the Tracker. At the left position, the output is at zero, at the right position, it's at 100%.
Vertical grid: Sets the vertical resolution of values in the Tracking view. By default, the number of available values is set to 24 (bipolar -24 to +24, unipolar 0 - +24).
Snap to Grid: Ensures the grid value is adhered to even when making fine adjustments by holding the right-mouse button and dragging.
Select zone: Click and drag in this area to select multiple breakpoints. The segments between them can be edited using the Segment Edit zone.
Tracking view: Here you can draw curves and offsets that define the Tracker's modulation output using the different edit modes. The content of the other Trackers is shown as greyed out curves or offsets in the background (depending on which type of content is active in the Tracker being edited.
Segment Edit zone : Use this area to edit single or multiple segments between breakpoints. Clicking and dragging moves the segments to a new position in the Tracking view. Right-clicking and dragging allows you to make fine-adjustments without snapping to the grid. Double-clicking deletes segments.
Zoom bar: Zooms and navigates in the Tracking view. Clicking and dragging the handles zooms in and out. Clicking and dragging the bar scrolls the contents. Double-clicking the bar zooms out completely.
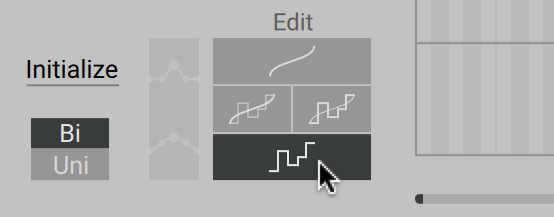
Edit mode: Determines whether the Tracker's modulation output is defined by a curve, offsets, or a combination of the two in the tracking view. For more information, refer to Tracking view and Edit modes.
Range switch: Sets the range of the Performer to bipolar or unipolar.
Initialize: Clears all curves and offsets, and resets the grid to bipolar or unipolar.
Tracking view and Edit modes
The Tracking view is used to establish the relationship between the MIDI input on the horizontal axis and the Tracker's modulation output on the vertical axis. It can contain a curve, offsets, or a combination of the two. This determines not only how you interact with the Tracker, but also its modulation output.
The curve establishes the relationship between the MIDI input and the modulation output across the whole range. This is useful for generating modulation that responds to the MIDI input in a coherent way, adjacent MIDI input values will produce progressively changing modulation values. The shape of the curve can be set using any number of breakpoints, creating separate segments between them:
The offsets establish the relationship between specific values of the MIDI input and the modulation output. This is useful for generating modulation that responds to the MIDI input in very specific, or unexpected ways. Each MIDI input value can produce any modulation value, hence abrupt changes in modulation are possible from one MIDI input value to the next. The offsets can be painted in for each value individually:
You can switch between curve and offsets using the different Edit modes:
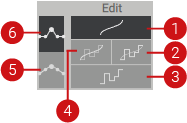 |
Curve mode: Only the curve is active and can be edited. The following mouse interactions are available:
Clicking on the Tracking view creates a new breakpoint.
Clicking and dragging an existing breakpoint moves it to a new position.
Right-clicking and dragging allow you to make fine-adjustments in one direction without snapping to the grid.
Combined Offset mode: Both the curve and the offsets are active, however only the offsets can be edited. The following mouse interactions are available:
Clicking and dragging adjusts the offset for multiple values.
Right-clicking and dragging sets multiple values to 0.
Clicking, holding, and then dragging up and down adjusts the offset for a single value.
Right-clicking, holding, and then dragging up and down allows for fine-adjustments for a single value without snapping to the grid.
Offset mode: Only the offsets are active and can be edited. The following mouse interactions are available:
Clicking and dragging adjusts the offset for multiple values.
Right-clicking and dragging sets multiple values to 0.
Clicking, holding, and then dragging up and down adjusts the offset for a single value.
Right-clicking, holding, and then dragging up and down allows for fine-adjustments for a single value without snapping to the grid.
Combined Curve mode: Both the curve and the offsets are active, however only the curve can be edited. The following mouse interactions are available:
Clicking on the Tracking view creates a new breakpoint.
Clicking and dragging an existing breakpoint moves it to a new position.
Right-clicking and dragging allow you to make fine-adjustments in one direction without snapping to the grid.
Absolute breakpoint editing: Sets the behavior when editing breakpoints to absolute. Moving a breakpoint only affects the breakpoint and its corresponding segments. This option is only available in Curve mode and in Combined Curve mode.
Relative breakpoint editing: Sets the behavior when editing breakpoints to relative. Moving a breakpoint also affects the other breakpoints by shifting their position relative to a virtual rubber band. This option is only available in Curve mode and in Combined Curve mode.
Using the Tracker to apply filter tracking to a sound
Filter tracking is a common feature found in synthesizer filters that forces the cutoff frequency to follow the pitch of incoming MIDI notes. When filter tracking is applied, low notes result in lower cutoff values, producing a darker sound. High notes result in higher cutoff values, producing a brighter sound. All resonant filters in Massive X offer filter basic tracking.
However, by using a Tracker to apply filter tracking to a sound, you can fully control the response to incoming notes. You can use this to intensify the effect or create chaotic behavior. It is also possible to invert the response. In this case, low notes produce a brighter sound, and high notes produce a darker sound.
The following tutorial shows you how to apply filter tracking to a sound and change the response of the tracking:
Open Massive X and keep the preset Init - Massive X selected.

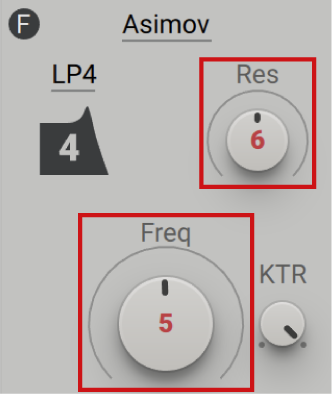
Set both the Freq and Res controls on the Asimov filter to noon.
Select the Tracker T1 in the navigation bar to show it in the editor.
For this workflow, set the Tracker to Note Pitch and Curve mode. The preset Init - Massive X already includes the correct settings.
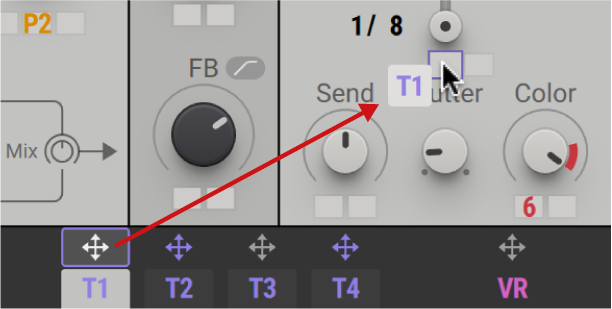
Drag and drop the arrow icon for T1 to the first modulation slot of the Freq control.
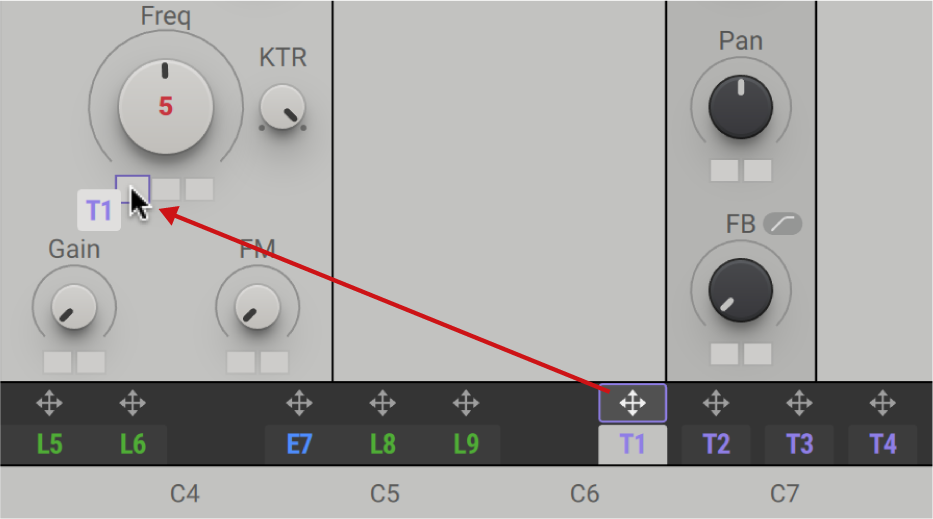
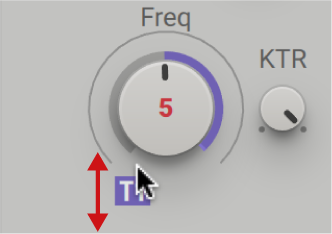
Click and drag the first modulation slot of the Freq control up to set the maximum modulation amount for the Tracker.
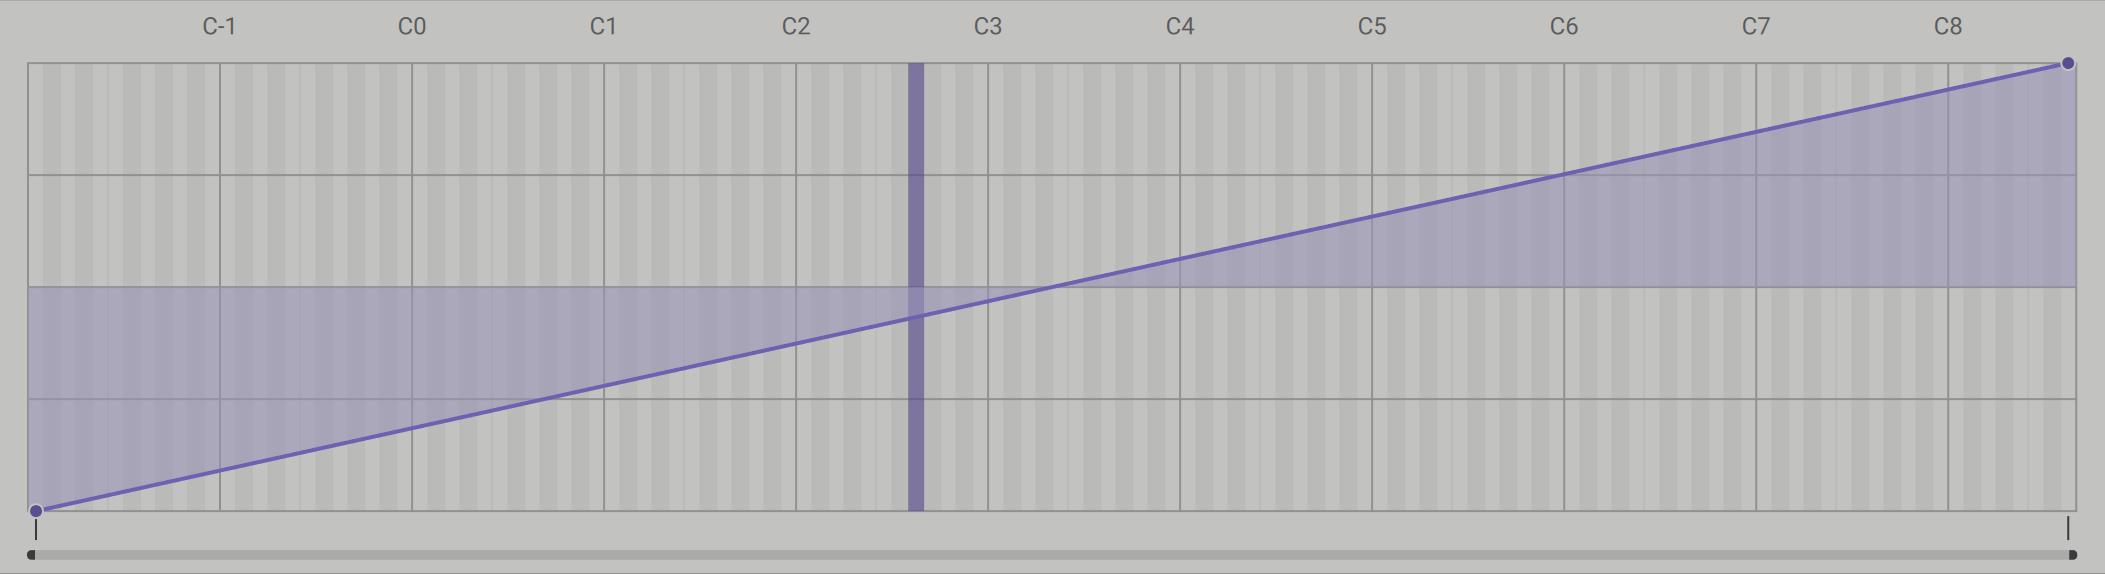
Play some notes on your keyboard or a sequence in your host software. You can see the active note being highlighted by a vertical bar in the Tracker's Tracking view.
Tip
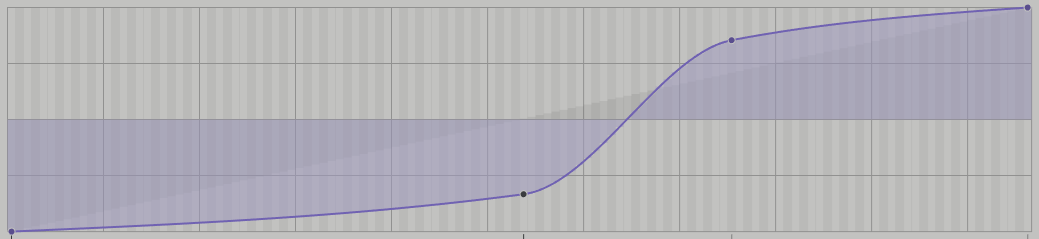
The curve in the Tracking view represents the values of the Tracker's modulation output (y-axis) for each MIDI note (x-axis).
Click on the curve in the Tracking view to create a new breakpoint.
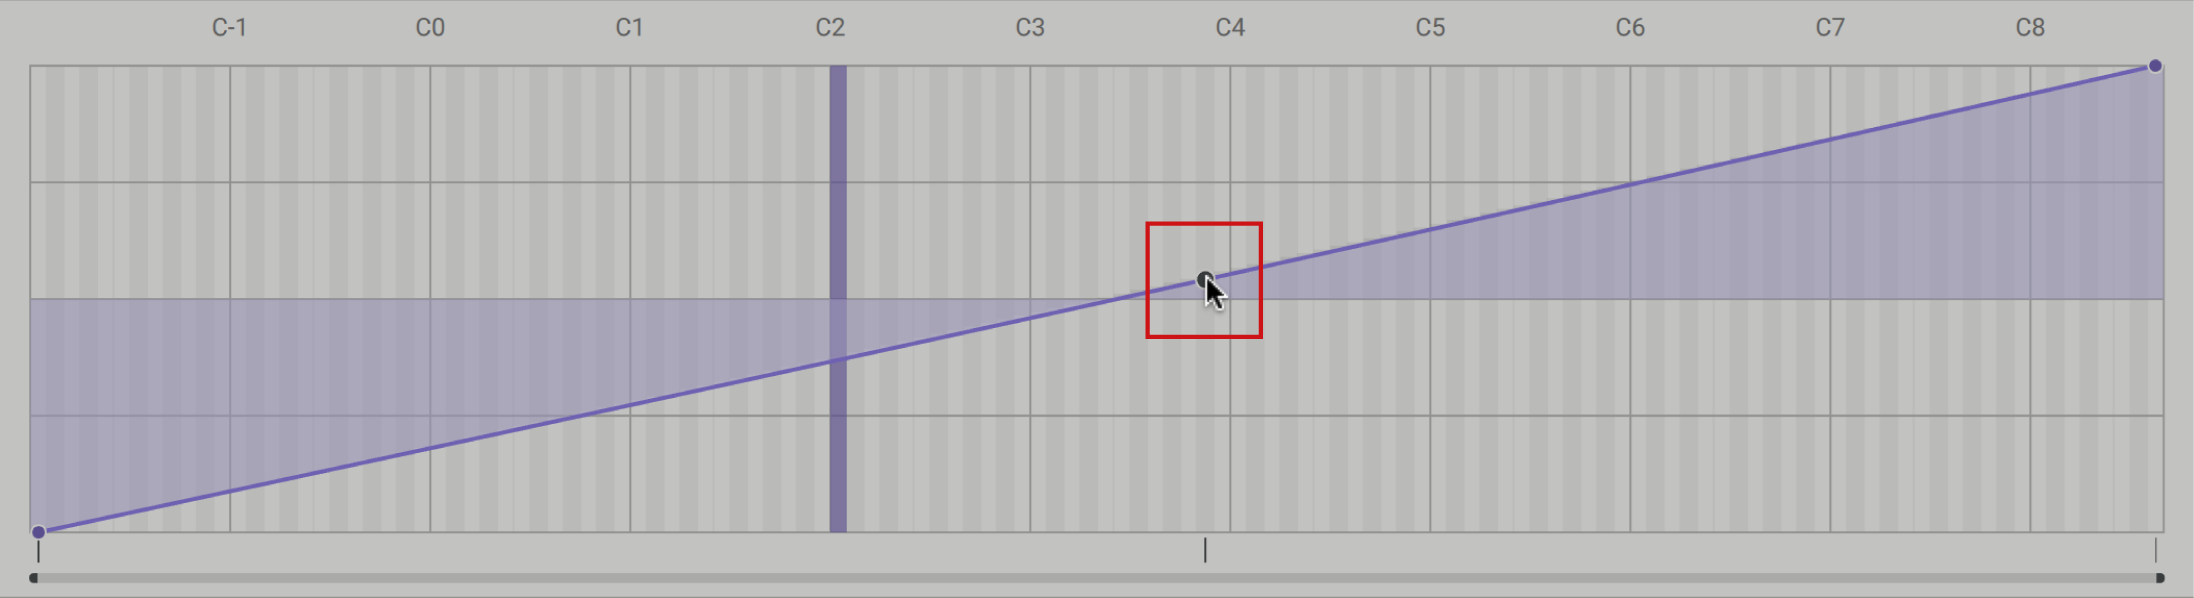
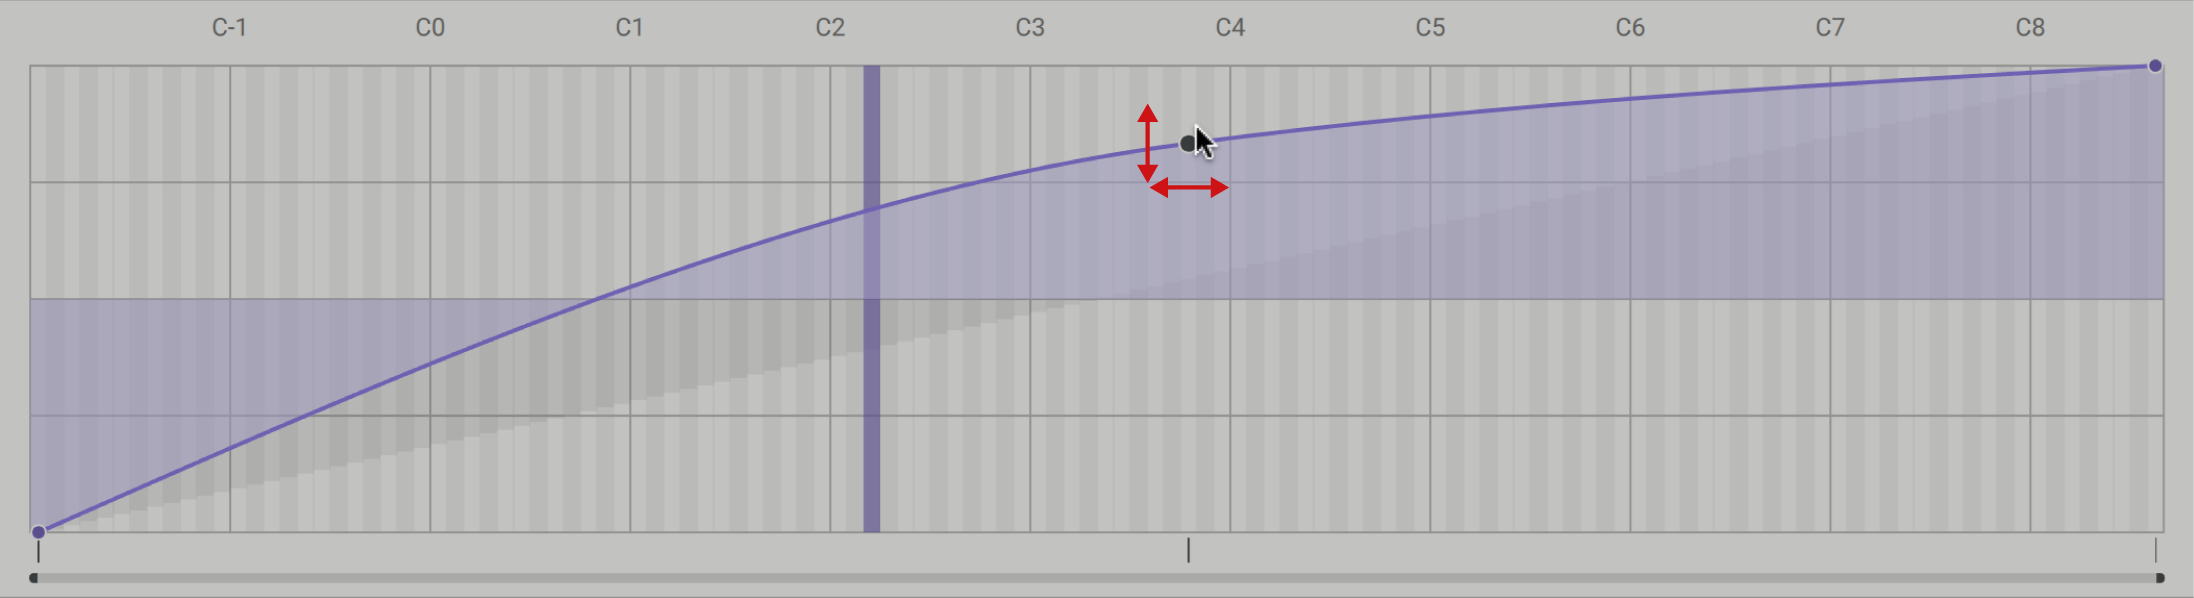
Click and drag the breakpoint in any direction to adjust the curve and therefore the Tracker's response to incoming notes.
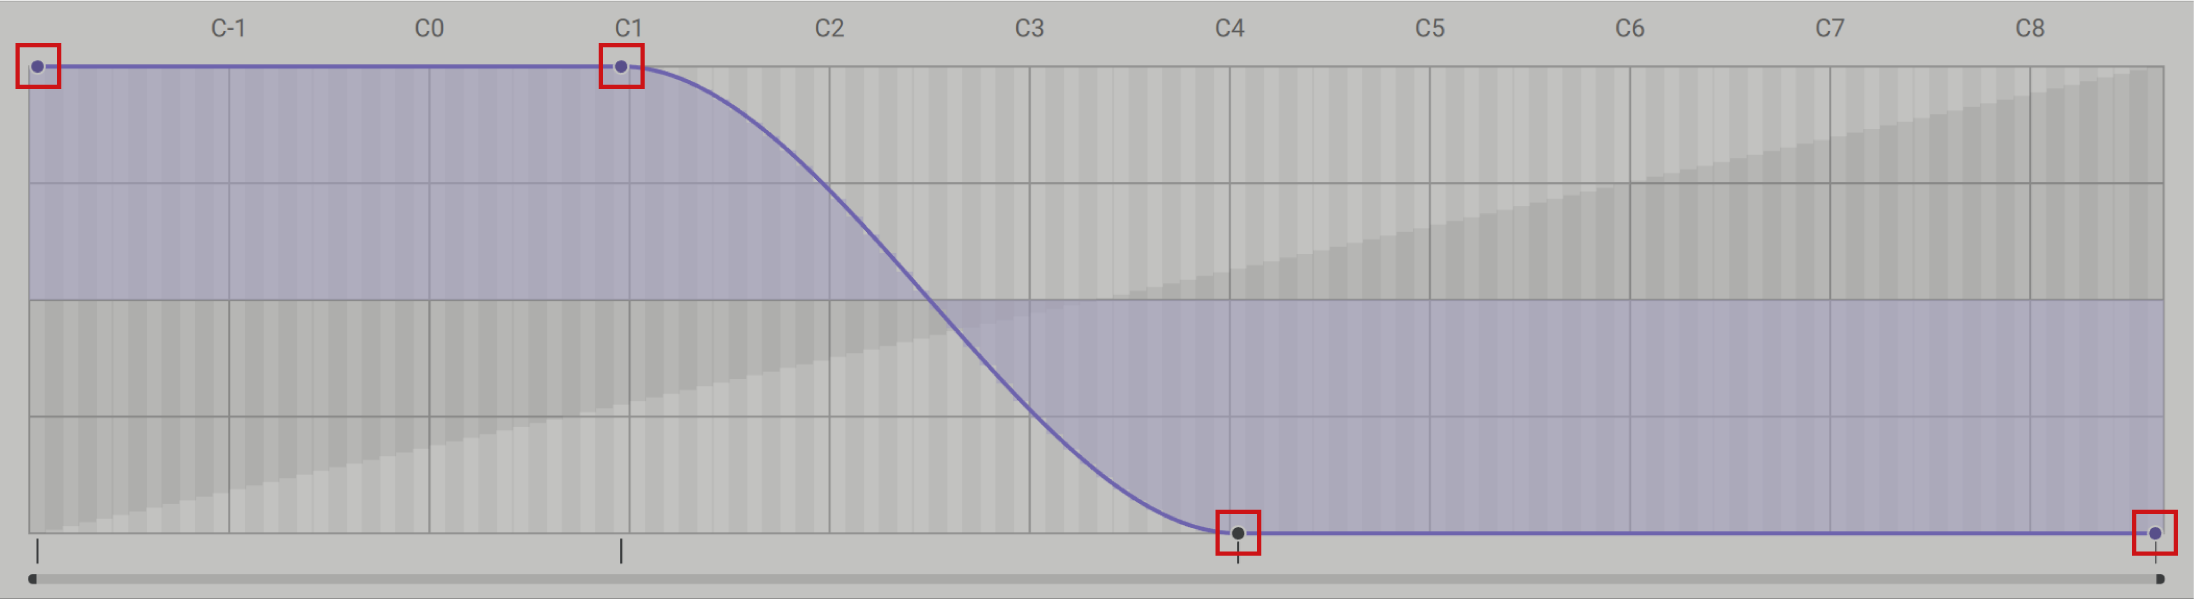
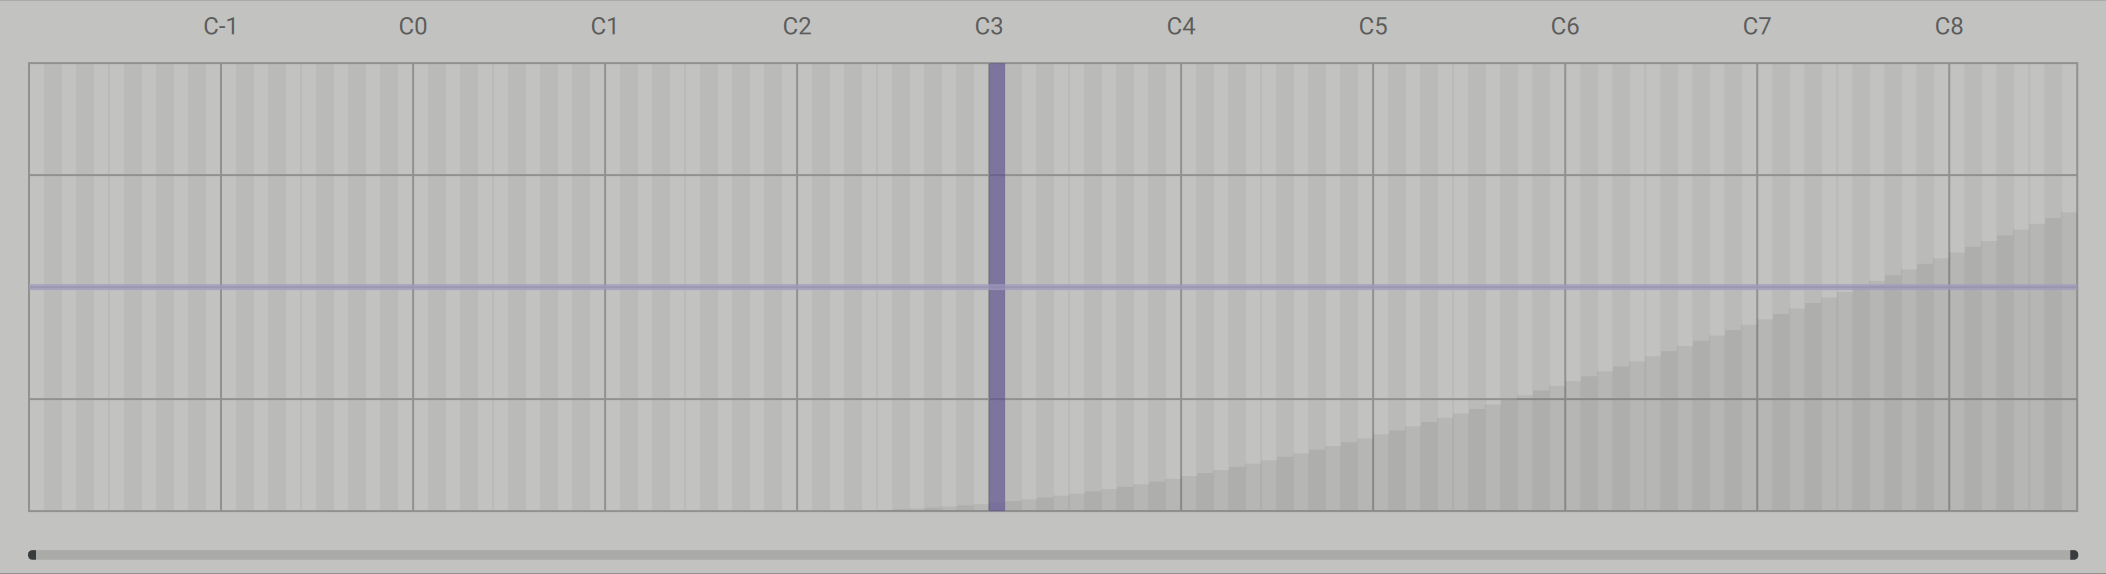
Repeat steps 7 and 8 to add a breakpoint in another position. By changing the position of the breakpoints, you can create a more extreme response to incoming notes. For example, by setting the breakpoints as shown below, the cutoff frequency rises strongly between notes C1 and C4, but stays at the respective value outside of this range.
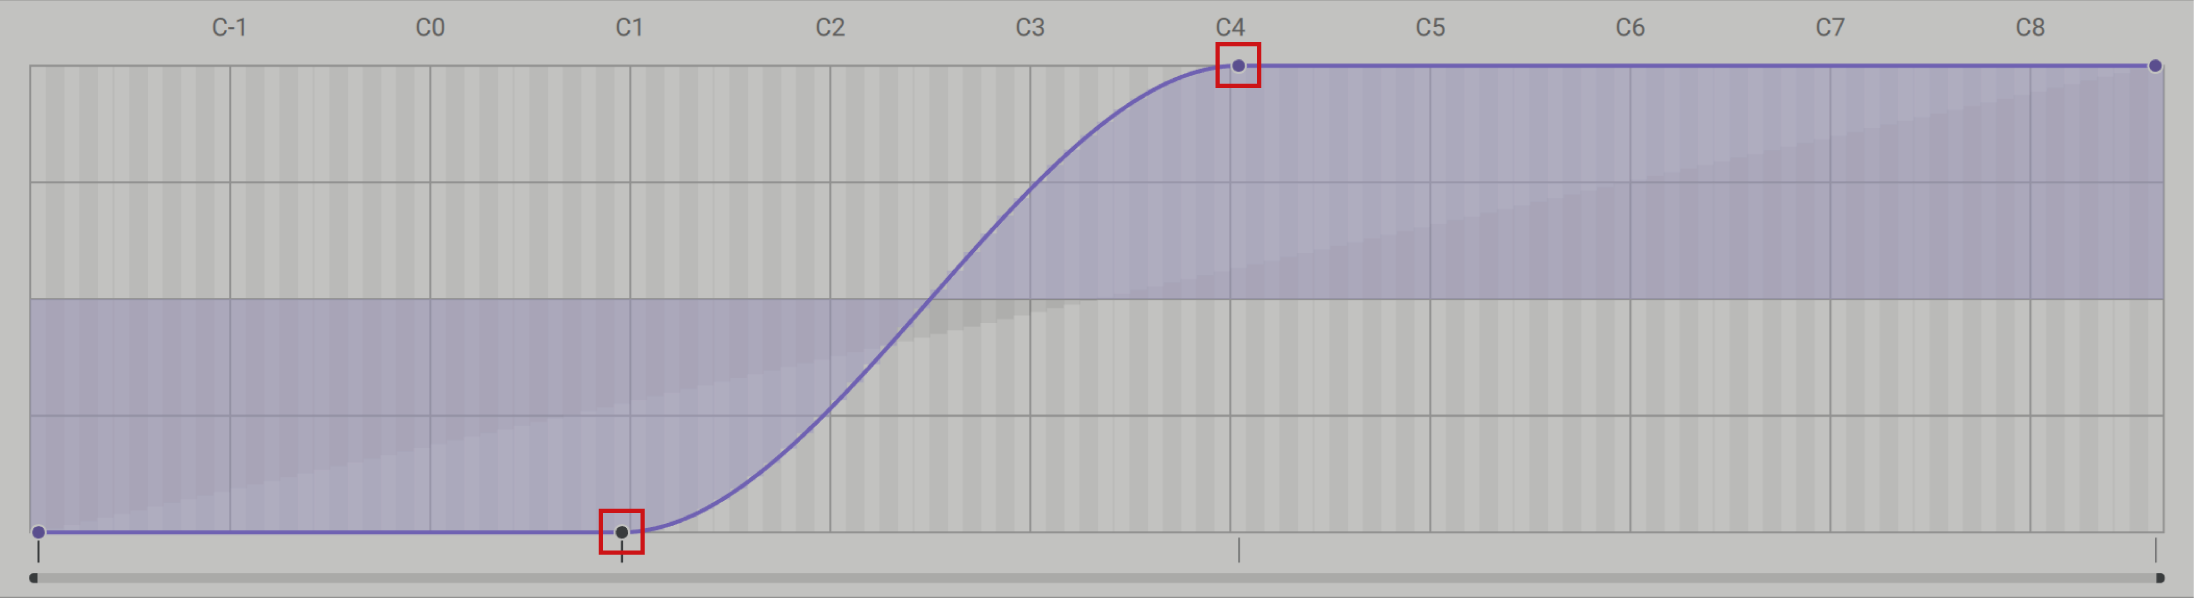
The cutoff frequency follows the pitch of incoming MIDI notes relative to the curve in the Tracking view. In the example above, notes lower than C1 produce a dark sound with the cutoff frequency at a minimum. Between C1 and C4, the sound becomes brighter with every note. Notes higher than C4 produce a bright sound with the cutoff frequency at the maximum.
To invert the response of the tracking, drag all breakpoints including the ones at the two ends of the curve fully up or down, respectively. Following the example above, the inverted curve is as follows:
The cutoff frequency follows the pitch of incoming MIDI notes in an inverted fashion: low notes produce a brighter sound, and high notes produce a darker sound.
Using the Tracker to create delay time variations in a sound
The Tracker's Offset mode can be used to make a sound respond to incoming MIDI notes in a very specific way. When combined with the Source Note Pitch, the modulation produced by the Tracker is defined independently for each note, by drawing in single values in the Tracking view. This is useful for fine-tuning a sound's behavior at specific pitches, or for creating anything from subtle to drastic sound variations across the keyboard.
The following tutorial shows you how to use Offset mode to recall defined delay time values when playing specific notes:
Open Massive X and select the preset Advanced Optics.

You can play the preset from your keyboard, however for this tutorial we recommend to program and play back a sequence of short notes with long pauses.
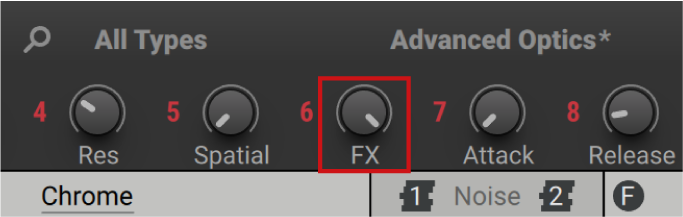
Turn the FX macro fully clockwise to make the echo effect in this preset more pronounced.
Show the Stereo Delay effect by clicking on the Z Stereo Effect slot.
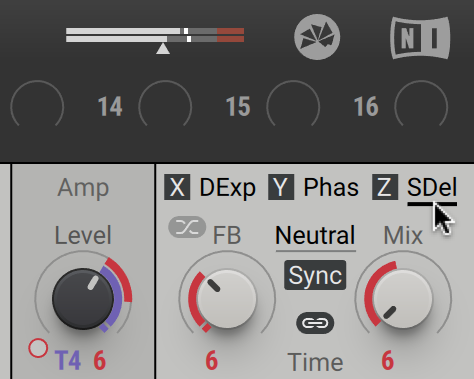
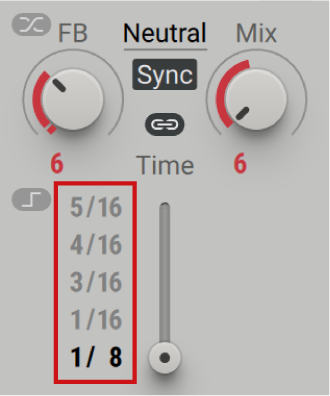
Adjust the individual delay times next to the delay time fader to create a variety of rhythmic echo effects depending on the position of the control.
Select the Tracker T1 in the navigation bar to show it in the editor.
For this workflow, set the Tracker to Note Pitch mode. The preset Advanced Optics already includes the correct setting.
Enable Offset mode in the left area of the Tracker.
Set the resolution of the Vertical Grid to 4 in the left area of the Tracker.
Note
By setting the resolution to 4, the Vertical Grid corresponds to the number of available values for the delay time control. This makes it easy to adjust the offset amounts in a meaningful way.

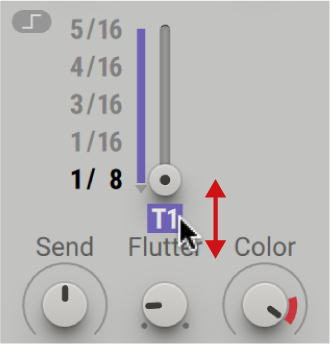
Drag and drop the arrow icon for T1 to the first modulation slot of the delay time control.
Click and drag the first modulation slot of the delay time control up to set the maximum modulation amount for the Tracker.
Play back the previously programmed sequence in your host software. You can see the active note being highlighted by a vertical bar in the Tracker's Tracking view.
Tip
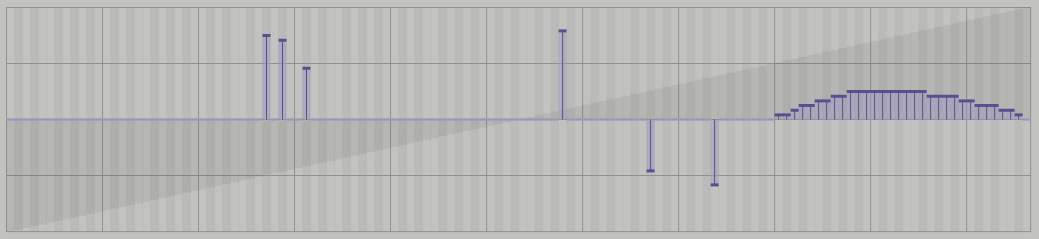
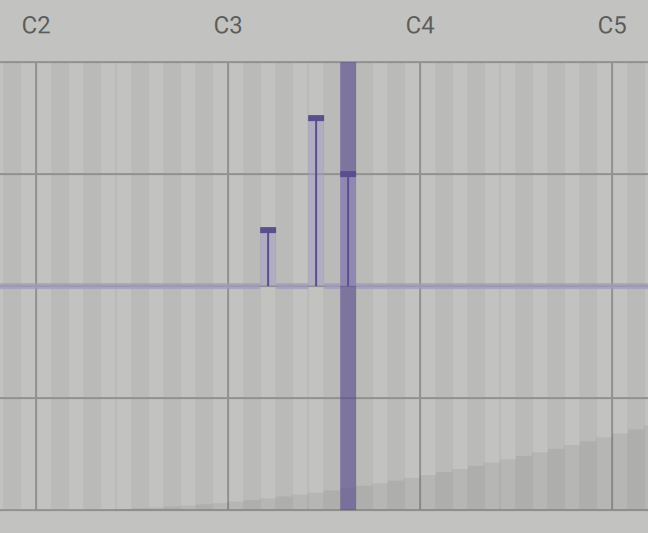
The offsets in the Tracking view represent the values of the Tracker's modulation output (y-axis) for each MIDI note (x-axis).
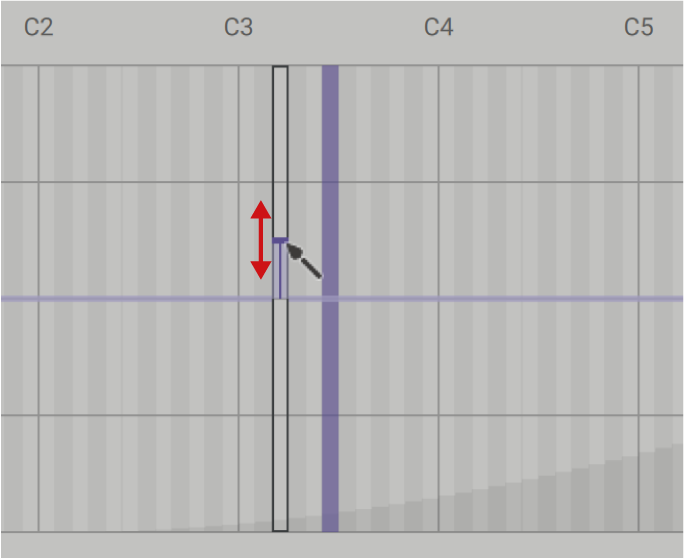
Click and drag the offset amount for one of the notes in the sequence to change the Tracker's response to this note.
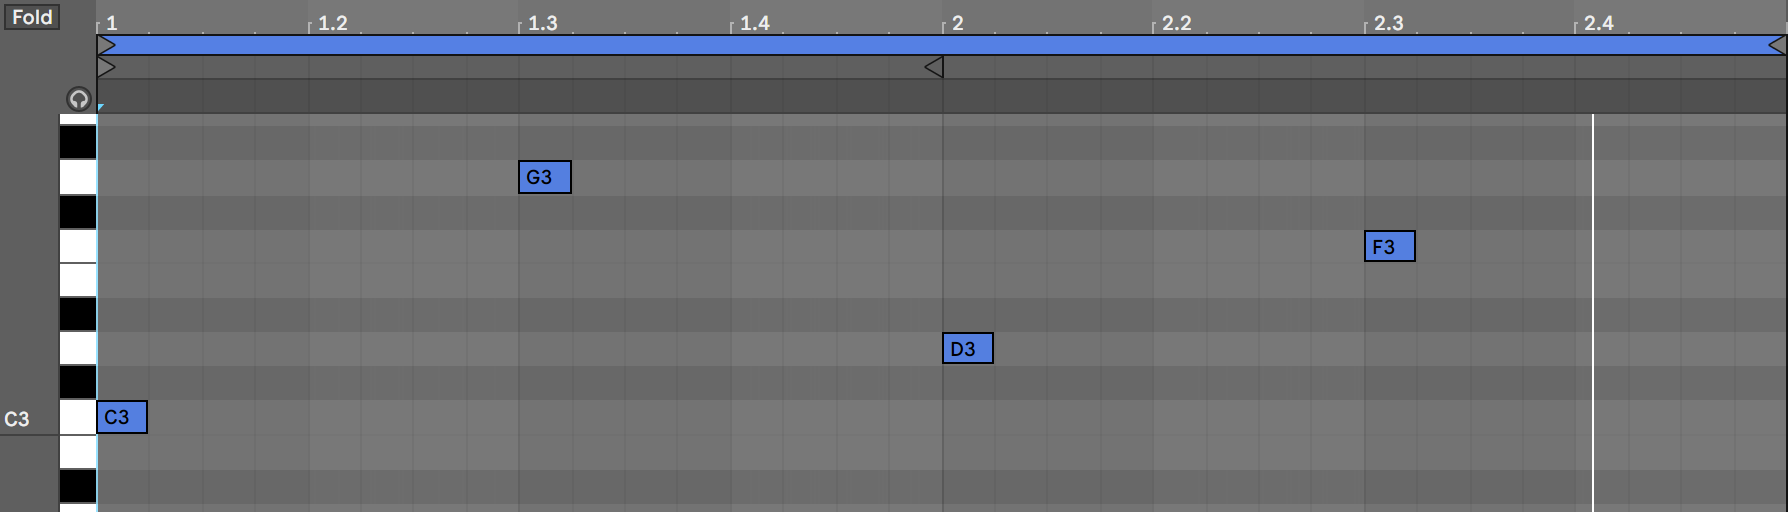
Repeat step 12 for the other notes in the sequence. By changing the offset amounts, you can define the delay time for each note independently. For example, by setting the offset amounts as shown below, C3 recalls a delay time of 1/8 (first value of the control), D3 recalls 1/16 (second value of the control), F3 recalls 4/16 (fourth value of the control), and G3 recalls 3/16 (third value of the control).
The delay time responds to specific MIDI notes relative to the respective offset amount. In the example above, the notes C3, D3, F3, and G3 each recall different delay time values for a variety of rhythmic echo effects.