Envelope page
The Envelope page of Absynth 6 lets you design advanced envelopes to modulate the parameters of the instrument.
The Envelope page of Absynth 6 lets you design advanced envelopes for modulating the parameters of the instrument.
To open the Envelope page, click the Envelope tab in the Header:

The Envelope page contains the following areas:
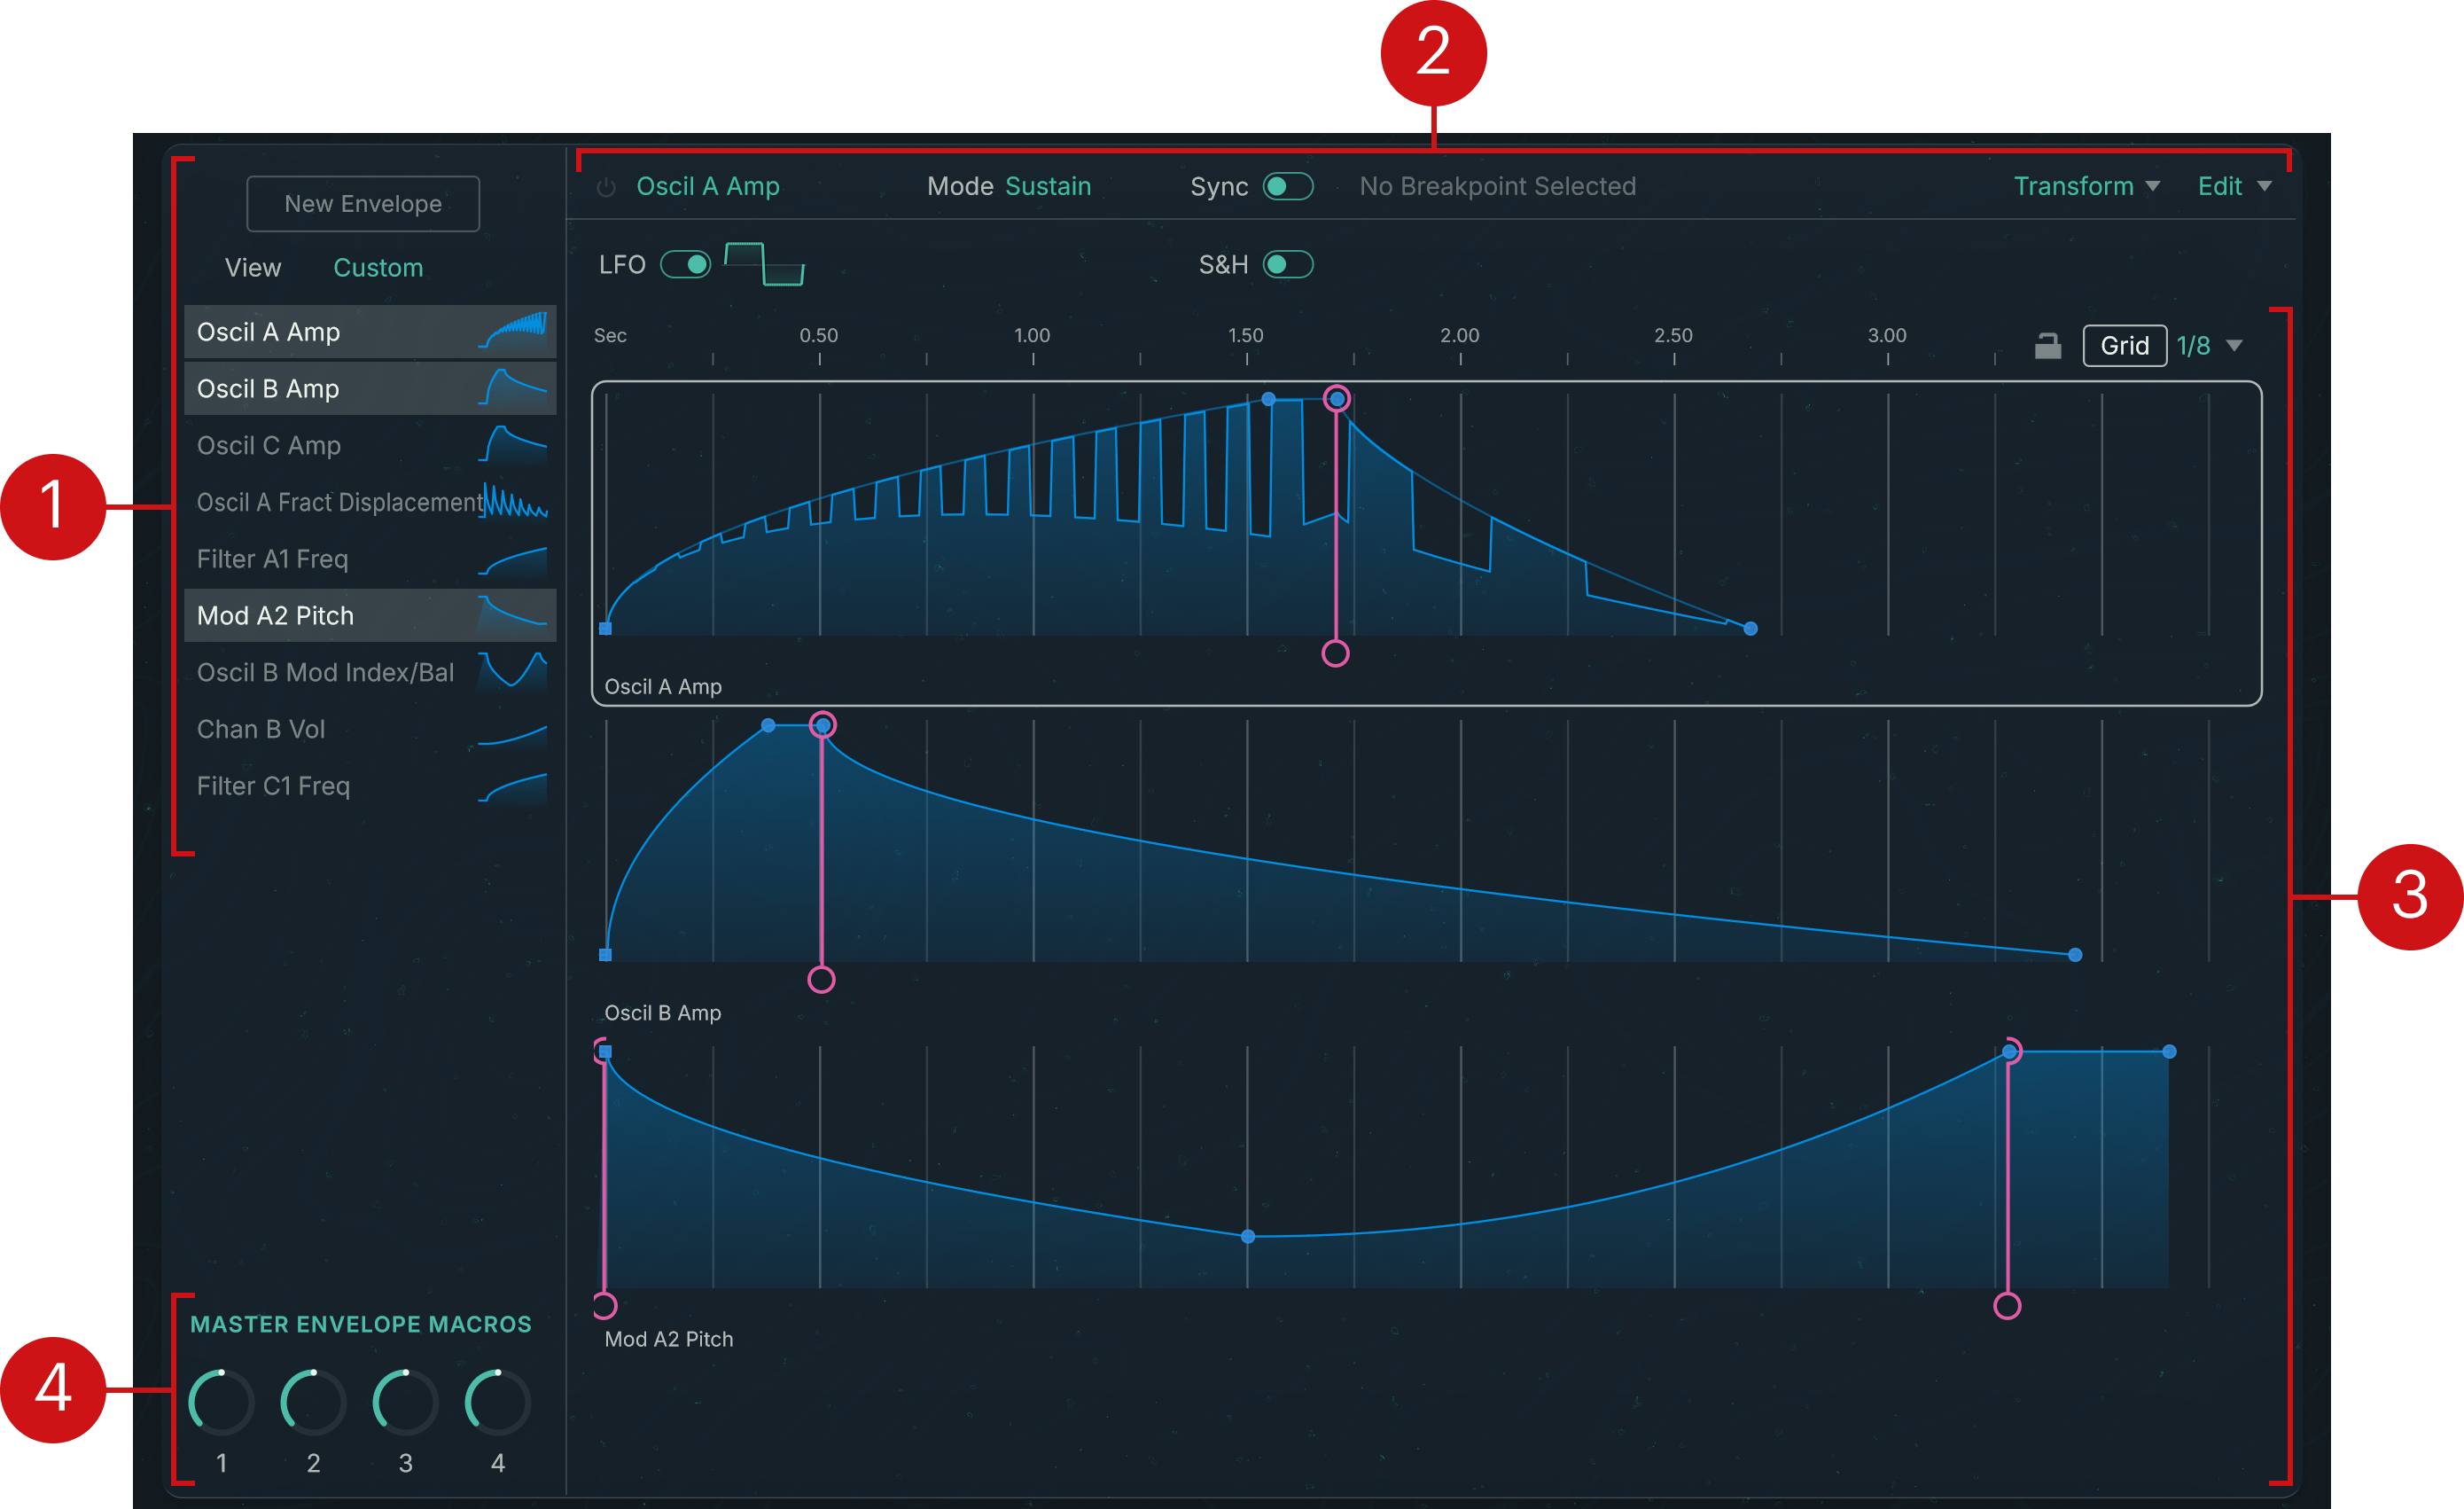
Envelope list: Contains all the envelopes used in the preset. You can select the desired envelopes from the list to open them in the Envelope Editor on the right. The Envelope list lets you also show only specific envelopes, and create new envelopes. You can find more information in Envelope list.
Envelope and breakpoint settings: Provides global settings and commands for the envelope under focus in the Envelope Editor. If a breakpoint is selected, the right part shows the settings for that particular breakpoint. You can find more information in Envelope and breakpoint settings.
Envelope Editor: Shows and lets you visually edit the selected envelopes and their breakpoints. You can find more information in Envelope Editor.
Master Envelope Macros: The four Envelope Macro knobs can be freely assigned to breakpoints, which makes these breakpoints available for MIDI control. You can find more information in Envelope Macros.
Envelope list
The Envelope list contains all the envelopes used in the preset.
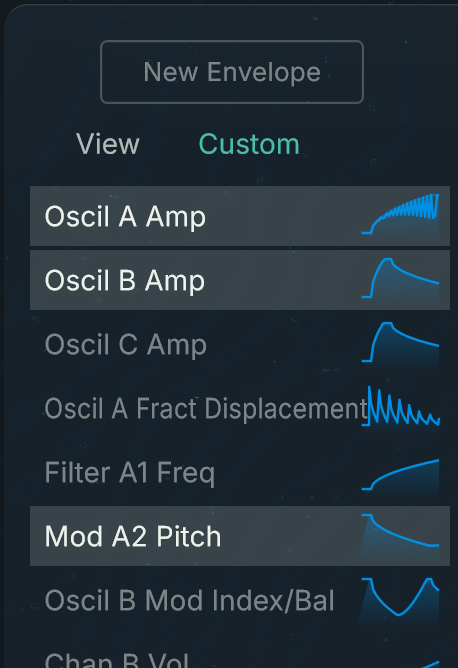 |
In this list, the envelope names describe the modulation targets: category of module (Oscil, Filter, Mod, Chan, etc.), channel and position (A, A2, B1, C, M1, etc.), and target parameter.
Selecting an envelope from the list will show it in the Envelope Editor on the right. Multiple envelopes can be selected simultaneously: They will be stacked in the Envelope Editor. You can select multiple contiguous entries by holding down the [Shift] key and selecting the upper entry and the lower entry from the list. You can select multiple non-contiguous entries by holding down the [Command] key (macOS) or the [Ctrl] key (Windows) and selecting the desired entries from the list.
The Envelope list provides two additional controls at the top:
New Envelope button: Creates a new envelope to modulate a new target parameter. You can find more information in Creating a new envelope.
View menu: Offers a quick way to select specific groups of envelopes and show them in the Envelope Editor. The View menu includes the following display options:
All: Selects all the envelopes from the list.
None: Clears the current selection.
Channel A–C: Selects all the envelopes that belong to the modules of channel A–C, respectively.
Master Channel: Selects all the envelopes that belong to the modules of the Main channel.
All Engines: Selects all the envelopes that belong to the source modules.
All Filters: Selects all the envelopes that belong to the Filter modules.
All Modulators: Selects all the envelopes that belong to the Modulator modules.
All Waveshapers: Selects all the envelopes that belong to the Waveshaper modules.
All Effects: Selects all the envelopes that belong to the effect module.
Creating a new envelope
You can create a new envelope modulation by using either of the following two methods:
Method 1: Parameter’s context menu
In the appropriate page of Absynth, navigate to the target parameter that you want to modulate, right-click it (Windows) or [control]-click it (macOS), and select Create a New Envelope… from the context menu.
Absynth automatically switches to the Envelope page with the new envelope selected and ready for editing.
Method 2: New Envelope dialog
In the Envelope page, click the New Envelope button at the top of the Envelope list.
The New Envelope dialog opens.
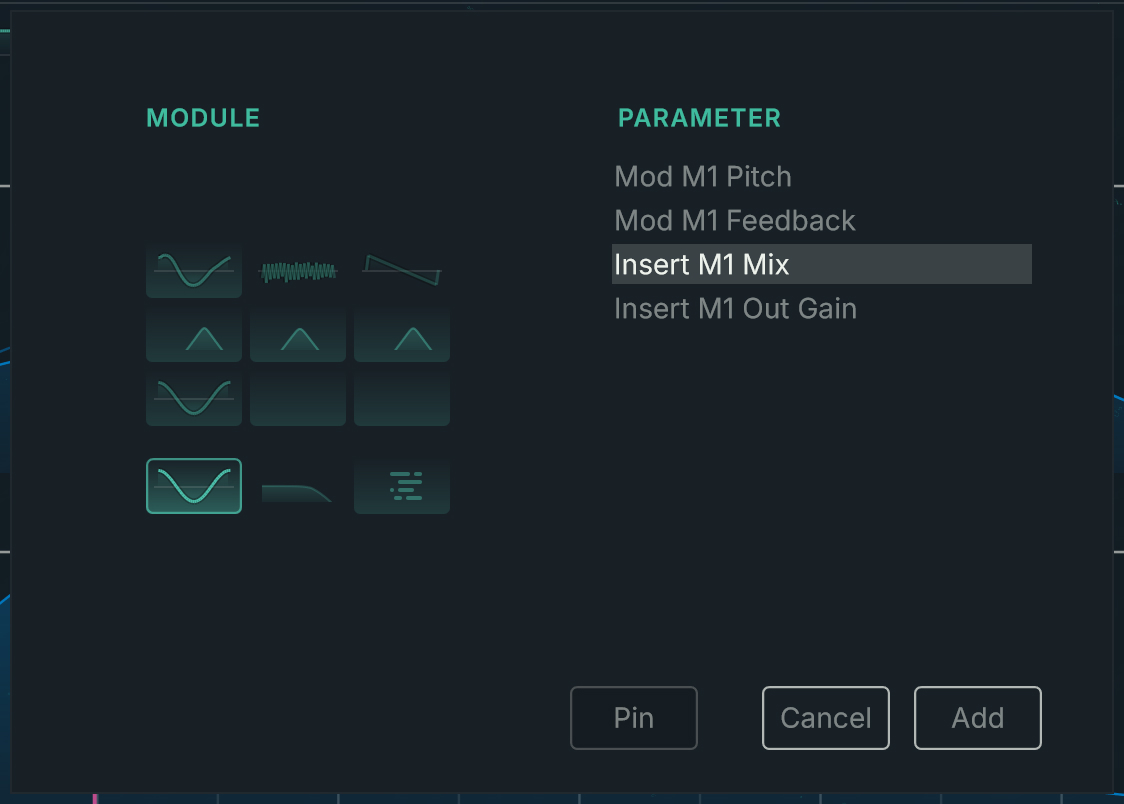
In the mini patch view on the left, select the module containing the parameter that you want to modulate.
The list on the right shows all the module’s parameters available for modulation.
Select the desired parameter from the list.
At the bottom of the dialog, click Add to create the new envelope.
The dialog closes and a new envelope automatically opens in the Envelope Editor, replacing any envelope(s) previously displayed.
When the New Envelope dialog is open, you can also use the following buttons at the bottom of the dialog:
Pin: When Pin is on, the dialog stays open when you click the Add button. This allows you to quickly create envelopes for multiple parameters in a row, and edit them at a later stage.
Cancel: Closes the dialog without creating any envelope.
Envelope Editor
The Envelope Editor displays the envelopes selected in the Envelope list on the left, and lets you visually create, edit, and delete breakpoints with the mouse.
The Envelope Editor contains the following elements:
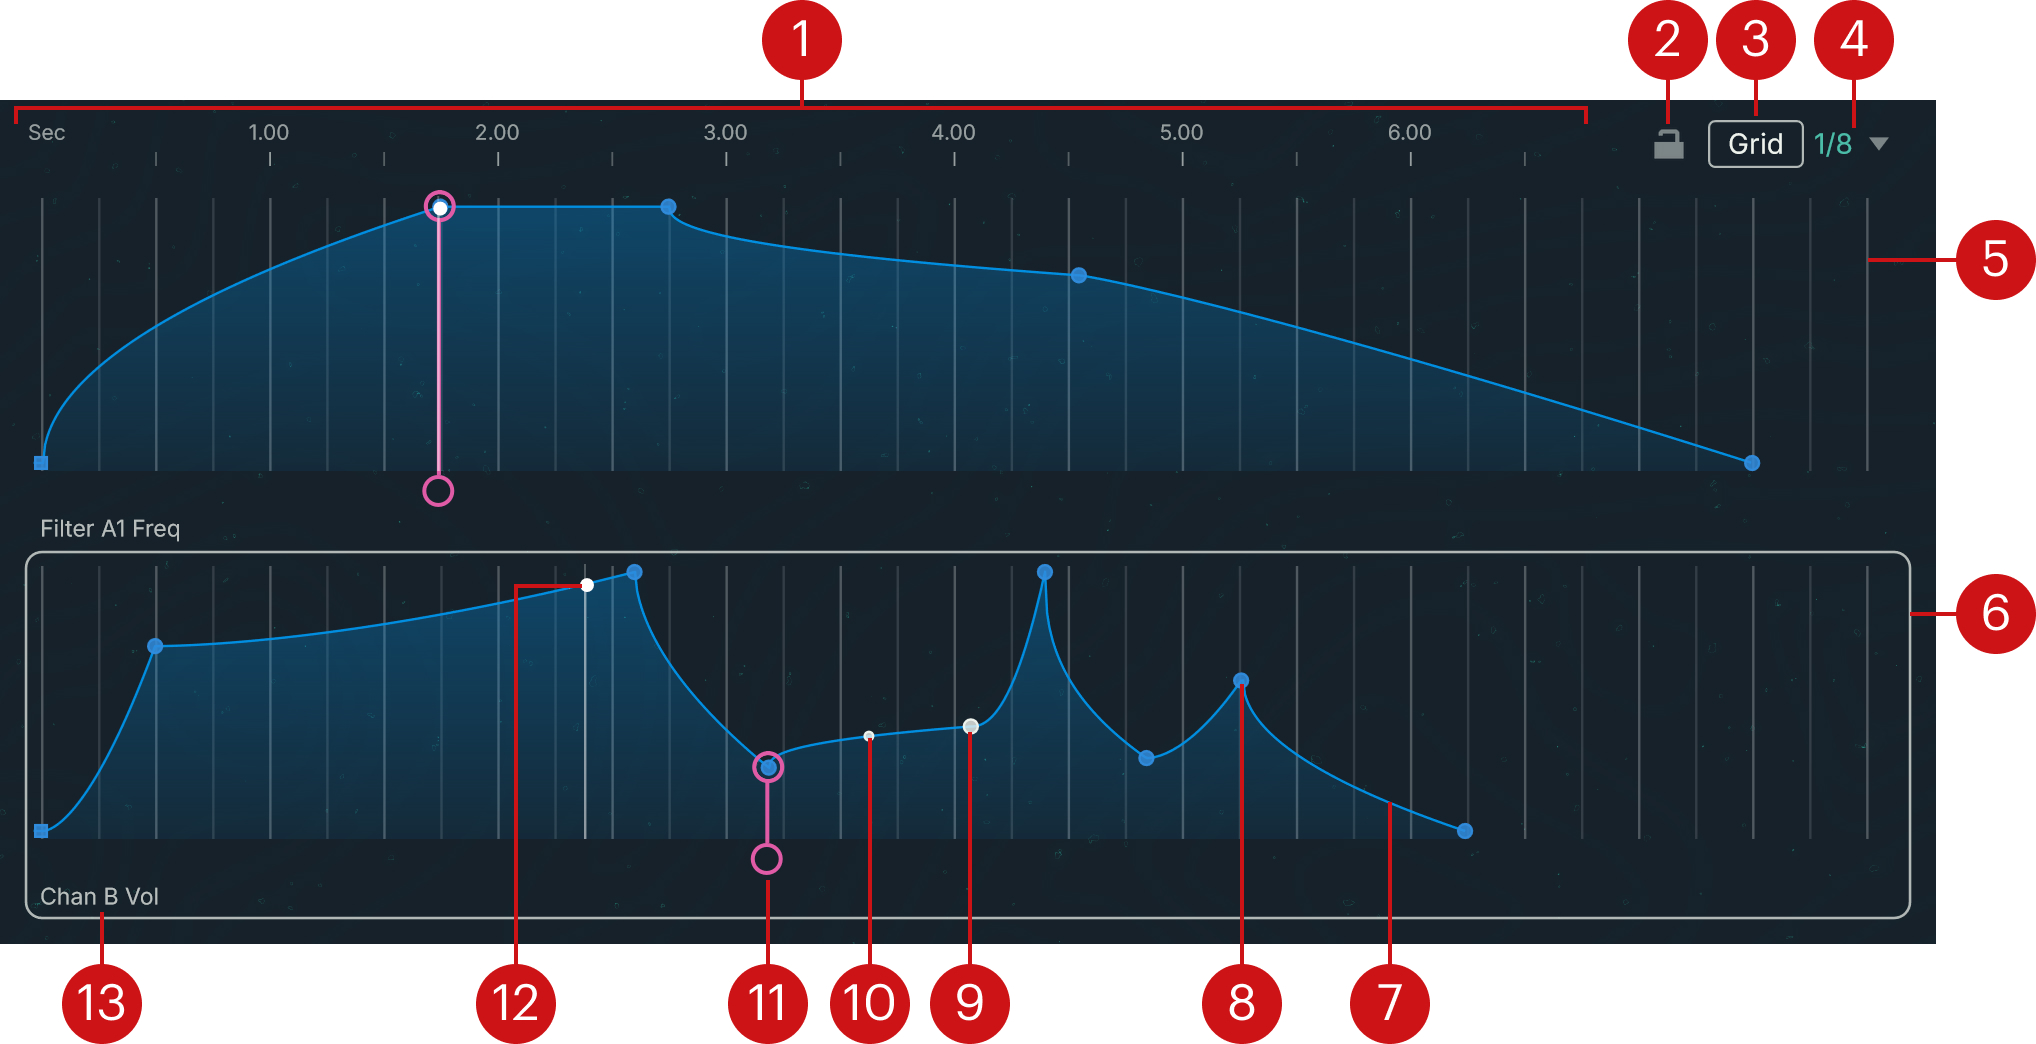
Timeline: Measures the time from the beginning of the envelope, in seconds. All the displayed envelopes use the same timeline, which helps shape the envelopes in relation to each other. You can click anywhere in the timeline and drag your mouse vertically to adjust the zoom factor and horizontally to scroll in the timeline.
Lock button: When the Lock button is off (default setting), as you drag a breakpoint all the following breakpoints move in the timeline accordingly to maintain the current time intervals between the breakpoints. If you activate Lock, the positions of the following breakpoints are locked, and moving a breakpoint in the timeline only changes the position of this breakpoint. Lock can be very useful for rhythmical envelopes where the breakpoints should stay synchronized with the beats.
Grid button: Activates or deactivates the grid. When the grid is active, gray vertical lines are displayed at regular intervals. As you drag a breakpoint closer to a grid line, the breakpoint will snap to the line. You can use it to quickly set perfect timings across different stages in the envelope or across multiple envelopes.
Note
When the grid is active, you can temporarily deactivate snapping by [Shift]+dragging the breakpoint.
Grid Size menu: Adjusts the size of the grid intervals. The available values are 1/8th, 1/16th, or 1/32nd of a second.
Grid line: The grid lines are visible only when the Grid button is on.
Focused envelope: The white frame indicates the envelope under focus. At the top of the page, the envelope and breakpoint settings always relate to the focused envelope. You can click anywhere in another envelope image or its background to switch the focus onto it.
Envelope shape: Represents the envelope’s amplitude values across the timeline. The shape is made of a series of breakpoints and transitions between them. When an envelope modulates a parameter, the value set in the Patch page represents the maximal value that the envelope can reach. The envelope will reduce this value according to its shape.
Breakpoint: Defines a target point in the envelope, for which you can precisely adjust the time and amplitude values. The transition between the previous breakpoint and this breakpoint will be interpolated according to the breakpoints’ positions and the chosen Slope value. You can create a breakpoint by double-clicking anywhere in the envelope display, and delete a breakpoint by double-clicking it. You can find mode information on creating and deleting breakpoints in Creating and deleting breakpoints.
Selected breakpoint: The white dot indicates the selected breakpoint. You can drag the breakpoint with your mouse to change its position. The parameters of the selected breakpoint are displayed in the breakpoint settings above the Envelope Editor.
Slope handle: You can drag this handle with your mouse to adjust the curve of the transition before the selected breakpoint. The corresponding Slope parameter is available in the BP Settings panel of the breakpoint settings above the Envelope Editor.
Note
The slope handle is not available if the transition is in step mode. You can find more information about the Slope/Step control in Breakpoint settings: BP Settings panel.
Sustain/Release marker: Sets the breakpoint as the sustain or release point of the envelope. The exact function of the marker depends on the envelope mode. You can move the marker onto the desired breakpoint by clicking. the round handle at the bottom and dragging your mouse horizontally. Any breakpoint can be set as sustain/release point except the first and the last breakpoints.
Playback position: The white vertical line with the white dot running on the envelope shape represents the current playback position.
Envelope name: Mirrors the name of the parameter modulated by the envelope.
Creating and deleting breakpoints
The same command lets you create or delete breakpoints depending on whether you use it on an existing breakpoint or not.
To create a breakpoint in an envelope:
Double-click anywhere in the envelope display to create a breakpoint at that position. You can also [Ctrl]-click (Windows) or [command]-click (macOS) anywhere in the envelope display.
To delete a breakpoint from an envelope:
Double-click a breakpoint in the envelope display to delete it from the envelope. You can also [Ctrl]-click the breakpoint (Windows) or [command]-click the breakpoint (macOS).
Envelope and breakpoint settings
At the top of the Envelope page, two rows of envelope settings provide parameters and commands to adjust the envelope under focus in the Envelope Editor.
 |
If a breakpoint is selected in the Envelope Editor, the right part of the envelope settings shows additional controls for the breakpoint. These controls are described in Breakpoint settings.
The upper row of settings contains the following elements, from left to right:
Envelope on/off switch: Activates or deactivates the envelope. This control is not available for the amplitude envelopes of the source channels (labeled Oscil A–C Amp).
Envelope name: Indicates the target parameter of the envelope modulation.
Mode menu: Selects from different envelope modes that define the envelope behavior. You can find more information in Envelope modes.
Sync switch (Release, Sustain, and Loop modes only): When Sync is on, the envelope is synchronized with the tempo of your DAW.
Beat control (Retrigger mode only): Adjusts the delay (in beats) after which the envelope is retriggered.
Transform menu: This menu is visible only when no breakpoint is selected in the Envelope Editor. The Transform menu lets you apply transformations to the envelope. You can find more information in Transform menu (Envelope settings).
Edit menu: This menu is visible only when no breakpoint is selected in the Envelope Editor. The Edit menu provides the following editing commands for the envelope:
Copy Envelope: Stores the envelope into the clipboard.
Paste Envelope: Inserts the envelope from the clipboard, replacing the existing envelope.
Initialize: Resets the envelope to the default envelope, which contains four breakpoints all set to the maximum amplitude.
Delete: Deletes the envelope and its modulation.
For envelopes in Release, Sustain, Loop, or Retrigger mode, the lower row of envelope settings lets you configure an internal LFO to modulate the envelope. You can find more information in Envelope LFO.
Envelopes in Control Driven mode and in Link mode provide additional parameters described in Control Driven mode and Link mode, respectively.
Envelope modes
The Mode menu of the envelope settings lets you choose from the following envelope modes:
The Release, Sustain, Loop, and Retrigger modes are based on the usual envelope concept in which the envelope modulates the parameter value over time.
In Control Driven mode you can choose a Macro or MIDI control to set the position in the envelope instead of following the time.
In Link mode the envelope can mirror the shape of another envelope.
Release mode
With an envelope in Release mode, when you play a note the envelope runs from the first to the last breakpoint in one go. If you release the note before the Sustain/Release marker has been reached, the envelope jumps to the marker and continues from there to the end. The Release mode is useful for percussive sounds, and for piano-like sounds with sustain.
Note
If the Sustain/Release marker is located near the beginning, the Release envelope will always run in the same way, no matter how long the note is held.
Sustain mode
In Sustain mode the envelope works like a classic ADSR envelope. When you play a note, the envelope runs until the Sustain/Release marker and stays at the marker position as long as you keep the note held. When you release the note, the envelope runs on the remaining path to the end. If you release the note before the Sustain/Release marker has been reached, the envelope jumps to the marker and continues from there to the end.
Loop mode
With an envelope in Loop mode, two markers let you define the loop start and end points. When you play a note, the envelope runs until the Loop End marker, jumps back to the Loop Start marker and repeats the looped section as long as you keep the note held. When you release the note, the envelope jumps to the Loop End marker and runs and continues from there to the end.
Retrigger mode
In Retrigger mode, when you play a note the envelope restarts at regular intervals as long as you keep the note held. You can adjust the retrigger interval by using the Beat control in the envelope settings. If the envelope reaches the Sustain/Release marker before being retriggered, it stays at the marker position until it is retriggered. When you release the note, the envelope jumps to the Sustain/Release marker and continues from there to the end. The Retrigger mode is especially useful for creating rhythmic, looped paths.
Control Driven mode
While an envelope in any other mode is controlled by the time, in Control Driven mode the movement on the horizontal axis is controlled by a Macro. The MIDI value 0 corresponds to the beginning of the envelope, 64 to its midpoint, and 127 to its end.
For example, if you draw a Control Driven envelope containing only two breakpoints connected by a straight line, the Macro will control the envelope parameter in a proportional (linear) way in the range between the values of the two breakpoints. By drawing more complex shapes you can create advanced non-linear controls for your parameters. You will find many examples of Control Driven envelopes in the factory presets.
Note
The Control Driven mode is not available for the amplitude envelopes of the source modules (labeled Oscil A–C Amp in the instrument).
In Control Driven mode the envelope provides one dedicated setting:
Control: Selects the control assigned to the envelope. The available controls are the Macros 1–16, Mod Wheel, Aftertouch, Sustain Pedal, and Velocity.
Link mode
The Link mode lets you connect the edited envelope to another envelope (called the “source” envelope). In Link mode, all the changes made to the source envelope will also affect the edited envelope. Even though you cannot directly modify the breakpoints of the edited envelope, you can control how it will translate the source envelope by adjusting the available scaling parameters.
Note
The Link mode is not available for the amplitude envelopes of the source modules (labeled Oscil A–C Amp in the instrument).
In Link mode the envelope provides the following settings:
Source menu: Selects the source envelope.
Time %: Scales the time intervals between breakpoints as a percentage of the intervals in the source envelope. This makes the envelope faster or slower. A value of 50 % will double the speed of the source envelope, a value of 200 % will halve it.
Amount %: Scales the amplitudes of the breakpoints as a percentage of the amplitudes in the source envelope. This scaling adjusts the overall depth of the envelope modulation compared to the source envelope.
Offset: Adjusts an offset globally added to the amplitudes of the breakpoints. Negative offset values will decrease the amplitudes.
Slope %: Scales the slopes of the transitions between breakpoints as a percentage of the slopes in the source envelope. Scaling down the slopes makes the transitions start faster and end more softly, and vice versa.
The Link mode not only saves time when editing similar envelopes, but can also serve for creative purposes. You could, for example, link the cutoff frequencies of the filters on multiple channels and choose slightly different time or slope scaling values to create a more organic sound.
Breakpoint settings
The breakpoint settings appear in the right half of the envelope settings as soon as a breakpoint is selected in the envelope display.
Note
The breakpoint settings are not available for envelopes in Link mode, these envelopes reuse instead the settings of another envelope.
The breakpoint settings are organized into three panels that you can successively show by clicking the three little green dots or the panel label on their right:
 |
the following panels are available: BP Settings, BP Macros, and Assign BP To.
Breakpoint settings: BP Settings panel
The BP Settings panel lets you numerically adjust the position of the breakpoint and the slope of the previous transition. Your adjustments in this panel are equivalent to dragging the breakpoint or the slope handle with your mouse in the envelope display of the Envelope Editor.
The panel contains the following settings:
 |
∆ Sec / Sec: Adjusts the breakpoint’s time value (horizontal axis). Clicking the label lets you switch between ∆ Sec and Sec. ∆ Sec adjusts the time of the breakpoint relative to the previous breakpoint, while Sec adjusts the time of the breakpoint relative to the beginning of the envelope.
Amt / [Unit]: Adjusts the breakpoint’s amplitude value (vertical axis). Clicking the label lets you switch between Amt and the particular unit (for example, Hz or dB) of the modulated parameter. Amt adjusts the amplitude as a percentage of the original parameter value. [Unit] adjusts the amplitude as an absolute value; in this case the value range might vary with the parameter.
Slope / Step: Adjusts the shape of the transition before the breakpoint. Clicking the label lets you switch between Slope and Step. Slope adjusts the curve of the transition: A value of 1 corresponds to a straight line; for values between 0 and 1 the transition starts fast and ends slowly; for values above 1 the transition starts slowly and ends fast. If you switch to Step, the envelope will keep the value of the previous breakpoint until it reaches this breakpoint.
Breakpoint settings: BP Macros panel
The BP Macros panel lets you use Macros to control the position of the breakpoint. The panel contains the following settings:
 |
Time Macro: Selects the control assigned to the breakpoint’s time (horizontal position). The available controls are the Macros 1–16, Mod Wheel, Aftertouch, Sustain Pedal, and Velocity. Selecting Not Assigned deactivates the time control.
Time Scale: Adjusts the range of the Macro control relative to the original time value. Negative Time Scale values invert the control.
Amp Macro: Selects the control assigned to the breakpoint’s amplitude (vertical position). The available controls are the Macros 1–16, Mod Wheel, Aftertouch, Sustain Pedal, and Velocity. Selecting Not Assigned deactivates the amplitude control.
Amp Scale: Adjusts the range of the Macro control relative to the original amplitude value. Negative Amp Scale values invert the control.
Breakpoint settings: Assign BP To panel
The Assign BP To: panel lets you assign the breakpoint to one of the four Envelope Macros. The panel contains the following settings:
 |
1–4 selector: Assigns or unassigns the corresponding Envelope Macro to this breakpoint. Only one Envelope Macro can be assigned at a time. The cell of the assigned Envelope Macro is highlighted.
Time: Adjusts the depth of the control over the breakpoint’s time value as a percentage of the original time value. If no Envelope Macro is assigned to the breakpoint, the Time parameter is grayed out and inactive.
Amount: Adjusts the depth of the control over the breakpoint’s amplitude value as a percentage of the original amplitude value. If no Envelope Macro is assigned to the breakpoint, the Amount parameter is grayed out and inactive.
Envelope LFO
For all envelope modes except the Control Driven and Link modes, you can modulate the envelope amplitude using a dedicated low-frequency oscillator (LFO). The LFO wave will modulate the entire envelope, but every breakpoint can set different depth and rate values. The resulting LFO modulation is visually displayed in the Envelope Editor.
The LFO parameters are available in the lower row of the envelope settings, above the envelope displays.
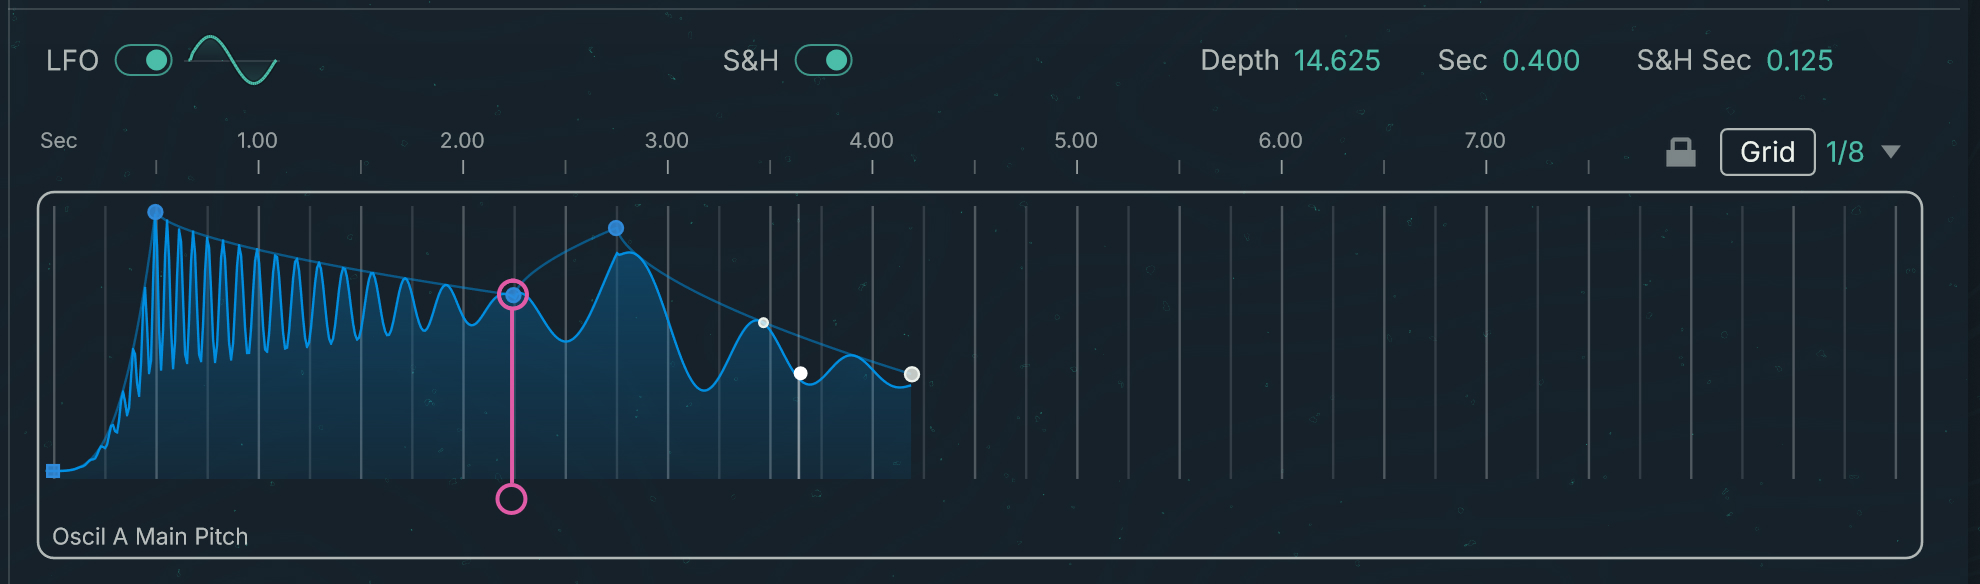 |
The LFO parameters on the left affect the entire envelope:
LFO switch: Activates or deactivates the LFO modulation of the envelope amplitude. The remaining LFO parameters will be visible only when the LFO switch is active.
Waveform thumbnail: Depicts the shape of the waveform used by the LFO. Clicking the thumbnail opens a Waveform selector where you can choose another waveform or create your own waveform for the LFO.
S&H switch (Sample & Hold): Activates or deactivates the Sample & Hold mode. When S&H is off (default setting), the LFO steadily follows the selected waveform. When S&H is on, the LFO “samples” the waveform by extracting a value at regular intervals, and maintains this value until the next value is sampled. This process generates a staircase modulation signal based on the selected waveform.
If a breakpoint is selected in the Envelope Editor, additional LFO parameters for this breakpoint appear on the right in the BP Settings panel of the breakpoint settings:
 |
Depth: Adjusts the amount of modulation, from 0 to 100. At 0 the LFO has no effect on the envelope. At 100 the LFO oscillations go down to zero.
Tip
By setting Depth to zero on chosen breakpoints, you can limit the LFO modulation to the remaining parts of the envelope.
Sec: Adjusts the period of the oscillation in seconds, which defines the rate of the LFO (a short period making a high rate).
S&H Sec: Available only when the Sample & Hold switch (S&H) is on, this adjusts the time interval between two sampled values, in seconds.
Note
If the breakpoint’s LFO settings are not visible, click the three little dots in the row above until BP Settings is displayed.
Between breakpoints, the values of the LFO settings evolve according to the Slope/Step setting of the next breakpoint. You can find more information on this setting in Breakpoint settings: BP Settings panel.
Transform menu (Envelope settings)
The Transform menu lets you apply various transformations to the envelope under focus or to all the envelopes displayed.
Note
The Transform menu is visible only if no breakpoint is selected in the Envelope Editor. If a breakpoint is selected, click anywhere in the background of the envelope display to deselect the breakpoint.
 |
Selecting either transformation from the menu opens a dedicated Transform panel with additional settings at the top of the page:
 |
In the Transform panel the following elements are common to all transformations:
Transform Envelope menu: Switches to another transformation.
Target menu: Specifies the envelope(s) affected by the transformation. If you select Selected Envelope (default setting) the transformation will affect only the envelope under focus (indicated by the white frame in the Envelope Editor). If you select All Visible Envelopes the transformation will affect all the envelopes shown in the Envelope Editor.
Cancel: Closes the panel and leaves the envelope(s) untouched.
Apply: Transforms the envelope(s) according to the panel settings and closes the panel.
The other parameters in the Transform panel depend on the selected transformation. As you change the parameter values, the shape of the envelope(s) and the resulting sound are updated in real time to show you the effect of your actions. You can then choose to apply these changes or to cancel them.
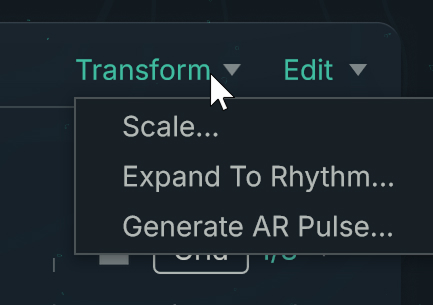
The Transform menu provides the following transformations:
Scale…: Scales the various parameters of the envelope(s). You can choose which parameters should be scaled, and to which extent. The Transform panel contains the following parameters:
Time Scale: Scales the time intervals between breakpoints as a percentage of the original intervals. This scaling makes the envelope faster or slower.
Amp Scale: Scales the amplitudes of the breakpoints as a percentage of the original amplitudes. This scaling modifies the overall depth of the envelope modulation.
Slope Scale: Scales the slopes of the transitions between breakpoints as a percentage of the original slopes. Scaling down the slopes makes the transitions start faster and end more softly, and vice versa.
Amp Offset: Adjusts an offset globally added to the amplitudes of the breakpoints. Negative offset values will decrease the amplitudes. The available values range from -100 to 100: At -100 all the amplitudes are null. At 100 all the amplitudes are at the maximum.
Expand To Rhythm…: Creates a rhythmic pattern by triggering the envelope(s) on selected steps. The Transform panel contains the following parameters:
Num Beats: Adjusts the number of steps in the pattern.
BPM: Adjusts the speed of the pattern in beats per minute.
Duration: Adjusts the length of the steps, measured in beats.
Step Sequencer: Shows the individual steps as numbered cells in a row. You can create a rhythmic pattern by activating or deactivating the desired cells. Only the active cells will trigger the envelope(s).
Generate AR Pulse…: Creates a series of attack-release pulses based on the original envelope(s). The Transform panel contains the following parameters:
Num Beats: Adjusts the number of pulses.
BPM: Adjusts the speed of the pulse in beats per minute.
Duration: Adjusts the length of the pulses, measured in beats.
Shape: Adjusts the attack time of the pulses.
Slope: Adjusts the slope of the attack and release stages in the pulses. Smaller Slope values make the attack and release transitions start faster and end more softly, and vice versa.
Min Level: Sets the lowest amplitude value that the pulse can reach.
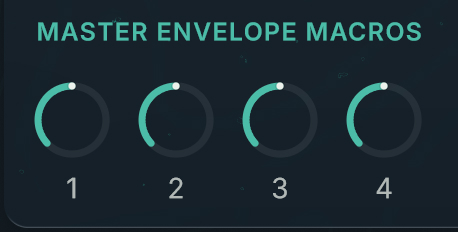
Envelope Macros
The four Envelope Macros (1–4) allow you to control envelope breakpoints from a common knob and using MIDI.
 |
As with generic Macro controls, setting up the Envelope Macros includes two parts: assigning breakpoints to an Envelope Macro, and (if desired) assigning that Envelope Macro to a MIDI control.
To assign a breakpoint to an Envelope Macro:
Select the breakpoint in the envelope display.
The breakpoint settings appear in the top right of the page.
In the breakpoint settings, click the three little dots until the third dot lights up and the Assign BP To panel shows up.
Activate the switch 1–4 corresponding to the desired Envelope Macro.
The breakpoint is now controlled by the Envelope Macro.
Now, to assign the Envelope Macro to a MIDI control:
Right-click (Windows) or [control]-click (macOS) the Envelope Macro knob 1–4 in the MASTER ENVELOPE MACROS and select Midi Learn from the context menu.
Move the MIDI control on your MIDI controller or MIDI keyboard.
The Envelope Macro is now controlled by this MIDI control.