Assign page
The Assign page of Absynth 6 lets you configure the Macros, MIDI control, note scaling, and tuning of the instrument.
The Assign page of Absynth 6 lets you configure the Macros, MIDI control, note scaling, and tuning of the instrument.
To open the Assign page, click the Assign button at the top of the Absynth 6 window:

The Assign page contains the following areas and elements:
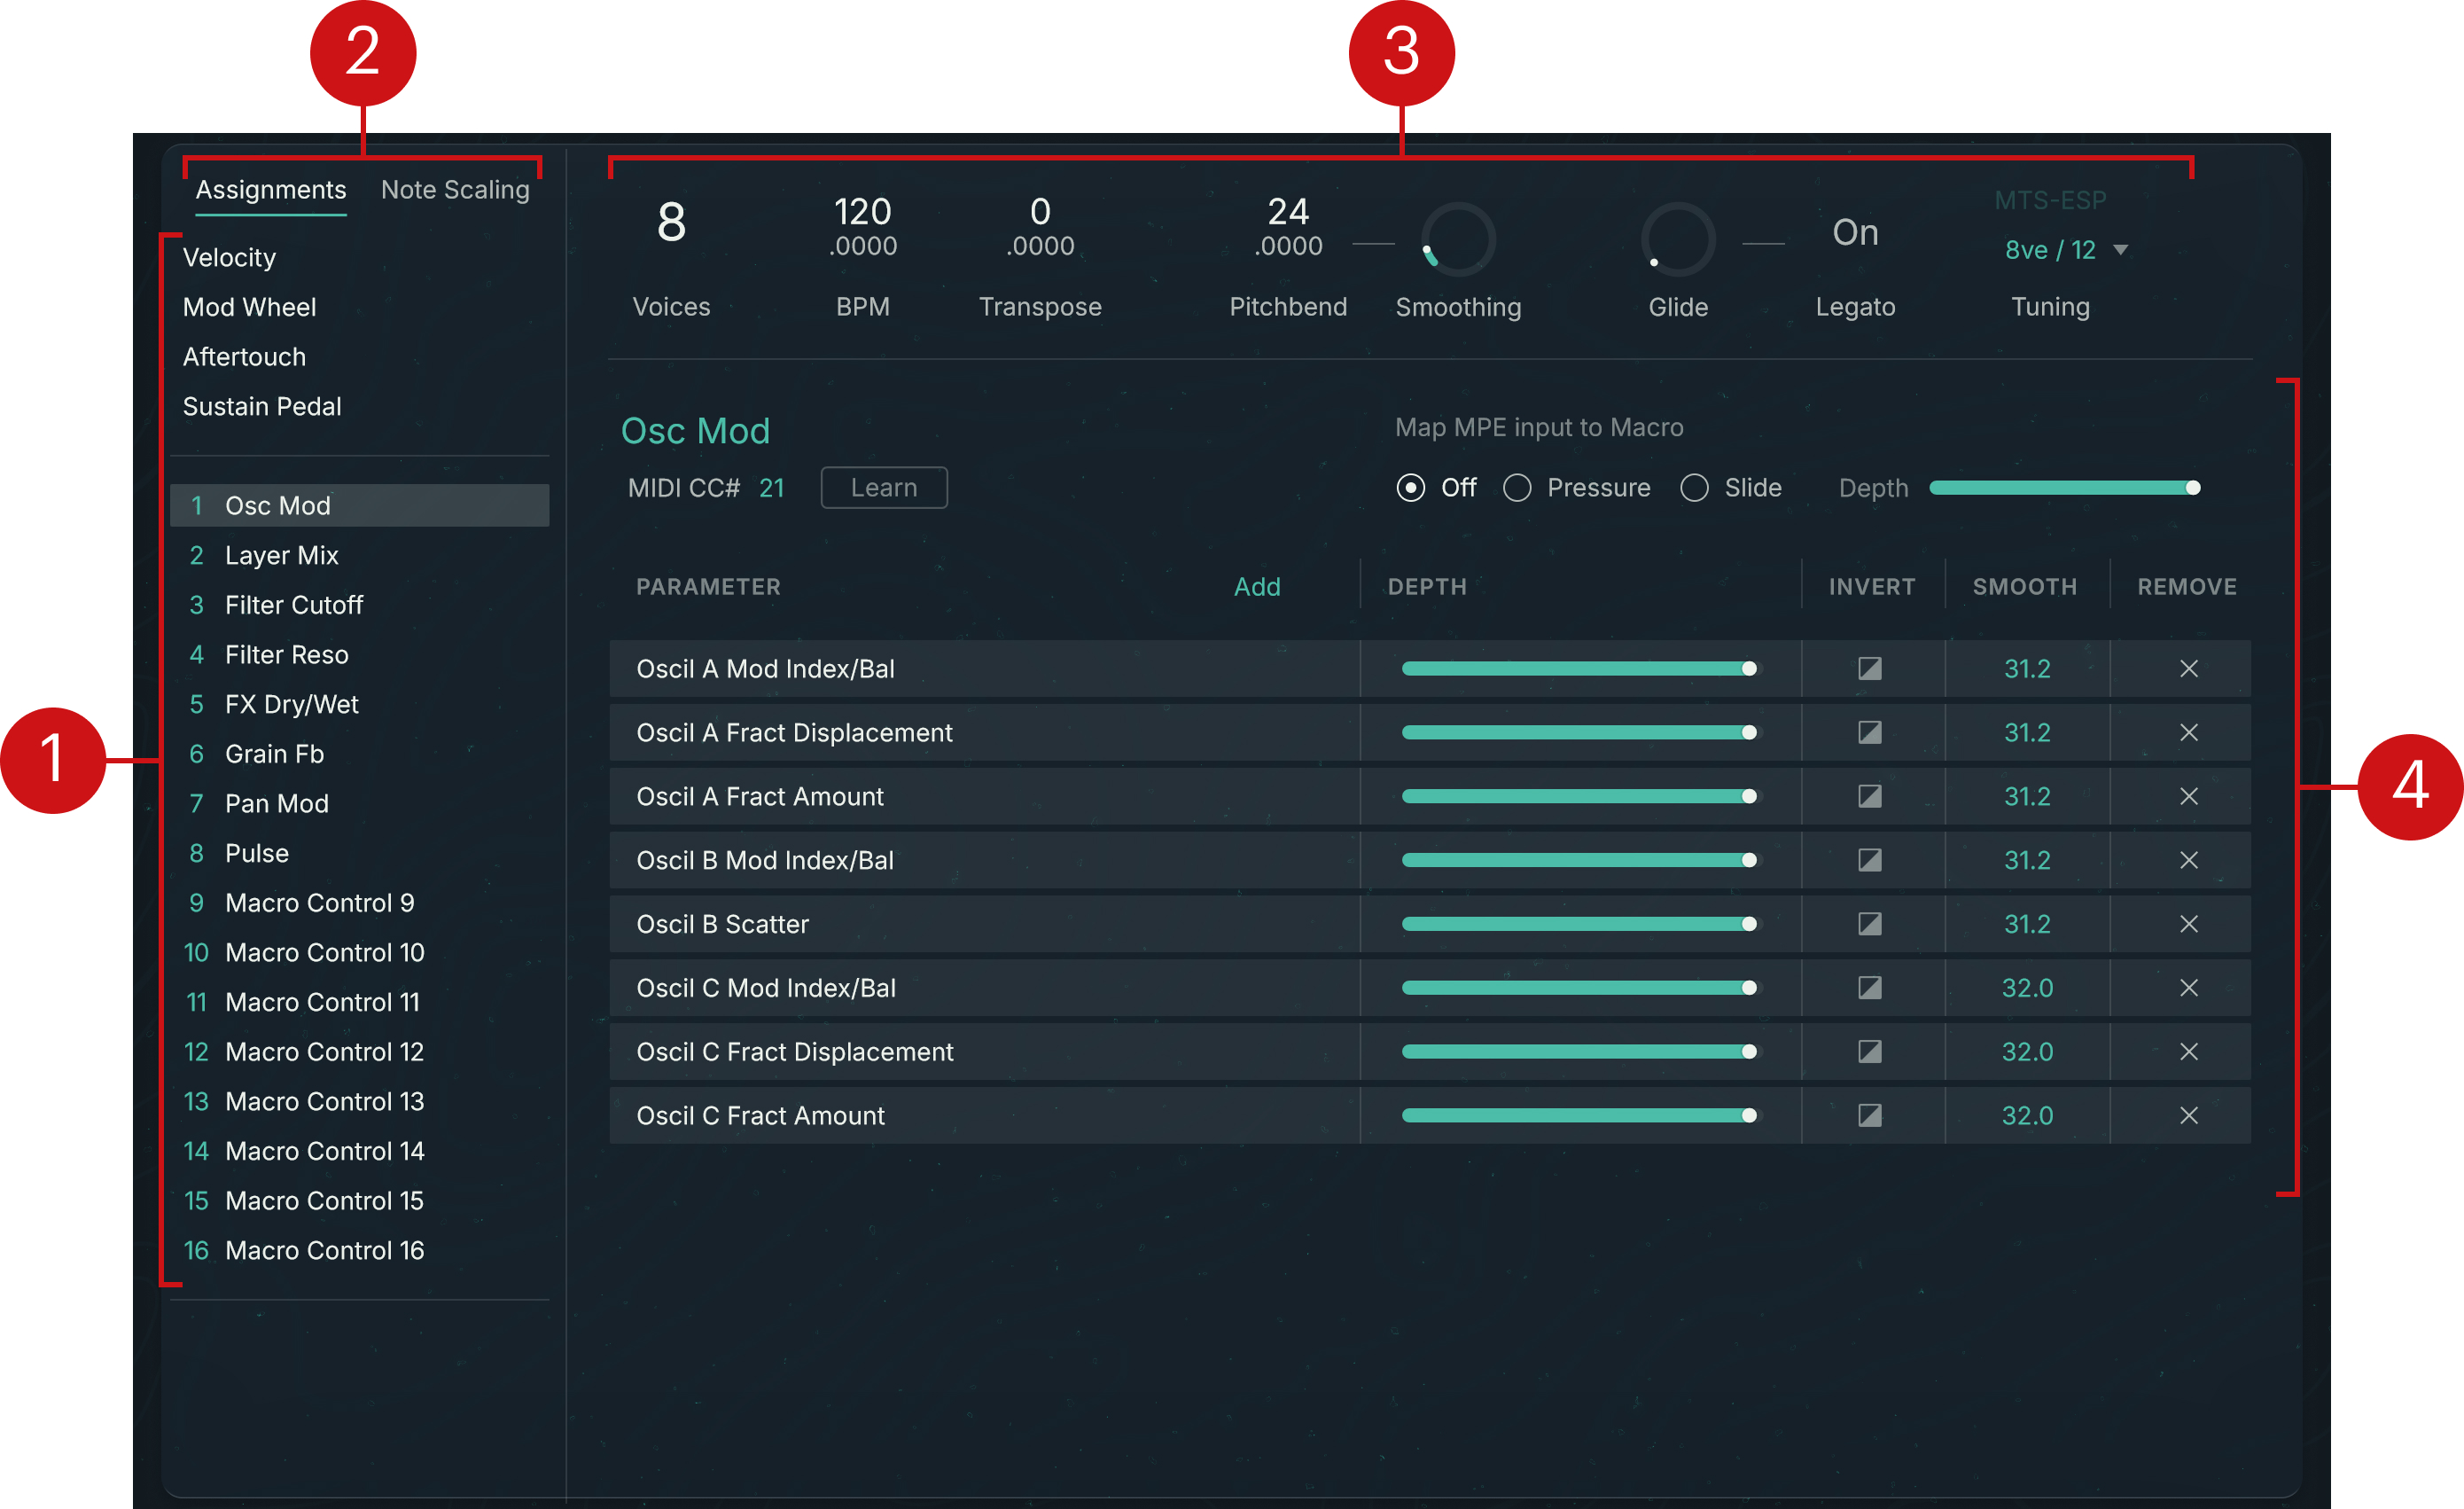
Control List / Parameter List: When Assignments is selected above, this shows a list of the MIDI and Macro controls. When Note Scaling is selected above, it shows a list of the parameters that can be modulated by the played pitch. In any case, clicking an entry from the list displays its details on the right.
Assignments / Note Scaling switch: Switches the Assign page between showing the MIDI and Macro assignments and the note scaling settings.
Global Response area: Shows global settings affecting how the instrument reacts to your input. You can find more information in Global Response.
Assignment Details / Note Scaling Details: Lets you configure the details for the control or parameter selected in the list on the left.
Global Response
At the top of the Assign page, the Global Response area lets you adjust how the instrument reacts to your input. It contains the following settings:

Voices: Defines the number of voices produced by Absynth 6. This setting affects all the presets.
BPM: Sets the global tempo, measured in beats per minute. This setting is available only if Absynth 6 is running as a standalone application. The BPM value affects, for example, the effects that depend on tempo.
Transpose: Shifts the global pitch, by semitones. The resolution is by 1/10 cent, which is the minimal step width and can also be described as one thousandth of a semitone.
Pitchbend: Adjusts the pitch range available for the MIDI Pitchbend input, in semitones.
Smoothing: Adjusts how fast the pitch reacts to Pitchbend changes. For higher Smoothing value, the pitch will take longer to reach its new value.
Glide: Adjusts the duration of a gradual pitch transition between played notes (glissando). The default value is 0 and the notes are generated directly at their pitches without any transition. If you raise the Glide value, the next notes will start from the pitch of the previous note and gradually move to their own pitch.
Legato: When on, the Glide setting affects only the notes played legato, that is, with no silence in between. When off, the Glide setting affects all the notes.
Tuning menu: Selects a global tuning. Clicking the displayed value opens a menu where you can select another tuning from the list of predefined tunings. You can also select Import Tuning File at the top of the menu: This opens a dialog in which you can select a custom tuning file. Beforehand, make sure to place your tuning files in the
Tuningsubfolder of your Absynth user folder. You can click the Show Tuning Folder… at the bottom of the dialog to quickly open this folder in the Finder (macOS) or Explorer (Windows). Absynth supports MTS-ESP microtunings.Auto Trigger: Lets Absynth trigger notes automatically. The Auto Trigger menu lets you select from the following modes:
None: Automatic note trigger is inactive.
Always On: Absynth holds a note whose pitch is specified by the Note control. To modify the pitch value, you can click it and drag your mouse vertically or horizontally, or double-click the value and enter a new pitch.
Audio Input: Notes are triggered depending on level of the incoming audio. The note pitch is specified by the Note control. To modify the pitch value, you can click it and drag your mouse vertically or horizontally, or double-click the value and enter a new pitch. Below, the Threshold slider lets you set the level above which the incoming audio will trigger a note.
MIDI and Macro assignments
When Assignments is selected in the top left corner of the Assign page, you can review and modify the MIDI and Macro assignments for your preset.
On the left, the Control List shows the Velocity, Mod Wheel, Aftertouch, Sustain Pedal, and Audio Modulator controls followed by the 16 Macro controls:
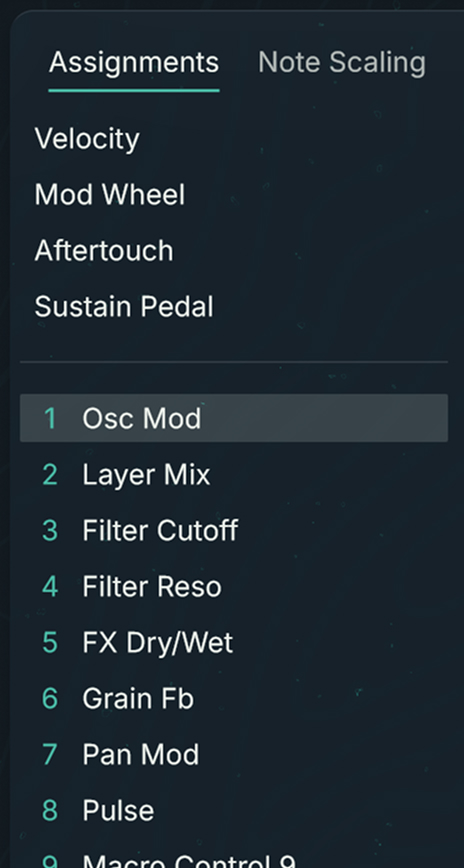 |
Select a control from the Control List to show its assignment details on the right.
The selected control is highlighted.
In the Control List, you can rename the Macros by double-clicking their entry, typing a new name, and pressing [Enter] on your computer keyboard. The Macro name will be updated accordingly everywhere in the instrument, as well as on your Kontrol S-Series keyboard.
Note
Unassigned Macros are named Macro Control X where X is the Macro’s number. When you assign a Macro for the first time, it automatically takes the name of its target parameter. You can modify the Macro name at any time to your liking.
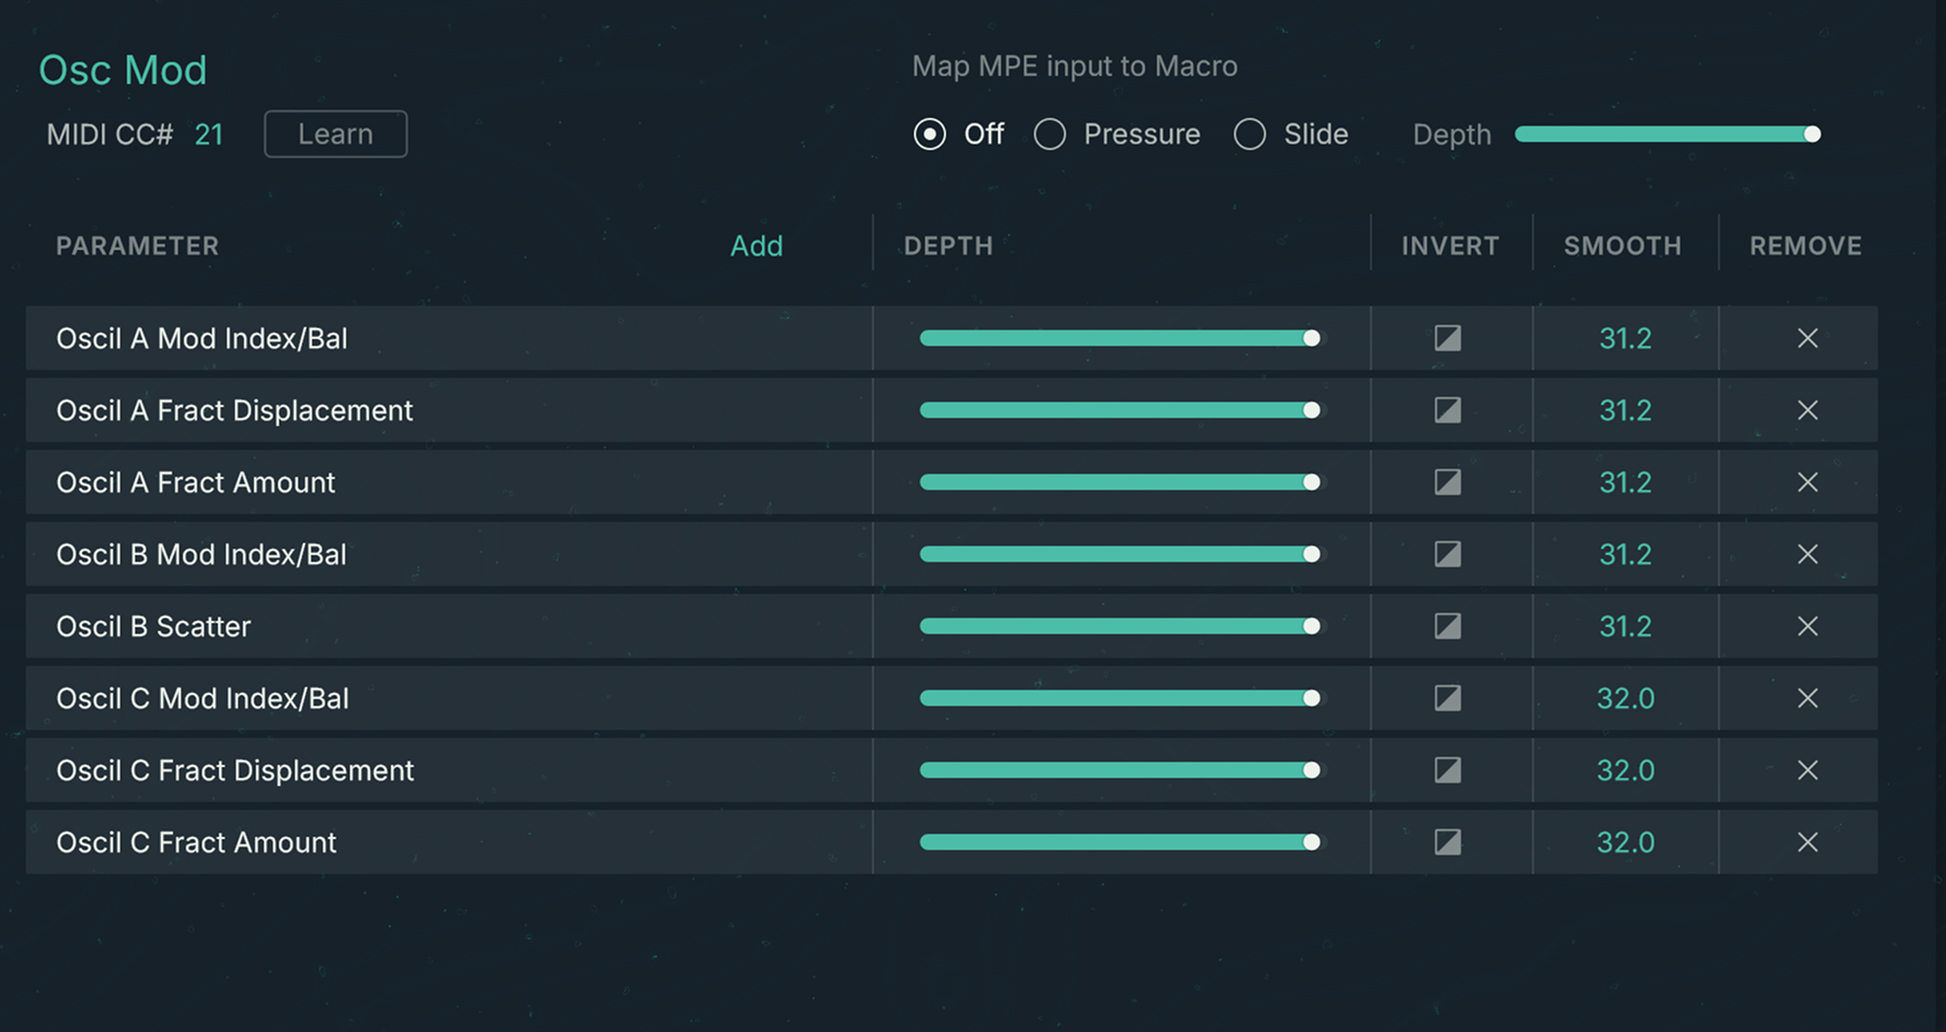
On the right, the Assignment Details show the assignments for the selected control:
Control settings
The top part of the Assignment Details shows the name of the selected control (green) and its general settings. The control settings apply to all its targets.

The available settings depend on the selected control:
The Velocity, Mod Wheel, and Sustain Pedal MIDI controls don’t have any settings.
The Aftertouch MIDI control provides a Polyphonic Aftertouch button: When active, you can control the listed targets for each played note independently.
Note
To use Polyphonic Aftertouch, your MIDI keyboard or controller must support it.
The settings of the Audio Modulator control let you configure how the audio sources will be translated into modulation signals. These settings are described in Audio Modulators.
The 16 Macros provide the following settings, from left to right:
MIDI CC#: Lets you specify the MIDI CC number from which you want to control the Macro. To change the value, you can click it and drag your mouse vertically, or double-click it and type the number followed by [Enter] on your computer keyboard. You can also click the Learn button on the right and move the desired control element on your MIDI controller.
Map MPE input to Macro: Lets you use MPE (MIDI Polyphonic Expression) signals to control the Macro. You can select the Pressure or the Slide MPE signal and adjust its modulation amount using the Depth slider. Selecting Off deactivates MPE for this Macro.
Note
To use MPE, your MIDI controller or keyboard must support it.
Audio Modulators
The Audio Modulators can convert Absynth’s internal audio signals into modulation signals that you can assign to parameters. Absynth provides four Audio Modulators, labeled A, B, C, and D. Each modulator has its own audio source and settings, and it can be turned on or off independently,
An Audio Modulator acts as an envelope follower: It creates a modulation signal that reproduces the amplitude curve of the audio source, with some optional adjustments.
In addition, each Audio Modulator can act as an envelope trigger: When the processed source signal reaches a certain threshold level, the Audio Modulator can trigger the envelopes of the desired module in your patch.
When you select Audio Modulator in the Control List on the left, its control settings appear on the right:

A/B/C/D buttons: Clicking either letter shows the settings of the corresponding modulator (whether it is active or not). Underneath the letters, the lit dots indicate the active modulators.
Modulator on/off switch: Activates or deactivates the modulator. When the modulator is inactive, the remaining settings on the right are grayed out and the little dot under the modulator letter is unlit.
Source menu: Selects the module whose audio output will be used to modulate the target parameters.
Post Envelope button: Selects whether the source audio is tapped after the amplitude envelope has been applied (button on) or before (button off).
Gain control: Adjusts the amplification or attenuation applied to the audio source before it is converted to a modulation signal. For example, this can be useful for the modulation signal to reach a specific range of values for the target parameter(s).
Attack control: Adjusts how quickly the modulation signal will follow the upward movements of the source level. Higher Attack values lead to slower reactions.
Decay control: Adjusts how quickly the modulation signal will follow the downward movements of the source level. Higher Decay values lead to slower reactions.
Trigger menu: Selects a target module for the envelope trigger. Once you have selected a module, all the envelopes assigned to this module will be triggered every time that the modulation signal passes the threshold level. If None is selected (default setting), the envelope trigger is off.
Note
If you select Engine A, B, or C from the menu, every time that the signal reaches the threshold, the corresponding source module A, B or C will play the note again.
Level meter and Threshold slider: The horizontal bar shows the current level of the resulting modulation signal. When a module is selected in the Trigger menu above, an additional slider lets you adjust the threshold value that will trigger the envelopes of the module. On the right, the dot lights up when the envelopes are triggered.
Target list
The lower part of the Assignment Details shows the assignment’s targets in a table layout, with one row for each target.
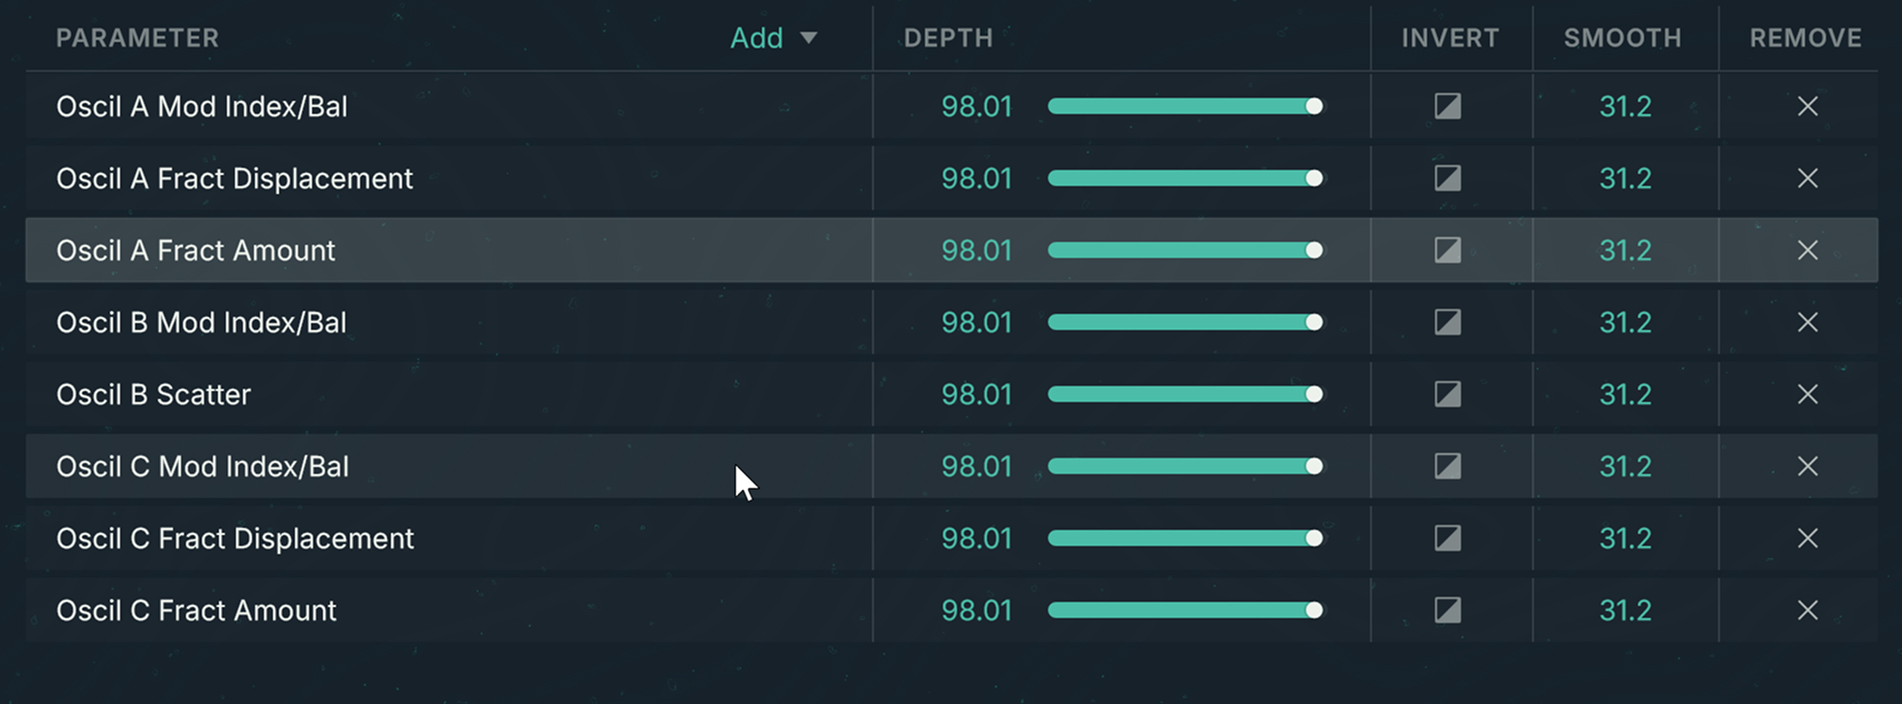
Each row contains the following elements, from left to right:
Parameter Descriptor: Identifies the target parameter with an explicit label. For example, for a module the label could include the channel letter, the module position in the channel, the panel in the module, and the parameter name.
Depth: Adjusts how strong the parameter value is affected by the assignment, as a percentage of the current parameter value.
Invert switch: Reverses the modulation. The parameter value will decrease when the controller value increases.
Smooth: Adjusts how long it takes for the parameter to reach its new values upon changes in the controller value.
Note
The Smooth setting is not available when adjusting the Velocity assignments (Velocity selected on the left).
Remove: Removes this target parameter from the list. The parameter will not be controlled by the MIDI or Macro control anymore.
You can add target parameters by clicking the Add button above the table, and selecting the desired parameter from the menu. Upon your selection a new row will appear in the table with the assignment settings for the new target.
You can also add or edit a parameter assignment from the page containing the parameter:
Switch to the page containing the parameter that you want to control, and locate that parameter in the page.
Right-click (Windows) or [control]-click (macOS) the parameter and select Modulation Settings… from the menu.
A Modulation Settings dialog appears with the parameter name in the header and its modulation settings below.
If you want to control the parameter using a MIDI or Macro control, click the menu in the Macro section and select the desired control from the list. If you want to control the parameter using key velocity, activate the Velocity switch. If you prefer to control the parameter using an Audio Modulator, click the menu in the Audio Modulator section and select either modulator A, B, C, or D.
In either section, you can adjust the Depth value and activate the Invert switch directly from the dialog. This is equivalent to using the Depth and Invert elements from the Assign page’s Target list described above.
Note scaling
When Note Scaling is selected in the top left corner of the Assign page, you can configure the modulation of specific parameters according to the played key. For example, you could make the frequency of a bandpass filter follow the pitch of the key.
On the left, the Parameter List shows the available parameters:
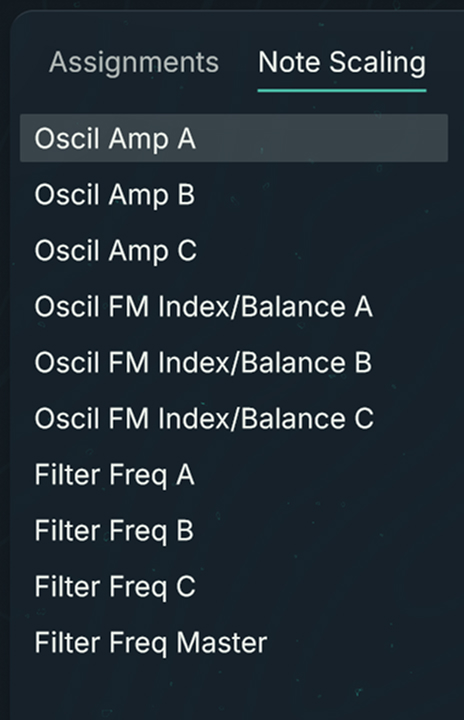 |
The following parameters are available for note scaling:
Oscil Amp A/B/C: Amplitude envelope of the Main oscillator in the source module on channel A/B/C.
Oscil FM Index/Balance A/B/C: Ratio between the Main and Mod oscillators in the source module on channel A/B/C.
Filter Freq A/B/C/Master: Cutoff frequency of the Filter modules on channel A/B/C or on the Main channel.
Select a parameter from the list to show its scaling details on the right.
On the right, the Note Scaling Details show the note scaling for the selected parameter:
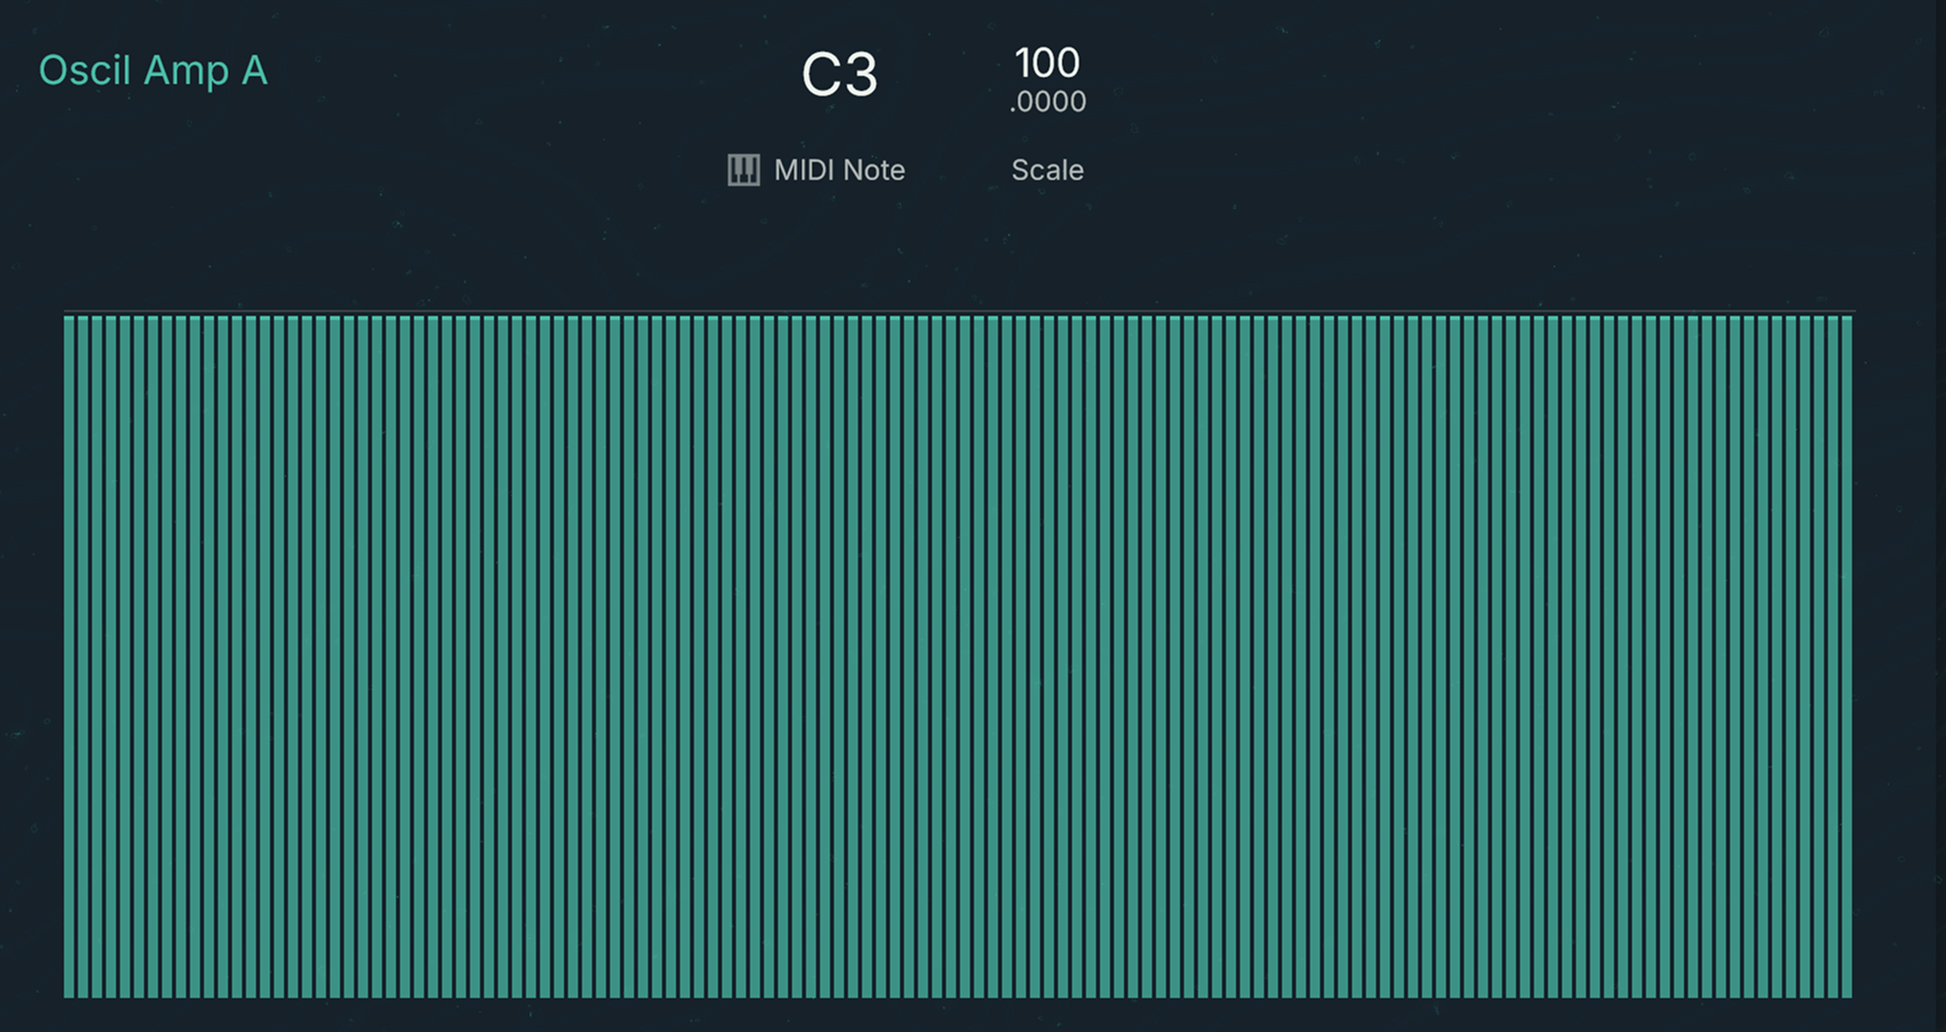
The top part of the Note Scaling Details lets you adjust the parameter modulation value for each individual keys. It contains the following controls:
Key: Selects the desired pitch. To select another pitch you can drag the value vertically with your mouse, or double-click it and type the desired MIDI Note number on your computer keyboard.
MIDI Note switch: When on, you can use your MIDI keyboard to quickly select the Key value. This can be useful when adjusting the modulation for several keys in a row.
Scale: Adjusts the modulation value for the selected pitch. The value is expressed as a percentage of the original, non modulated parameter value.
The bottom part of the Note Scaling Details shows the modulation curve as a series of vertical bars representing the scale values over the full key range, from the lowest pitch on the left to the highest pitch on the right. You can quickly draw a modulation curve with your mouse as follows:
Click anywhere in the vertical bars and drag your mouse to draw the desired modulation curve.