Browser page
The Browser page of Absynth 6 lets you explore and load your factory and user presets, and create new mutations from existing presets.
The Browser page of Absynth 6 provides intuitive tools to quickly find presets according to their sonic characteristics. It also includes the Mutator, which proposes a totally different approach for generating new sounds from existing presets.
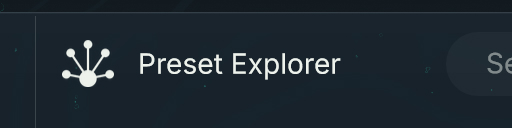
To open the Browser page, click the Browser button at the top of the Absynth 6 window:

The Browser page contains the following areas and elements:
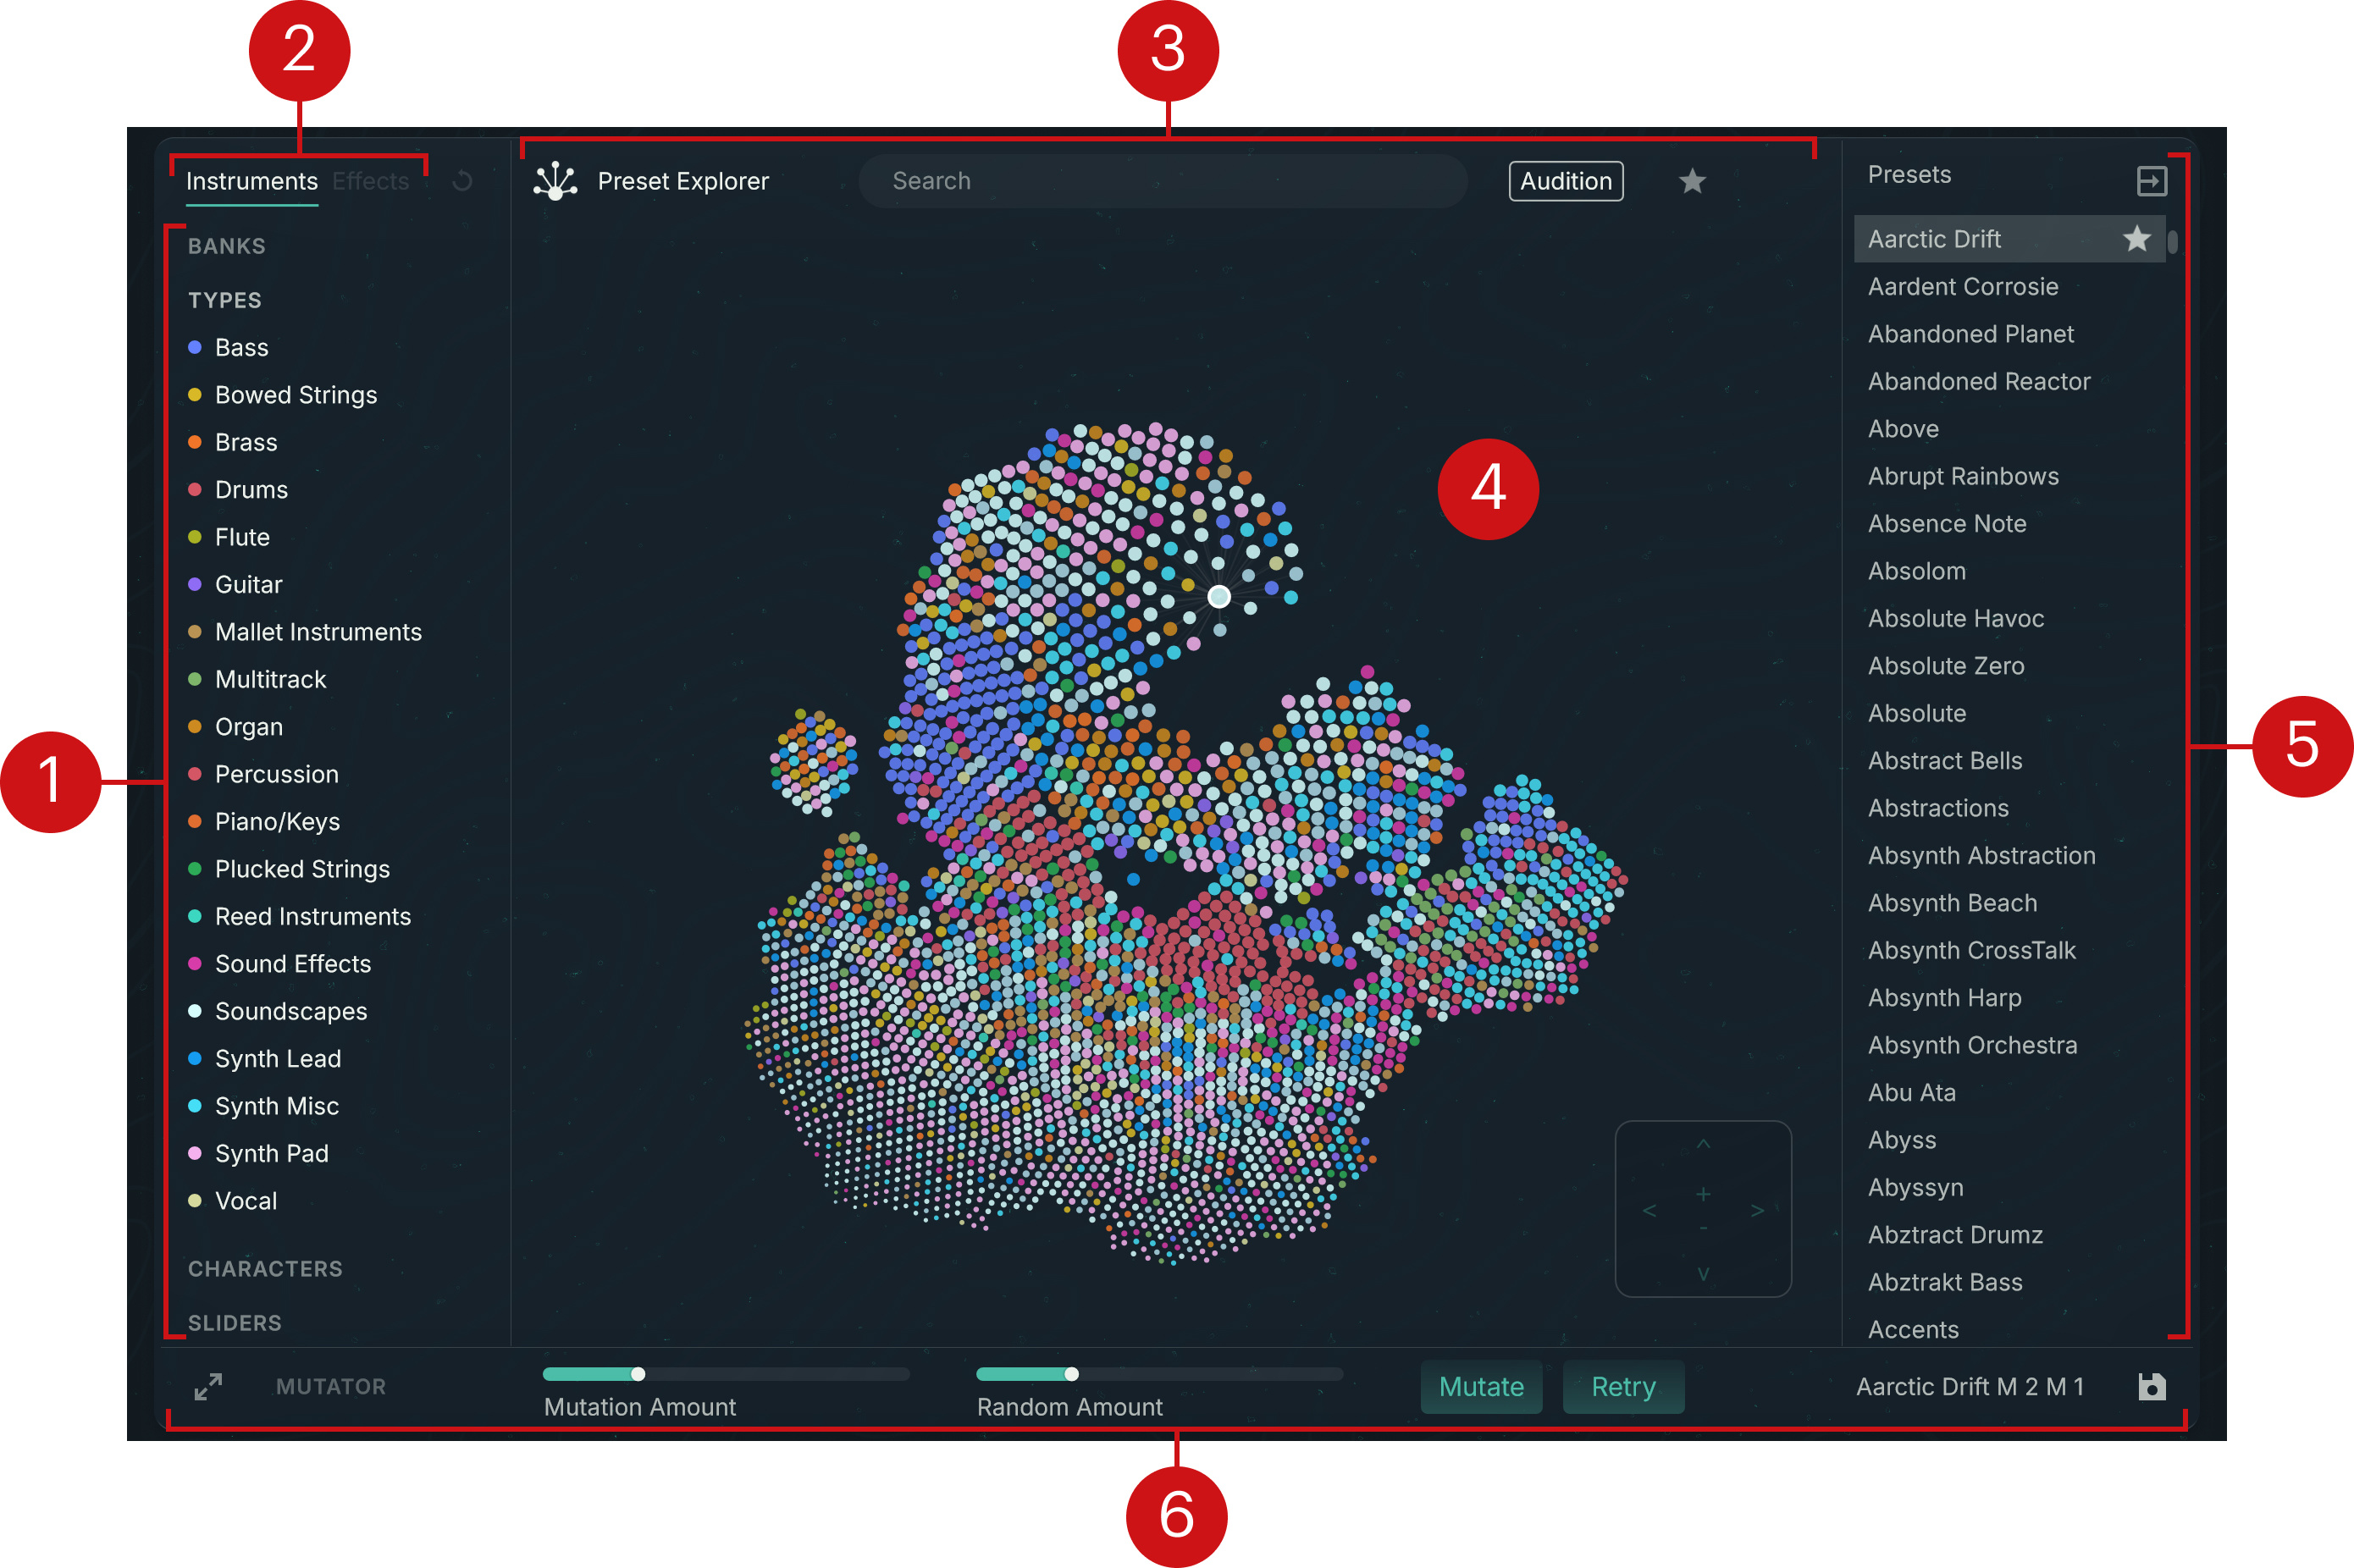
Tag filter: Lets you narrow down the search results according to descriptive attributes. Refer to Using the Tag filter.
Instruments/Effects selector: Switches between browsing the instrument presets and browsing the effect presets. You can browse the effect presets only from the Preset List view. In the Preset Explorer view the Effects label is grayed out and inactive.
Browser global controls: The elements at the top of the Browser page let you switch between the Preset List and Preset Explorer views of the Browser, search for a text string, activate audition, display only the Favorites, and include user presets in your search. Refer to Browser global controls.
Search results: The middle and biggest part of the Browser page shows all the presets matching your search criteria, as specified in the Tag filter on the left and in the global controls at the top. The Browser can display the search results in two different views:
The Preset Explorer view (depicted above) shows the presets as dots on a map. In this map the distance between dots indicates the sonic similarity between the presets.
The Preset List view shows the presets in a classic table layout with detailed information and sorting facilities.
Right panel: The content of the right panel depends on the Browser view: In Preset Explorer view the right panel shows the search results as a compact preset list, in Preset List view it shows the properties of the loaded preset.
Mutator: The Mutator lets you quickly generate variations of the current preset that go in a particular direction. Refer to Mutating your sound.
Browser global controls
The row at the top of the Browser page contains a set of global browsing controls:
 |
Preset Explorer: Switches the Browser between the Preset Explorer view (Preset Explorer button on) and the Preset List view (Preset Explorer button off).
Search field: Lets you type a text string to show only the presets containing that string in their name or author field.
Audition: When on, the Browser plays a glimpse of the presets’ sound as you select them in the search results. This can help you choose between presets without having to load each of them. When Audition is on, you can click a preset to audition it, and double-click it to load it. When Audition is off, clicking the preset will load it directly.
Note
Audition is available only for factory instrument presets.
Favorites (star icon): Shows only your Favorites in the search results below. You can define any presets as Favorites by activating their star icon in the Preset List view or in the Presets pane of the Preset Explorer view. Favorites let you quickly create and recall a custom collection of your most beloved presets.
User Content (user icon): Available only in the Preset List view. When on, the Browser shows only user presets. When off, the Browser shows both factory and user presets.
Using the Tag filter
On the left of the Browser page, the Tag filter lets you search for presets using descriptive attributes like their bank or NKS tags. NKS tags are used to characterize and classify presets based on various musical characteristics. Having the presets tagged in a meaningful way can encourage your sonic exploration and help you find the right presets quickly.
 |
You can use the Tag filter as follows:
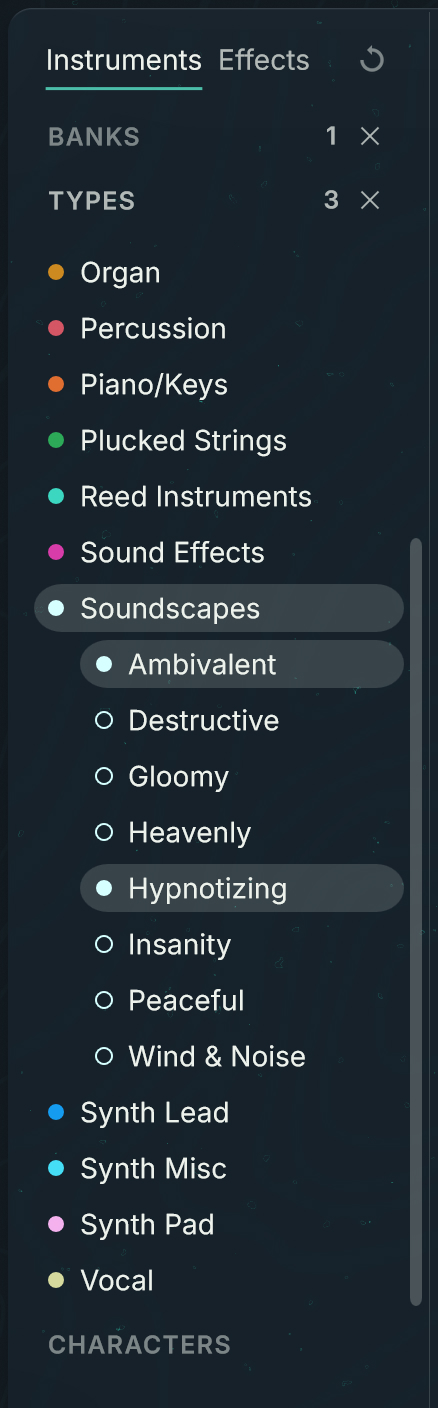
The attributes are organized into the following categories: Banks, Types, and Characters. An additional Sliders category is available specifically for the Preset Explorer view of the Browser: The filters in this category work differently and are described in Using the Sliders category.
Clicking a category header unfolds the category and shows its attributes. Only one category can be unfolded at a time.
Each Type has a dedicated color. These colors appear on the dots in the Preset Explorer view to quickly recognize the preset types.
Selecting a Bank, a Type, or a Character limits the search results to the presets with this attribute. You can select only one Bank and one Type at a time. If you select multiple Characters, the search results include all the presets having at least one of them.
Selecting a Type unfolds its Subtypes. You can select one or more Subtypes to further refine your search. If you select multiple Subtypes, the search results include all the presets having at least one of them.
The number of selected attributes (if any) appears next to each category header, indicating an active filtering in that category. You can click the little cross on the right to quickly deselect these attributes and reset the filtering for that category.
In the top right corner, the Reset button (little cycling arrow) lets you globally reset the Tag filter by deselecting all attributes from all categories.
Note
Resetting the Tag filter does not affect the Search field. To display your entire collection of presets, make sure that you also delete any text string from the Search field.
Using the Sliders category
The Sliders category in the Tag filter is only available when the Browser is in Preset Explorer view. Instead of showing a list of fixed attributes, the Sliders category contains a set of sliders describing various sonic dimensions. Each dimension provides a continuous range from one sonic aspect to its opposite.
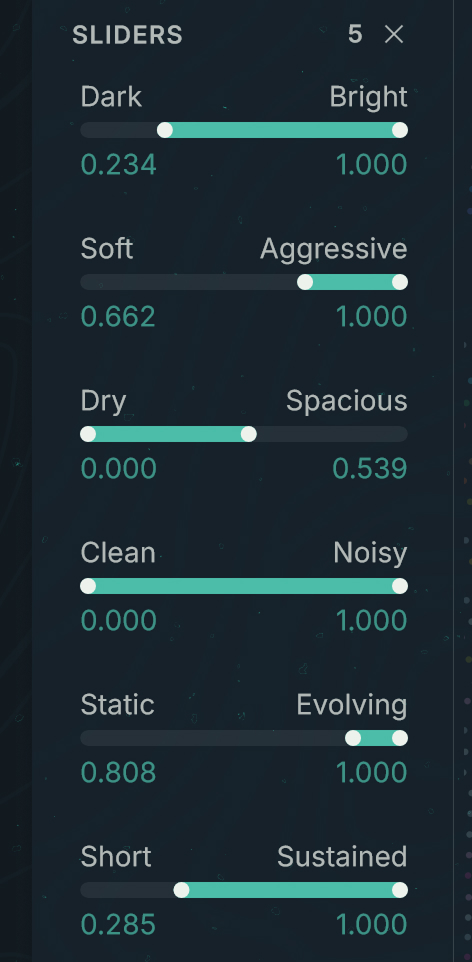 |
Each sliders provides two handles that define the minimum and maximum values for that particular sonic dimension. The colored bar between the handles corresponds to the range of allowed values: Only the presets within this range will appear in the search results. By default, the colored bars take up the full ranges and no presets are filtered. As you drag some of the handles with your mouse, you can progressively narrow down the search results regarding specific aspects of the sound, and get a unique list of presets corresponding to your very own collection of sonic criteria.
Preset Explorer view
The Preset Explorer view is the default view of the Browser. It provides a visual and intuitive way to explore your factory instrument presets by focusing onto their sonic aspects and similarities.
To switch the Browser to Preset Explorer view, activate the Preset Explorer button at the top of the Browser page.
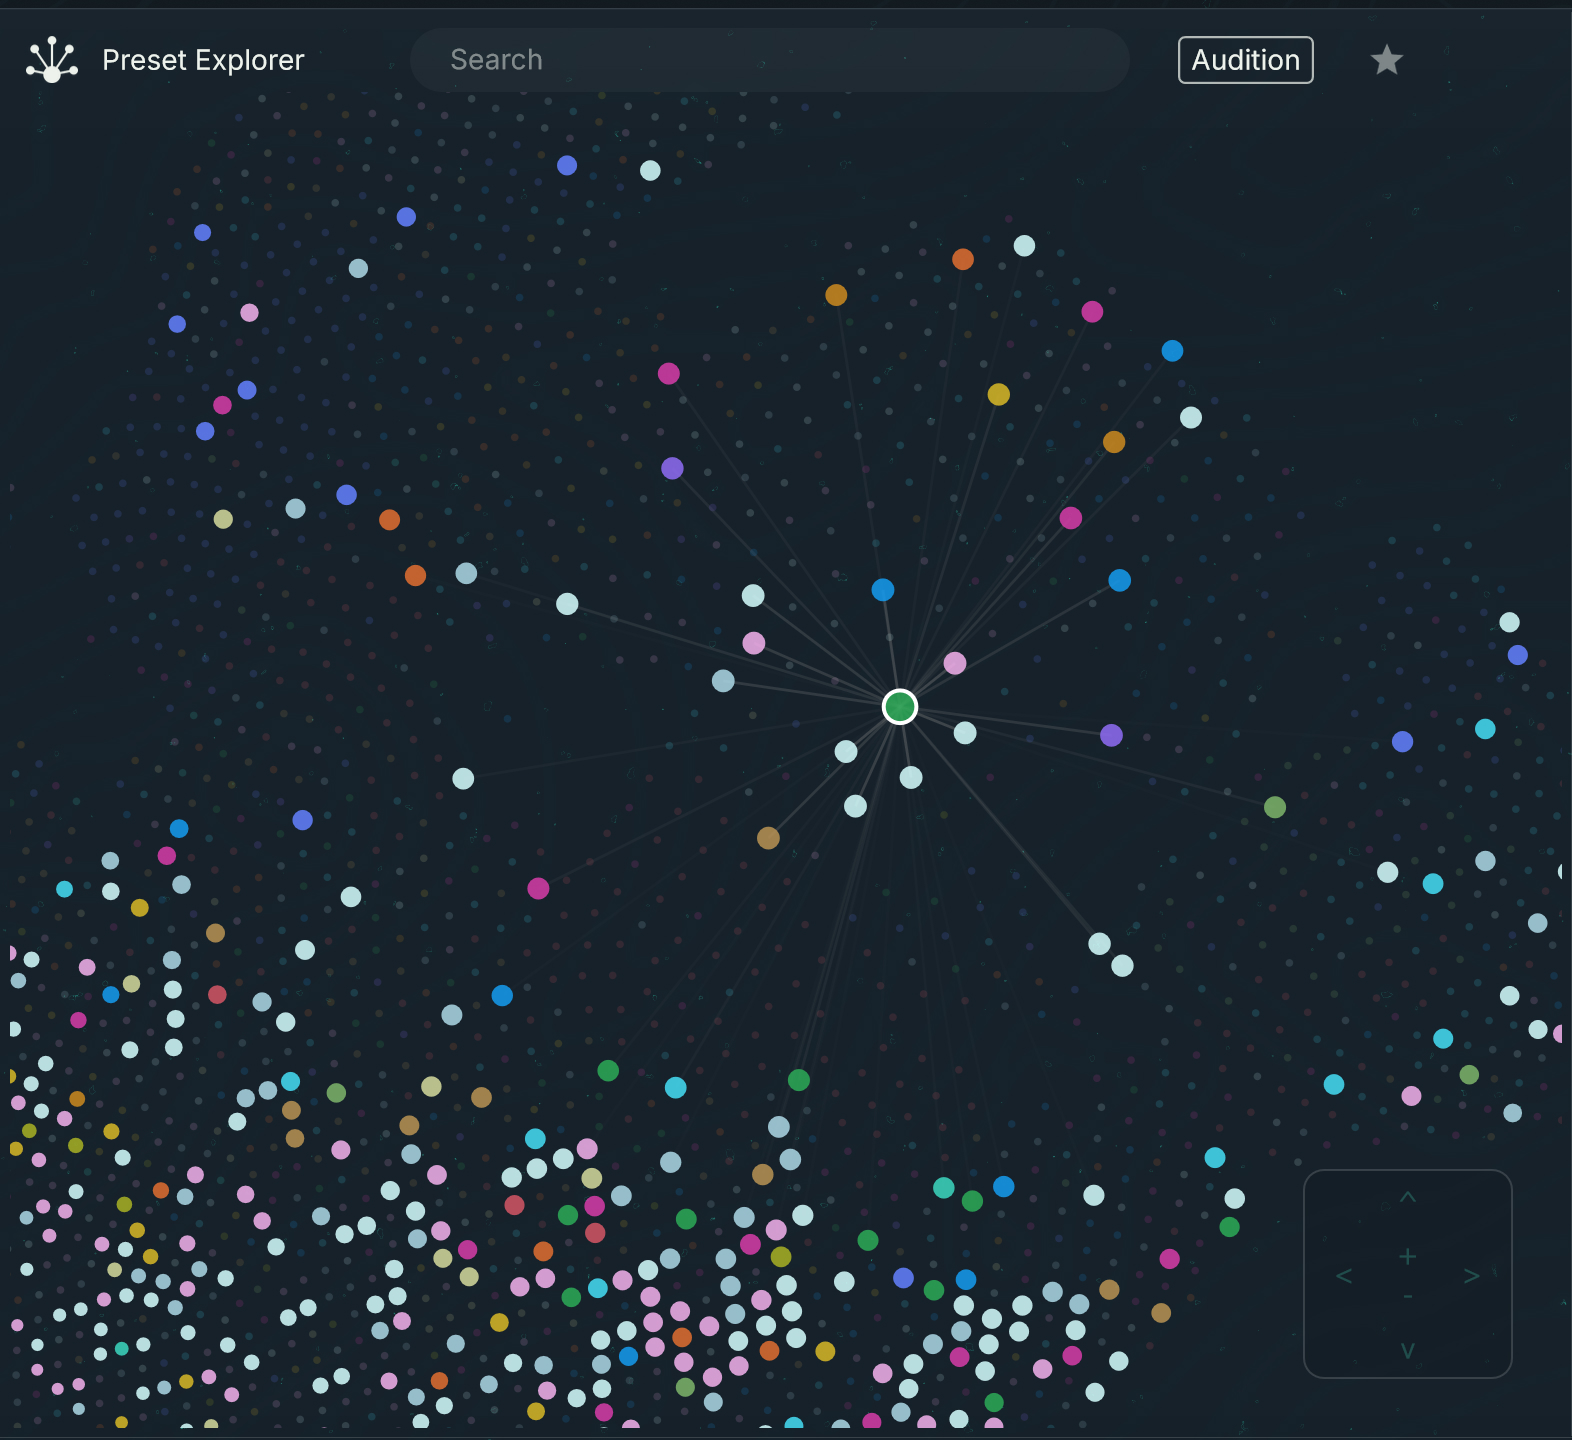 |
In the Preset Explorer view, your search results are represented as colored dots on a two-dimensional map:
Each dot on the map represents a preset. The dot color indicates the preset Type, according to the color code of the Tag filter on the left. This lets you visualize the type of sound that you can expect from each preset.
Note
The dots of the presets excluded from the search results are still visible but they are smaller, grayed out, and inactive.
The distance between the dots illustrates the sonic similarity between the presets: The closer the dots, the closer their sounds.
As you hover the mouse over a dot, the preset’s name and Type/Character attributes appear in a tooltip box.
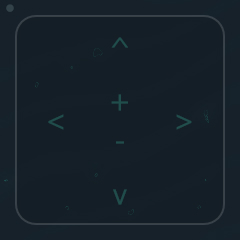
You can move across the map by clicking anywhere in the map and dragging your mouse, and you can zoom in/out using the mouse wheel. You can also use the Move controls at the bottom right of the map: You can click the arrow buttons to move in the corresponding direction, and click the +/- buttons to zoom in or out.
You can select another preset by clicking its dot. The selected dot is highlighted and the map is automatically centered on it. You can also select neighboring dots by pressing the left/right/up/down arrows on your computer keyboard: Each keystroke will select the next available dot in the direction pressed. You can use this to wander your preset libraries following your ears. On the way, you can quickly mark your discoveries as Favorites in the Presets panel on the right for later use.
If the Audition button is on in the Browser global controls, selecting a dot auditions the preset, and double-clicking the selected dot (or pressing [Enter] on your computer keyboard) loads it.
If Audition is off, selecting a dot directly loads the preset.
Presets panel
When the Browser is in Preset Explorer view, its right part contains the Presets panel. The Presets panel shows the same search results as the two-dimensional map, but arranged as a compact list:
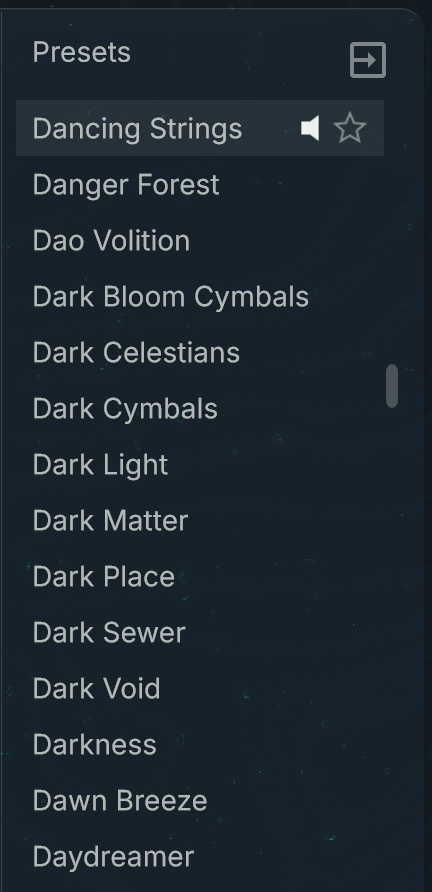 |
You can hide or show the panel by clicking the arrow button in the top right corner.
In the list, the presets are sorted alphabetically. The loaded preset is highlighted. If the Audition button is on in the Browser global controls above, you can select a preset to audition it or double-click the preset to load it. The last auditioned preset is slightly highlighted and shows a small speaker icon. If Audition is off, clicking a preset directly loads it.
As you hover over presets from the list with your mouse, star icons appear next to each preset and let you manage your Favorites. You can click the star icons to add or remove their presets to/from your Favorites. The star icons are lit for the presets set as Favorites. You can then display only your Favorites by activating the star icon at the top in the Browser global controls.
Preset List view
The Preset List view of the Browser shows your search results in a table layout.
To switch the Browser to Preset List view, deactivate the Preset Explorer button at the top of the Browser page.
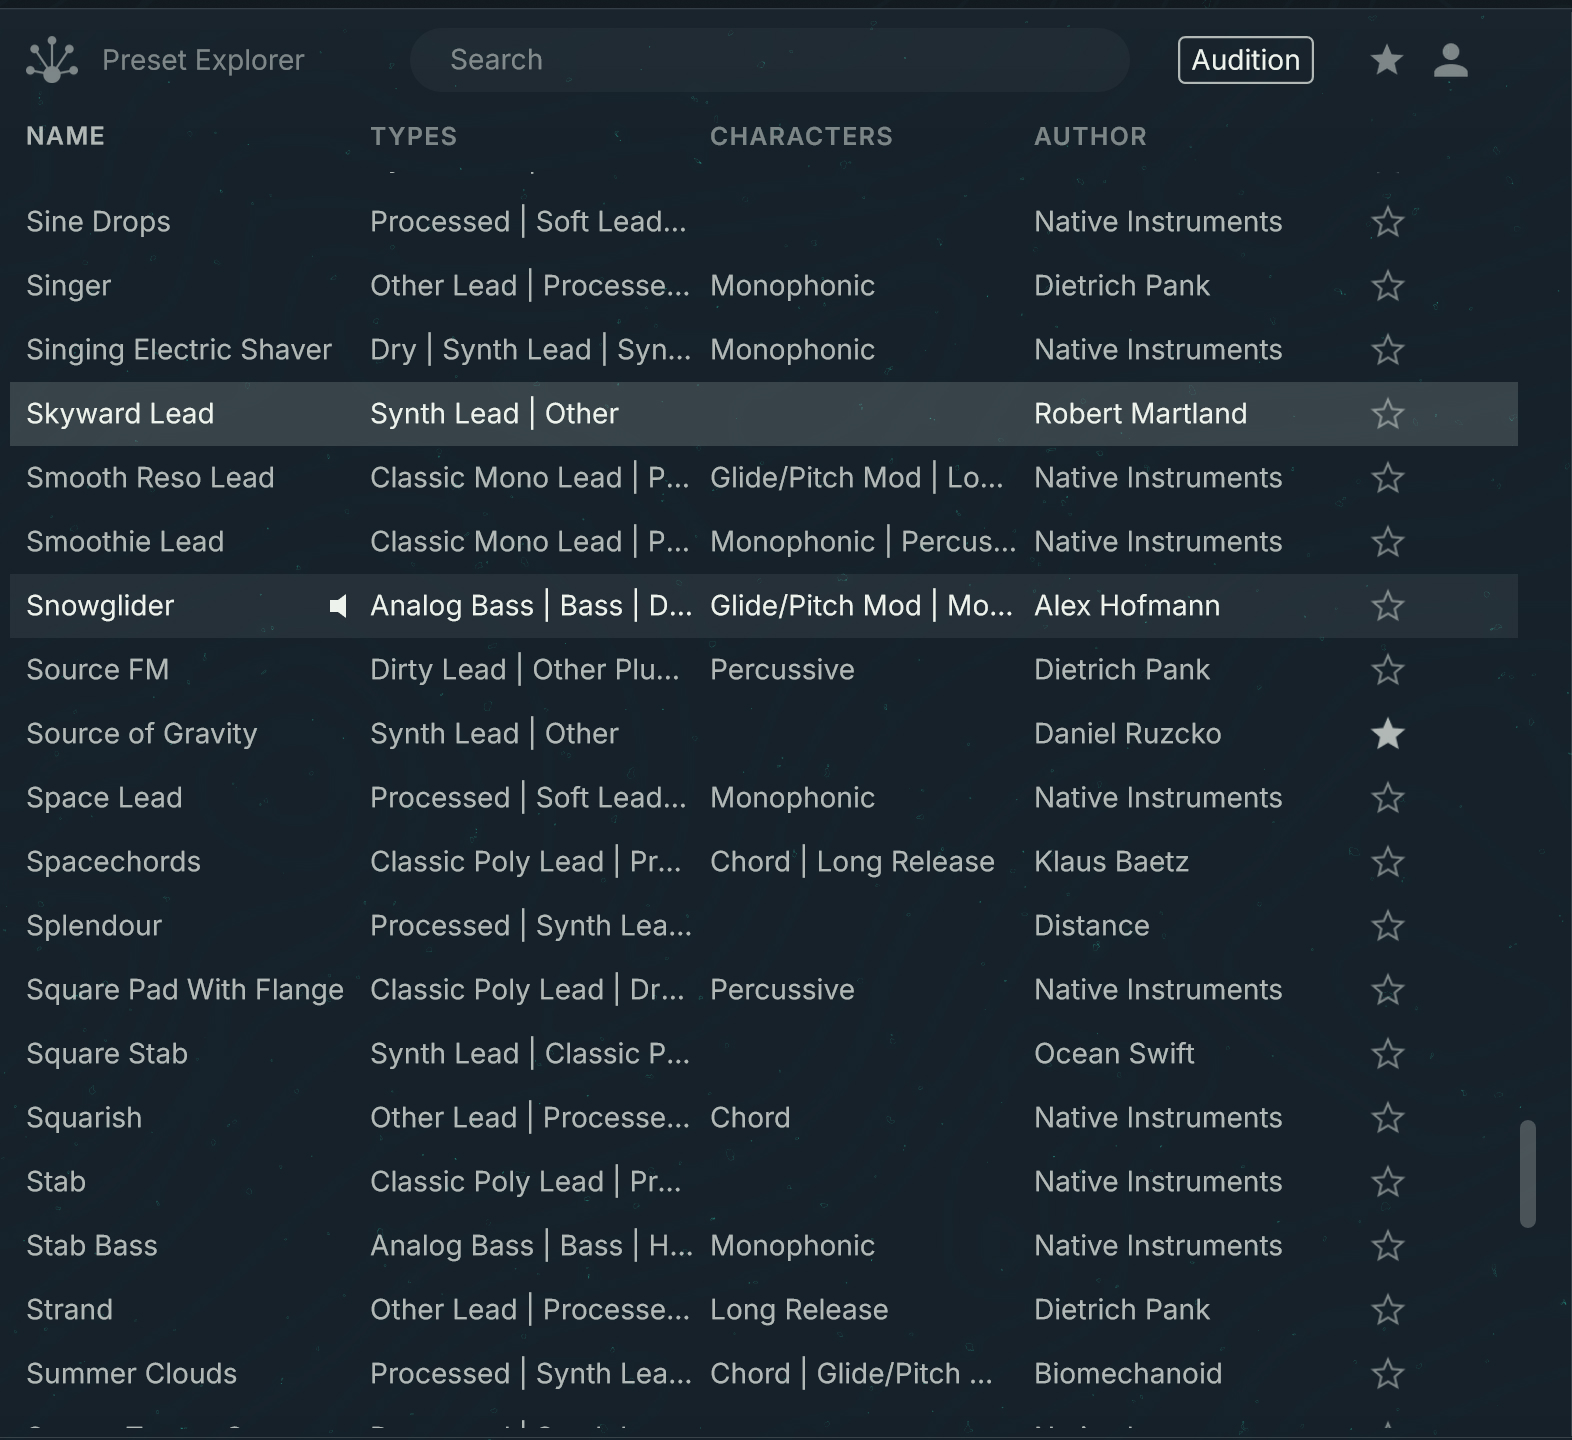 |
In the Preset List view, each preset matching your search criteria appears as a row in the table. The table provides the following columns, from left to right:
Name: Shows the preset name. You can click the NAME column header to sort the presets by name.
Types: Shows the Type and Subtype tags of the preset.
Characters: Shows the Character tags of the preset.
Author: Shows the preset author, as defined in the preset properties. You can click the AUTHOR column header to sort the presets by author.
Favorites: The star icons in the rightmost column let you manage your Favorites. You can click the star icons to add or remove their presets to/from your Favorites. The star icons are lit for the presets set as Favorites. You can then display only your Favorites by activating the star icon at the top in the Browser global controls.
In the list, the loaded preset is highlighted. You can select another preset by clicking its row. You can also select the previous or next preset by pressing the up/down arrows on your computer keyboard.
If you are browsing factory instrument presets, and if the Audition button is on in the Browser global controls above, you can select a preset to audition it, and double-click a preset to load it. You can also load the selected preset by pressing [Enter] on your computer keyboard. The last auditioned preset is slightly highlighted and shows a small speaker icon. If Audition is off, clicking a preset directly loads it.
Properties panel
When the Browser is in Preset List view, its right part contains the Properties panel, which shows the properties (name, author, bank, company, and comments) of the loaded preset:
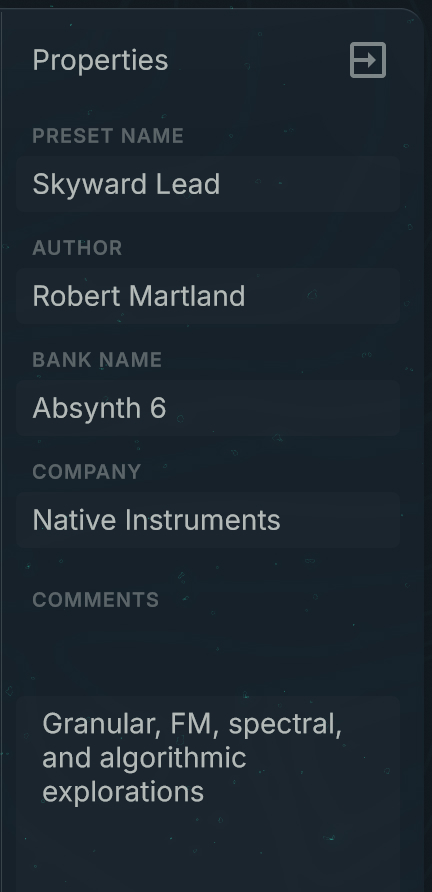 |
You can hide or show the panel by clicking the arrow button in the top right corner.
In the Properties panel, you can edit the AUTHOR, BANK, COMPANY, and COMMENTS properties by clicking inside either field (the active field is outlined) and entering the new text from your computer keyboard.
As with any parameter adjustment, your edits in the Properties panel are not stored automatically. To keep your changes, you need to save the preset, for example using the Save / Save As button in the Header.
Note
Your edits in the Properties panel cannot be reverted using the Undo/Redo commands.
Mutating your sound
At the bottom of the Browser page, the Mutator lets you “mutate” the current preset to color its sound with other sonic characteristics. You simply need to describe these sonic characteristics in the Browser using the Tag filter, and the Mutator will take the search results as “direction“ for the mutations. You can set the extent of the mutation (how far it is from the original preset) and add randomization to it. The result is a completely new sound based on the original preset, enhanced with your musical descriptions, and created with a single click. You can retrigger mutations as many times as you want, recursively mutate your preset, go back to a previous mutation, modify your search in the Browser to try another direction, and save any of the results as new user presets.
Mutator in compact view
By default the Mutator is displayed in compact view. The compact view makes more room for the Browser’s search results above, while providing the main mutation controls:

View button (double arrow icon): Switches the Mutator to the extended view, which lets you configure the mutation process more in detail.
Mutation Amount: Adjusts the extent of the mutation. In other words it is the distance between the current sound and the next mutation. The more you drag the slider to the right, the farther the mutated preset will be from the original and the closer it will be to the presets in the search results.
Random Amount: Adjusts the amount of randomization applied to the mutated parameters. The more you drag the slider to the right, the more the parameters of the mutated preset will deviate from the road between the original preset and the presets in the search results.
Mutate: Triggers the mutation. Once the mutation is computed it is automatically loaded and it replaces the original preset (which can be itself a previous mutation). The mutation takes the name of the original preset and appends a “M” (for “mutation”) and the rank number of the mutation: M1 for the first mutation, M2 for the second one, and so on.
Retry: Cancels the last mutation and triggers a new mutation starting from the previous one. The new mutation takes the name of the canceled one. If you have not triggered any mutation yet, the Retry button is grayed out and inactive.
Mutation History menu: Shows the name of the selected mutation. Clicking the mutation name opens a menu with all the mutations from the Mutation History. You can select any mutation from the menu to load it in the instrument.
Save Mutation (floppy disk icon): Saves the selected mutation as a user preset. The saving procedure is the same as with the Save As command from the Absynth menu.
Mutator in extended view
In extended view the Mutator provides the set of controls of the compact view, along with additional controls for selecting the parts of the instrument that should be mutated and for adjusting further properties of the mutated sound.

In the top left corner of the Mutator, clicking the View button (double arrow icon) switches back to compact view.
The extended view contains four sections, from left to right: Module Lock, Preset Mutation, Fine Tuning, and Mutation History.
Module Lock
The Module Lock section contains a small representation of your patch and its modules as configured in the Patch page. In this mini patch view you can select which components should be mutated and which should be locked. By locking individual components (or entire channels), you make sure that the mutation will retain their distinctive sonic feature.
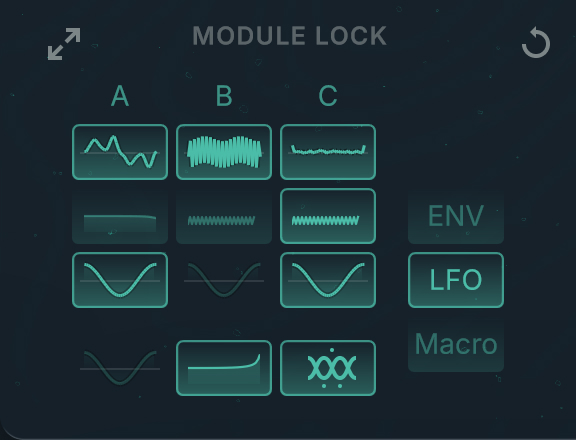 |
The icons on the module buttons illustrate the module contents (for example, a particular waveform or effect) to easily distinguish them.
The module buttons can have three states:
Fully lit: The module is active in the Patch page and included in the mutation. You can click the button to exclude the module from the mutations (the button turns dimmed).
Dim lit: The module is active in the Patch page but excluded from the mutation. You can click the button to include the module in the mutations (the button turns fully lit).
Grayed out: The module is deactivated in the Patch page and cannot be included in any mutation.
On the right, you can click the ENV (Envelope), LFO, and Macro buttons to include or exclude the envelopes, the LFOs, and the Macro assignments in/from the mutations, respectively. Included components are fully lit, excluded components are dim lit.
The lock states of the individual modules and components are saved with each preset. In the top right corner of the Module Lock section, the Reset button (little cycling arrow) lets you globally reset the lock states to their original values.
Note
Selectively including or excluding components in the Module Lock section can be a great help when mutating towards particular attributes. For example, if you have a bass sound and want it to be more percussive, make sure to activate the Envelope button, and maybe the Effect module. Or if you want an FM-like sound, activate the Oscillator modules and nothing else.
Preset Mutation
The Preset Mutation section provides the basic mutation controls:
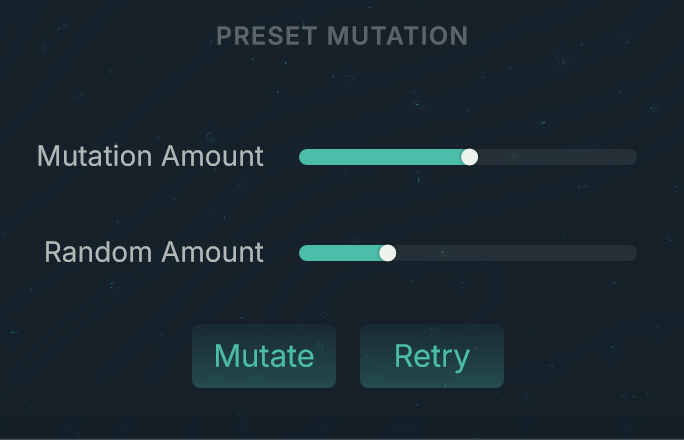 |
Mutation Amount: Adjusts the extent of the mutation. In other words it is the distance between the current sound and the next mutation. The more you drag the slider to the right, the farther the mutated preset will be from the original and the closer it will be to the presets in the search results.
Random Amount: Adjusts the amount of randomization applied to the mutated parameters. The more you drag the slider to the right, the more the parameters of the mutated preset will deviate from the road between the original preset and the presets in the search results.
Mutate: Triggers the mutation. Once the mutation is computed it is automatically loaded and it replaces the original preset (which can be itself a previous mutation). The mutation takes the name of the original preset and appends a “M” (for “mutation”) and the rank number of the mutation: M1 for the first mutation, M2 for the second one, and so on.
Retry: Cancels the last mutation and triggers a new mutation starting from the previous one. The new mutation takes the name of the canceled one. If you have not triggered any mutation yet, the Retry button is grayed out and inactive.
Fine Tuning
The Fine Tuning section provides quick access to eight characteristics of the sound. The eight controls let you quickly tweak the sound after a mutation, or simply after loading a preset.
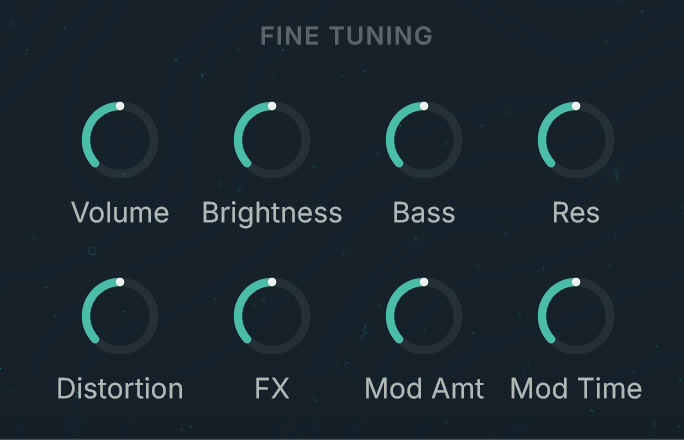 |
Only the parameters that affect the current patch are active. The others are dimmed.
Note
The controls in the Fine Tuning section are intended to make on-the-fly adjustments to the sound when browsing or mutating presets. They are not meant for live performance and they can be neither automated nor modulated nor controlled via MIDI.
Mutation History
The Mutation History section shows the list of all the mutations created since you started Absynth, in chronological order (the oldest at the bottom).
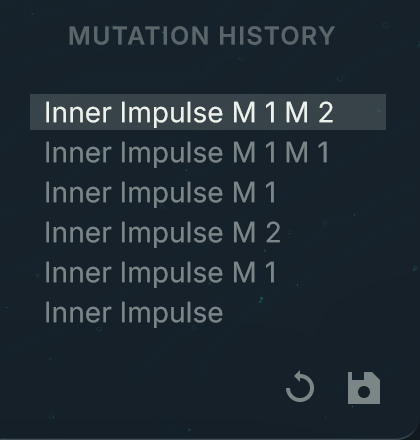 |
You can click any entry from the list to load that mutation, replacing the current preset or mutation. This lets you quickly compare the sound of different mutations. If an older mutation is selected, clicking Mutate starts a new branch of mutations, which will be added as well to the Mutation History.
In the bottom right corner, two buttons are available:
Reset (little cycling arrow): Clears the Mutation History, removing all the mutations from the list.
Note
Resetting the Mutation History cannot be undone!
Save Mutation (floppy disk icon): Saves the selected mutation as a user preset. The saving procedure is the same as with the Save As command from the Absynth menu.
Mutation tips
Here are a few more tips when using the Mutator:
Setting the Mutation Amount slider at a higher value will actually generate more predictable results. This is because as the mutation amount increases, the Mutator algorithm is more likely to load a whole channel from a patch, which means that the envelope, filter, and oscillator will have been crafted for each other.
The Retry button and the Fine Tuning controls are especially useful when you want to stick with results only in the category that you have selected in the Browser.
If you deactivate the Macro button in the Module Lock section, your Macro assignments will likely stay mapped during mutations.
Mutation controls in other parts of the instrument
You can find mutation controls in other parts of Absynth 6, making mutations available even if another page is open:
A Mutate button is available in the Absynth Header:

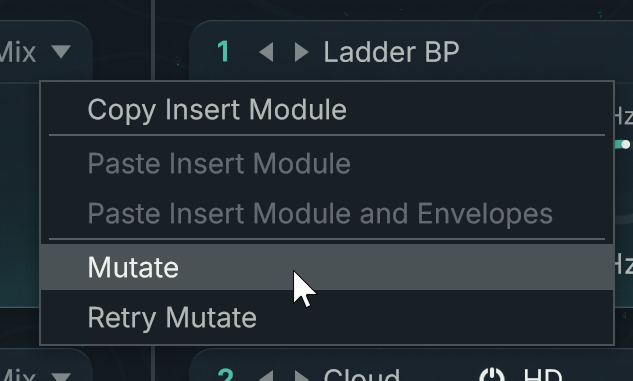
A Mutate and a Retry Mutate commands are available in the Edit menu of each module in the Patch page so that you can selectively mutate single modules while working on your patch: