Pattern Editor
The Pattern Editor is a powerful and intuitive tool that lets you customize and compose complex patterns for your percussion ensemble.
The Pattern Editor lets you create and modify advanced rhythmic patterns for your percussion ensembles. You can quickly compose complex rhythms thanks to a variety of intuitive editing tools.
In Session Percussionist, a pattern is a sequence of notes played in loop by one percussion instrument. The factory library includes dedicated sets of patterns for each of the 16 instrument categories. These patterns are available for all the instruments and variations within the category.
You can use factory patterns as is, or you can modify them or create new patterns from scratch and save them as user patterns for later use.
Each player in your ensemble has a dedicated octave. In this octave, the lower five keys C to E are mapped to five patterns among all the patterns available in this instrument category. This makes these five patterns available on your MIDI keyboard and in MIDI tracks in your DAW.
Opening the Pattern Editor
The Pattern Editor can be accessed at any time at the bottom of the instrument:
To open the Pattern Editor, click Editor at the bottom of the instrument.
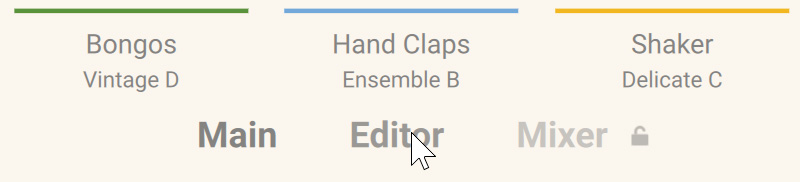
The Pattern Editor shows up and displays the pattern of the selected key.
Pattern Editor overview
The Pattern Editor contains the following areas and controls:
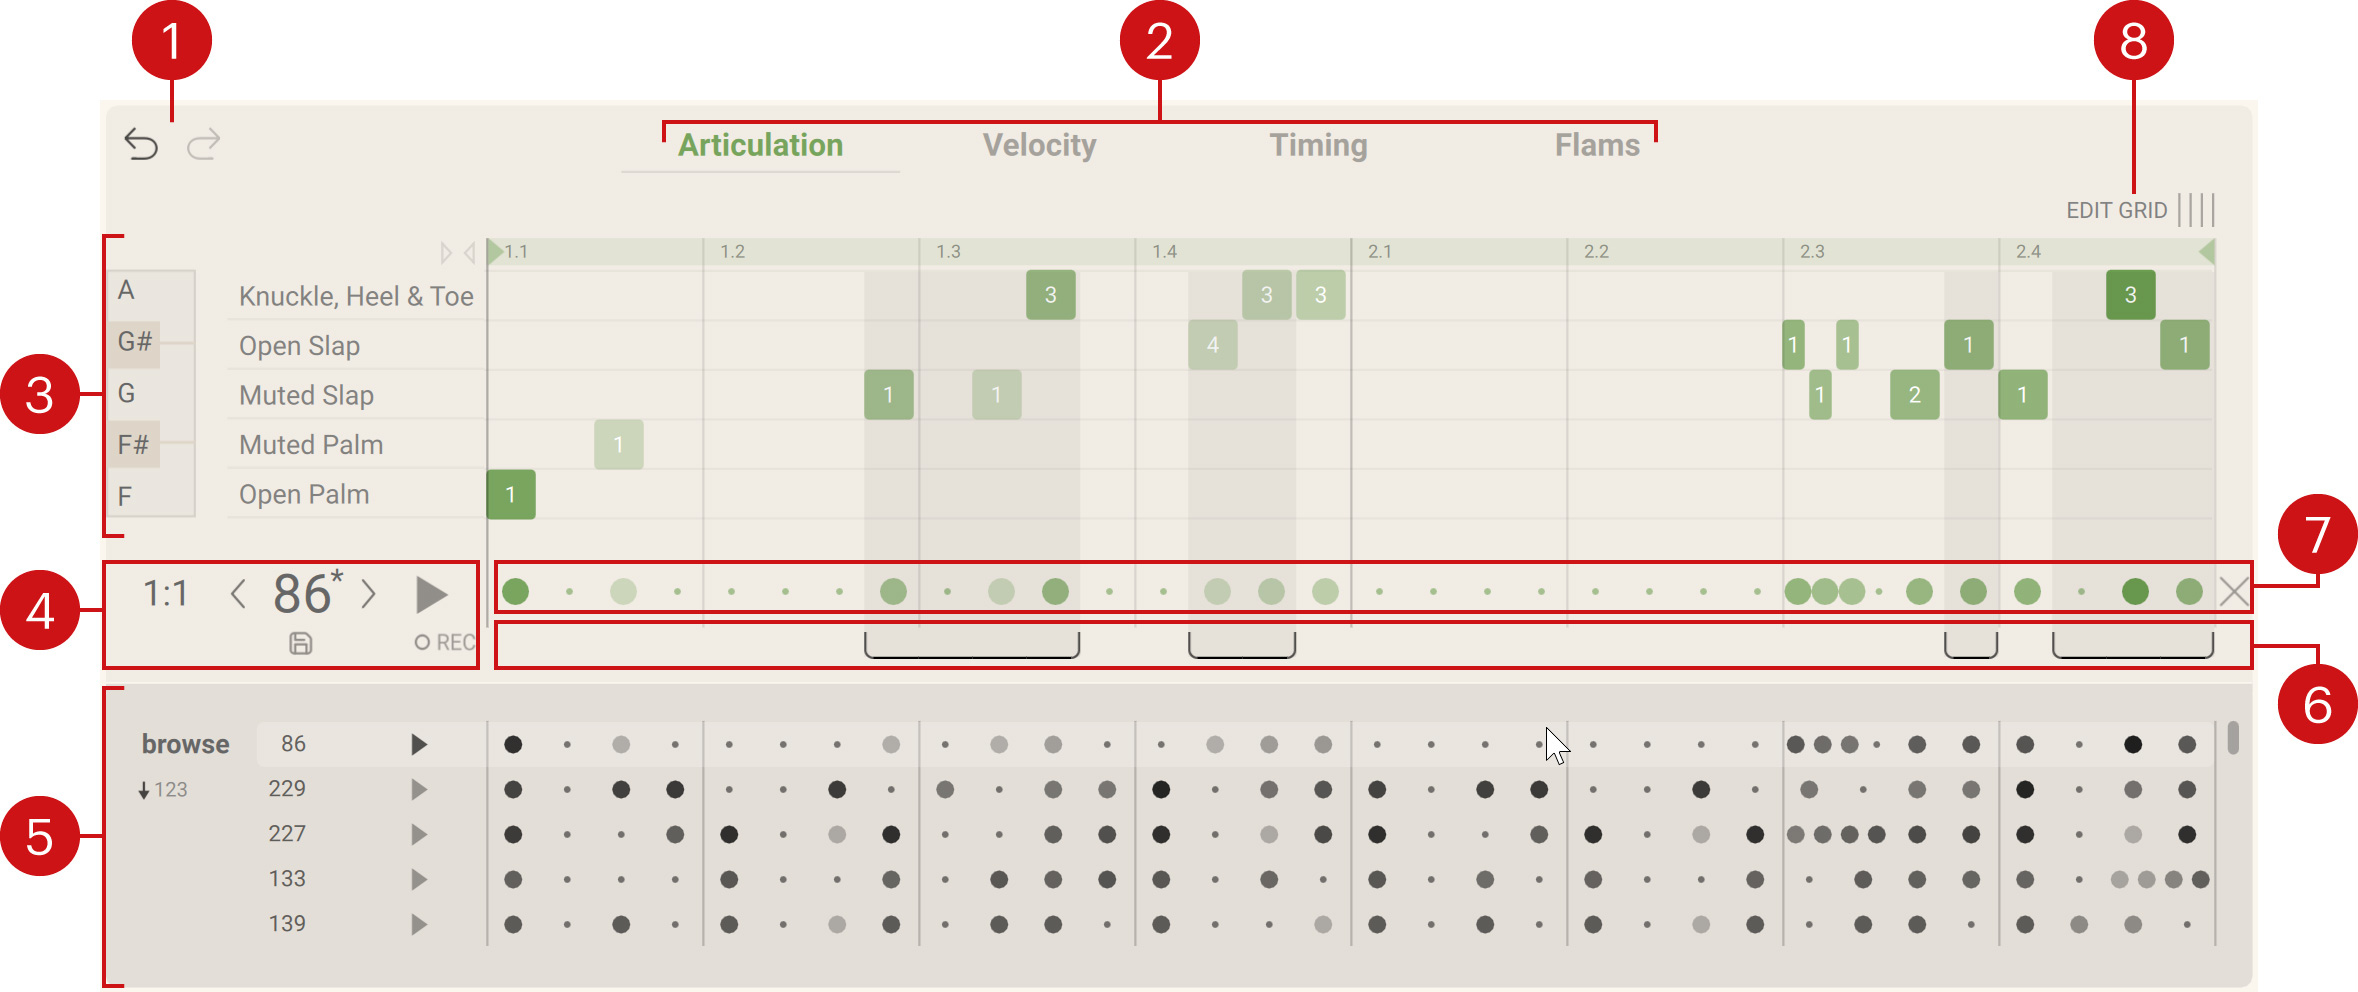
Undo/Redo buttons: Let you undo or redo your last edits on the pattern. The buttons get darker to indicate that an undo or redo action is available. On every undo/redo, the affected edit is temporarily displayed above the buttons. The undo/redo works across all panels (Articulation, Velocity, Timing and Flams): If you undo an edit that was made on another panel, the Pattern Editor automatically switches to that panel so that you can see which edit has just been undone. Your actions in the Selection strip are also included in the undo history, that is, you can undo selecting steps. The undo/redo history is stored for each key separately: Even if you have switched to another key, you can return to the previous key and undo/redo your edits there.
Panel selector: Selects the Articulation, Velocity, Timing or Flams panel. Click the desired tab to display the panel below. The selected tab is highlighted. For more information on the various panels, refer to Articulation panel, Velocity panel, Timing panel and Flams panel.
Panel area: Shows the panel selected above. While the content of this area depends on the selected panel, all panels share the same structure:
The right and biggest part of the panel area contains a grid of steps representing the pattern, with the timeline (in beats and bars) on the horizontal axis. The grid lets you precisely adjust various properties of the notes in the pattern. At the top of the grid, the timeline lets you edit the loop range and propagate it across the entire pattern. For more information on editing the loop, refer to Loop range and Propagate button.
At the left of the grid, each panel provides a different set of editing controls.
For more information on the various panels, refer to Articulation panel, Velocity panel, Timing panel and Flams panel.
Pattern tools: Display the ID number of the current pattern, and let you set the pattern’s playback rate, load another pattern, save a user pattern, audition the pattern and record a new pattern live. For more information, refer to Pattern tools.
Pattern Browser: Displays all the patterns available for this percussion instrument. This includes the factory patterns and the user patterns that you have saved. Among various features, the Pattern Browser can sort patterns according to their similarity to the current pattern. You can also audition patterns, change their sorting order, and load/drag them onto various targets. For more information, refer to Pattern Browser.
Selection strip: Lets you select a particular set of steps from the grid. All your actions in the panels above will apply only to these steps. For more information, refer to Selection strip.
Step strip: Displays a visual summary of your pattern. The Step strip lets you quickly create notes at various velocities, delete notes, and add/remove accents, no matter which panel is displayed above. For more information, refer to Step strip.
EDIT GRID button: Lets you modify the underlying pattern grid by adding or removing steps at the desired locations in the grid. For more information, refer to Edit Grid button and Grid strip.
Selecting keys
The Pattern Editor always displays the pattern mapped to the selected key. The selected key is indicated by a frame around its name in the Key selector, at the bottom of the instrument.
Note
The Key selector is not visible on the Mixer page. To show it, switch to the Main or Editor page by clicking Main or Editor at the bottom of the instrument.
You can click another key in the Key selector to select it and open its pattern in the Pattern Editor:
In the Key selector, click the desired key of a player.
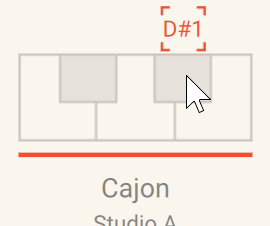
The key name appears with a surrounding frame. The pattern mapped to that key is opened in the Pattern Editor above, ready for editing.
Selecting keys via MIDI
If the Pattern Editor is open, instead of clicking keys in the Key selector, you can also select keys directly from your MIDI keyboard. To do this, you first need to activate the MIDI Follow button (showing a MIDI connector icon) in the top right corner of the instrument:
 |
Once the MIDI Follow button is on, you can open patterns in the Pattern Editor by pressing their keys on your MIDI keyboard.
Note
As a reminder, each player in your ensemble has a dedicated octave on your MIDI keyboard. Within this octave, the first five keys (C to E) trigger five patterns for this player. These five keys are depicted for each player in the Key selector, at the bottom of the instrument window. For more information on how keys are used in Session Percussionist, click the question mark in the top right corner of the instrument to display the onboard Help page, or refer to About Session Percussionist.
Changing the key mappings
If you want to change the pattern mapped to a key, do the following:
Select the desired key in the Key selector or from your MIDI keyboard (if the MIDI Follow button is on).
In the Pattern Editor, modify the current pattern or load another one, for example by using the Pattern Browser, clicking the Next/Previous Pattern buttons or dragging the Pattern switcher.
The key now triggers the new or modified pattern. The list of patterns in the Pattern Browser is updated according to the new pattern.
Remapping keys via drag and drop
When the Pattern Editor is open, you can drag a pattern from the Pattern Browser and drop it onto another key to map it to that key. For example, you can use this to assign the next key to a pattern similar to the current one.
In the Pattern Browser, click anywhere in the line of the pattern, hold the mouse button depressed and move your mouse onto the desired key in the Key selector.
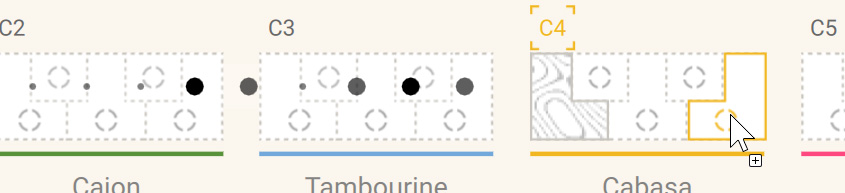
An overlay of the selected pattern follows the mouse movements. A little “+” appears when the mouse pointer reaches the keys, indicating that you can drop the pattern there.
Release the mouse button to drop the pattern onto that key.
The selected pattern is mapped to the key.
Alternatively, you can quickly duplicate a pattern mapping from one key to another by using drag and drop within the Key selector. For example, this can be useful to quickly map a base pattern onto multiple keys of a player, and then add rhythmic variations to the duplicates; or to create a backup of the original pattern before you modify it, ready to be dragged back in case you want to revert your changes.
In the Key selector, click a key and hold the mouse button depressed, drag your mouse over the target key and release the mouse button.

The pattern mapped to the source key is now also mapped to the target key.
Note
You can also drop the pattern/key onto a key of another player. If this other player holds an instrument from a different category, an “articulation remapping” takes place under the hood that tries its best to translate the original pattern’s perceived melody for use with the articulations available in the target instrument category. While the converted pattern might not always sound totally convincing in itself, it is automatically used as source for the pattern suggestions shown in the Pattern Browser, that will now offer authentic patterns for the new instrument category with a matching accent structure and vibe to the original.
Pattern Browser
The Pattern Browser lets you audition and load patterns from the list of all the patterns available for the current category of instruments. The Session Percussionist factory library already includes an extensive collection of patterns for each of the 16 instrument categories. In addition, the user patterns that you might have saved will also appear in the Pattern Browser marked with a letter “U.”
The Pattern Browser provides a powerful sorting feature (active by default): At any time, the list of patterns is sorted according to their similarity to the current pattern: The closest-sounding pattern will be listed first, the second closest will be second, etc. This similarity sorting is updated in real-time upon any action in the Pattern Editor: when loading another preset, adding or removing notes, changing note velocities, etc.) . The similarity sorting can be useful in various situations, for example:
You can easily find similar patterns and map them to neighboring keys.
You can quickly enter or record a rough pattern draft which includes the essential notes and let the Pattern Browser suggest similar, more refined patterns from the factory library.
You can select from refined factory patterns resembling a pattern that you just dragged and dropped from a different category of another player.
The Pattern Browser shows pattern as a list. It provides the following controls:

Pattern ID: Unique identifier for the pattern. Factory patterns are numbered starting from 1, while user patterns show a letter “U” followed by numbers starting from 1.
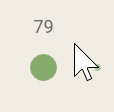
Audition: Click anywhere in the pattern row to audition the pattern (the playback position is indicated in the Step strip preview). Click again to stop auditioning.
Step strip preview: Shows a picture of the pattern’s Step strip, including note positions and velocities in the pattern. Click once to audition or stop auditioning the pattern. Double-click to load the pattern. You can also drag the preview to the real Step strip above to load it. Upon loading, the list of patterns is updated according to the new pattern. You can also load the preview to any key in the Key selector below to load the pattern there.
Scroll bar: Drag the handle vertically to access the next or previous presets in the list. Alternatively, click above or below the scroll handle to step-scroll five patterns with each click.
Numerical sorting (“123”): Switches the pattern list between similarity (default setting) and numerical sorting.
Deleting user patterns
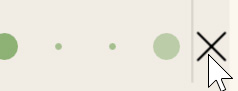
When you hover the line of a user pattern with your mouse, a little trash bin icon appears next to the pattern ID:
 |
Click the trash bin icon to delete the user pattern.
The user pattern is deleted and removed from the pattern list.
Note
User patterns can be created using the Save button in the Pattern tools.
Loop range and Propagate button
By default, the whole pattern is played in loop. In the timeline above the grid, the end points of the loop are indicated by colored triangles. The colored segment between both triangles represents the loop range. The timeline lets you adjust the loop range in various ways.
Note
You can adjust the loop range on all panels (Articulation, Velocity, Timing and Flams), and for each of the 25 player keys independently.
To move either end point of the loop:
Click either triangle in the timeline.

Drag the triangle horizontally to adjust the end point.

The loop range is modified accordingly. In the grid, the portions outside the loop range are grayed out and will not be played back.
You can move the entire loop in the timeline:
Click anywhere between both colored triangles and drag your mouse horizontally to move the loop in the timeline:

If you drag a full-length loop, it will simply move the starting point within your pattern:
In a full-length loop, click anywhere between both colored triangles and drag your mouse horizontally to move the starting point of the loop:

If the loop is shorter than the grid, you can propagate it throughout the grid:
Click the Propagate button on the left of the timeline, indicated by two facing triangles.

A new pattern is being created with the looped portion reproduced onto the entire grid. Like any other action in the Pattern Editor, this can be undone.

At any time, you can reset the loop range:
In the timeline, double-click anywhere between both colored triangles to reset the loop range to the entire pattern.
Pattern tools
The following pattern tools are available:
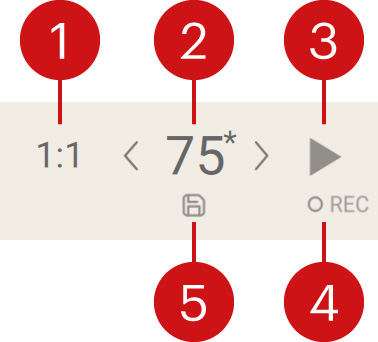 |
Playback Rate: Selects the playback rate of the pattern. Click the value to cycle through the available rates. You can choose from 1:1 (original speed, default value), x2 (double speed) and 1:2 (half speed).
Pattern switcher: Shows the ID number of the loaded pattern. Click the number and drag your mouse vertically to fast scroll through pattern IDs, then release the mouse button to load the corresponding pattern. Click the left or right arrow to switch to the previous or next pattern. If you have modified the pattern, an asterisk appears next to the ID to remind you that the current pattern state has not been saved yet. If you want to reuse your custom pattern in the future, you have to save it using the Save button (see below).
Audition: Starts/stops the playback of the pattern. This allows you to hear this single instrument playing the pattern. If you want to audition how this pattern sounds together with the other instruments in your ensemble, use instead the Global Audition button in the top right corner of Session Percussionist.
Record: Lets you record a pattern live on your MIDI keyboard. Click the Record button to start the recording: a metronome click is turned on at the tempo of your DAW. If the playback is stopped in your DAW, a one-bar count-in starts, during which you can already start to record. If the playback is running in your DAW, the recording position is synchronized to the DAW transport. The recording continues until you explicitly stop it: until then, you can record multiple layered loops (overdubbing). Once you have stopped the recording, you can use the Undo button to selectively cancel each additional loop you have recorded. You can also use the Record button to create a first draft of a pattern idea, and then look in the Pattern Browser for factory patterns that are similar to your recorded draft
Save: Stores the current pattern state as a user pattern. The user pattern gets its own ID starting with the letter “U” (for “user”) followed by an automatic numbering, and it will be available for all instruments and variations in this instrument category. You can save up to 20 user patterns in each instrument category. User patterns are listed in the Pattern Browser together with factory patterns. Notably, they are included in the automatic search for similar patterns. User patterns can be deleted using the Pattern Browser.
Step strip
The Step strip is located under the grid. It provides an overview of your pattern and lets you quickly create or delete notes, change note velocities on the fly, and duplicate parts of the pattern.

The Step strip stretches over the entire timeline. In the Step strip, notes are indicated by colored circles. The circles’ color intensity mirrors the note velocity: stronger colors indicate higher velocities. Empty steps are indicated by a little point.
The effect of your mouse actions in the Step strip strongly depends on whether you click a step inside or outside the selected steps (if any).
Note
To select or deselect steps, use the Selection strip located under the Step strip.
For each action, we first describe the result if you click outside the selected steps, then if you click inside. The following actions are available:
Click an empty step to create a note. The new note will have the same velocity as the last created or edited note. To change this default velocity, just set any note velocity once, it will be remembered and used as the new default. If the step is inside the selection, a note is created on each empty step in the selection.
Click a note to delete it. If the note is inside the selection, all selected notes are deleted.
Double-click a note to apply a +30 velocity accent. If you double-click an empty step, it first creates a note with the same velocity as the last created or edited note, then applies a +30 velocity accent. If the step is inside the selection, the same results apply to all similar steps (with note or empty) in the selection.
Click a note, hold the mouse button and drag your mouse vertically to adjust its velocity. The velocity temporarily appears above the note until you release the mouse button. If you click and drag an empty step, it first creates the note and adjusts its velocity on the fly. If the step is inside the selection, the velocities for all selected steps are adjusted proportionally.
If some steps are selected, pressing [option] + click (Mac) or [Alt] + click (Windows) on a step will duplicate the selected steps (including the empty ones) starting from the step that you have clicked. If your selection includes non-adjacent steps, the gaps between selected steps will be retained during duplication: Upon pasting, the corresponding steps will stay untouched:

Note
When duplicating steps, the grid structure is ignored: The notes are copied one by one into the target steps even if the source and target steps have different lengths due to the varying grid structure. As a consequence, the rhythm of the duplicated notes might differ from the original rhythm.
You can also delete multiple notes at once:
Click the Delete button (little cross) at the right of the Step strip to delete the selected notes from the pattern.
The selected notes are deleted.
Note
If no notes or all notes are selected when you click the Delete button, all notes are deleted and the grid is additionally reset to the default 16th note grid. You start again with a fresh, empty pattern.
Selection strip
The Selection strip is located under the grid and the Step strip. It provides various tools to select the desired steps in your pattern. Once your selection is done, you can for example edit only those selected notes while leaving the remaining steps untouched, or duplicate the selected steps to another position in the grid.

The Selection strip stretches over the entire timeline. In the Selection strip, the selected steps show upward-pointing brackets and they have a gray background that extends vertically throughout the grid.
Your step selection remains active when you switch between the Articulation, Velocity, Timing and Flams panels. Your actions in the Selection strip are stored in the undo history like any other action in the Pattern Editor: If you are not happy with your current step selection, you can always return to a previous selection.
The following actions are available in the Selection strip:
Click a step to select it. This deselects all other steps.
Click a step to select it, then [Shift] + click another step to select all steps in between. This lets you quickly select groups of adjacent steps.
[command] + click (Mac) or [Ctrl] + click (Windows) a step to add it to the selection or remove it from the selection. This lets you select non-adjacent steps.
Click any selected step to deselect all steps.
Double-click any step to select all steps.
Replicate selection: If some steps are selected and you press [option] + click (Mac) or [Alt] + click (Windows) on a step in the Selection strip, the selection state (“selected” or “deselected”) of all steps before the step you have clicked will be replicated onto the following steps of the pattern: The step you have clicked will mirror the selection state of step 1, its right neighbor will mirror the state of step 2, etc. This allows you to quickly select a repeating sequence of steps without having to select each of them manually:
Example 1: If you select the 1st step ("selected" state, noted “s”), leave the 2nd and 3rd steps deselected ("deselected" state, noted “–”), and then press [option] + click (Mac) or [Alt] + click (Windows) on the 4th step, the sequence made of the first three steps (selection states: s – –) will be replicated starting from the 4th step, thus generating a [s – – s – – s – –…] selection sequence throughout the pattern:

Example 2: In order to select all off-beat 8th notes in the default grid, select the 3rd step and press [option] + click (Mac) or [Alt] + click (Windows) on the 5th step:

Note
Your actions in the Selection strip do not modify the notes in your pattern, only their selection state.
Tip
You can also select all notes playing a specific articulation by opening the Articulation panel and double-clicking the articulation name at the left of the grid.
Edit Grid button and Grid strip
By default, the steps in the grid have a length of one 16th note: four steps make a quarter note, and 32 steps fill up the two 4/4 bars of the timeline.
However, in some situations you might want to create notes outside the 16th-note grid or groups of notes with a different timing structure. For this, the Pattern Editor lets you locally adjust the pattern grid by inserting or removing steps as needed. This is done in the Grid strip.
The Grid strip is hidden by default. In order to show the Grid strip and modify the grid, do the following:
Click the EDIT GRID button at the top right of the pattern grid.

The Grid strip appears above the timeline.

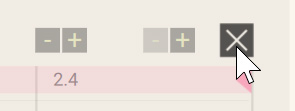
By default, the Grid strip provides a pair of “+” and “-” buttons for every 8th note. You can click them to add or remove a step from the 8th-note division below: For example, starting from the default two 16th-note steps available in a 8th-note division, clicking the “+” button will add a third step to the division and distribute the three steps evenly, which allows you to create triplet 16th notes.
The available step lengths are: triplet 8th note, 16th note (default length), triplet 16th note, 32th note, quintuplet 8th note, and septuplet 8th note.
Tip
You can also focus on a portion of the grid (for example, the first quarter note), thoroughly edit the grid in that portion, and then use the loop range and Propagate tools to set the loop range to the edited portion and replicate your edits onto the entire grid.
Changes made to the grid are basically non-destructive. Notably, existing notes are not affected by your modifications to the grid: If you add or remove a step in a division that already contains notes, the notes will appear at new step positions in the grid, but their timing and flam values (as seen on the Timing and Flams panels) are automatically updated to make up for the move, so that no difference will be heard in existing notes after adding or removing the step.
The Close button at the far right lets you close the Grid strip at any time:
To close the Grid strip, click the Close button (the little cross) at the right of the strip.
Note
When duplicating steps, the grid structure is ignored: The notes are copied one by one into the target steps even if the source and target steps have different lengths due to the varying grid structure. As a consequence, the rhythm of the duplicated notes might differ from the original rhythm. Fore more information on duplicating steps, refer to Step strip.
Articulation panel
Each percussion instrument can produce different sounds depending on how it is played. These sounds are called “articulations.” In Session Percussionist, each instrument provides up to five main articulations, which are mapped to the keys F to A in the player’s octave on your MIDI keyboard. In addition, each main articulation contains a variable number of sub-articulations. The Articulation panel lets you choose the articulation played by each note in the pattern.
To open the Articulation panel:
Click Articulation at the top of the Pattern Editor to open the Articulation panel.

The Articulation panel consists of the following elements and controls:
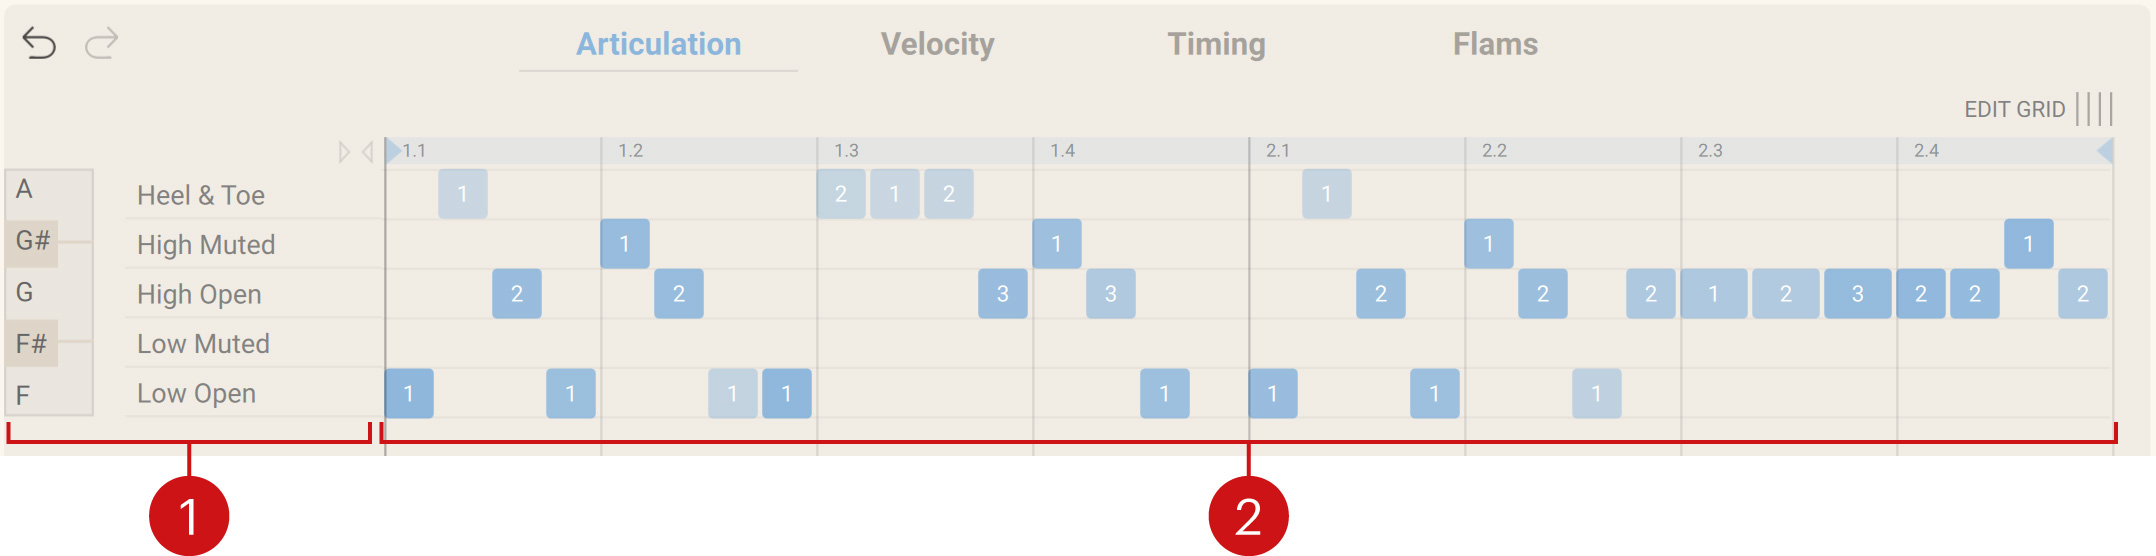
Main articulations: Lists the main articulations for this instrument. On the left, the corresponding keys on your MIDI keyboard are displayed. Click an articulation name once to play its sound. Double-click an articulation name to add to the current selection all steps with a cell on that articulation lane.
Articulation grid: Represents the notes in your pattern and lets you set their articulations. The grid contains a few horizontal lanes, one for each main articulation. Notes are represented by rectangle cells on the lanes: Cells on a particular lane will play the corresponding main articulation. The horizontal position of a cell indicates its step in the timeline, while its vertical position indicates which main articulation is played on that step. The color intensity of a cell mirrors the note velocity (darker colors indicate higher velocities). The little number displayed on a cell indicates the sub-articulation played by this note. The available mouse actions in the grid are described below.
Mouse actions in the Articulation grid
The effect of your mouse actions in the Articulation grid strongly depends on whether you click a cell inside or outside the selected steps (if any). For each action, we first describe the result if you click outside the selected steps, then if you click inside.
Note
You can quickly select all steps whose cell is on a particular lane by double-clicking the articulation name on the left. You can select steps in many other ways by using the Selection strip under the grid.
The following mouse actions are available in the grid:
Click a cell to delete it. If the cell is inside the selection, all selected notes are deleted.
In a column already containing a cell, click on another lane to move the cell to that lane and change the main articulation played on that step. If the step is inside the selection, all selected notes are set to that main articulation.
In an empty column, click on a lane to create a note playing that main articulation. The new note will have the same velocity as the last created or edited note. If the step is inside the selection, all selected steps are set to this articulation (on empty steps the notes are created).
Double-click a cell to apply a +30 velocity accent. If you double-click on a lane in an empty column, it first creates a note playing that main articulation with the same velocity as the last created or edited note, then applies a +30 velocity accent. If the step is inside the selection, the same results apply to all similar steps (with note or empty) in the selection.
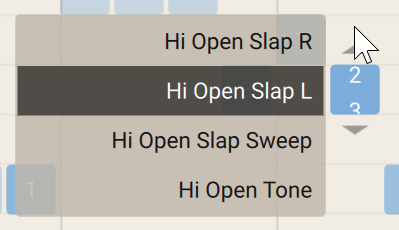
As you hover a cell with your mouse, a list appears nearby showing the available sub-articulations. Click the cell, hold the mouse button depressed and drag your mouse vertically to select another sub-articulation from the list. As you drag the mouse, you can audition the various sub-articulations when they get selected. Release the button when the desired sub-articulation is highlighted. The number on the cell is updated accordingly.
If the step is inside the selection, all cells in the selection are set to these main articulation and sub-articulation.
You can also set both the main articulation and the sub-articulation in one go by clicking an empty position in the grid, holding the mouse button and dragging the mouse vertically.
Velocity panel
The Velocity panel lets you adjust the velocity of each individual note in the pattern. In addition, it provides a set of velocity editing tools that can affect multiple notes or the whole pattern at once.
To open the Velocity panel:
Click Velocity at the top of the Pattern Editor to open the Velocity panel.

The Velocity panel consists of the following elements and controls:
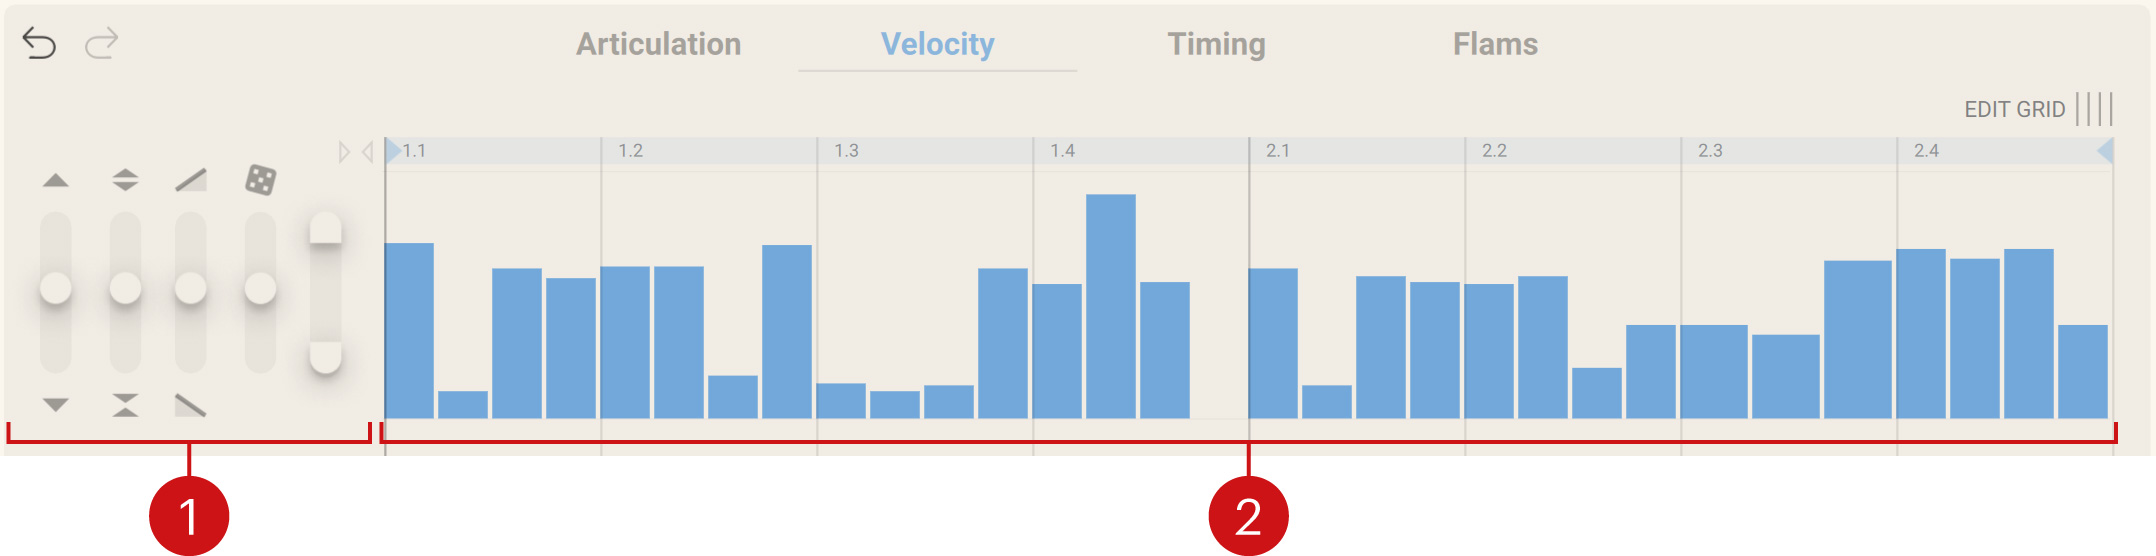
Velocity tools: Provide various functions to modify the velocities. If some steps are selected, the tools affect the velocities of the selected steps, otherwise they affect the whole pattern. The Velocity tools behave relatively to the current velocities: When you move and release a slider, it returns to its default position and the new velocities will be used as starting point for your next edits. This allows you to apply the tools several times in a row. The effect of each tool is directly mirrored in the Velocity grid on the right. From left to right, the following tools are available:
Shift: Adds/removes a fixed amount to/from all velocities. This velocity amount increases as you pull the slider further up or down. Hold [Shift] while dragging to scale the velocities instead of offsetting them.
Compress/Expand: Amplifies or attenuates the velocity differences between notes relative to the current mean of all velocities as the imaginary “center.” Moving the slider upward amplifies the differences in velocity (expander behavior): High velocities get even higher and low velocities get even lower. Moving the slider downward attenuates the differences (compressor behavior): All velocities tend to move toward the mean velocity.
Tilt: Puts the velocities on a slope. The slope is centered on the current mean of all velocities. Moving the slider upward uses a raising slope, while moving the slider downward uses a decreasing slope. The slope becomes steeper as you move the slider further away. For example, this tool is useful to create crescendos.
Randomize: Adds or removes a random value to each velocity. The position of the slider determines the maximum value that can be added or removed.
Limit: Shrinks the range of available velocity values. Moving the upper handle downward decreases the highest velocities, and moving the lower handle upward increases the lowest velocities. This is especially useful if you want to dial in only the soft ghost notes, or to tame only some loud, spiking notes.
Velocity grid: Represents the velocities of the notes in your pattern as vertical, adjustable bars. The following mouse actions are available:
For a note outside the selection, click at the desired height in the grid to set its velocity to that value. Click and drag your mouse vertically to adjust the velocity. As you drag the mouse, the velocity value appears under the bar.
For a note inside the selection, press [option] + click (Mac) or [Alt] + click (Windows) at the desired height to set the velocities of all selected notes to that value. Click the bar and drag your mouse vertically to shift the selected velocities by the same amount, or hold [Shift] while dragging to scale the velocities instead.
Click at a certain height in the grid on an empty step to create a note with the corresponding velocity. If the step is inside the selection, notes are created for all empty steps in the selection.
Note
To select or deselect steps, use the Selection strip under the grid.
Timing panel
The Timing panel lets you adjust the timing of each individual note in the pattern. In addition, it provides a set of timing editing tools that can affect the selected steps or the whole pattern at once.
To open the Timing panel:
Click Timing at the top of the Pattern Editor to open the Timing panel.

The Timing panel consists of the following elements and controls:
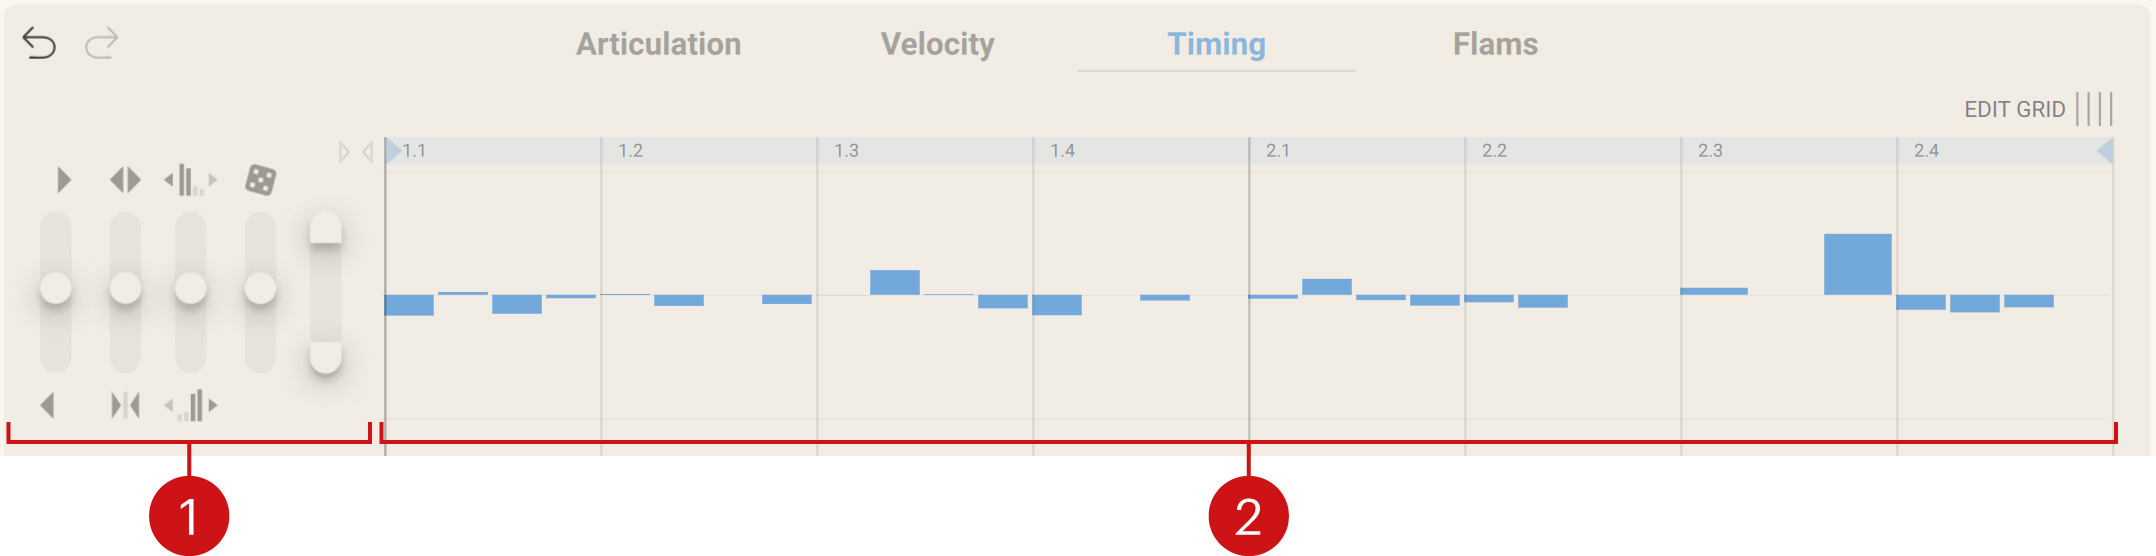
Timing tools: Provide various functions to modify the timings. If some steps are selected, the tools affect the timings of the selected notes, otherwise they affect all notes in the pattern. The Timing tools work relatively to the current timings: When you move and release a slider, it returns to its default position and the new timings will be used as starting point for your next edits. This allows you to apply the tools several times in a row. The effect of each tool is directly mirrored in the Timing grid on the right. From left to right, the following tools are available:
Shift: Adds/removes a fixed duration to/from all timings. This extra duration increases as you pull the slider further up or down. Please note: While it is possible to shift an entire pattern to the late or early side here, it makes more sense to have the timings generally centered around the middle line so that they can be properly scaled bipolar (instead of uni-polar) by the global Humanize control. If you want an entire player to play rather late or early, please use instead the Timing slider on the player’s channel strip of the Mixer.
Loosen/Tighten: Amplifies or attenuates the timing differences between notes. Moving the slider upward accentuates the differences in timing: Late notes get delayed and early notes get even earlier, that is, the player gets looser. Moving the slider downward attenuates the differences: All timings tend to move toward the middle zero, in other words the player gets tighter or quantized.
Velocity-based Shift: Adds/removes a variable duration to/from each timing depending on the note velocity. Notes with high or low velocities will be more affected than notes with middle velocities. Moving the slider upward brings high-velocity notes forward and delays low-velocity notes, whereas moving the slider downward has the opposite effect. Slightly moving this slider upward can have a positive effect on the perceived groove.
Randomize: Adds or removes a random value to each timing. The position of the slider determines the maximum value that can be added or removed.
Limit: Shrinks the range of available timings. Moving the upper handle downward brings the latest notes forward, and moving the lower handle upward delays the earliest notes, the limit being in each case the quantized center position.
Timing grid: Represents the timings of the notes in your pattern as vertical, adjustable bars. The bars are bipolar: bars above the zero represent lagging notes, whereas bars below the zero represent rushed notes. The following mouse actions are available:
On a note outside the selection, click at the desired height in the grid to set its timing to that value. Click and drag your mouse vertically to adjust the timing. As you drag the mouse, the timing value appears under the bar.
On a note inside the selection, press [option] + click (Mac) or [Alt] + click (Windows) at the desired height to set the timings of all selected notes to that value. Click the bar and drag your mouse vertically to shift the selected timings by the same amount, or hold [Shift] while dragging to scale the timings instead.
The timings shown in the Timing grid also depend on the modifications that you make to the grid itself using the Grid strip. For more information, refer to Edit Grid button and Grid strip.
Note
To select or deselect steps, use the Selection strip under the grid.
Flams panel
The Flams panel lets you add single or double flams to the notes in your pattern.
To open the Flams panel:
Click Flams at the top of the Pattern Editor to open the Flams panel.

The Flams panel contains the Flams grid:
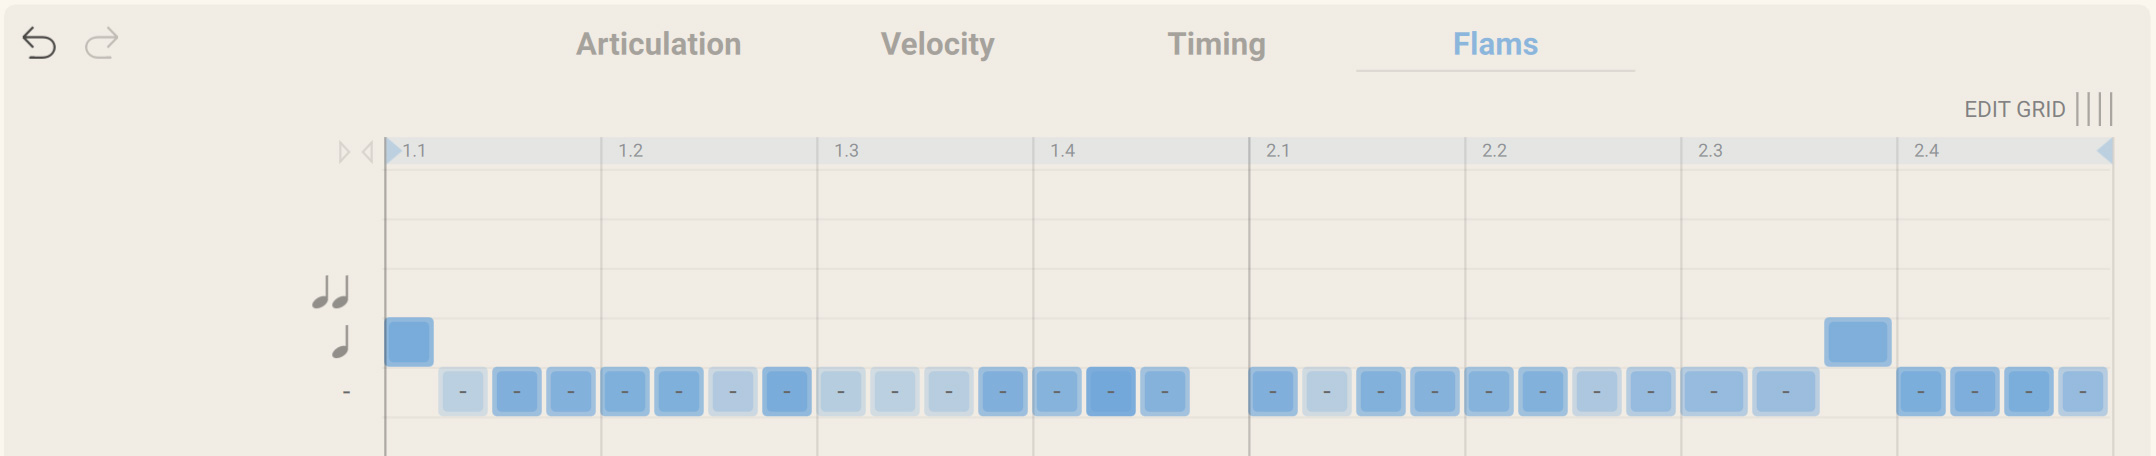
The Flams grid represents the notes in your pattern as square cells. The horizontal position of a cell indicates its step in the timeline, and its color intensity mirrors the note velocity (darker colors indicate higher velocities). The Flams grid contains three horizontal lanes: Notes on the bottom lane don’t play any flam, notes on the middle lane play a single flam, and notes on the upper lane play a double flam.
By moving a cell vertically onto the desired lane, you can define which flams the note will play:
Click in the desired free lane above or below a cell to place it onto that lane.
The note changes its flam. If some steps are selected and you change the flam of a cell that is inside the selected steps, all selected notes will change their flam accordingly.
Note
To select or deselect steps, use the Selection strip under the grid.
When you move a cell from the bottom lane to either other lane, you activate a single or double flam for that note. As you do this, the main note itself gets slightly delayed in order to “make room“ for the added flam note(s), thereby reproducing a natural playing behavior. You can see this added delay on the Timing panel. This delay will be removed if you deactivate the note’s flam by moving its cell back to the bottom lane.
Note
Each flam is considered a “locked group” of two or more coupled notes. This means that changing the timing or velocity of an existing flam will affect all corresponding notes.
When you create or select a flam, two flam controls appear at the left of the grid that let you adjust the flam velocity and speed for that note:
 |
You can adjust the Velocity and Speed flam controls for each note individually. If some steps are selected and you adjust the flam controls for a cell that is inside the selected steps, your changes will affec the flam controls for all selected notes.
Note
If you move a cell onto another lane, its Velocity and Speed controls are reset to their default values.
The flams shown in the Flams grid and their settings also depend on the modifications that you make to the grid itself using the Grid strip. For more information, refer to Edit Grid button and Grid strip.