Mixer
The Mixer in Session Percussionist enables you to mix and process the sound of the five players.
The Mixer enables you to mix and process the sound of the five players. Each player has its own dedicated channel strip featuring standard mixing controls as well as effects, spatialization, and musical parameters that affect pattern playback.
The Mixer consists of the following elements and controls:
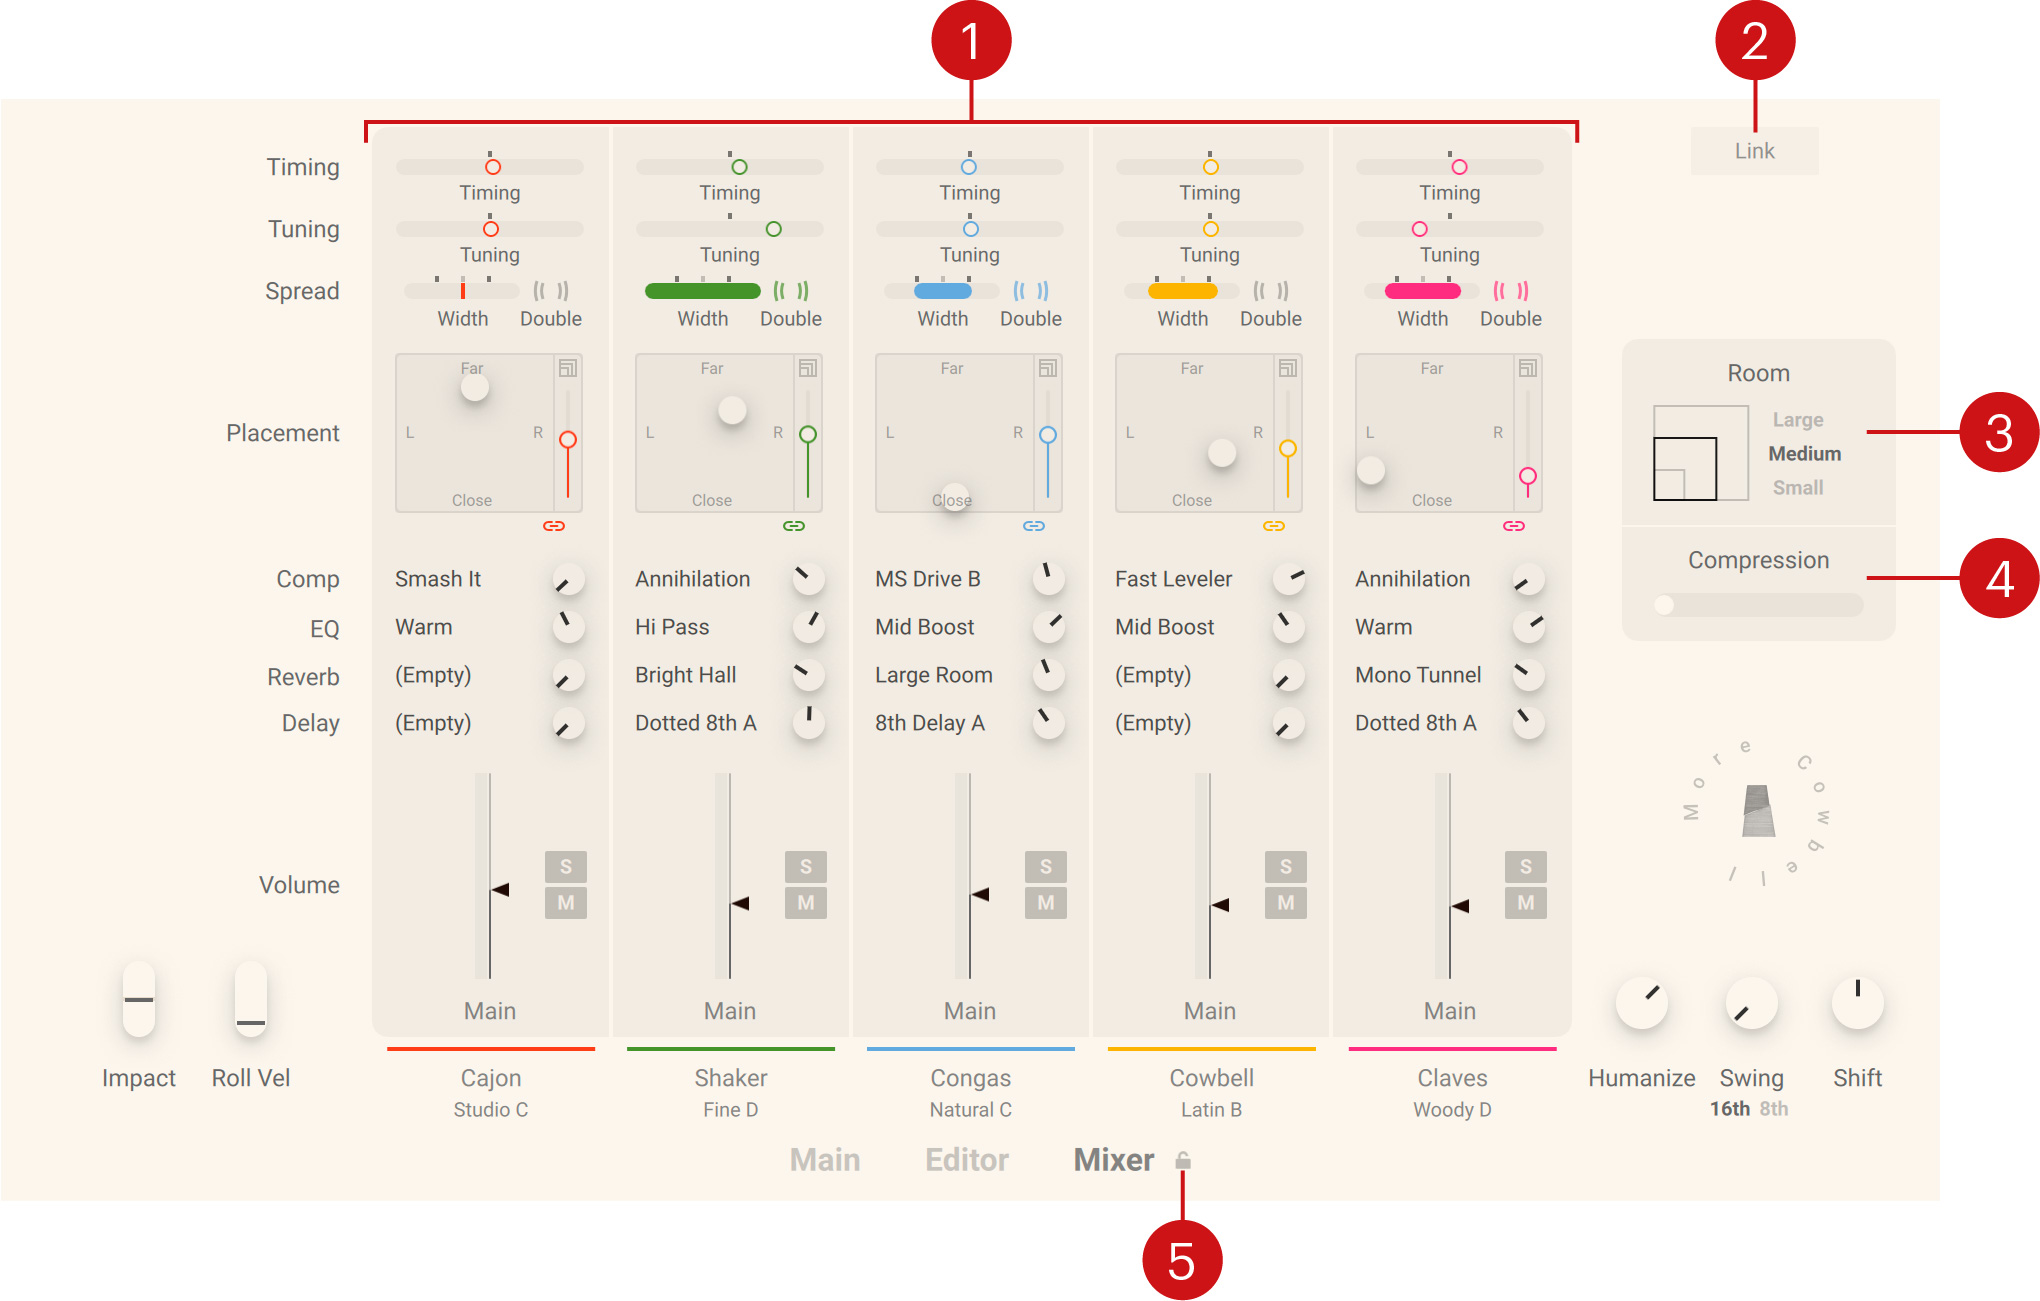
Channel strip: Controls the mix, spatialization, and musical parameters for each of the five players. For more information, refer to Channel strips.
Link: Links the settings of the five channel strips. Adjusting a parameter on one channel strip changes the same parameter on all other channels relative to its original setting.
Room: Switches between the three different sizes Large, Medium, and Small for the virtual recording room applied to the players’ individual room microphones (vertical faders next to their XY pad).
Compression: Adjusts the amount of compression applied to the players’ Room Microphones faders. By increasing the amount of compression, you can make the reverb sound more present in the mix.
Mixer Lock: Locks the settings of the five channel strips. When locked, you can switch between different instruments while retaining your channel settings. For more information, refer to Locking the channel strip settings when browsing instrument variations.
Channel strips
The channel strips enable you to control the mix, spatialization, and effects for each of the five players.
Each channel strip consists of the following controls:
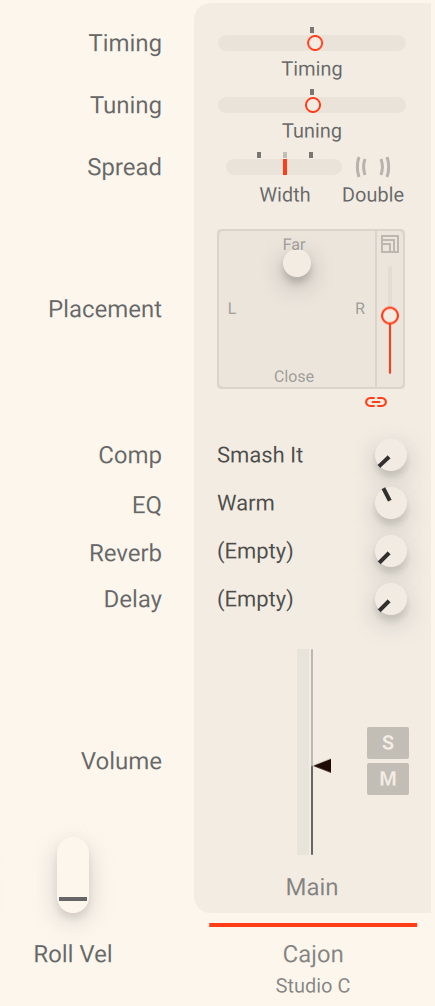 |
Timing: Adjusts the overall timing of the player relative to the musical grid and the other players in the range from -80 ticks to +80 ticks (one 16th note equals 240 ticks). At center position, the original timings are preserved (as defined on the Timing panel of the Pattern Editor). When moving the control to the right, the played notes are increasingly dragged, or lagging. When moving the control to the left, the played notes are increasingly rushed, or leading.
Tuning: Adjusts the overall tuning of the instrument in the range from -12 semitones to +12 semitones.
Spread: Controls the width and spread of the instrument in the stereo image.
Width: Adjusts the stereo width from mono to enhanced stereo. At middle position (gray markings), the original stereo width of the recording is preserved.
Double: Activates an additional recording layer, and spreads the two layers across the stereo image. While the strength of the stereo spread can still be adjusted using Width, the regular doubling sound is achieved by resetting Width to 100 %.
Placement: Controls the spatialization of the instrument and its position in the virtual recording room.
XY pad: Adjusts the position of the instrument in the virtual recording room. Moving the handle horizontally (x-axis) adjusts the position in the stereo image. Moving the handle vertically (y-axis) adjusts the distance between the instrument and you by blending between two differently positioned microphone setups. By pressing [Shift] while changing the position you can lock the movement to the y-axis. Clicking the Close or Far label moves the instrument to the clicked position. Clicking the L or R label moves the instrument at full left or full right while retaining its distance.
Room Microphones fader: Dial in a third pair of microphones feeding the global Room ambience reverb.
Link: Links the settings of the XY pad and the Room Microphones fader to achieve a natural sounding placement of the player in the room. Once the settings linked, changing the Close/Far mix in the XY pad also changes the amount of the Room Microphones, but not vice versa. That way it is possible to first set a desired Close/Far mix, then set a base value for the Room Microphones, and from that base let the Room Microphones amount follow the Close/Far mix.
Comp: Selects the compressor preset used to process the sound of the instrument. The control next to the preset selector adjusts the strength of the compression by scaling the compressor’s threshold and makeup gain parameters.
EQ: Selects the equalizer preset used to process the sound of the instrument. The control next to the preset selector adjusts the strength of the equalization by scaling the EQ’s boost or attenuate parameters.
Reverb: Selects the reverb preset used to process the sound of the instrument. The control next to the preset selector adjusts the strength of the reverberation.
Delay: Selects the delay preset used to process the sound of the instrument. The control next to the preset selector adjusts the strength of the delay effect.
Volume: Adjusts the level of the instrument signal in the mix.
S (Solo): Solos the respective channel strip, muting all other channel strips (exclusive solo). When solo is active on one channel strip, additional channel strips can be set to solo by clicking their M (Mute) buttons.
M (Mute): Mutes the respective channel strip. When solo is active on any channel, the M (Mute) buttons toggle the solo state of the other channels.
Output label: Opens a panel where you can select the outputs used for the main microphone signal (Close/Far mix) and for the Room Microphones signal individually. The available outputs are Main (default output going through the Kontakt Instrument Header) as well as any Output Channels defined in Kontakt’s Outputs section (but not the Aux Channels).
Note
Changes made to the output configuration in Kontakt require a restart of the plug-in or stand-alone application in order to appear in the Kontakt instrument.
Note
Like anywhere else in the instrument, you can press [Ctrl] + click (Windows) or [command] + click (Mac) on any parameter in the Mixer to reset the parameter to its default value.