Tools Components
The Components in Guitar Rig's Tools category provide auxiliary functions that you can use to change the Rack's signal flow in creative ways.
The Components in the Tools category provide auxiliary functions that you can use to change the Rack's signal flow in creative ways. You can use the Container to consolidate multiple effects or create complex effect chains using the Splitters, including Split Mix, Freq Crossover, and M/S Balance. Loop Machine Pro enables you to build compositions in live performances, or stack up sounds to create intricate loops.
Tip
The Signal Flow makes it easy to view and change the signal path when using Tools Components. For more information refer to Sidebar.
Visualization of Tools
Tools feature special visualization in the Rack that helps you maintain an overview of the structure when nesting Components within Containers and Splitters, or even Splitters within Splitters. The visualization dynamically adapts to changes made in the Rack.
The following overview shows you the indicators used in the visualization:
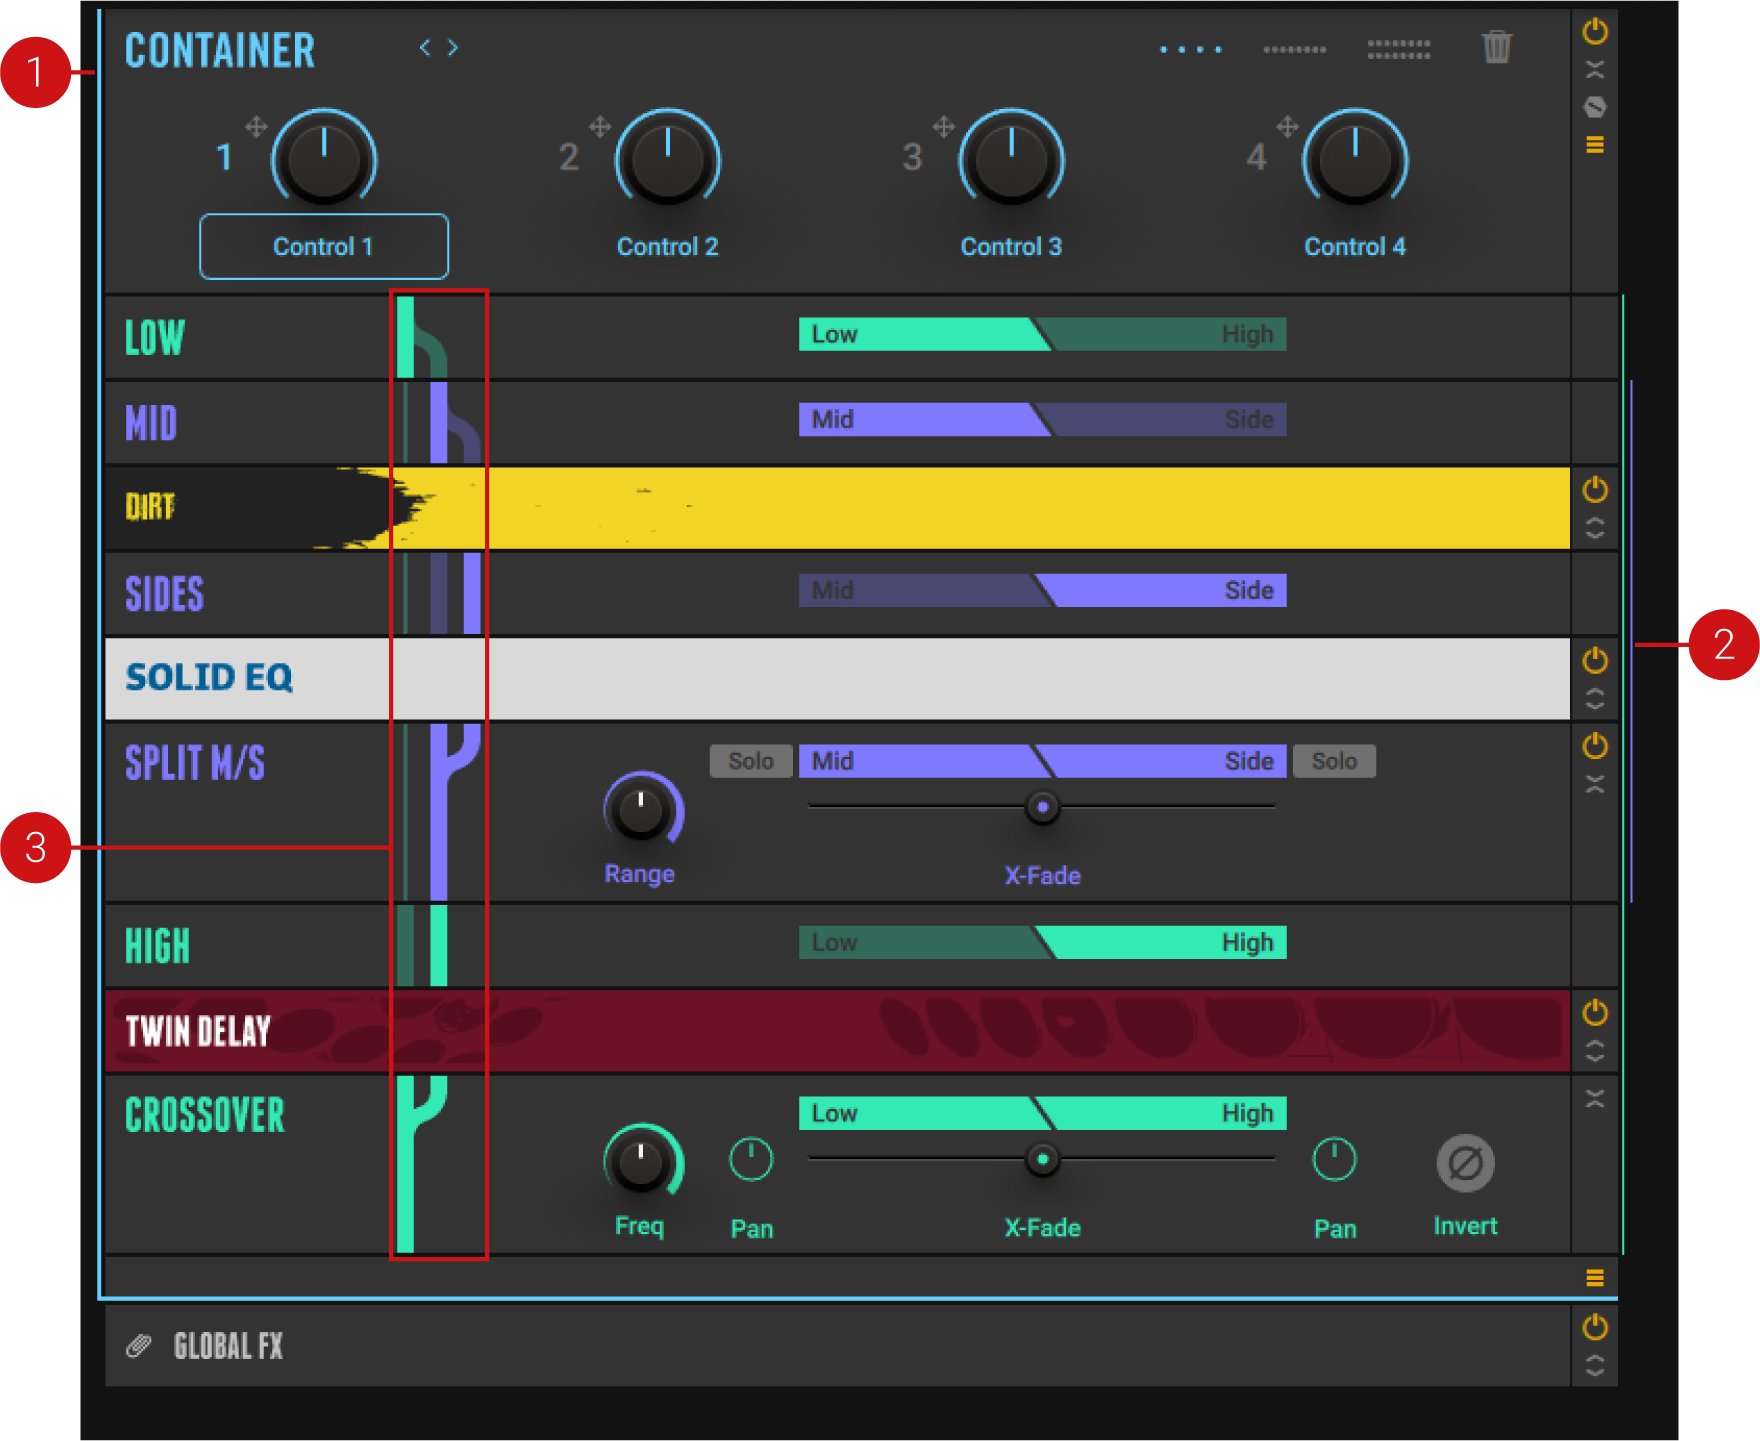
Container indicator: The thin blue line on the left side of the Rack indicates the extent of the Container and its contents.
Splitter indicator: The thin colored lines on the right side of the Rack indicate the extent and hierarchical level of Splitters in the Rack, starting with Mint, Plum, Pink, Red. Up to four levels of splitting are shown at the side of the Rack.
Routing indicators: Show the signal paths of Splitters, including the hierarchy of nested Splitters.
The thin line represents the signal of a higher-level Splitter that is being passed on down the signal path in the background.
The thick, solid line represents the signal that is fed into the effects chain nested right below. Additionally, it represents the summed signals in the Splitter's output section.
The thick, translucent line represents the signal that is fed into other effects chain in the Splitter.
Tip
The Signal Flow gives an overview of the signal path, and its color scheme mirrors the visualization of Tools in the Rack. For more information refer to Sidebar.
Container
The Container allows you to create powerful multi effects by combining multiple Components, controlled by up to 16 Container Macros. You can use it to organize your Rack more clearly, or to conveniently reuse your favorite combinations of effects in different Racks.
The Container contains the following parameters and controls:
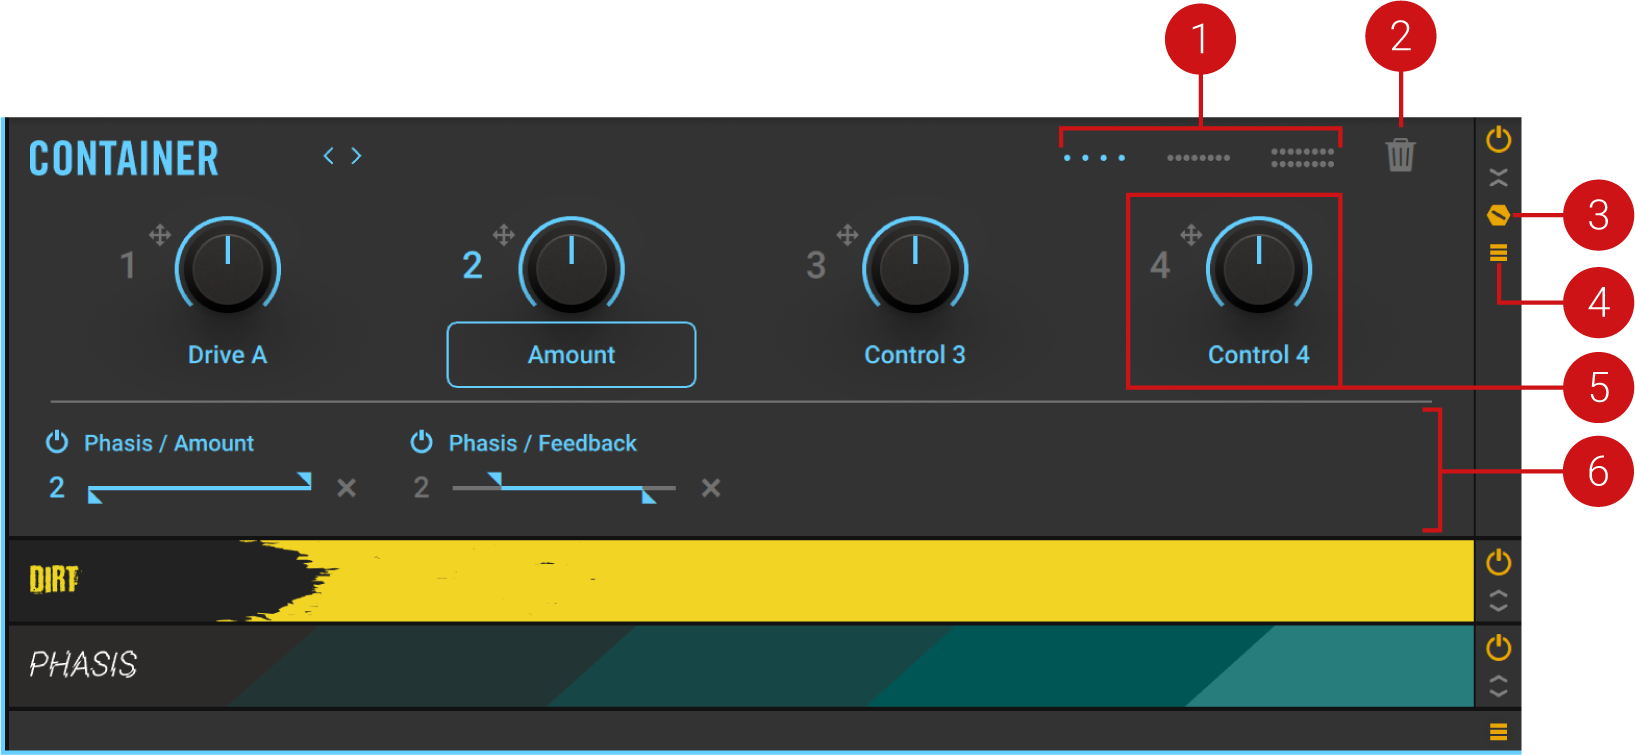
Macro Layout selector: Switches the number of available Container Macros between four, eight, and 16. When decreasing the number of Container Macros, all but the remaining Container Macros are deactivated. However, previous parameter assignments and MIDI mappings are restored when increasing the number of Container Macros again.
Clear Container: Clears the contents of the Container and all Container Macro assignments.
Show Expert panel: Shows the Expert panel that you can use to display and edit the assignments of the selected Container Macro.
Show Content: Shows or hides the list of Components in the Container.
Note
You can add, remove, replace, and move Components in the list in the same way as in the Rack. For more information, refer to Using the Rack.
Macro control: Controls parameters of Components in the Container, allowing you to create custom effect controls. Container Macros can be assigned in the same way global Macros are assigned. For more information, refer to Assigning Macros.
Expert panel: Displays the assignments of the selected Container Macro and provides functions to edit them. Container Macros can be edited in the same way global Macros are edited. For more information, refer to Editing Macros.
Crossover
Crossover is a Splitter that divides the frequency spectrum into two bands that each feed their own effects chain. You can add Components to the Low and High band independently, and freely adjust the crossover frequency that separates the bands. Additionally, each of the bands can be panned in the stereo image, further increasing the creative potential of the Crossover.
Tip
You can nest multiple Crossover Components to further divide the frequency spectrum and create more complex effects.
The Crossover contains the following parameters and controls:
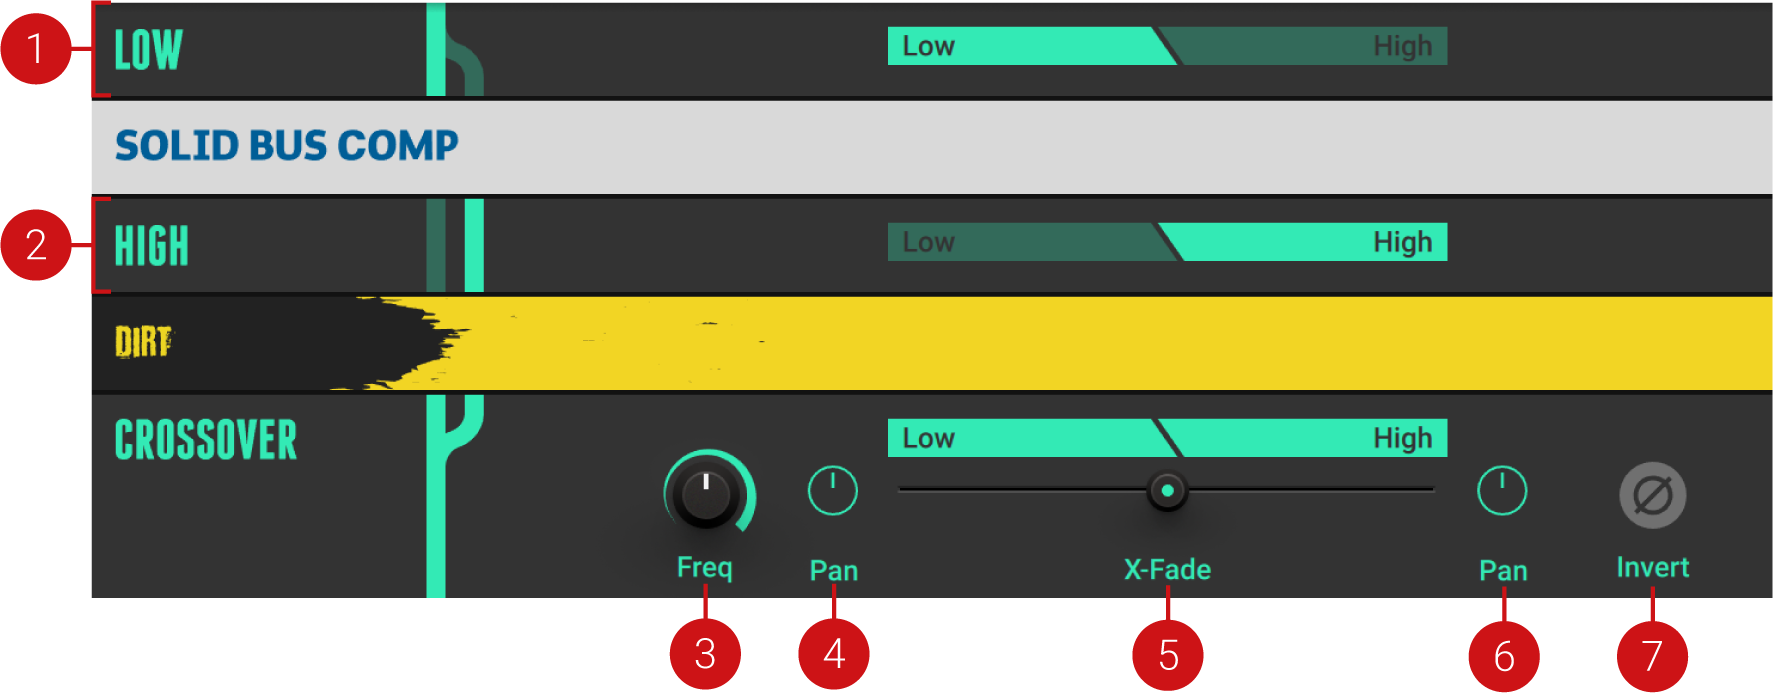
LOW: Feeds the Low band into the Components inserted below.
HIGH: Feeds the High band into the Components inserted below.
Freq: Adjusts the crossover frequency at which the frequency spectrum is divided into the Low and High bands.
Pan Low: Adjusts the position of the Low band in the stereo image.
X-Fade: Blends between the Low and High bands. Moving the fader to the left increases the level of the Low band and decreases the level of the High band, and vice versa.
Pan High: Adjusts the position of the High band in the stereo image.
Invert: Inverts the polarity, or phase, of the High band. When mixing the Low and High bands, this creates interesting phase cancellation effects.
Loop Machine Pro
Loop Machine Pro is a looper that enables you to record, play back, and overdub multiple layers of audio played back as a loop. You can use it to build compositions in live performances, or stack up sounds to create intricate loops. Recording and playback can be synchronized to the Metronome, and the tempo of your DAW. Additionally, you can export your loop or each individual layer as audio files. Loop Machine Pro remains in the Rack even if you load a new preset or clear the Rack, so you can use your recorded loops with different presets and Rack configurations.
Caution
Loops recorded in Loop Machine Pro are neither saved in presets nor the DAW's project file. You can use the File menu in Loop Machine Pro's Settings panel to save loops or export audio files.
Loop Machine Pro contains the following parameters and controls:

Input: Adjusts the input level of the Component.
Sidechain: Replaces Loop Machine Pro's input signal with Guitar Rig's global sidechain signal. When Sidechain is activated, Input is replaced with the Sidechain control, and Rec Pan in the Settings panel is replaced with the Side Pan control.
Sidechain: Adjusts the level of the global sidechain signal used as Loop Machine Pro's input signal.
Side Pan: Adjusts the panning of the global sidechain signal used as Loop Machine Pro's input signal, determining the stereo position of the recording. By changing Side Pan when recording multiple layers you can distribute them in the stereo field.
Layer Undo/Redo: Deletes the current layer, and restores the last deleted layer. Clicking Undo repeatedly deletes layers one after the other, starting from the most recent. You can only restored the most recent layer. The number indicates the count of layers contained in the loop.
Loop Speed: Switches the playback and recording speed between 2x (double time) 1x (regular time), and /2 (half time).
Record/Play/Overdub: Starts recording, overdubbing, or playback, depending on the state of the loop. Clicking the control when the loop is empty starts recording. Clicking the control when the loop is playing starts overdubbing. Clicking the control when playback is stopped starts playback. The color-coding indicates the state of the loop, red (recording), orange (overdubbing), green (playback). When recording is armed, the record icon will pulse.
Clear Loop: Clears all layers in the loop.
Playback Direction: Switches between regular and reverse playback.
Playback Time: Displays the current playback position in the loop in the format minutes:seconds.milliseconds.
Loop Length: Displays the loop length in the format minutes:seconds.milliseconds.
Loop Select: Switches between loops A and B. Only one loop can be heard at a time. If Record Length has been defined, playback will resume at the same position in the loop. If Record Length has been set to Free, playback will start from the beginning of the loop. When recording or overdubbing and switching to an empty loop, recording will start.
Transport: Controls the playback and recording of the active loop.
Record/Play/Overdub: Starts recording, overdubbing, or playback, depending on the state of the loop. Clicking the control when the loop is empty starts recording. Clicking the control when the loop is playing starts overdubbing. Clicking the control when playback is stopped starts playback. The color-coding indicates the state of the loop, red (recording), orange (overdubbing), green (playback). When recording is armed, the record icon will pulse.
Stop: Stops recording, overdubbing, or playback, depending of the state of the loop. Double-clicking Stop clears all layers in the active loop.
Volume: Adjusts the output level of the Component.
Settings Panel: Consists of global functions and settings that determine the basic behavior of Loop Machine Pro. For more information, refer to Settings Panel.
Settings Panel
The Settings panel in Loop Machine Pro offers control over the recording and metronome behavior, and gives you access to the File menu for opening and saving loops as well as exporting audio files.
The Settings panel contains the following parameters and options:
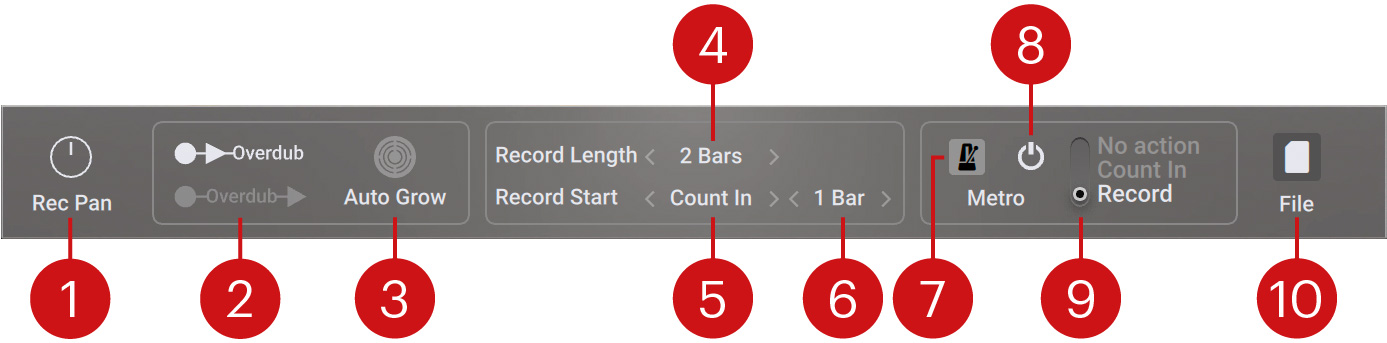
Rec Pan: Adjusts the panning of the input signal from left to right, determining the stereo position of the recording. By changing Rec Pan when recording multiple layers you can distribute them in the stereo field.
Overdub mode: Switches the overdubbing behavior between Record > Play > Overdub and Record > Overdub > Play. When Record > Play > Overdub is selected, clicking Record/Play/Overdub during recording will start playback. When Record > Overdub > Play is selected, clicking Record/Play/Overdub during recording will start overdubbing.
Auto Grow: Enables overdubbing of layers that exceed the original loop length. When Auto Grow is activated, the loop length doubles as soon as the new layer exceeds the original loop length.
Record Length: Sets the loop length in advance of recording. When set to None, the loop length will be set according to the first recorded layer.
Record Start: Selects one of three different recording modes. When Direct is selected, clicking record immediately starts recording. When Auto Detect is selected, recording will start once the input level exceeds -60 dB. When Count In is selected, recording is synchronized to the tempo of the Metronome and will start after a count-in as set using Count In Length. If the Metronome's Sync mode is set to Extern, the count-in will be started on the first beat of the next bar.
Count In Length: Sets the length of the count-in in bars. This setting is only available when Record Start is set to Count In.
Show Metronome: Shows or hides the Metronome in the Rack.
Metronome On/Off: Switches the Metronome on or off. The Metronome restarts when it is switched on unless its Sync mode is set to Extern.
Metronome Mode: Switches between three different modes that determine how the Metronome's click sound is played back during recording. When set to No action, the click remains muted. When set to Count In, the click is played back during count-in. When set to Record, and Record Length is defined, the click continues playing until it is manually muted. When set to Record, and Record Length is set to Free, the click is played during count-in and for the duration of the recording.
File: Enables opening and saving loops, as well as exporting audio files.
Open: Opens a previously saved loop file from the hard drive.
Save: Saves a loop file on the hard drive.
Export Current Loop Mixed: Exports an audio file that contains a mix of all layers in the loop.
Export Current Loop As Single Layers: Exports individual audio files for each of the layers in the loop.
Assigning a MIDI Controller to Loop Machine Pro
If you want to use a MIDI controller to control Loop Machine Pro, you first need to assign Macros that you can then map to your MIDI controller. For more information about mapping MIDI controllers, refer to MIDI Control. For more information about assigning Macros, refer to Macros.
Record/Overdub/Play, Stop, Loop Select: Requires assignment to a Macro configured as a button with Momentary mode activated.
Playback Direction: Requires assignment to a Macro configured as a button.
Loop Speed: Requires assignment to a Macro configured as a knob. A MIDI value of 0 will set half time, a value of 63 will set regular time, and a value of 127 will set double time. If your MIDI controller allows you to set specific MIDI values for button states, you can for example set the Off state to 63 and the On state to 127 in order to switch between regular and double time.
Split Mix
Split Mix is a Splitter that feeds the input into two parallel effects chains. You can add Components to the A and B path independently, and freely adjust the both the panning and mix of the two paths before the output. Additionally, you can split the left and right stereo channels of the input and route them to the A and B path, respectively. This makes it possible to create stereo effects using any combination of Components.
Tip
You can nest multiple Split Mix Components to increase the number of parallel effects chains.
The Split Mix contains the following parameters and controls:
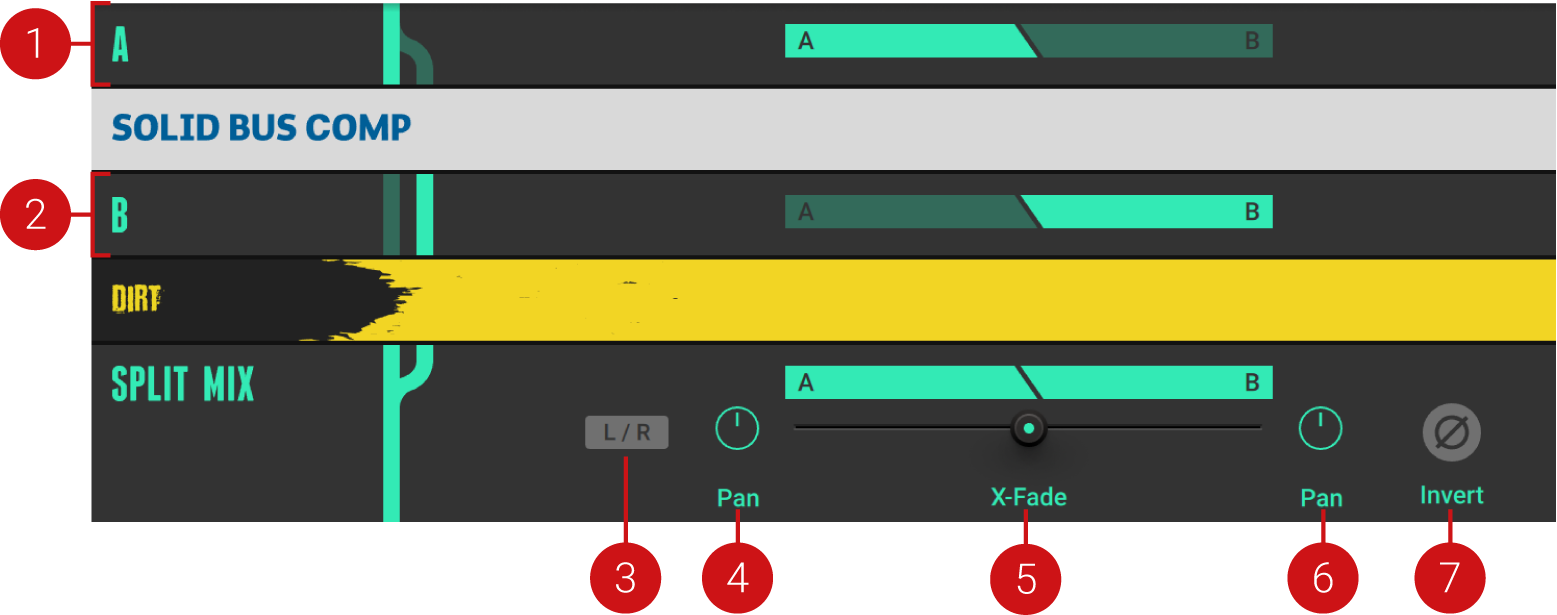
A path: Feeds the A path into the Components inserted below.
B path: Feeds the B path into the Components inserted below.
L/R: Routes the input's left stereo channel to the A path and the right stereo channel to the B path.
Pan A: Adjusts the position of the A path in the stereo image.
X-Fade: Blends between the A and B paths. Moving the fader to the left increases the level of the A path and decreases the level of the B path, and vice versa.
Pan B: Adjusts the position of the B path in the stereo image.
Invert: Inverts the polarity, or phase, of the B path. When mixing the A and B paths, this creates interesting phase cancellation effects.
Split M/S
Split M/S is a splitter that separates the mid and side signals of the input, each feeding their own effects chain. The mid signal contains all information that is shared between the stereo channels. The side signal contains all information that is different between the stereo channels. In practical terms, the mid signal contains the direct sound of the instruments, while the side signal contains the reverb and other stereo effects. You can add Components to the MID and SIDE band independently, and adjust the mix of the two bands before the output.
Tip
You can nest the Crossover in Split M/S to process specific frequency bands both in the mid and side bands.
The Split M/S contains the following parameters and controls:
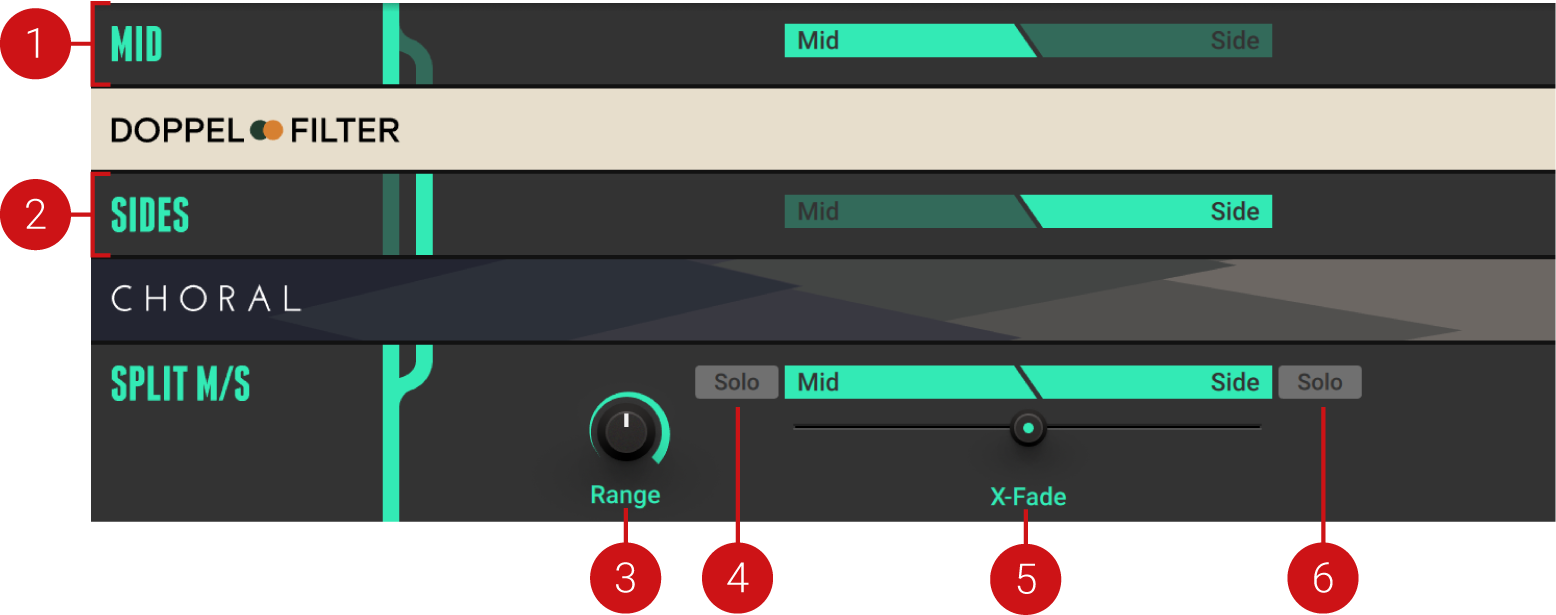
MID: Feeds the mid band into the Components inserted below.
SIDE: Feeds the side band into the Components inserted below.
Range: Adjusts the maximum attenuation of the X-Fade on either side of its range. Turning Range to the right increases the separation between the mid and side bands when using X-Fade.
Solo Mid: Replaces the output with the direct signal from the mid band.
X-Fade: Blends between the mid and side bands. Moving the fader to the left increases the level of the mid band and decreases the level of the side band, and vice versa.
Solo Side: Replaces the output with the direct signal from the side band.