Rack Tools
Rack Tools in Guitar Rig provide the Rack's infrastructure, including macro control, audio recording, metronome, tuner, volume control, and global effects.
The Rack Tools provide the Rack's infrastructure, including macro control of parameters, audio recording, a metronome and a tuner, as well as additional volume control and global effects. You can show or hide each Rack Tool individually from the Toolbar.
The following overview shows you the Rack Tools in the Toolbar:
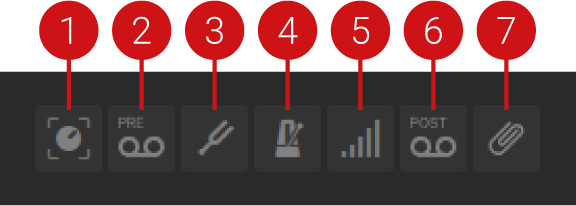 |
Show Macros: Shows the Macros Rack Tool in the Rack. Macros are global controls that can be assigned to any parameter in the Rack. For more information, refer to Macros.
Show Tapedeck Pre: Shows the Tapedeck Pre Rack Tool in the Rack. The Tapedeck Pre is an audio recorder that can be used for recording and playing back the Rack's input signal. For more information, refer to Tapedeck Pre.
Show Tuner: Shows the Tuner Rack Tool in the Rack. The Tuner is an electronic tuner that can be used to detect the pitch of the notes played by an instrument. For more information, refer to Tuner.
Show Metronome: Shows the Metronome Rack Tool in the Rack. The Metronome is a metronome and musical clock that can be used to play to a click track. Additionally, it sets the global tempo reference for the Rack. For more information, refer to Metronome.
Show Preset Volume: Shows the Preset Volume Rack Tool in the Rack. The Preset Volume is a level control that can be used to compensate for loudness differences between presets. For more information, refer to Preset Volume.
Show Tapedeck Post: Shows the Tapedeck Post Rack Tool in the Rack. The Tapedeck Post is an audio recorder that can be used for recording and playing back the Rack's output signal. For more information, refer to Tapedeck Post.
Show Global FX: Shows the Global FX Rack Tool in the Rack. The Global FX host Components that are independent of the loaded preset and are applied to the output signal of the Rack. For more information, refer to Global FX.
Macros
Macros provide global controls that can be assigned to any parameter in the Rack. They enable you to create a set of controls that bring out the most of your custom multi-effect.
Note
If a Macro is assigned to a parameter in the Rack Tools or Loop Machine Pro, it cannot be assigned to any other parameter. When loading a preset, Macro assignments to parameters in the Rack Tools or Loop Machine Pro take preference and persist even if the preset includes assignments for the respective Macro.
The Macros contain the following parameters and controls:
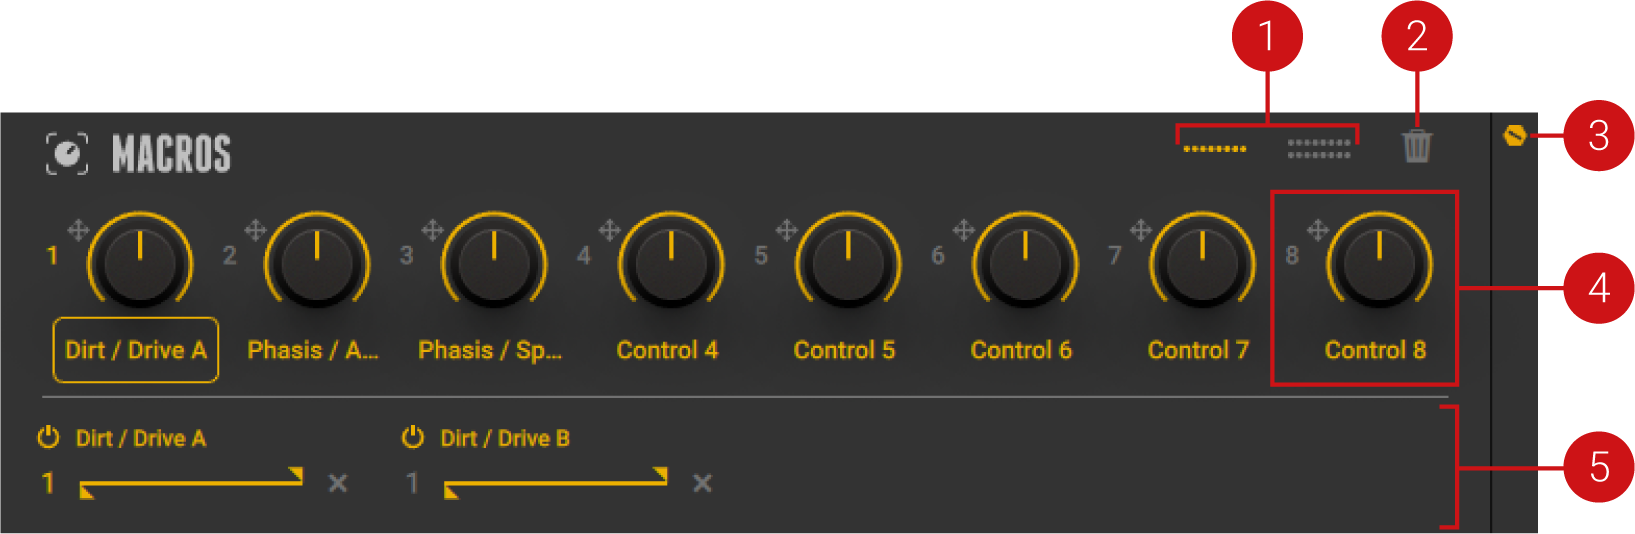
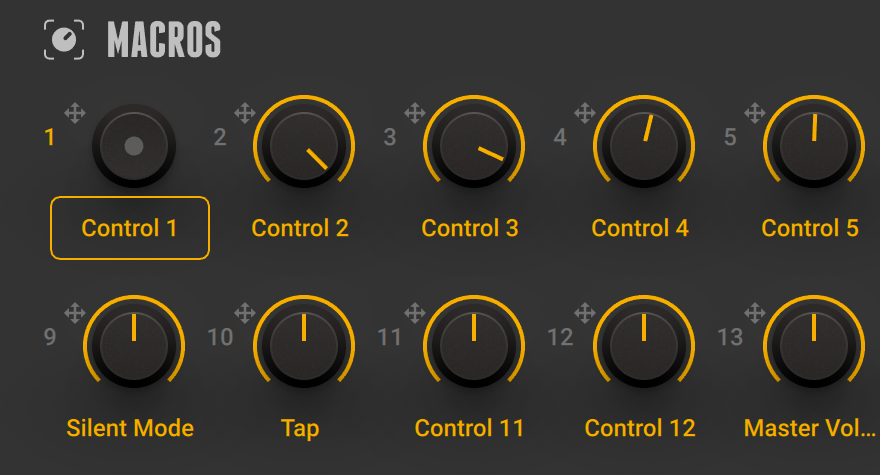
Macro Layout selector: Switches the number of Macros between 8 and 16. When decreasing the number of Macros, all but the remaining Macros are deactivated. However, previous parameter assignments and MIDI mappings are restored when increasing the number of Macros again.
Clear Macros: Clears all Macro assignments with the exception of parameters in the Rack Tools or Loop Machine Pro, which can be deleted individually in the Expert panel. For more information, refer to Editing Macros.
Show Expert panel: Shows the Expert panel that you can use to display and edit the assignments of the selected Macro.
Macro control: Controls parameters of Components in the Rack, allowing you to create custom effect controls. For information, refer to Assigning Macros.
Expert panel: Displays the assignments of the selected Macro and provides functions to edit them. For more information, refer to Editing Macros.
Configuring Macros
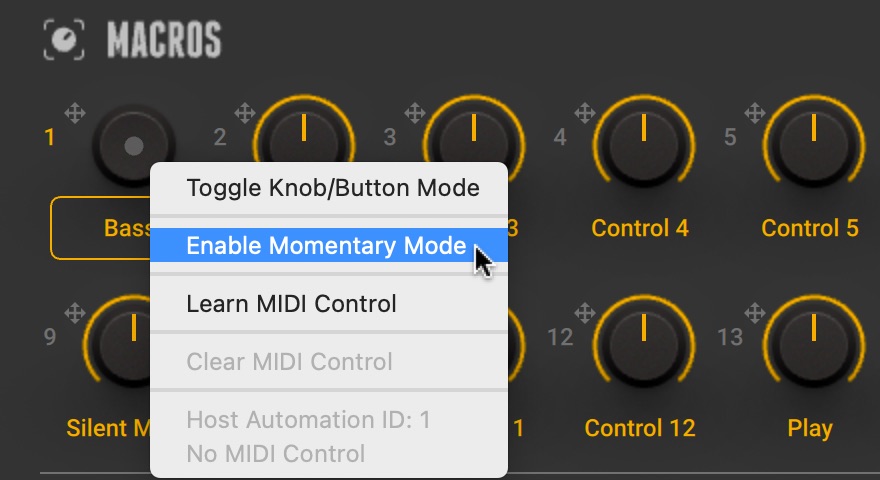
Macros can be configured as rotary knobs or buttons. Macro buttons enable you to switch functions on multiple Components at the same time, or adapt the Macros to the layout of your MIDI controller. Additionally, you can use Macro buttons creatively by assigning them to any control on Components and toggle between two specific values. You can set specific values for each of the assigned controls in the Expert panel. For more information, refer to Editing Macros.
To change the configuration of a Macro as either knob or button:
Right-click the Macro and select Toggle Knob/Button Mode.
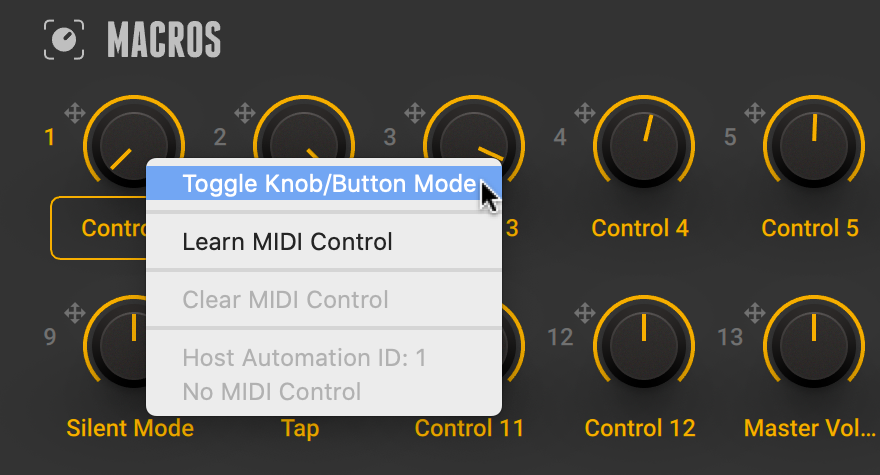
The configuration of the the Macro is changed.
When a Macro is configured as a button, it can be set to either Toggle or Momentary mode. In Toggle mode, the button changes its state each time it is pressed. In Momentary mode, the button holds the On value for as long as the button is pressed, and returns to the Off value as soon as it is released.
To activate Momentary mode, right-click the Macro button and select Enable Momentary Mode.
Assigning Macros
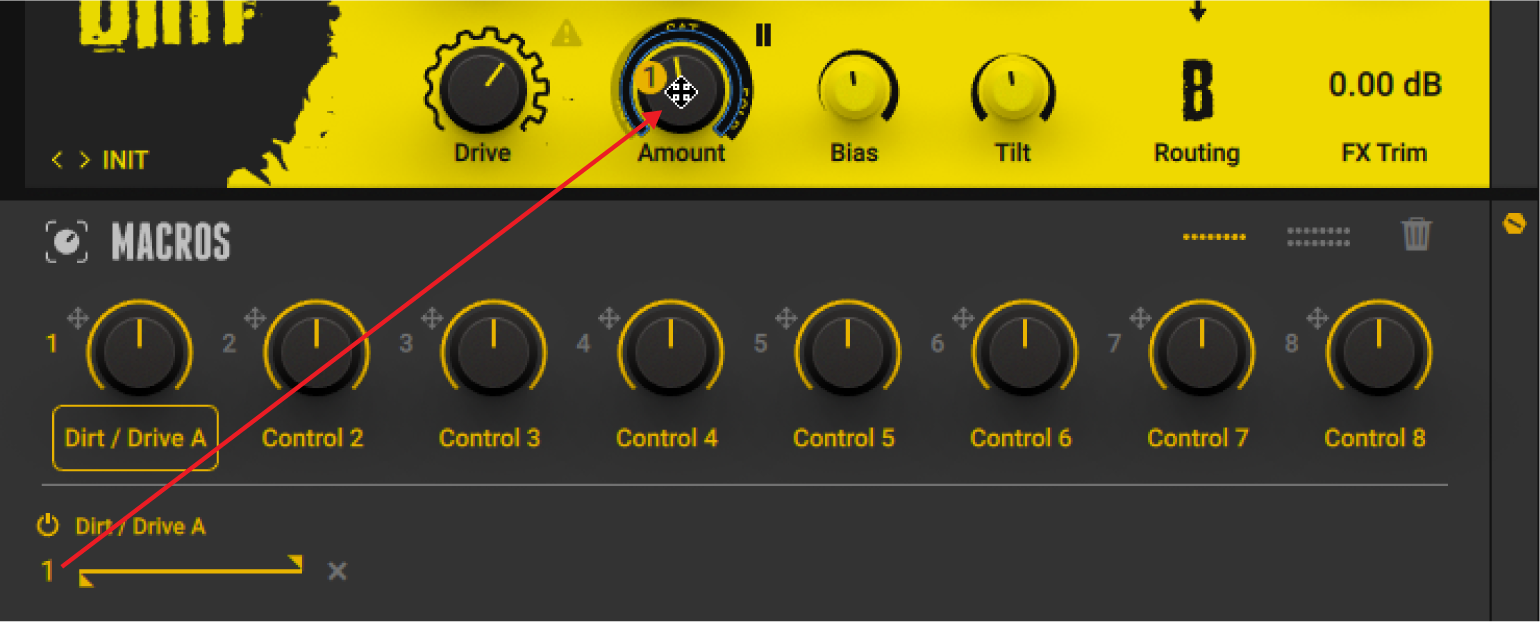
You can assign Macros to parameters using drag and drop. A single Macro can be assigned to up to eight parameters at the same time.
Click the Macro number icon or the target icon next to it, and keep the mouse button pressed.

Drag and drop the icon onto the parameter you want to assign the Macro to.
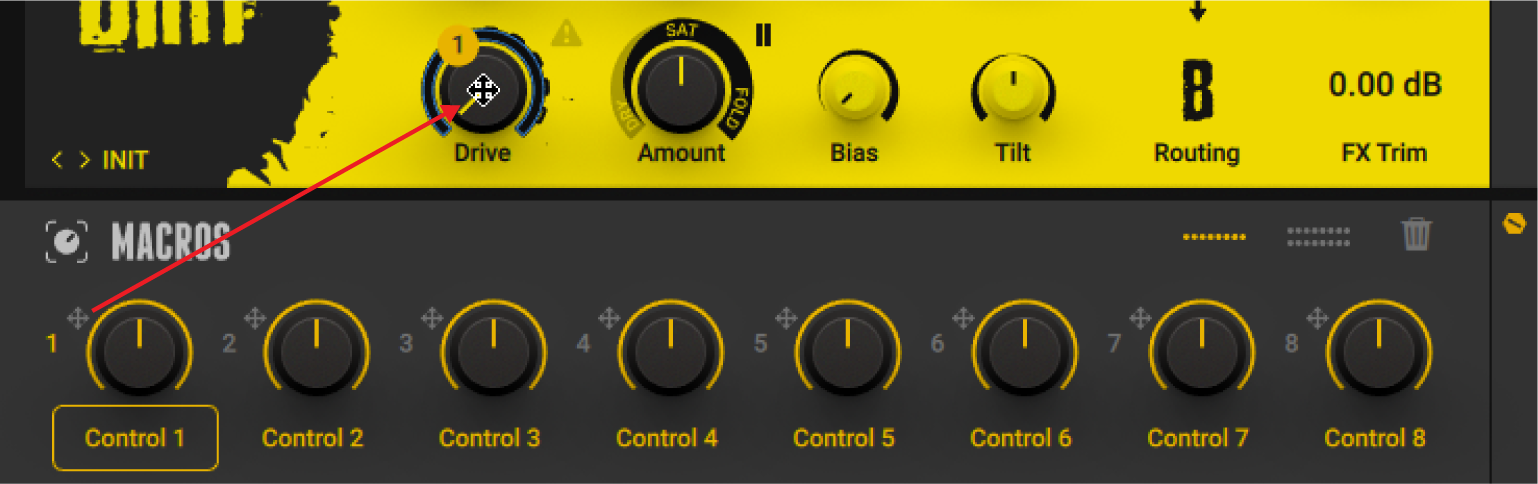
The Macro is assigned to the parameter, and the Expert Panel displays the assignment accordingly.
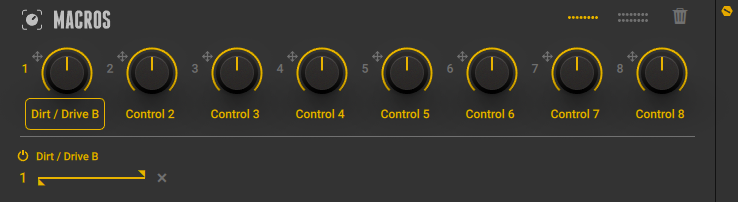
Editing Macros
The Macros' Expert panel displays the assignments of the selected Macro and provides functions to deactivate, reassign, delete, and adjust the range of assignments. Additionally, you can rename Macros directly on their label
The Macro's Expert panels share the following controls used for editing assignments:

Assignment On/Off: Switches the respective assignment on or off.
Reassign: Enables you to reassign the assignment by dragging and dropping the icon onto the new parameter.
Macro Range: Adjusts the range of Macro control applied to the assigned parameter by setting the minimum and maximum value. When moving the maximum value past the minimum value, the response of the parameter to the Macro control is reversed.
Delete: Removes the assignment.
Deactivating Assignments
To deactivate an assignment, click the Assignment On/Off button.

The assignment is deactivated and the assigned parameter will not be controlled by the Macro. You can click the Assignment On/Off button again to activate the assignment.
Reassigning Assignments
To reassign an assignment, drag and drop the Assignment number icon to the new parameter.
The assignment is removed from the original parameter and assigned to the new parameter.
Deleting Assignments
To delete an assignment, click on the x button next to it.

The assignment is removed from the parameter.
Adjusting the Range of Assignments
The range of an assignment determines the response of the assigned parameter to the Macro control. You can adjust the range by setting its minimum and maximum value on the range slider.
To adjust the range of an assignment, move the minimum and maximum values (triangle icons) on the range slider.

Note
The range settings are saved in relation to the assigned parameter. When deleting and reassigning assignments, or when assigning additional Macros to the same parameter, the range settings are preserved.
Tip
By moving the maximum value past the minimum value or vice versa, you can invert the range of the assignment. In this case the response of the parameter to the Macro control is reversed.
Renaming Macros
To rename a Macro:
Double-click the Macro's label.
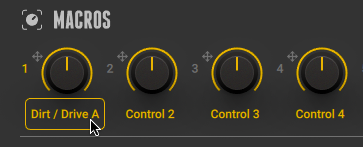
Type in the new name for the Macro and press [Enter] to confirm.
The new name appears in the Macro's label.
Tapedeck Pre
Tapedeck Pre is an audio recorder for recording and playback of the Rack's input signal. For example, you can use it to capture the direct sound of your instrument and play it back when building your Rack. Additionally, Tapedeck Pre enables you to open an audio file and process it using the Rack. You can open an audio file by dragging and dropping it onto the Tapedeck Component.
This Rack Tool contains the following parameters and controls:
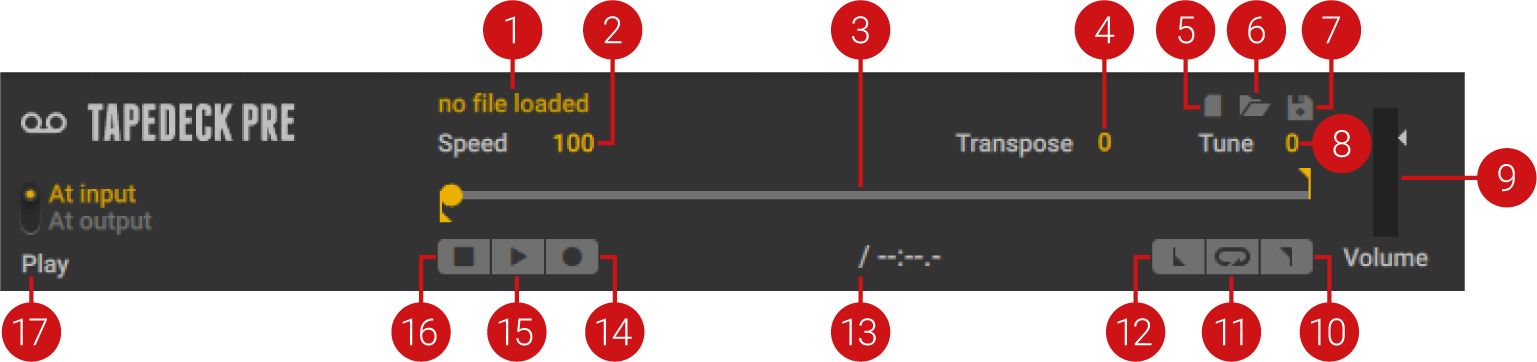
File name: Displays the file name of the loaded audio file.
Speed: Adjusts the playback speed of the audio file in the range of 50% to 150% while preserving the original pitch, enabling you to slow down a musical phrase when playing along in practice.
Timeline: Represents the lengths of the audio file. The dot indicates the playback position. You can move the dot along the timeline to adjust the playback position. The downward pointing Start marker indicates the start of the Loop, the upward pointing End marker indicates the end of the Loop. You can move the Loop markers along the timeline to adjust the length and position of the Loop.
Transpose: Adjusts the pitch of the audio file in the range of -12 to +12 semitones while preserving the original playback speed.
New file: Creates a new audio file and activates the Record button.
Open file: Opens a file dialog that loads an audio file from the hard drive. The supported file formats are WAV, AIFF, and MP3. Alternatively, you can drag and drop an audio file onto the Tapedeck Component to open it.
Save file: Opens a file dialog that saves the loaded audio file to the hard drive.
Tune: Adjusts the pitch in the range of -50 to +50 cents. You can use this control to fine-tune the setting made with the Transpose control.
Volume: Adjust the output level at which the playback is mixed with the input signal. The meter shows the peak level of the output signal. The red indicator at the top indicates clipping. When Record is activated, the peak level of the input signal is shown.
Loop End: Sets the End marker for the Loop at the current playback position.
Loop: Activates the Loop. When playback reaches the position of of the End marker, playback resumes at the position of the Start marker.
Loop Start: Sets the Start marker for the Loop at the current playback position.
Timecode: Shows the timecode in min:sec:ms. On the left side, the playback position is shown. On the right side, the length of the audio file is shown.
Record: Arms the recording and shows the peak level of the input signal on the meter of the Volume control. When Record is activated, you can start recording by clicking Play.
Play: Starts the playback of the audio file. When Record is activated, it starts the recording.
Stop: Stops the playback. Clicking Stop a second time resets the playback position to the Loop's Start marker. Clicking Stop a third time resets the playback position to the start of the audio file.
Play: Changes the routing for the output signal. When At input is selected, the output signal is sent to the Rack. This setting is used for regular operation of Tapedeck Pre. When At output is selected, the output signal bypasses the Rack and is sent to the input of Tapedeck Post. This setting can be used in combination with the Tapedeck Post's Transfer and Sync functions to create overdub recordings.
Tapedeck Post
Tapedeck Post is an audio recorder for recording and playback of the Rack's output signal. For example, you can use it to record the processed sound of your instrument, and edit the recorded audio file in another application. Additionally, Tapedeck Post enables you open an audio file and play it back as unprocessed backing track. You can open an audio file by dragging and dropping it onto the Tapedeck Component.
This Rack Tool contains the following parameters and controls:
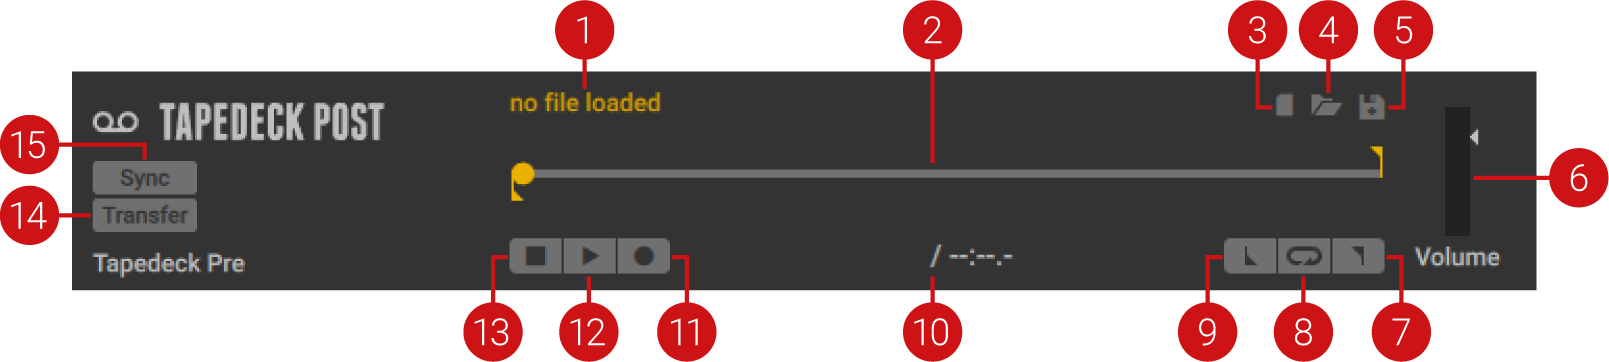
File name: Displays the file name of the loaded audio file.
Timeline: Represents the lengths of the audio file. The dot indicates the playback position. You can move the dot along the timeline to adjust the playback position. The downward pointing Start marker indicates the start of the Loop, the upward pointing End marker indicates the end of the Loop. You can move the Loop markers along the timeline to adjust the length and position of the Loop.
New file: Creates a new audio file and activates the Record button.
Open file: Opens a file dialog that loads an audio file from the hard drive. The supported file formats are WAV, AIFF, and MP3. Alternatively, you can drag and drop an audio file onto the Tapedeck Component to open it.
Save file: Opens a file dialog that saves the loaded audio file to the hard drive.
Volume: Adjust the output level at which the playback is mixed with the input signal. The meter shows the peak level of the output signal. The red indicator at the top indicates clipping. When Record is activated, the peak level of the input signal is shown.
Loop End: Sets the End marker for the Loop at the current playback position.
Loop: Activates the Loop. When playback reaches the position of of the End marker, playback resumes at the position of the Start marker.
Loop Start: Sets the Start marker for the Loop at the current playback position.
Timecode: Shows the timecode in min:sec:ms. On the left side, the playback position is shown. On the right side, the length of the audio file is shown.
Record: Arms the recording and shows the peak level of the input signal on the meter of the Volume control. When Record is activated, you can start recording by clicking Play.
Play: Starts the playback of the audio file. When Record is activated, it starts the recording.
Stop: Stops the playback. Clicking Stop a second time resets the playback position to the Loop's Start marker. Clicking Stop a third time resets the playback position to the start of the audio file.
Transfer: Sends the loaded audio file to Tapedeck Pre. If an audio file is loaded in Tapedeck Pre, it is replaced by the audio file received from Tapedeck Post. You can use this to create overdubs by playing back a previously recorded file in Tapedeck Pre, playing on top of the playback, and recording the result in Tapedeck Post.
Sync: Synchronizes the transport of Tapedeck Pre and Tapedeck Pro. When activated, the Play and Stop buttons of either Tapedeck control both Tapedecks simultaneously.
Tuner
Tuner is an electronic tuner that can be used to detect the pitch of the notes played by an instrument. Additionally, it provides a number of different tuning modes and can also be used to produce a reference tone.
This Rack Tool contains the following parameters and controls:
Note
Some of the controls are contained in the Expert panel. For information about showing or hiding the Expert panel, refer to Component Controls.
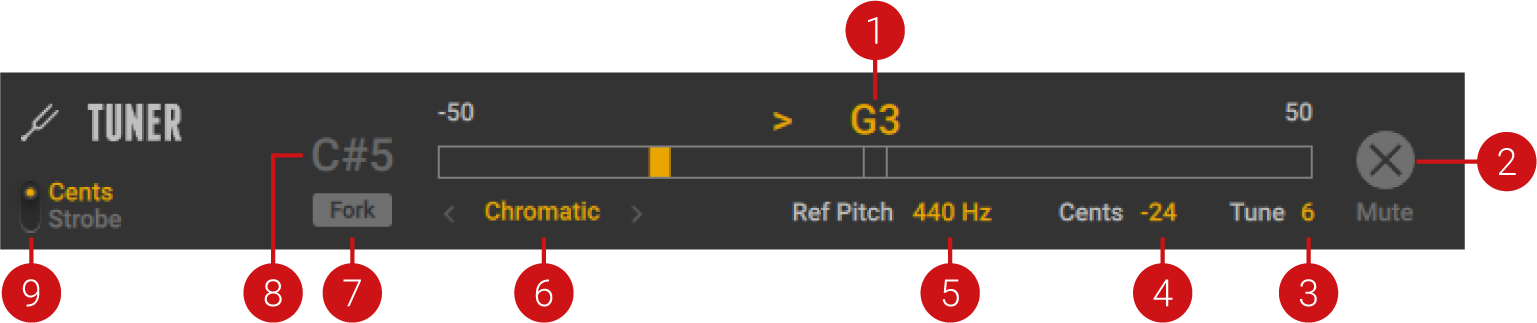
Tuning display: Shows the tuning of the input signal in relation to musical pitches. The deviation from the ideal tuning is shown either in cent or as a strobe display, depending on the mode set using Cents/Strobe.
Mute: Mutes the output of the Tuner, but not the reference tune when Fork is activated. Muting the output is useful when tuning an instrument in a live situation.
Tune: Transposes the tuning range in the range of -7 to +7 semitones.
Cents: Shows the deviation from the ideal tuning in cents.
Ref Pitch: Sets the tuning reference for the A in the range of 425 to 455 Hz.
Tuning: Selects between 8 available tuning modes. You can set the tuning mode by clicking on it and selecting an entry from the drop-down menu, or by clicking on the < and > arrows.
Fork: Activates the reference tone. The pitch of the reference tone can be set using the Fork Pitch control.
Fork Pitch: Sets the pitch of the reference tone that can be activated using Fork.
Cents/Strobe: Switches between two available modes for the visualization in the Tuning display.
Cents: The display shows the deviation from the ideal tuning to musical pitches in cents. When the yellow indicator is on the left side of the display, the tuning is flat in the range of -50 to -1 cents. When the yellow indicator is on the right side of the display, the tuning is sharp in the range of +1 to +50 cents. When the indicator turns green at the center of the display, the tuning is ideal.
Strobe: The display shows strobe lights to indicate the relationship between the tuning and the musical pitches. When the strobe lights are moving to the left, the tuning is flat. When the strobe lights are moving to the right, the tuning is sharp. The faster the strobe lights move, the higher is the deviation from the ideal tuning. When the strobe lights stop moving, the tuning is ideal.
Metronome
Metronome is a metronome and musical clock that can be used to play to a click sound. Additionally, it sets the global tempo reference for the Rack, which Components can use to synchronize parameters to the beat of the music.
This Rack Tool contains the following parameters and controls:
Note
Some of the controls are contained in the Expert panel. For information about showing or hiding the Expert panel, refer to Component Controls.
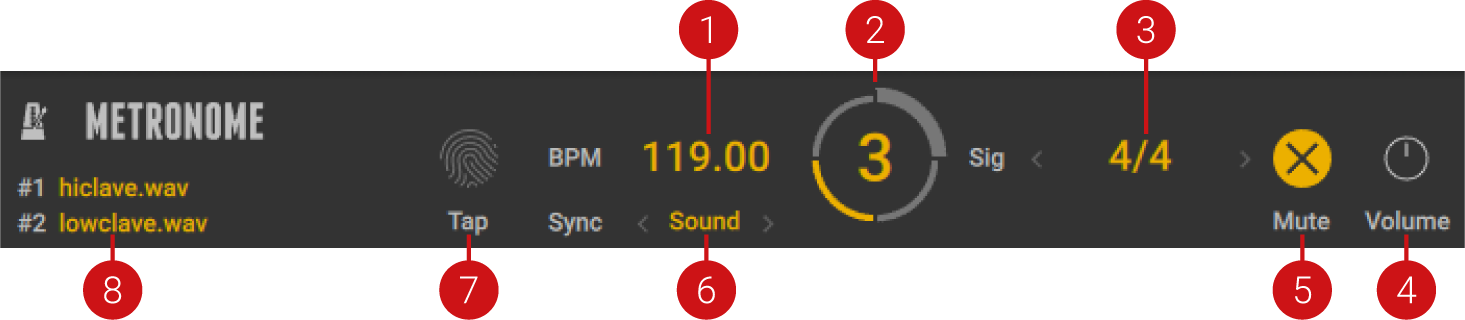
BPM: Sets the tempo of the Metronome in the range of 20 to 400 beats per minute.
Beat display: Shows the number of the active beat in the bar. Additionally, the time signature as set with Sig is displayed as a circular indicator.
Sig: Sets the time signature of the Metronome. You can set the time signature by clicking on it and selecting an entry from the drop-down menu, or by clicking on the < and > arrows.
Volume: Adjusts the output level of the Metronome's audible click.
Mute: Mutes the Metronome's audible click.
Sync: Selects one of three available synchronization modes for the Metronome.
Extern: The tempo and time signature are synchronized to the DAW (Guitar Rig plug-in) or incoming MIDI clock (Guitar Rig stand-alone application). In this mode the Tap, BPM, and Sig controls are deactivated.
Free: The tempo and time signature are set independently of the loaded preset using the Tap, BPM, and Sig controls.
Sound: The tempo and time signature are set according to the values saved in the preset, and can be changed using the Tap, BPM, and Sig controls.
Tap: Sets the tempo according to the average interval of repeated clicks on the control. Tap overwrites the tempo set using the BPM control.
Tip
You can also assign a MIDI controller to Tap for hardware control. For more information, refer to Using MIDI Learn.
#1 / #2: Displays the audio files used to play the Metronome's click, and enables you to change them by clicking on the file names. Audio file #1 is played on downbeats and accentuated beat divisions. Audio file #2 is played on all other beats. These menus are available in the Expert Panel.
Preset Volume
Preset Volume is a utility for adjusting the output level and effect mix of a preset. Since amplifiers and distortion are highly sensitive to level differences, gain settings play an important role in sound design, resulting in vastly different volume levels. Preset Volume enables you to compensate for this by adjusting the output level, assisted by the automatic Learn function. Mix can be used to blend the input and the effect signal, for example to achieve parallel compression.
Note
When its view is collapsed, Preset Volume still shows the Volume and Learn controls, enabling you to apply these key functions while saving space in the Rack.

Volume: Adjusts the output level of the preset before the Global FX.
Learn: Adjusts Volume automatically by analyzing the input signal and determining the optimal output level. For best results, play loudly while the analyzation is in progress.
Wet: Adjusts the level of the processed effect signal from the Rack before the Mix control is applied.
Mix: Blends between the input signal of Guitar Rig and the processed effect signal from the Rack. You can use this to achieve parallel processing, for example parallel compression.
Dry: Adjusts the level of the input signal of Guitar Rig that can be blended into the processed effect signal from the Rack using the Mix control.
Post Mix / Pre Mix: Changes the routing and behavior of the Mix control. When set to Post Mix, Mix blends the Dry signal (unprocessed Guitar Rig input signal) with the Wet signal (processed Rack output signal). When set to Pre Mix, Mix splits the signal before the Rack, adjusting both the level of the Dry signal and the level of the Wet signal. Since this affects the Rack input level, the sound of Components may change, in particular amplifiers and distortion.
Global FX
Global FX contains Components that are independent of the loaded preset and are applied to the output signal of the Rack. Therefore, you can use the Global FX to set up an effects chain that finalizes and polishes the sound of any preset you load.
Tip
Since the Global FX are independent of presets, the decay of long echoes and reverbs is not cut off when loading a new preset. You can use this to create smooth transitions when switching between presets.
This Rack Tool contains the following parameters and controls:
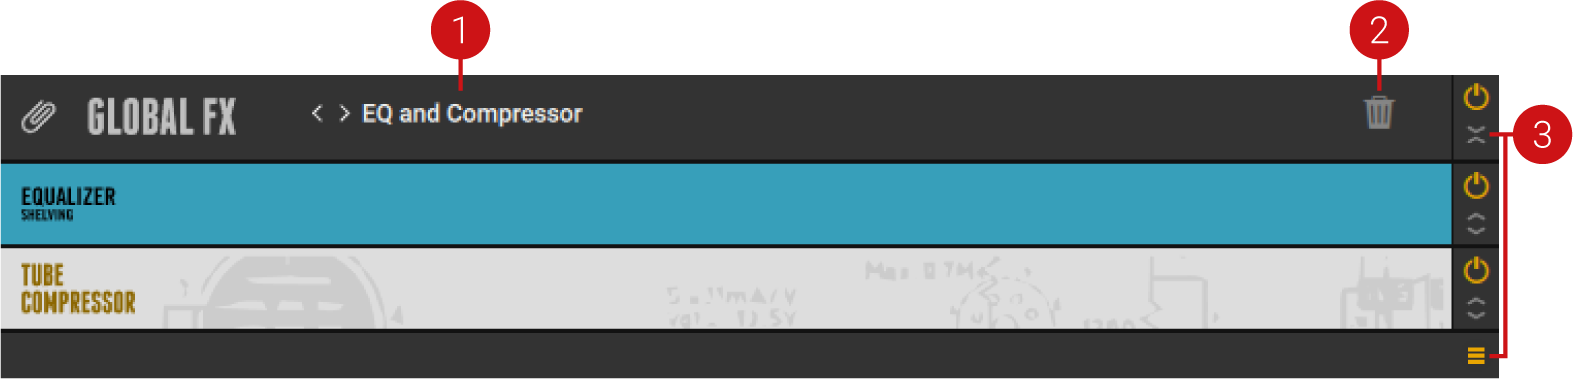
Preset menu: Recalls and saves presets for the Global FX. This menu can be used in the same way as the Preset menu in Components. For more information, refer to Using Component Presets.
Clear Global FX: Clears the contents of the Global FX.
Show Content: Shows or hides the list of Components in the Global FX.
Note
You can add, remove, replace, and move Components in the list in the same way as in the Rack. For more information, refer to Using the Rack.