Overview of the Rack
The Rack is at the heart of Guitar Rig. Here you can combine and tweak the individual effects, called Components, to create any multi-effect imaginable.
The Rack is at the heart of Guitar Rig. Here you can combine and tweak the individual effects, called Components, to create any multi-effect imaginable. The required infrastructure is provided using dedicated Rack Tools, which are accessible through the Rack's Toolbar.
The following overview shows you the basic structure of the Rack:
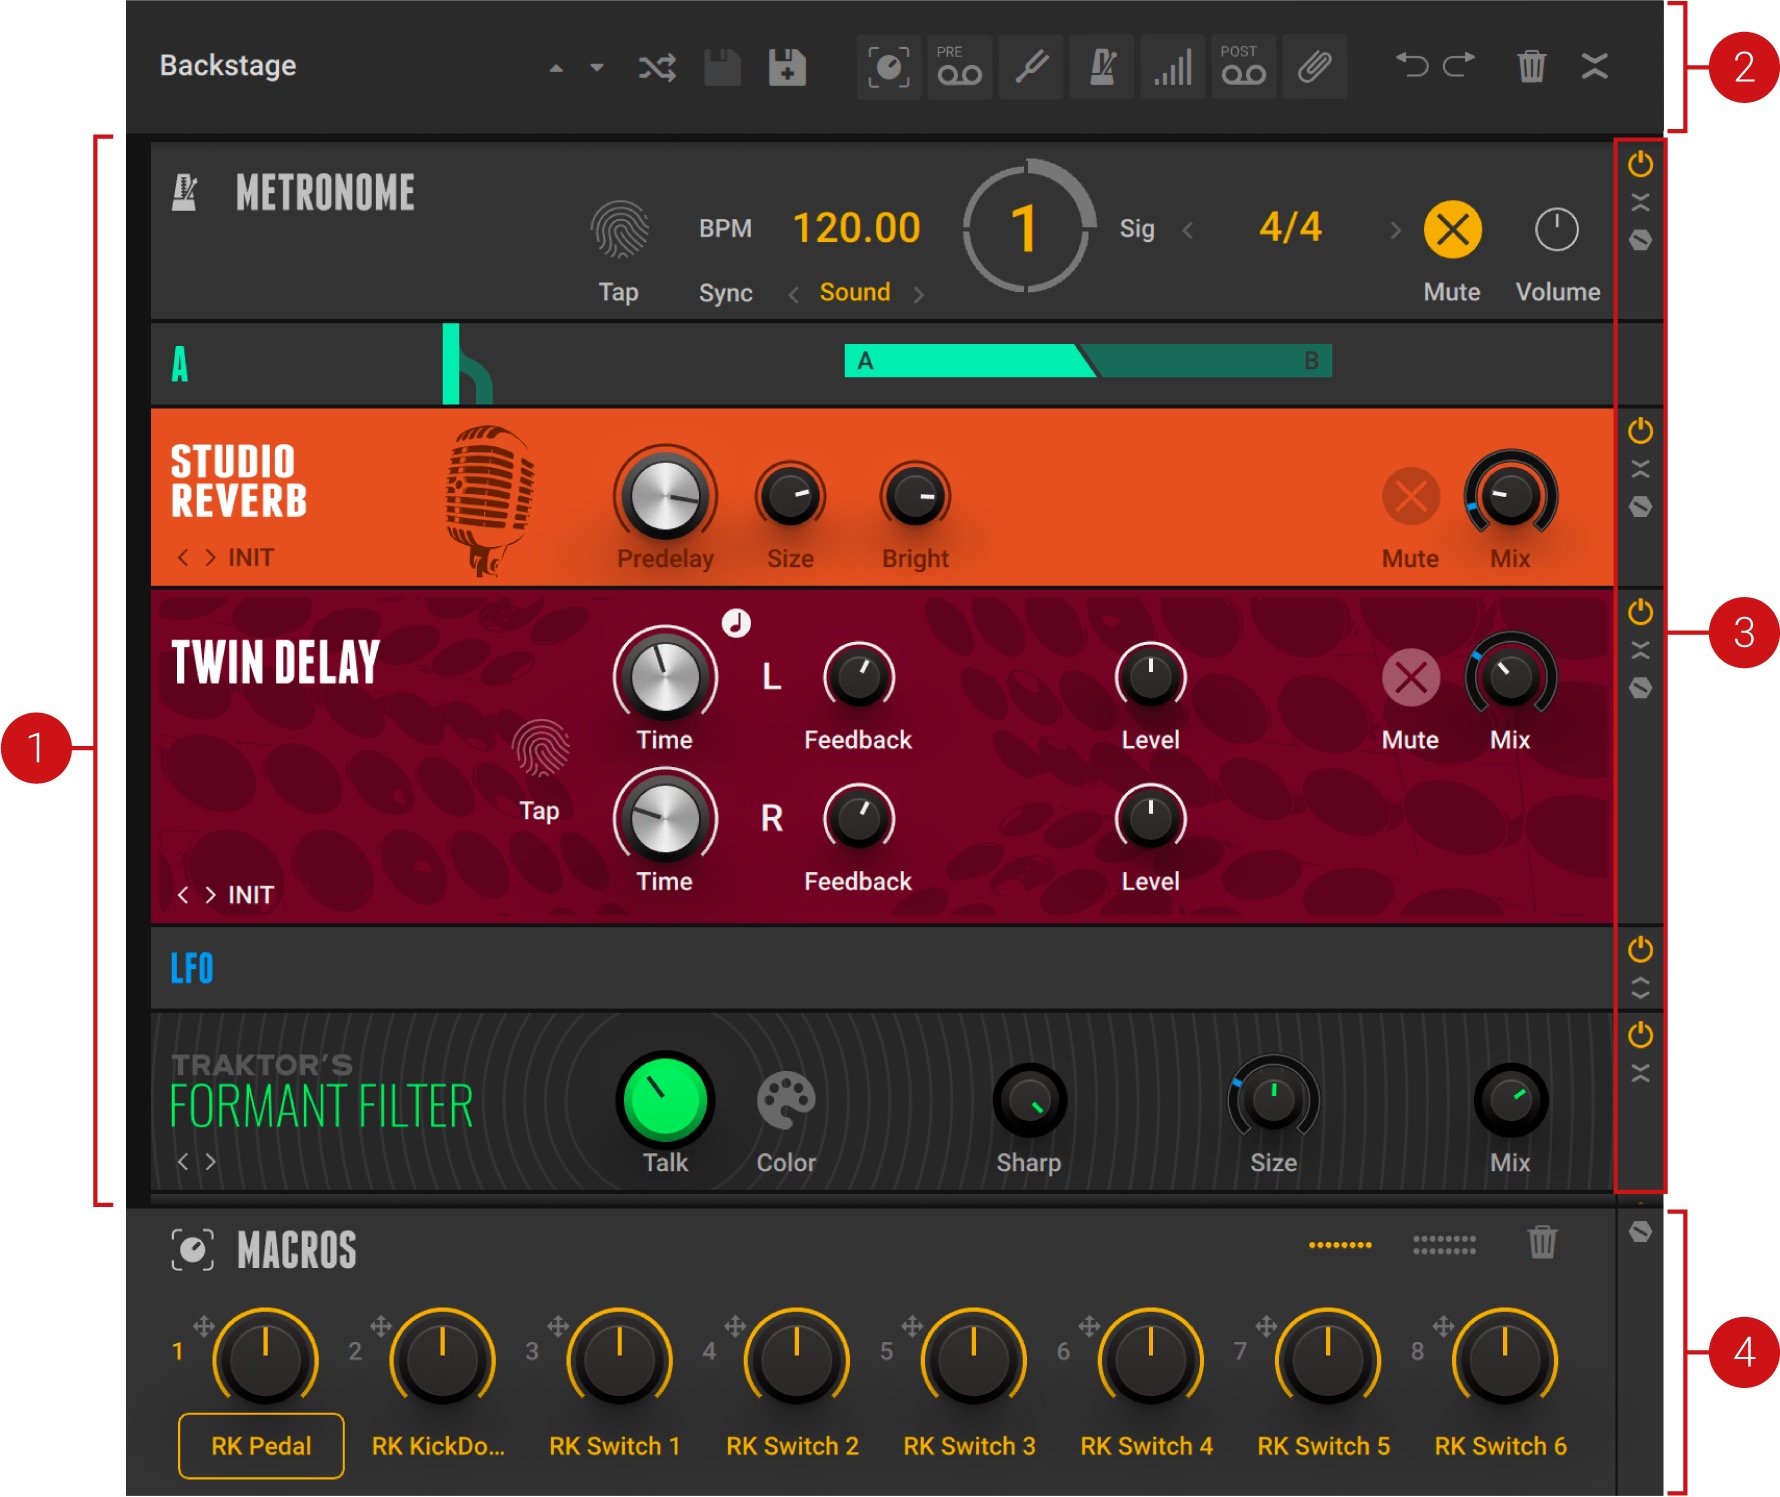 |
Components: In the main area of the Rack you can add Components, arrange them in elaborate effects chains, and tweak all of their controls. For more information, refer to Using the Rack.
Toolbar: The Toolbar gives access to important Rack controls and the Rack Tools, which provide the Rack's infrastructure. For more information, refer to Toolbar.
Component controls: The Component controls provide common functions that are found on most Components. For more information, refer toComponent Controls .
Macros: The Macros are a special Rack Tool providing global controls that can be assigned to any parameter in the Rack. For more information, refer to Macros.
Toolbar
The Toolbar enables you to switch between and save presets, clear the Rack, collapse or expand all Components, and show or hide the Rack Tools, which provide the Rack's basic infrastructure.
Note
The Guitar Rig stand-alone application retains settings made in the Toolbar from the last session. The plug-in uses default settings (all Rack Tools hidden).
The following overview shows you the controls and settings in the Toolbar:

Preset display: Shows the loaded preset. When the preset has been changed, this is indicated by a * following the preset name.
Preset selection: Switches between presets in the Browser's Results list. For more information, refer to Loading Presets.
Preset Shuffle: Loads a random preset from the Browser's Results list. For more information, refer to Loading Presets.
Save preset: Saves the loaded User preset. When no User preset is loaded, the button is deactivated and grayed out. For more information, refer to Saving User Presets.
Save new preset: Saves the loaded preset as a new User preset. For more information, refer to Saving User Presets.
Show Rack Tools: Show the individual Rack Tools in the Rack. For more information, refer to Rack Tools.
Undo/Redo: Reverts the last change made to the Rack (undo, left arrow icon), and repeats the last change from the undo history (redo, right arrow icon).
Clear Rack: Clears the contents of the Rack and all Macro assignments.
Collapse/Expand All: Expands or collapses the view of all Components in the Rack. When expanded, the Components are shown in full, including all of their controls. When collapsed, the controls are hidden and the Components are represented by narrow bars showing only their name and artwork.
Component Controls
The Component controls are located on the right side of each Component and enable you to switch individual Components on or off, collapse or expand their view, and show or hide additional views like the Expert panel and nested Component lists.
The following overview shows you the available Component controls:
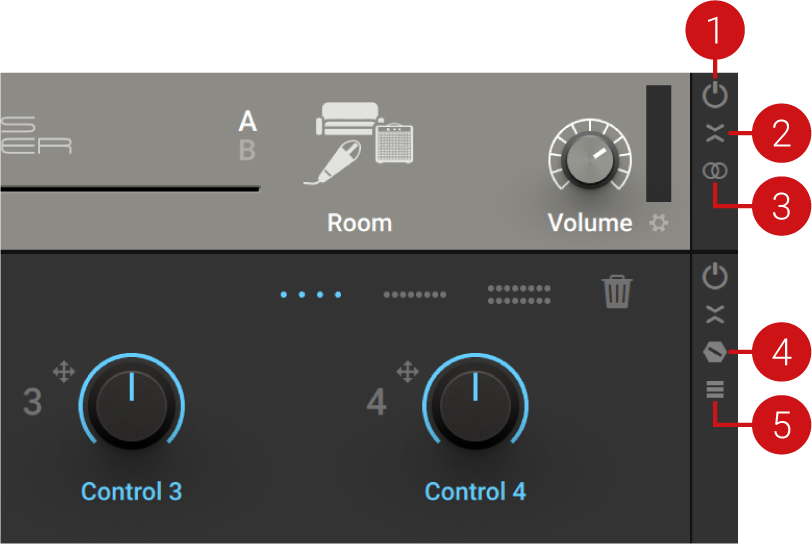 |
Component On/Off: Switches the Component on or off. When on, the input signal is processed and passed on to the next Component. When off, the input signal bypasses the Component and processing is deactivated, removing the Component's load from the CPU.
Collapse/Expand: Collapses or expands the view of the Component. When expanded, the Component is shown in full, including all of its controls. When collapsed, the controls are hidden and the Component is represented by a narrow bar showing only its name and artwork.
Stereo: Activates stereo processing for the Component. When activated, the left and right stereo channels are processed separately. When deactivated, the left and right stereo channels are summed to mono. This control is only available for certain Components.
Tip
You can reduce the CPU load of a Component by deactivating stereo processing.
Show Expert Panel: Shows the Expert panel containing additional controls that you can use to change the character or behavior of the Component. This control is only available for certain Components, including most of the amplifiers.
Tip
For information about the individual parameters and controls of Components, including the Expert panel, refer to Components Reference.
Show Content: Shows a list of nested Components. This control is only available for the Container Component and the Master FX Rack Tool.
Using the Rack
In the Rack you can combine and tweak the individual effects, called Components, to create any multi-effect imaginable. The Rack facilitates this by providing workflows for adding, removing, replacing, and moving Components. The following sections explain these basic workflows.
Note
The same workflows also apply for the lists of Components in the Master FX Rack Tool and the Container Component.
Adding Components to the Rack
You can add Components to the Rack by using drag and drop.
To add a Component, drag and drop the respective Component Tile from the Browser into the Rack. The expected position in the Rack is indicated by a yellow line.
Tip
Alternatively, you can add Components by double-clicking the respective Component Tile in the Browser. The Component will be added at the bottom of the Rack.
You can also use the context menu in the Rack to add Components. If no Component is selected, the new Component is added at the bottom of the Rack. If a Component is selected, the new Component is added underneath the selected Component. Opening the context menu automatically selects the Component at the mouse position.
Note
You can select a Component by clicking on it. Holding [SHIFT] on the keyboard allows for selection of multiple Components.
To add a Component, right-click in the Rack to open the context menu and select the Component from the Add Component menu.
Tip
By saving a User Component preset with the name "INIT" you can set the default state of the Component. For more information, refer to Component Presets in the Component.
Deleting Components from the Rack
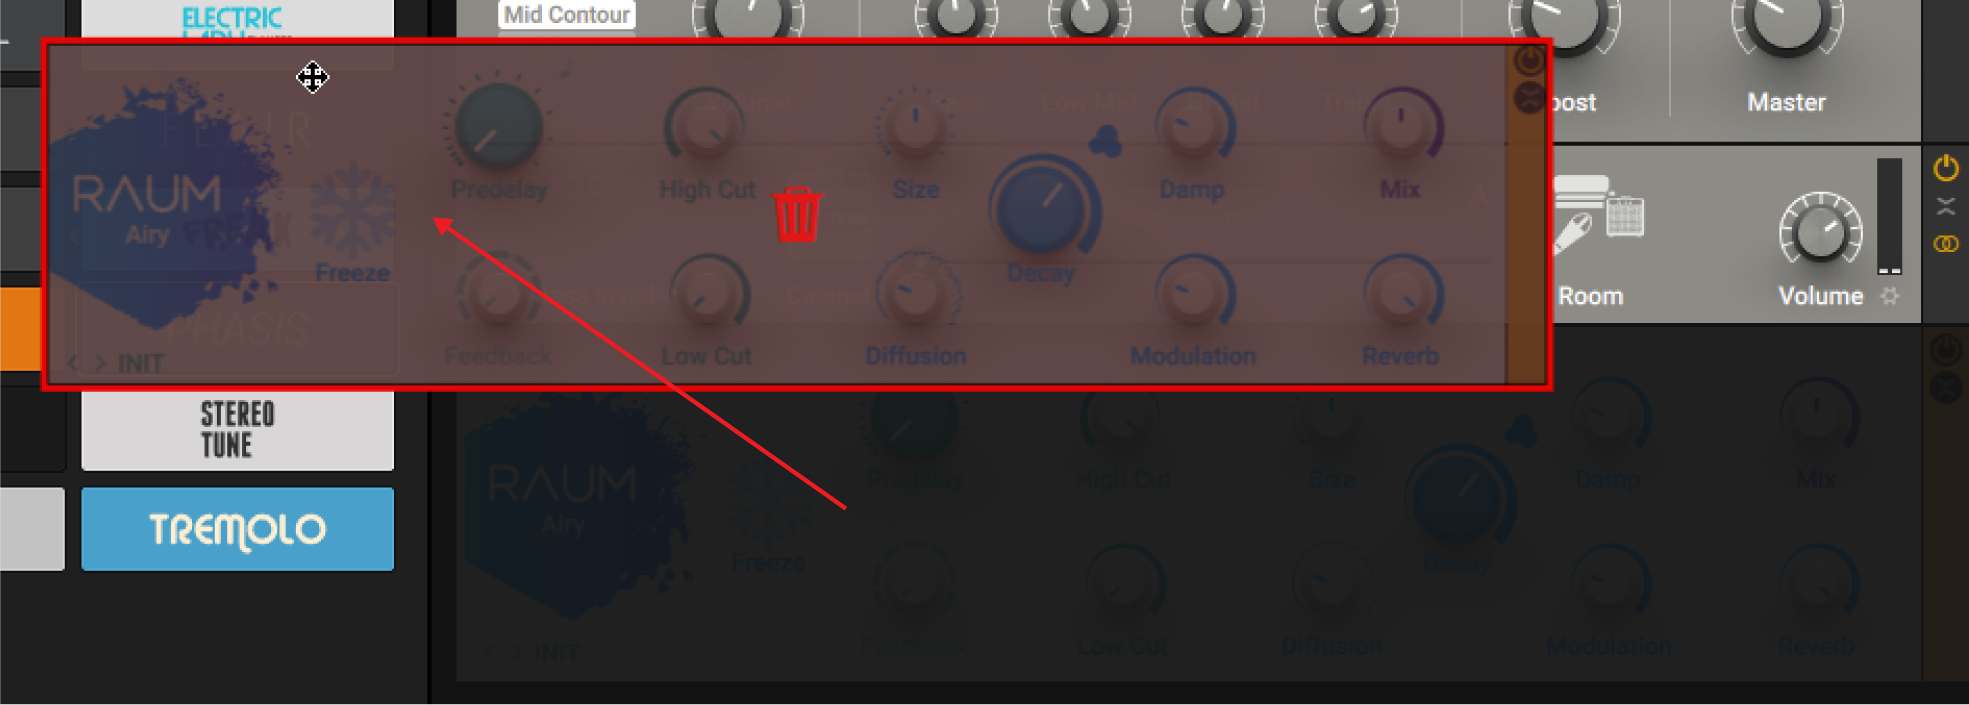
You can delete Components from the Rack by using drag and drop.
To delete a Component, drag and drop the Component to the outside of the Rack. If multiple Components are selected, they are deleted together.
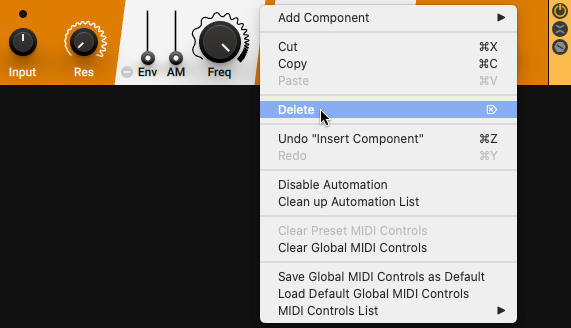
You can also use the context menu to delete Components. If no Component is selected, the command in the context menu is not available. If one or more Components are selected, they will be deleted. Opening the context menu automatically selects the Component at the mouse position.
Note
You can select a Component by clicking on it. Holding [SHIFT] on the keyboard allows for selection of multiple Components.
To delete all selected Components, right-click in the Rack to open the context menu and select Delete.
Tip
Alternatively, you can press [delete] (macOS) or [Del] (Windows) on the keyboard, or use the command from the Main menu. For more information, refer to Editing the Rack.
Replacing Components in the Rack
You can replace Components in the Rack by using drag and drop.
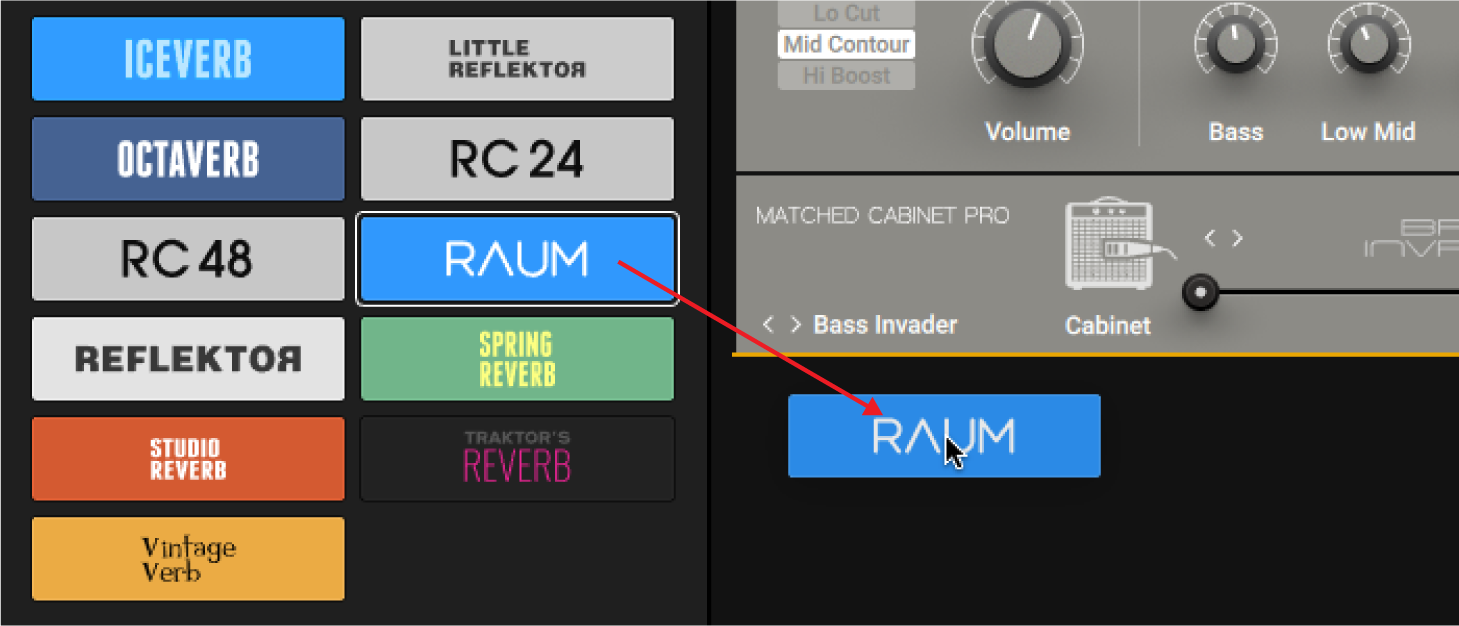
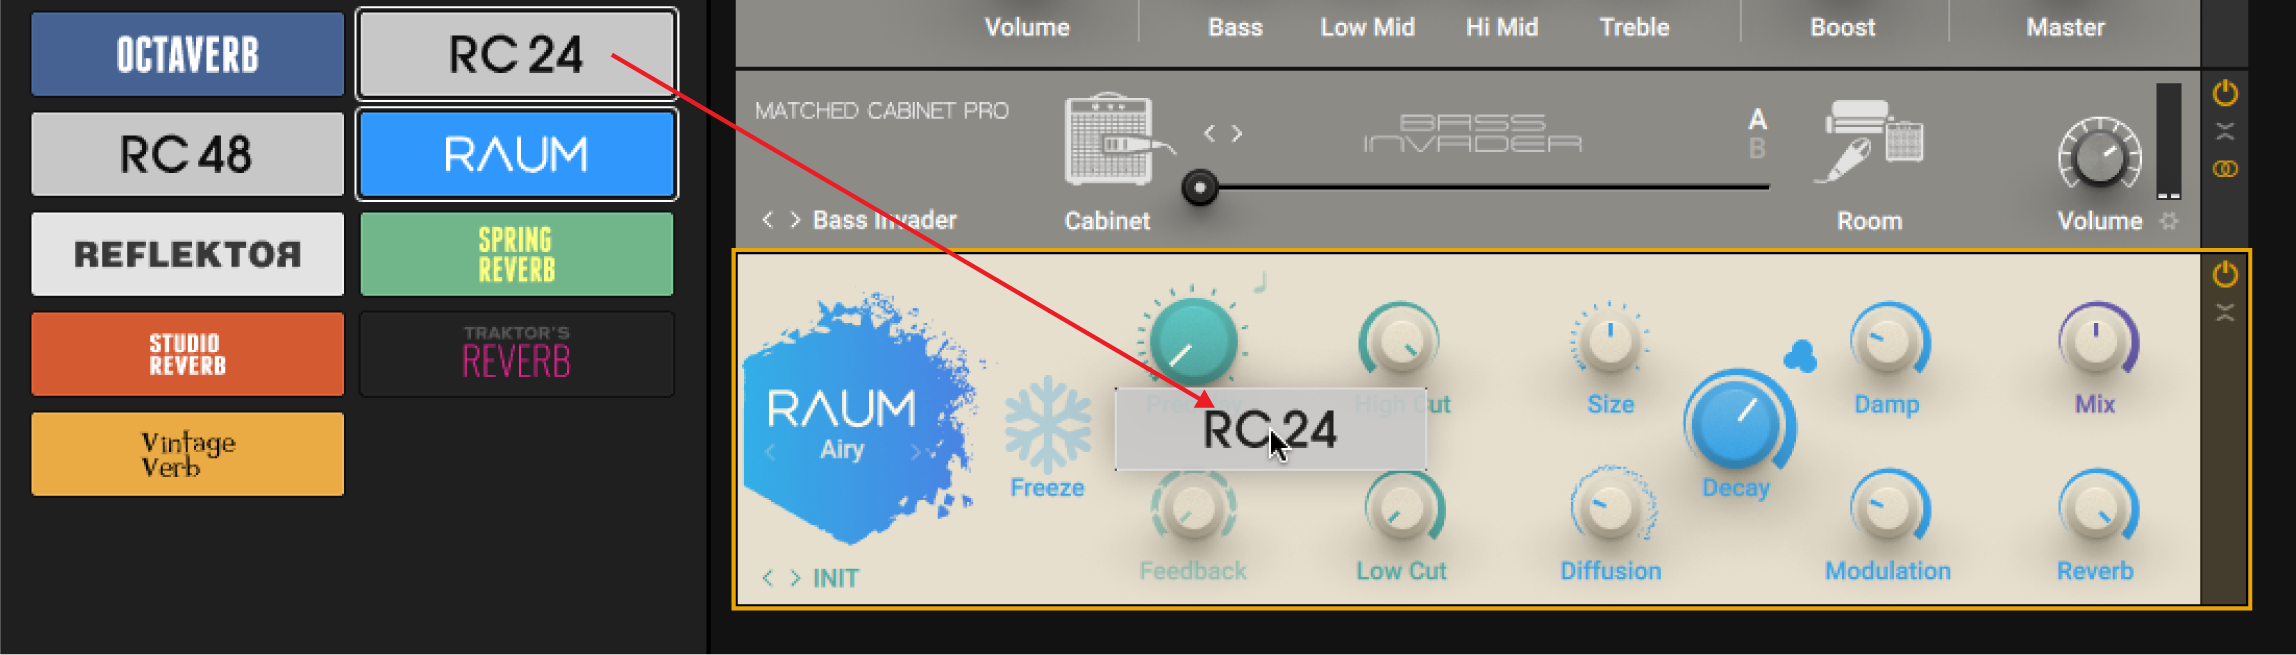
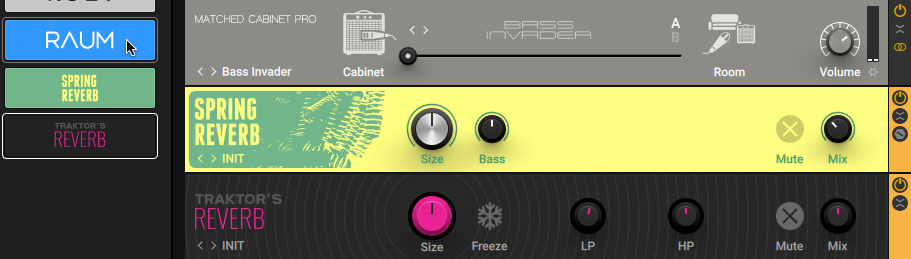
To replace a Component, drag and drop the respective Component Tile from the Browser onto the Component you want to replace. The Component that is expected to be replaced is highlighted in yellow.
You can also replace Components by double-clicking Component Tiles. All Components selected in the Rack will be replaced.
Note
You can select a Component by clicking on it. Holding [SHIFT] on the keyboard allows for selection of multiple Components.
To replace all selected Components, double-click a Component Tile in the Browser.
Moving Components in the Rack
You can move Components in the Rack by using drag and drop.
To move a Component, drag and drop the Component to a new position in the Rack. The expected position in the Rack is indicated by a yellow line. If multiple Components are selected, they are moved together.
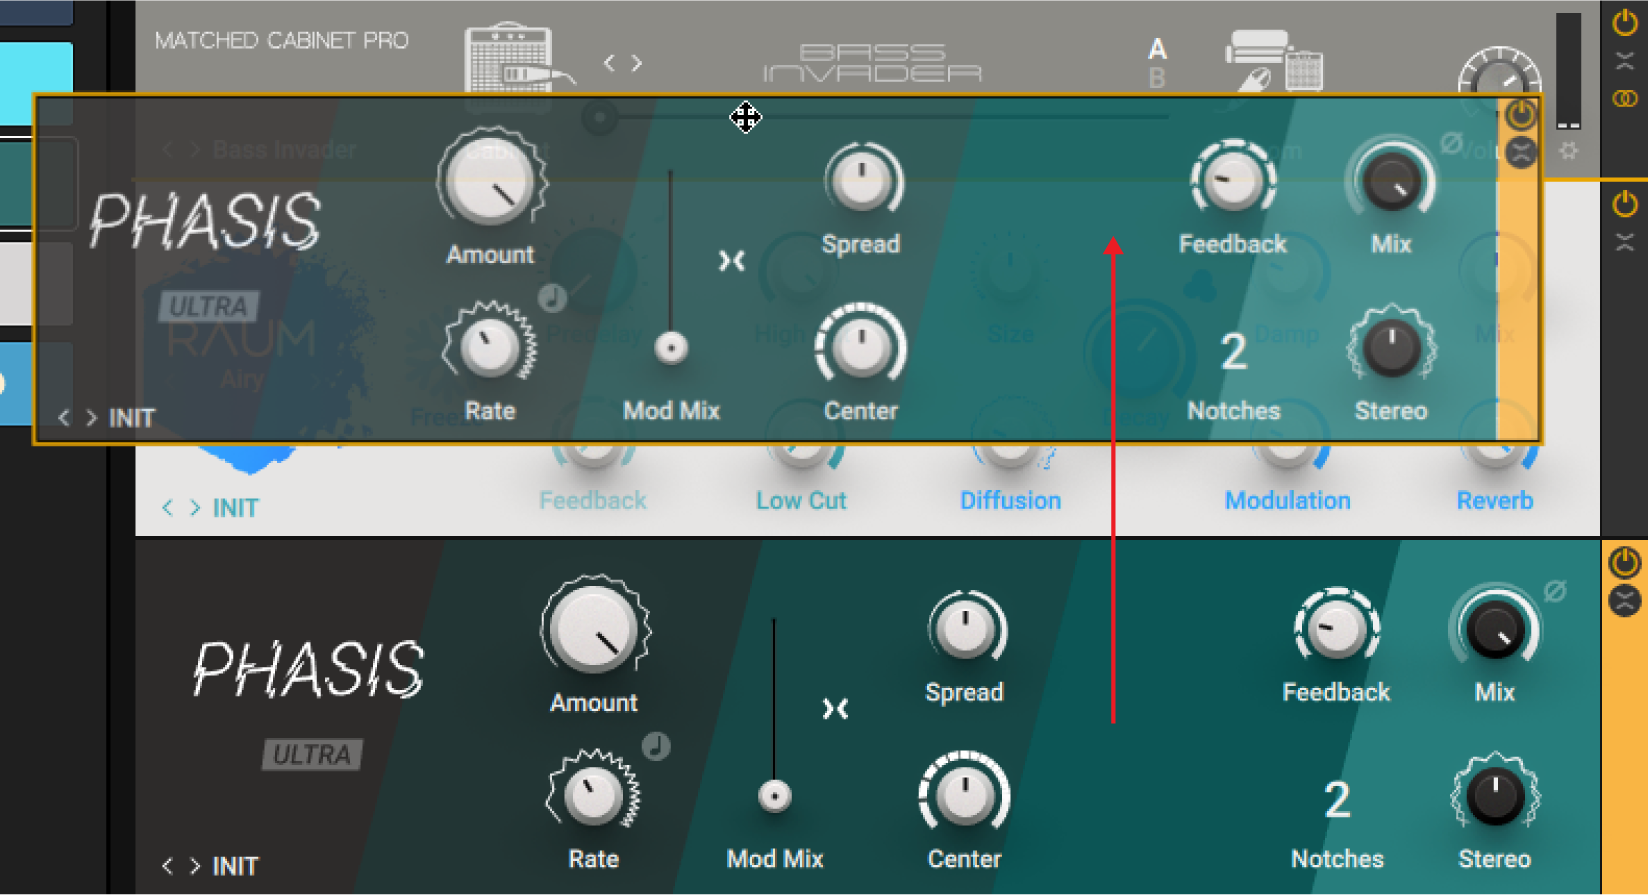
Note
You can select a Component by clicking on it. Holding [SHIFT] on the keyboard allows for selection of multiple Components.
Tip
Alternatively, you can move Components in the Signal Flow. For more information, refer to Sidebar.
Editing the Rack
You can edit the Rack by using common editing commands, including undo and redo as well as cut, copy, and paste. The commands can be accessed in the Edit sub-menu of the Main menu. Additionally, most of the commands are also available in the Rack's context menu.
Editing the Rack Using the Main Menu
You can use the Main menu in the Header to edit the Rack. The available commands can be accessed in the Edit sub-menu.
To open the Main menu, click the Main menu button (three vertical dots) in the Header.
The following overview shows you the available commands:
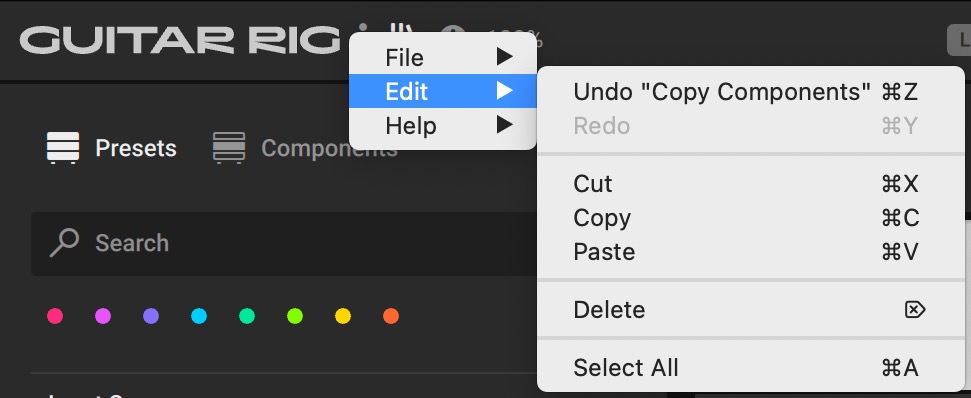 |
Undo: Reverts the last change made to the Rack.
Redo: Repeats the last change from the undo history.
Cut: Cuts all selected Components and copies them to the clipboard.
Copy: Copies all selected Components to the clipboard.
Paste: Pastes the Components from the clipboard.
Delete: Deletes all selected Components. For more information, refer to Deleting Components from the Rack.
Select All: Selects all Components in the Rack.
Note
You can select a Component by clicking on it. Holding [SHIFT] on the keyboard allows for selection of multiple Components.
Tip
Keyboard shortcuts are available for all commands contained in the Edit sub-menu. For more information, refer to Keyboard Shortcuts.
Editing the Rack Using the Context Menu
You can use the context menu to edit the Rack.
To open the context menu, right-click on the background of a Component or the Rack.
The following overview shows you the available commands:
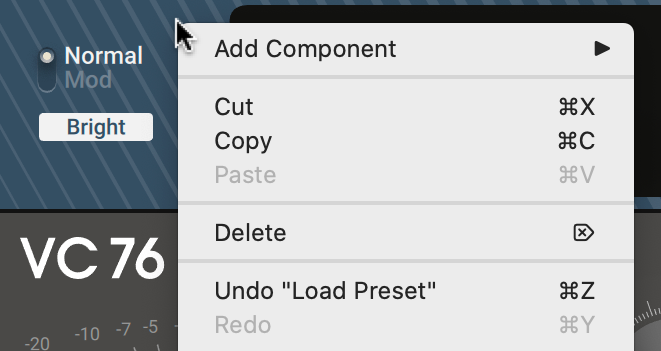 |
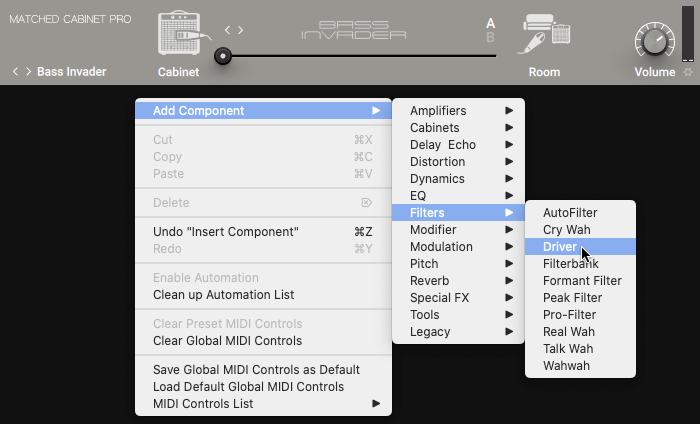
Add Component: Opens sub-menus showing all available Components, and allows to add Components to the Rack by selecting them. For more information, refer to Adding Components to the Rack.
Cut: Cuts all selected Components and copies them to the clipboard.
Copy: Copies all selected Components to the clipboard.
Paste: Pastes the Components from the clipboard.
Delete: Deletes all selected Components. For more information, refer to Deleting Components from the Rack.
Undo: Reverts the last change made to the Rack.
Redo: Repeats the last change from the undo history.
Note
You can select a Component by clicking on it. Holding [SHIFT] on the keyboard allows for selection of multiple Components.
Tip
Keyboard shortcuts are available for all editing commands contained in context menu of the Rack. For more information, refer to Keyboard Shortcuts.