Overview of Guitar Rig
Guitar Rig's user interface comprises of the Rack for combining and tweaking effects, and the Browser, which enables you to load presets and effects from the library.
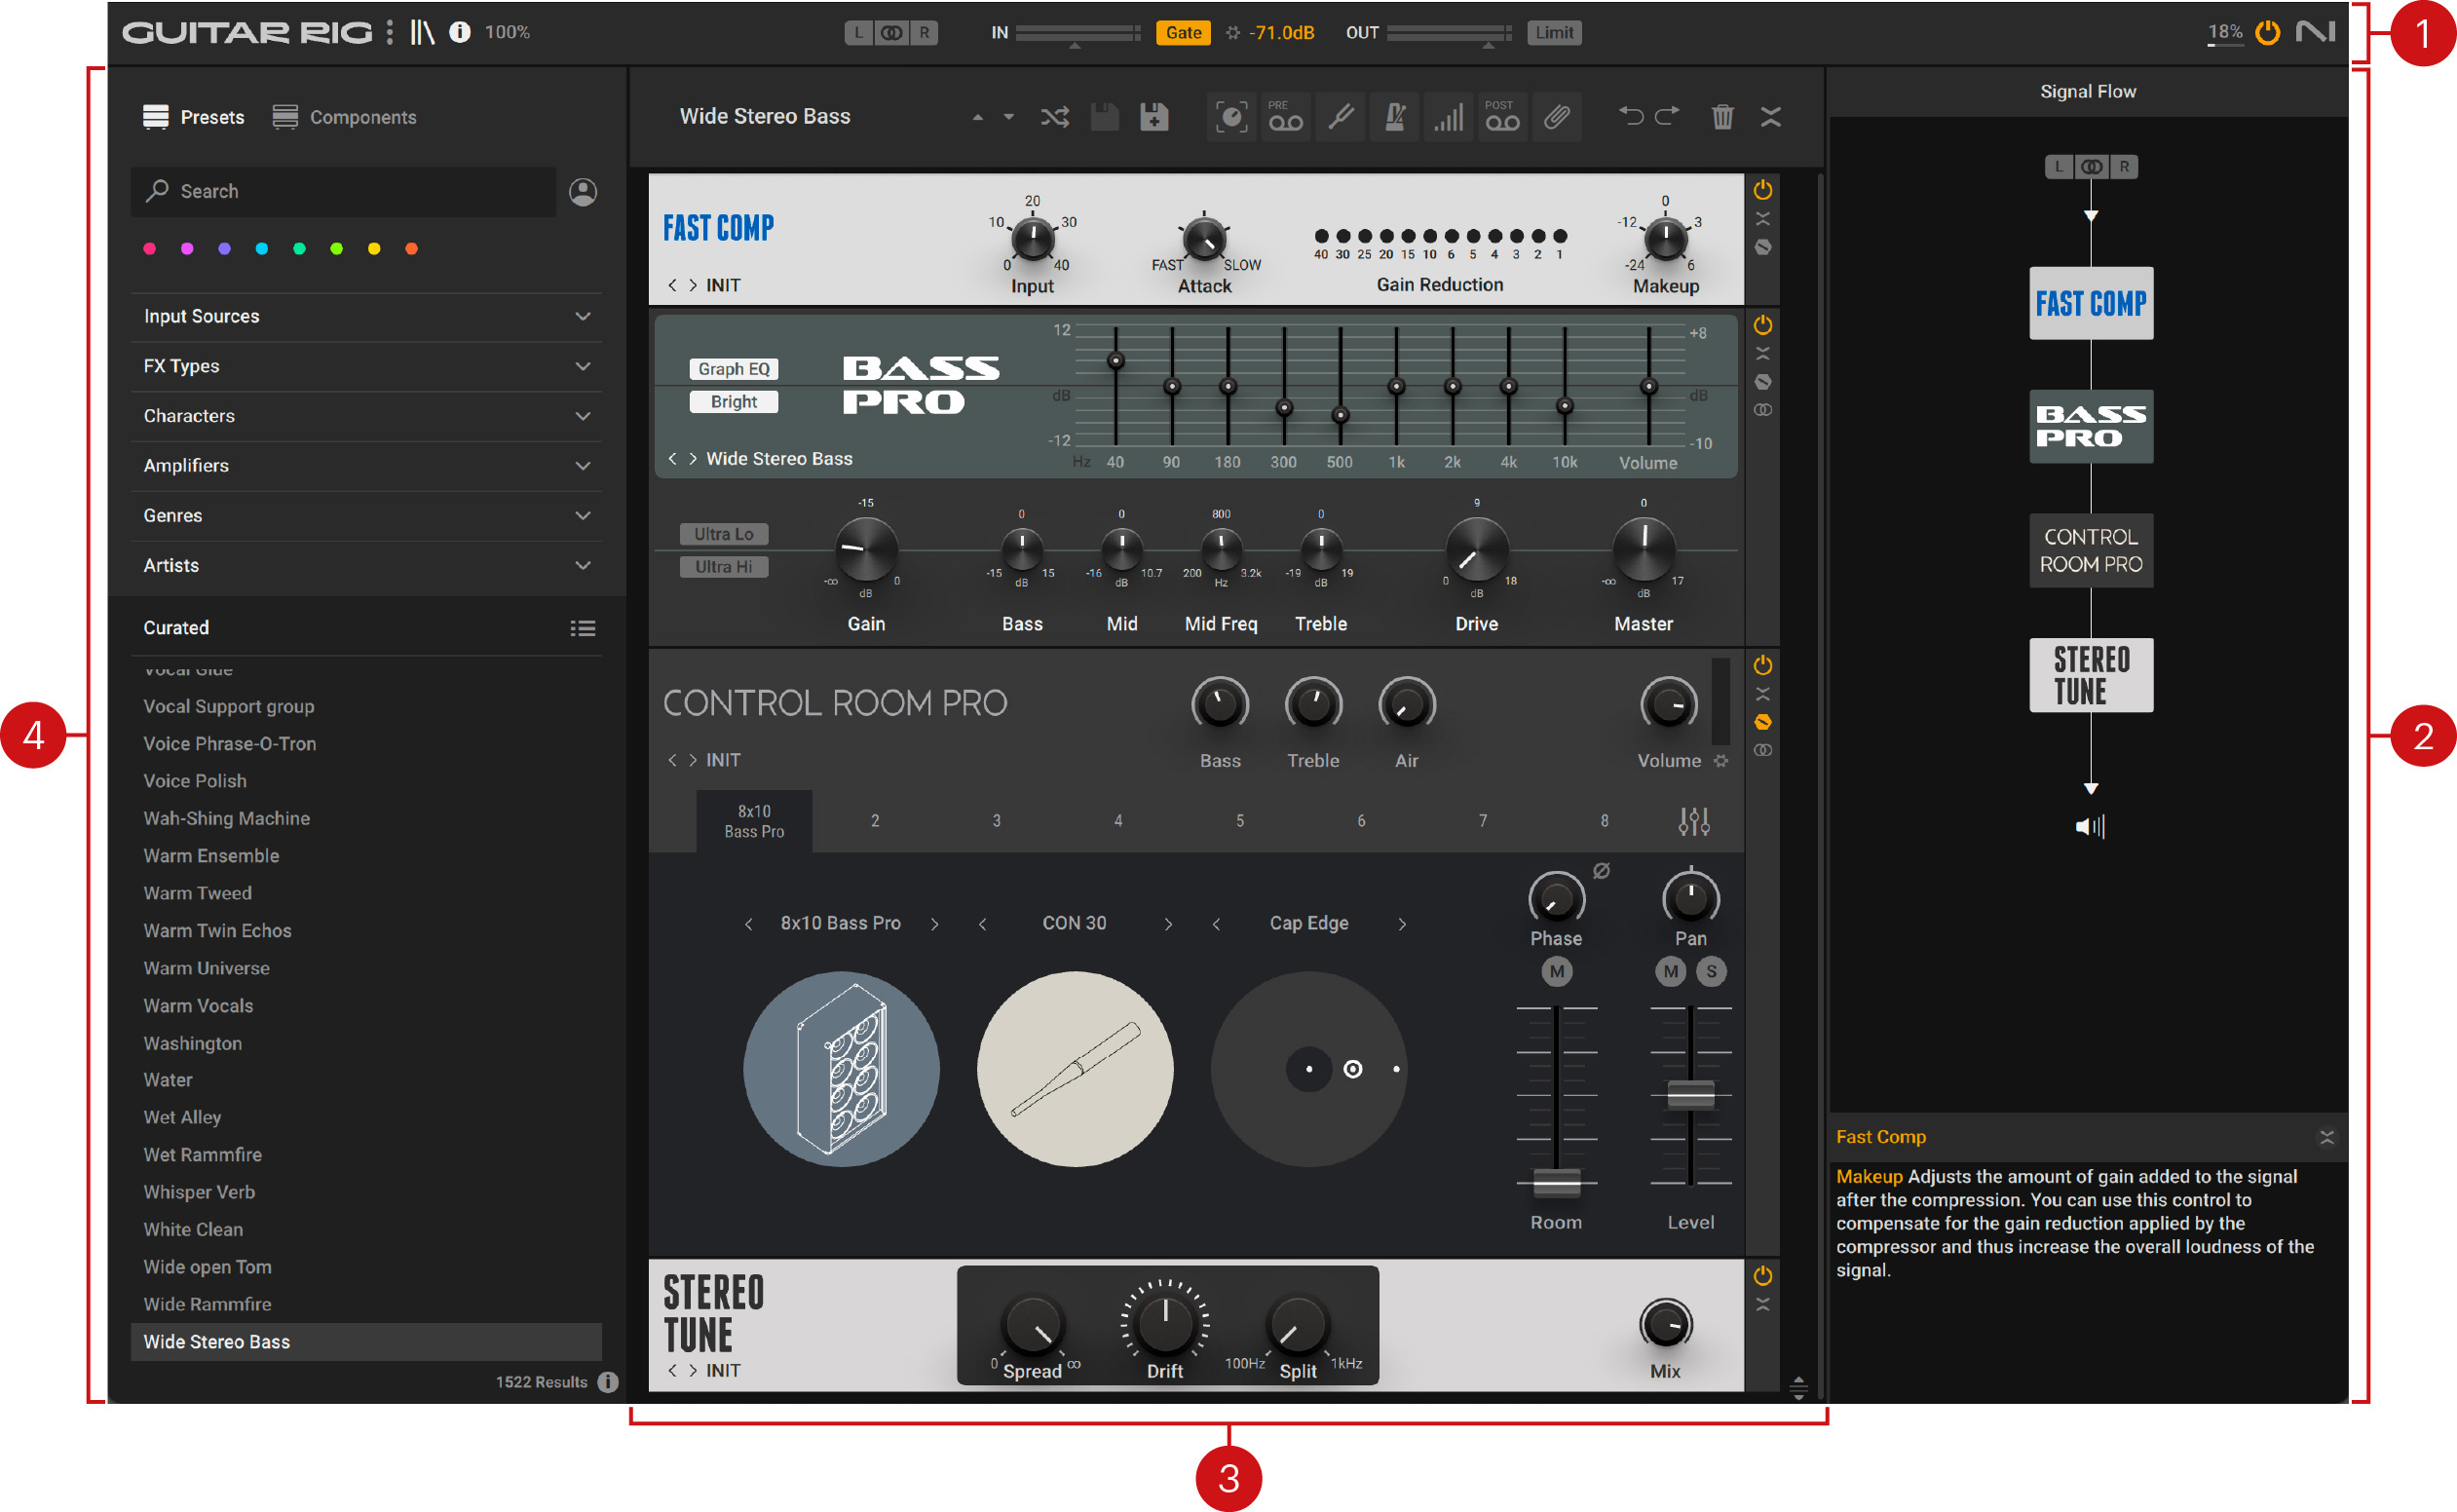
Guitar Rig makes its wealth of effects accessible through a clear layout that focuses on the Rack. In the Rack you can combine and tweak the individual effects, called Components, to create any multi-effect imaginable. The Rack is accompanied by the Browser, which enables you to find presets and load Components from Guitar Rig's extensive library. The Header provides global controls and settings, and the Sidebar contains the Signal Flow as well as the Info pane.
The following overview shows the Rack, Browser, Header, and the Sidebar in the user interface:
 |
Header: Provides global controls and settings related to preset management, software preferences, audio inputs and outputs, and the audio engine. For more information, refer to Header.
Sidebar: Focuses on features that make using the Rack more intuitive and efficient, including the Signal Flow and the Info pane. For more information, refer to Sidebar.
Rack: Facilitates the creation of custom multi-effects based on Components. The required infrastructure is provided using dedicated Rack Tools, which are accessible through the Rack's Toolbar. For more information, refer to Overview of the Rack.
Browser: Gives access to Guitar Rig's extensive library, including presets and Components. Sophisticated browser functionality like Favorites, Filters, and the Search field enable you to quickly find the right content. For more information, refer to Browser.
Tip
To learn about how signals are passed through and processed in Guitar Rig, refer to Signal Path.
Header
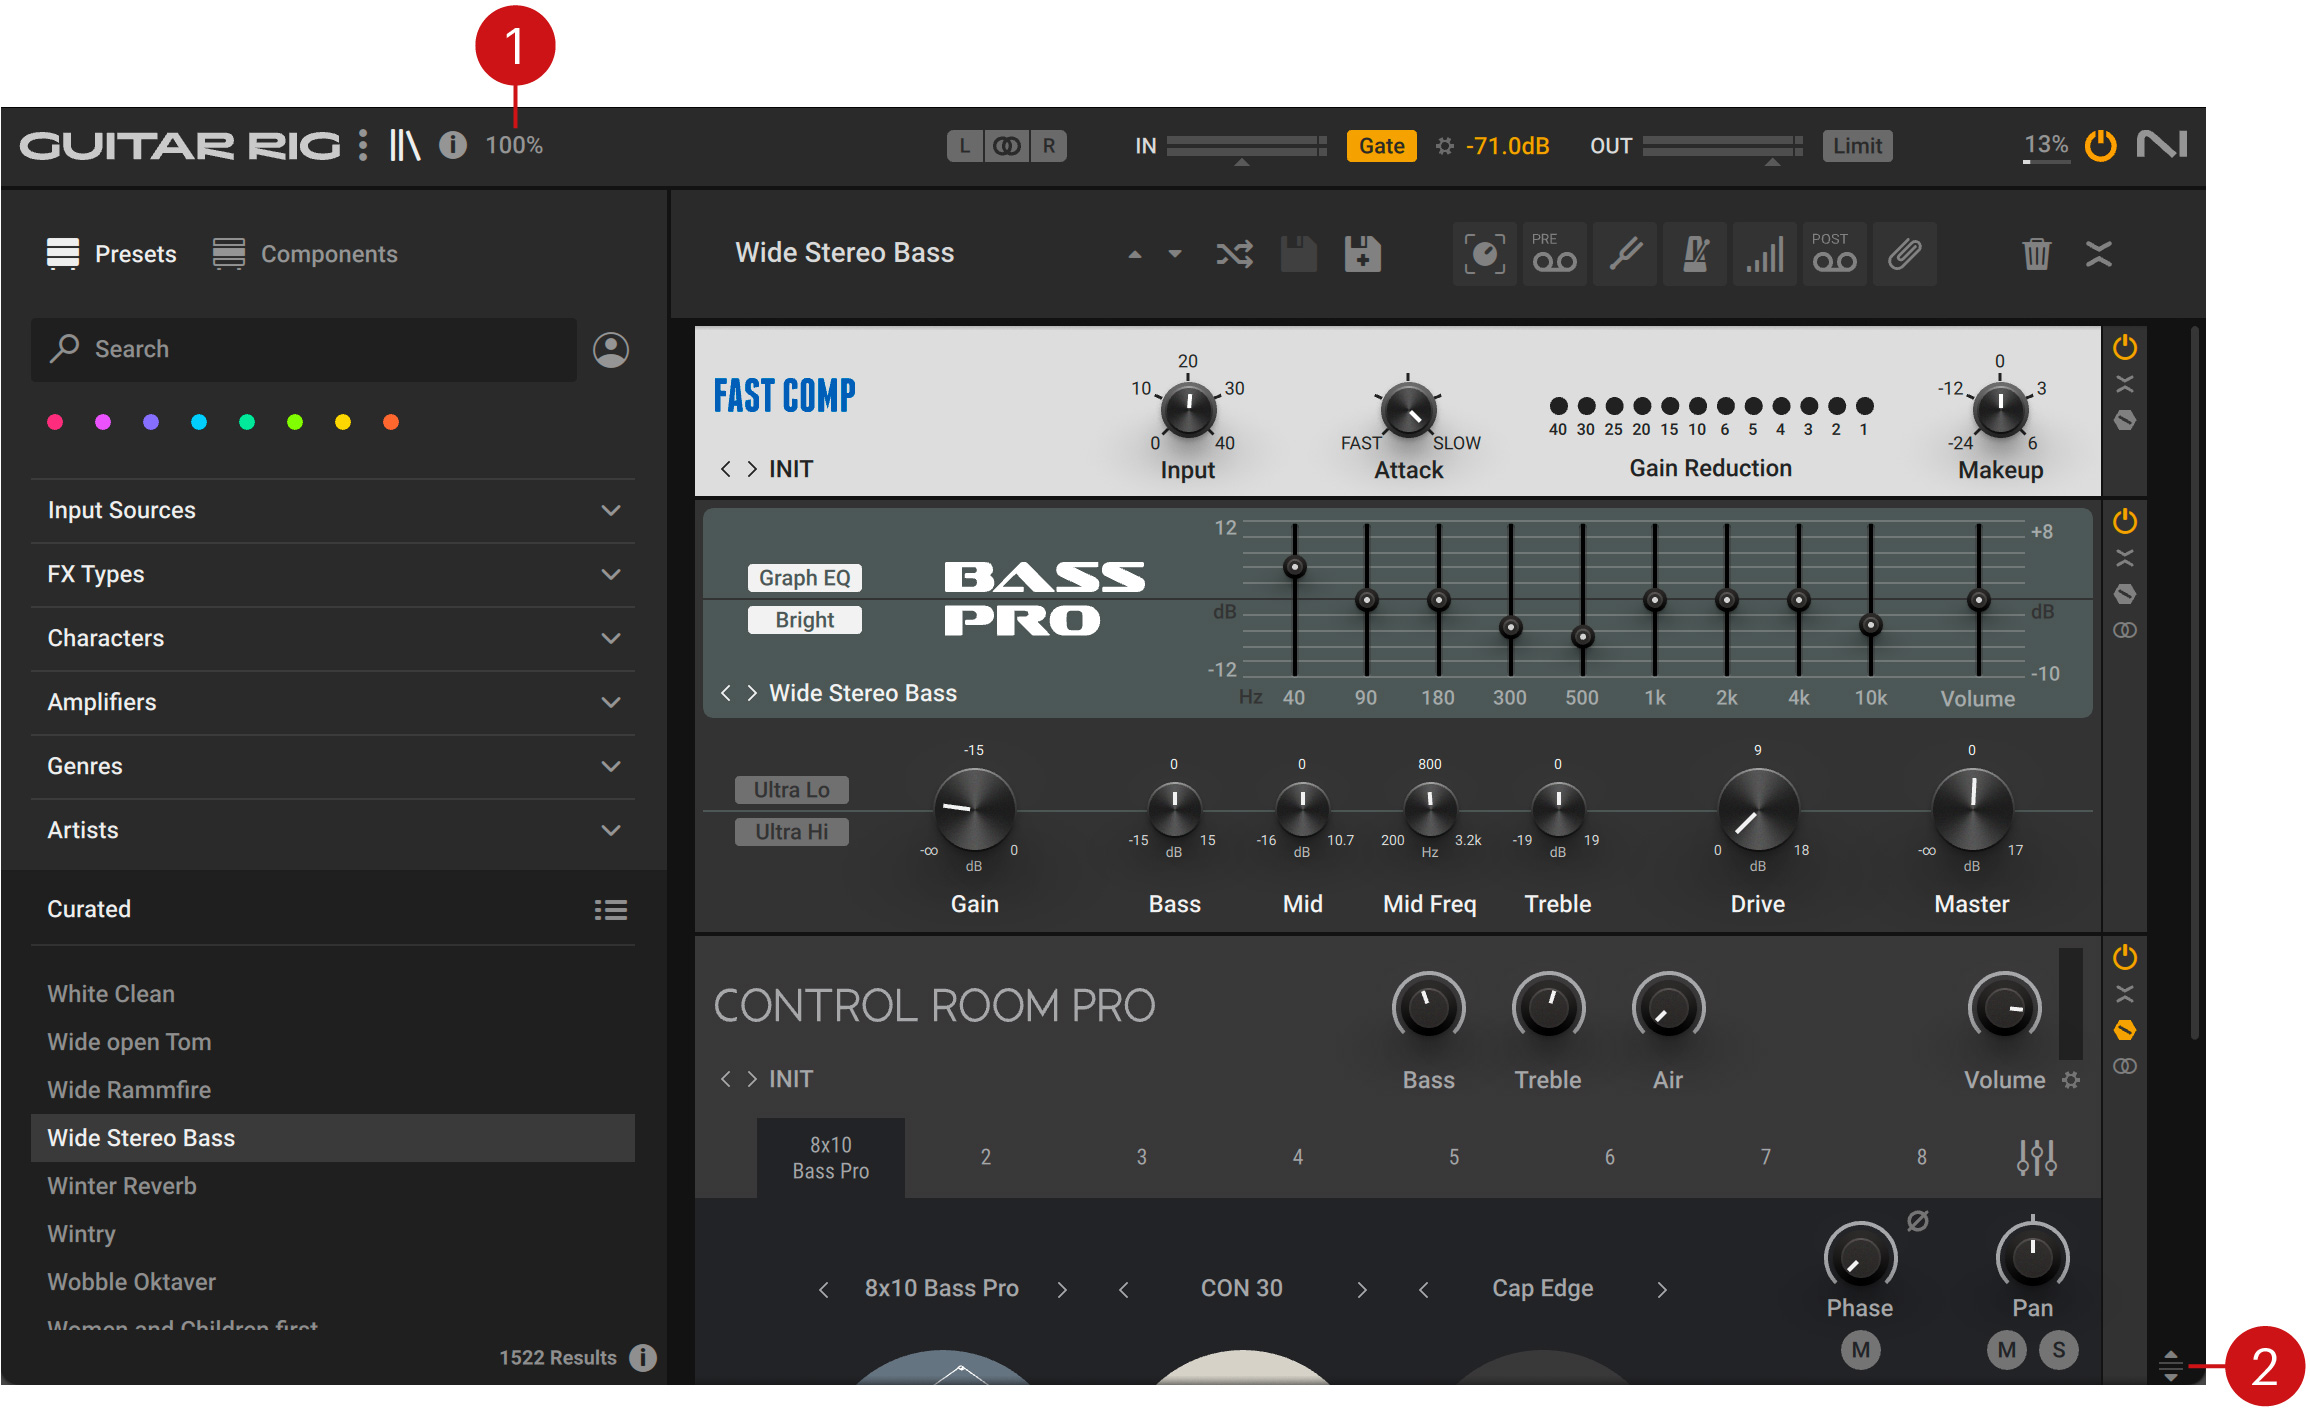
The Header at the top of Guitar Rig contains the Main menu, audio input and output controls, and functions related to the audio engine. Below you can find an overview of the controls and settings.
Note
The Guitar Rig stand-alone application retains settings made in the Header from the last session. The plug-in uses default settings, which can be overwritten by using the option in the Preferences. For more information, refer to General.
The following overview shows you the controls and settings in the Header:
 |
Main menu: Opens the Main menu that contains global options and preferences. For more information, refer to Main Menu.
Browser: Shows or hides the Browser on the left side of the user interface. For more information, refer to Browser.
Info: Shows or hides the Sidebar that contains the Signal Flow and Info pane. For more information, refer to Sidebar.
View size: Sets the magnification of the user interface, and gives the option to save the current size as default. For more information, refer to View and Rack Size.
Input selector: Selects the input configuration for the Rack. You can select select either the left or right input in a mono configuration, or a stereo configuration using both inputs. For more information, refer to Input Selector.
Input Level: Adjusts the input level of the Rack in the range of -20 dB to +20 dB, and shows the current peak input level. Clipping is indicated by the red dot at the right of the level meter.
Gate: Activates the noise gate that is used to suppress unwanted background noise. The input signal is gated when it falls below the threshold as set with the Gate Threshold control.
Threshold Learn: Adjusts the Gate Threshold automatically by analyzing the input signal and determining the optimal threshold for separating the direct instrument signal from the background noise. For best results, play softly while the analyzation is in progress.
Gate Threshold: Adjusts the threshold level of the gate. When the input signal falls below threshold, the level is fully attenuated, or gated. Increasing the threshold results in a higher amount of gating by making the gate less sensitive to low input levels.
Output Level: Adjusts the input level of the Rack in the range of -70 dB to +6 dB, and shows the current peak output level. Clipping is indicated by the red dot at the right of the level meter.
Limit: Activates the output limiter that is used to prevent digital clipping. The output signal is limited when it rises above the maximum level of 0 dBfs.
CPU Load: Shows the current CPU load used by Guitar Rig's audio engine.
Audio Engine On/Off: Switches the audio engine on or off.
NI Logo: Opens the About screen that shows the Credits and User Details including the version, license type, and serial number of the installed software.
View and Rack Size
You can customize Guitar Rig's visual presentation by adjusting the magnification of the user interface and the vertical size of the Rack.
The following controls are available for setting the view and Rack size:

View size: Sets the magnification of the user interface, and gives the option to save the current size as default. The magnification can be set in 9 steps from 75% to 200%.
Rack size: Adjusts the vertical size of the Rack by dragging the icon up and down. When used in conjunction with the View size, you can optimize the visual presentation for visibility (large View size, small Rack size) or Rack space (small View size, large Rack size).
Note
The Guitar Rig stand-alone application retains the View size setting from the last session. The plug-in uses the default setting, which can be overwritten by using the option in the View size menu.
Input Selector
The Input selector in the Header enables you to select the input configuration for the Rack.
Tip
The Input Selector can also be found in the Signal Flow. For more information, refer to Sidebar.
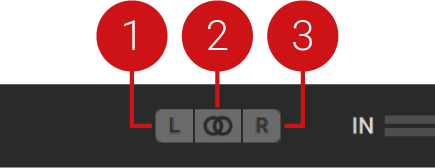
The Input selector contains the following controls:
 |
Left Input: Only the left stereo input is used in a mono configuration. Components using stereo processing receive the signal from the left stereo input on both stereo channels.
Stereo Input: Both the left and right stereo input are used in a stereo configuration. Components using stereo processing receive the signals from the left and right stereo inputs on the respective stereo channel.
Note
When Stereo Input is selected, the Stereo option in the Component Controls is activated automatically for all relevant Components. For more information, refer to Component Controls.
Right Input: Only the left stereo input is used in a mono configuration. Components using stereo processing receive the signal from the right stereo input on both stereo channels.
Sidebar
The Sidebar focuses on features that make the Rack more intuitive and efficient to use. It contains the Signal Flow, which gives an overview of the Components in your Rack, and the Info pane, which displays brief descriptions of user interface elements.
By using the Signal Flow alongside the Rack, you can see all Components at a glance and change the routing using drag and drop. The clear representation of the signal path is especially useful when Components are nested in Tools like Split M/S, Split Mix, Crossover, or Container. For more information about Tools Components, refer to Tools Components.
The Info pane gives access to information about each Component, and details the functionality of all controls in the Rack. You can display descriptions by clicking on Components and hovering over user interface elements. Additionally, you can open the corresponding section in the Guitar Rig online manual by clicking on the Info pane's heading text.
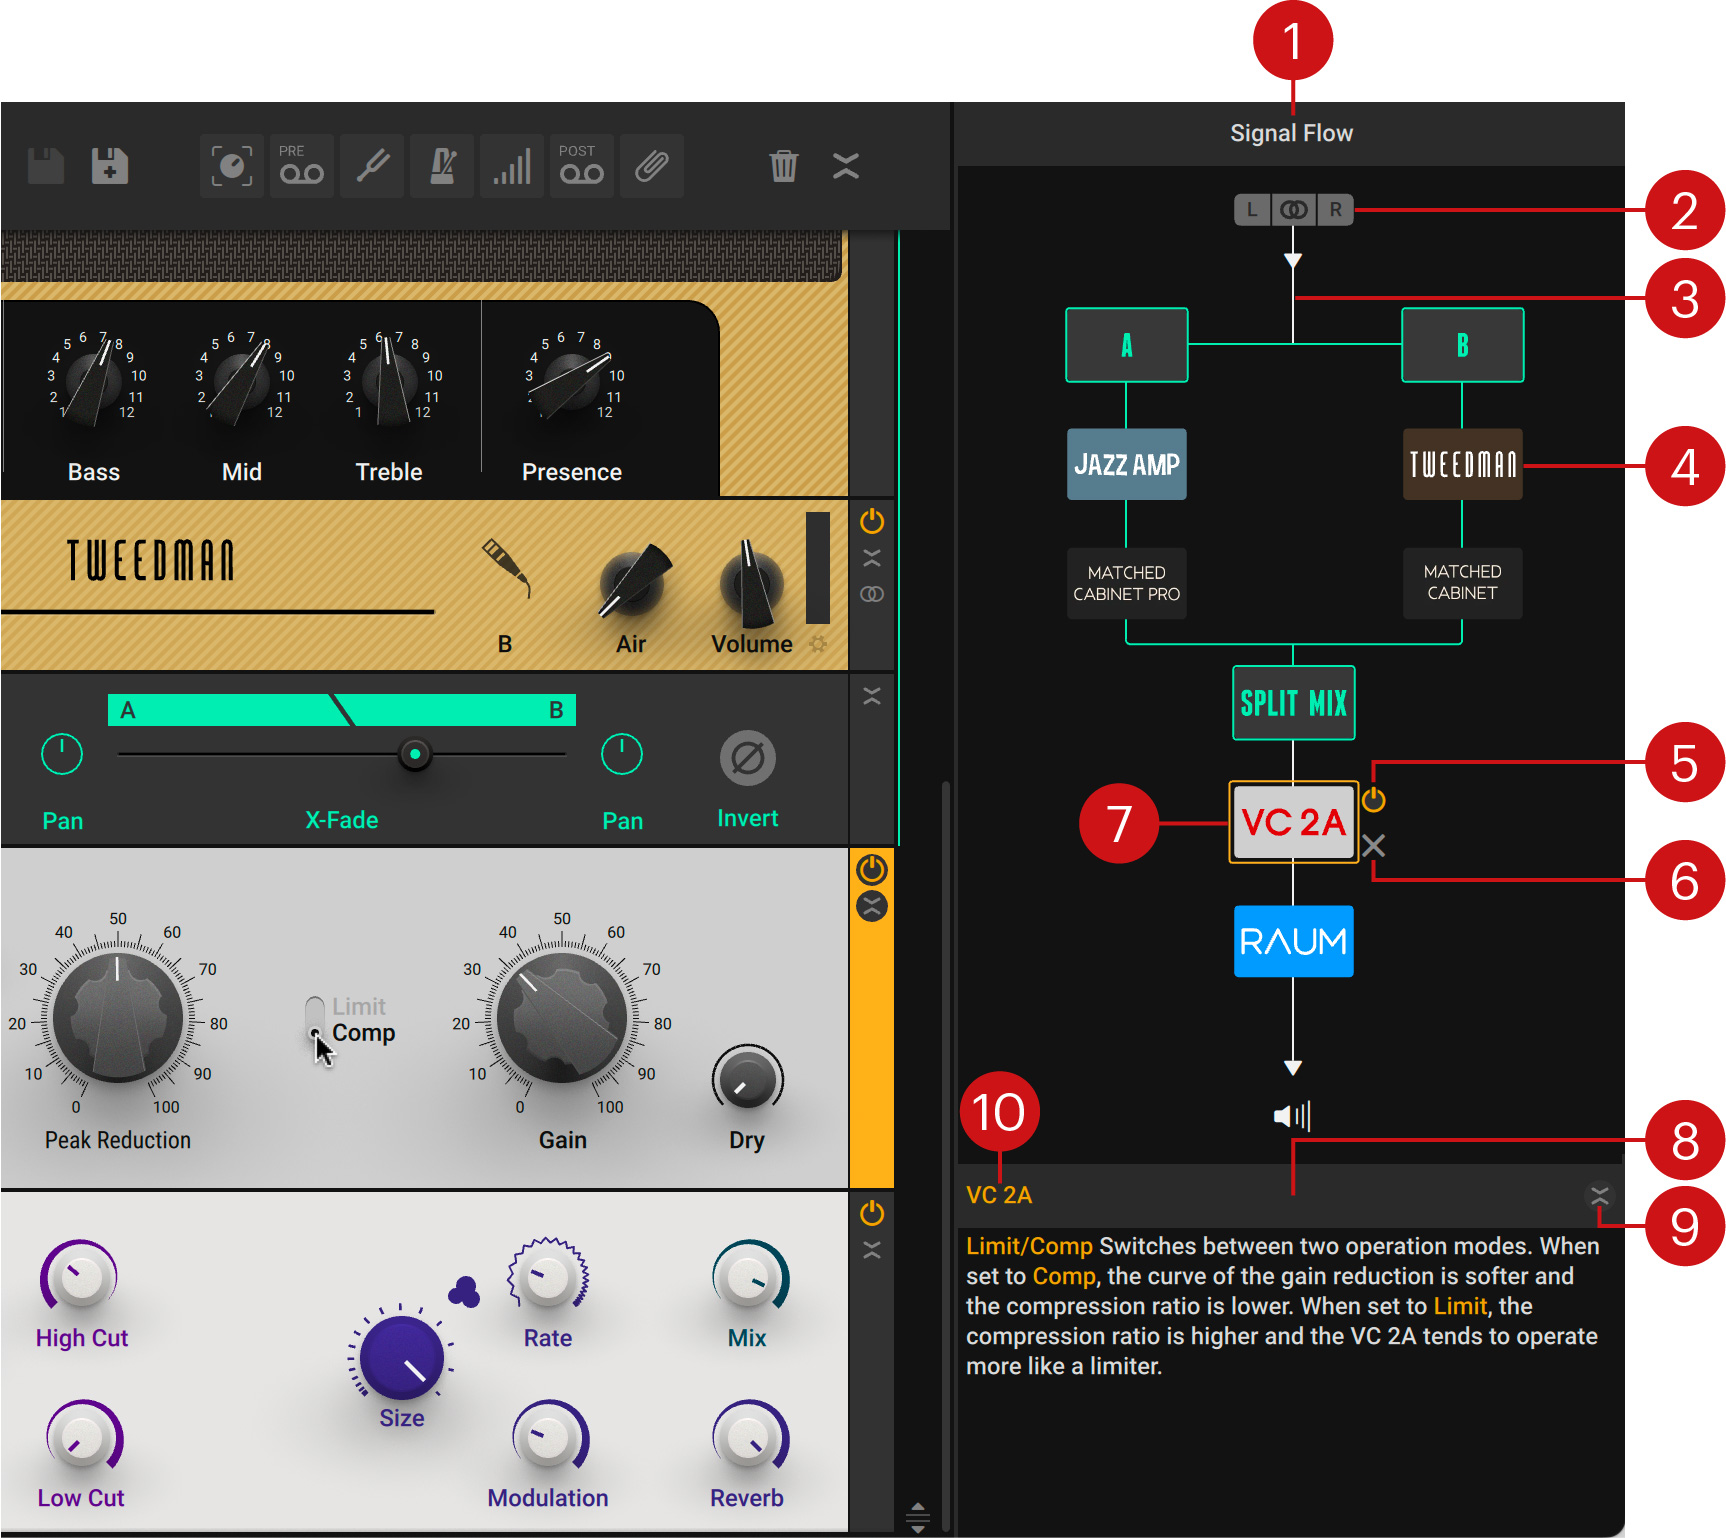
The following overview shows you the elements and controls in the Sidebar:
 |
Signal Flow: Shows the Components in the signal path in the Rack, and enables you to change the routing using drag and drop. Additionally, you can select Components, delete them, and switch them on or off. The colors in the Signal Flow mirror the visualization of Tools in the Rack. For more information, refer to Visualization of Tools.
Input Selector: Enables you to select the input configuration for the Rack. For more information, refer to Input Selector.
Signal Path: Represents the signal passing through the Rack from top to bottom. For more information, refer to Signal Path.
Component: Represents a Component in the Rack. Dragging and dropping the Component along the signal path changes its position in the Rack.
Component On/Off: Switches the Component on or off. When on, the input signal is processed and passed on to the next Component. When off, the input signal bypasses the Component and processing is deactivated, removing the Component's load from the CPU.
Delete Component: Deletes the Component from the Rack.
Selected Component: Selecting a Component in the Signal Flow scrolls to its position in the Rack and select it. Additionally, a description of the Component is shown in the Info pane.
Info pane: Displays brief descriptions of user interface elements when hovering over them using the mouse. Clicking on Components in the Rack or the Signal Flow displays general information about them.
Expand/Collapse: Shows or hides the Info pane in the Sidebar.
Heading Text: Displays the name of the user interface element that is described in the Info pane. Clicking the heading text opens the relevant section in the Guitar Rig online manual.
