Modifiers
Modifiers in Guitar Rig are modulation sources that you can assign to any parameter in the Rack in order to control it, opening up vast possibilities in sound design.
Modifiers are modulation sources that you can assign to any parameter in the Rack in order to control it. They do not generate or process sound directly, but instead provide a variety of functions to automatically adjust controls over time. Originating from synthesizers, this concept opens up vast possibilities in sound design.
Like on a synthesizer, the available modulation sources include an Envelope, an LFO, and sequencers. Additionally, the Input Level Modifier can be used as an envelope follower that tracks the input signal and transforms it into a modulation source.
The Modifiers share the following controls used for creating and editing assignments:
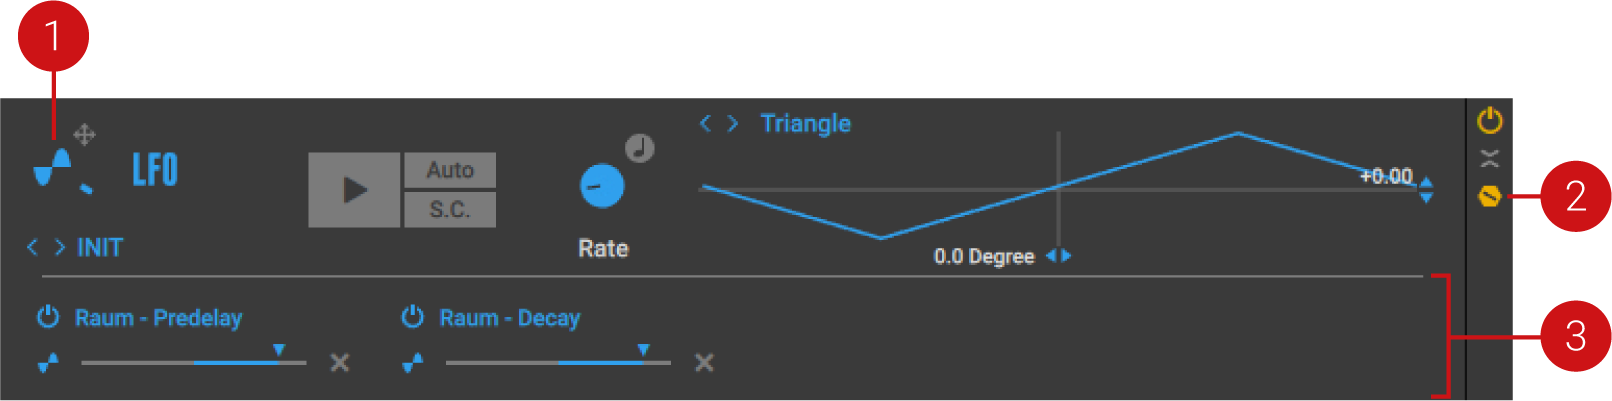
Assignment icon: Allows for assignment of the Modifier using drag and drop. For information, refer to Assigning Modifiers.
Show Expert panel: Shows the Expert panel that you can use to display and edit the assignments of the Modifier.
Expert panel: Displays the assignments of the Modifier and provides functions to edit them. For more information, refer to Editing Modifier Assignments.
Assigning Modifiers
You can assign Modifiers to parameters using drag and drop. A single Modifier can be assigned to up to four parameters at the same time.
Click the Modifier icon or the target icon next to it, and keep the mouse button pressed.
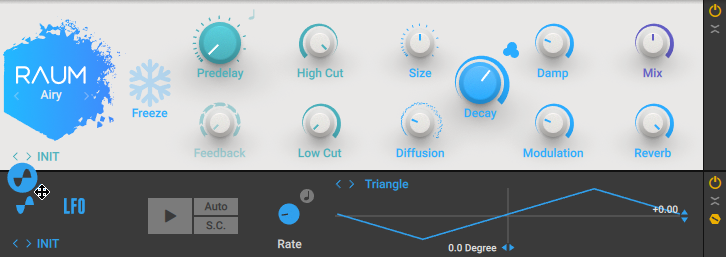
Drag and drop the icon onto the parameter you want to assign the Modifier to.
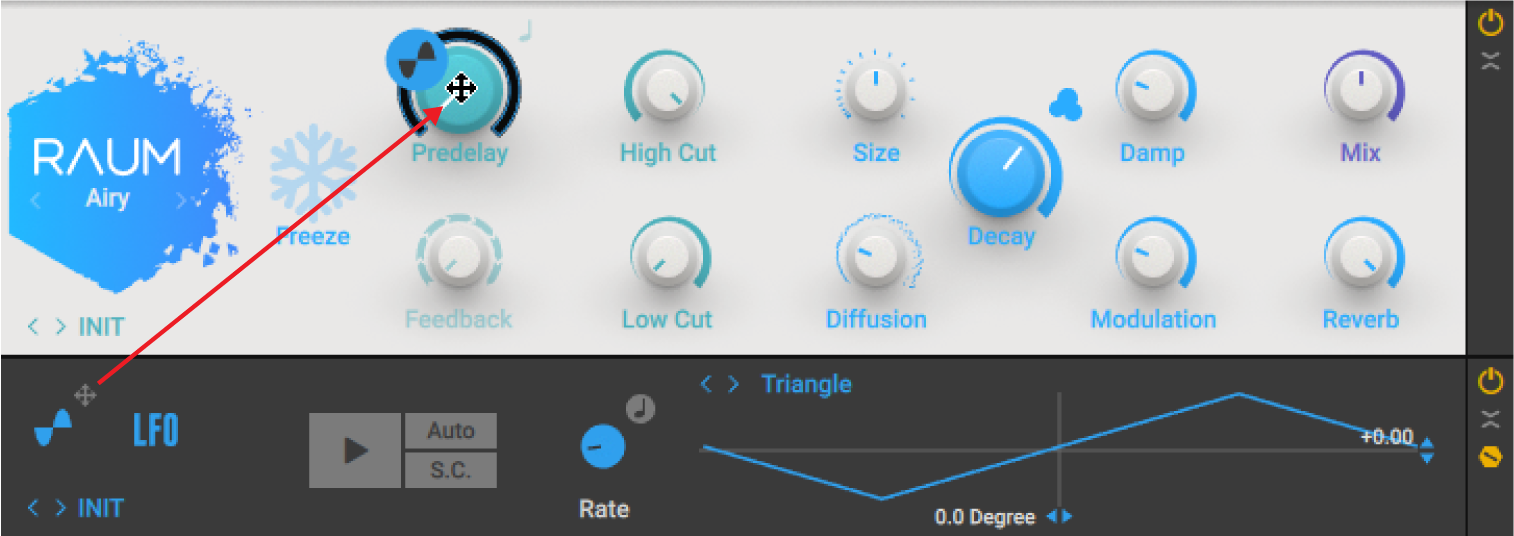
The Modifier is assigned to the parameter, and the Expert Panel displays the assignment accordingly.

Editing Modifier Assignments
The Modifiers' Expert panel displays the assignments of the selected Macro and provides functions to deactivate, reassign, and delete assignments, as well as adjust the modulation depth.
The Modifiers' Expert panels share the following controls used for editing assignments:

Assignment On/Off: Switches the respective assignment on or off.
Reassign: Enables you to reassign the assignment by dragging and dropping the icon onto the new parameter.
Modulation Depth: Adjusts the strength of modulation applied to the assigned parameter. Settings to the right of the center apply positive (non-inverted) modulation, while settings to the left of the center apply negative (inverted) modulation. At center position, no modulation is applied.
Delete: Removes the assignment.
Deactivating Assignments
To deactivate an assignment, click the Assignment On/Off button.

The assignment is deactivated and the assigned parameter will not be controlled by the Modifier. You can click the Assignment On/Off button again to activate the assignment.
Reassigning Assignments
To reassign an assignment, drag and drop the corresponding Modifier icon to the new parameter.
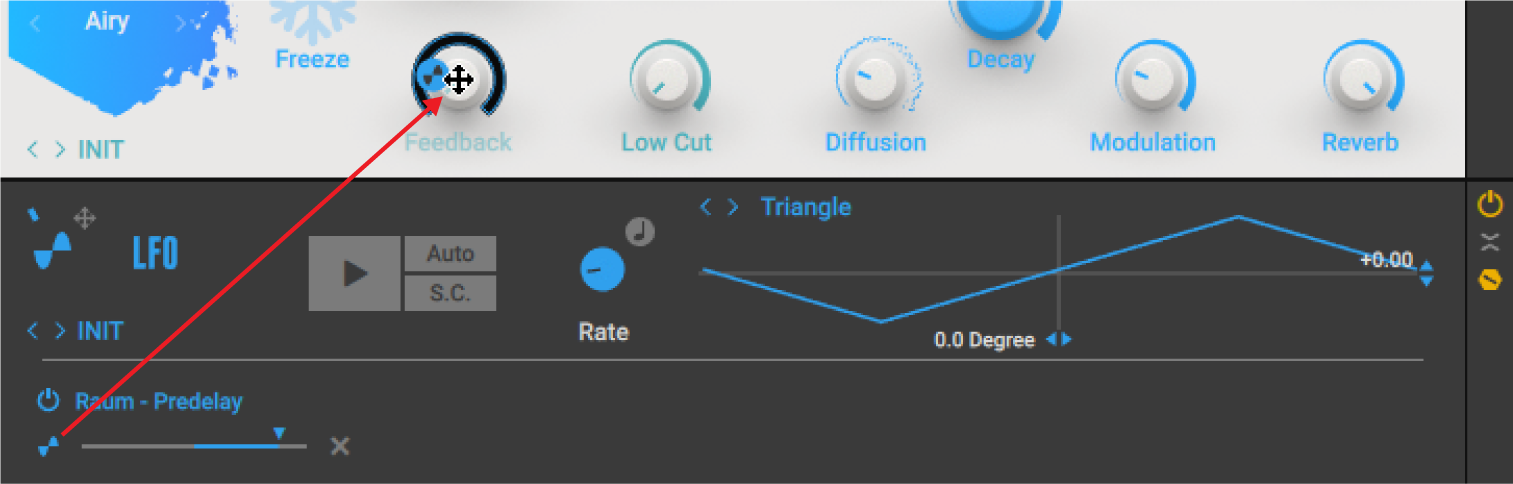
The assignment is removed from the original parameter and assigned to the new parameter.
Deleting Assignments
To delete an assignment, click on the x button next to it.

The assignment is removed from the parameter.
Adjusting the Modulation Depth of Assignments
The modulation depth determines the response of the assigned parameters to the Modifier. Increasing the depth makes the Modifier control a wider range of the parameters it is assigned to.
To adjust the modulation depth of a particular assignment, move the control left or right. Settings to the right of the center apply positive (non-inverted) modulation, while settings to the left of the center apply negative (inverted) modulation.

Analog Sequencer
Analog Sequencer generates a sequence of up to 16 steps as control signal. Each step can have a different value, enabling you to program rhythmic parameter changes. The sequence is played back in a cycle and synchronized to the tempo of the Metronome.
This Component contains the following parameters and controls:

Steps: Sets the number of steps in the sequence and therefore its length.
Tempo: Sets the note length of each of the 16 steps. You can set 1/4, 1/8, 1/16, or 1/32 notes.
Slide: Adjusts the amount of portamento, which is the time it takes the pitch to slide from one sequencer step to the next.
Sequence sliders: Adjust the values of each of the steps in the sequence. In center position, the step's value is 0. Moving the slider down sets negative values, moving the slider up sets positive values.
Envelope
The Envelope generates a very flexible control signal that is triggered by musical events. You can accurately edit the envelope's contour using a graphical editor. Once triggered, the envelope changes assigned parameters according to this contour. You can either use the input or the sidechain signal to trigger the envelope, or start it manually using the Play button.
This Component contains the following parameters and controls:
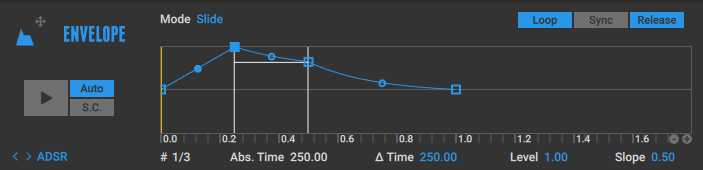
Play: Triggers the envelope, which generates a control signal according to its contour.
Auto: Activates automatic triggering based on the input signal. When you play a note on your instrument, the envelope detects the corresponding peak in the signal and starts playing.
S.C.: Switches the signal used for automatic triggering to the global sidechain signal. Auto needs to be activated for this setting to have an effect. For more information about sidechaining, refer to Sidechaining.
Mode: Switches between two modes for editing the envelope in the Graph, Slide and Fixed. When Slide is selected, moving a node in the Graph also changes the following nodes, therefore extending the total envelope time. When Fixed is selected, moving a node in the Graph does not change the other nodes, therefore keeping the total envelope time constant.
Loop: Activates Loop mode. When activated, the sustain phase of the envelope plays in a loop once the envelope is triggered. Deactivating Loop stops playback. When both Loop and Release are activated, the loop plays for as long as the trigger remains active, for example when holding the Play button.
Sync: Activates Sync mode. When activated, the envelope is synchronized to the tempo of the Metronome and the Graph is edited in musical intervals instead of the absolute duration (in seconds).
Release: Activates Release mode. When activated, the release phase of the envelope plays as soon as the trigger is not active any more, for example when releasing the Play button. Additionally, the sustain phase only plays for as long as the trigger remains active, for example when holding the Play button.
Graph: Displays and edits the envelope's contour. For more information, refer to Envelope Graph.
#: Displays the number of the selected node in the graph, which can be edited using the Time, Level, and Slope controls.
Abs. Time: Displays the duration in seconds from the start of the envelope to the selected node.
Time: Adjusts the duration in seconds from the previous to the selected node.
Level: Adjusts the level of the selected node.
Slope: Adjusts the shape of the envelope's contour to the left of the selected node.
Envelope Graph
The Graph is a visual interface that enables you to view and edit the envelope's contour. The vertical axis represents the strength of the envelope, and the horizontal axis represents the duration of the envelope. The envelope itself is displayed as a blue curve. It consists of multiple nodes which can be moved in the Graph to adjust the envelope's contour.
The following overview highlight the various interface elements of the Graph:
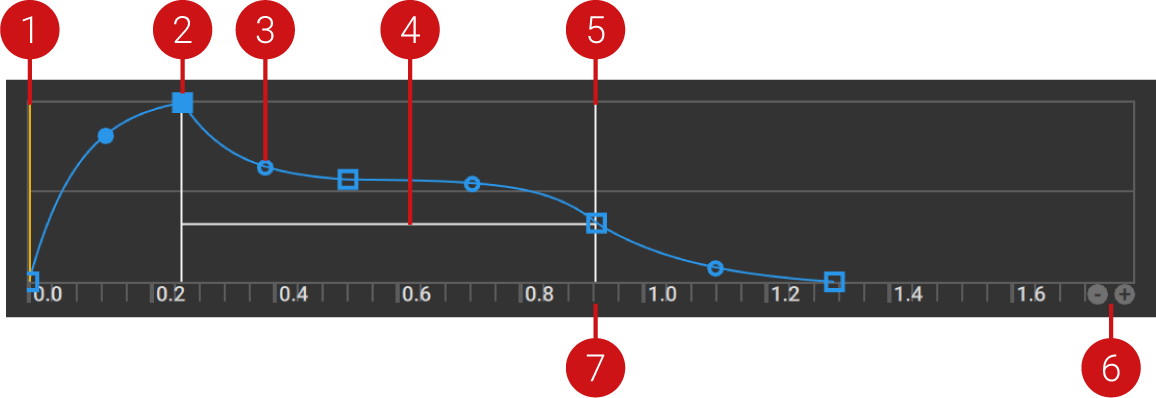 |
Position marker: Shows the current playback position of the envelope.
Node: Divides the envelope into segments that are used to adjust the envelope's contour. You can click and drag them in the Graph to change their level and position in time. When Sync is activated, the nodes snap onto the musical grid. You can add new nodes by right-clicking anywhere on the envelope curve, and remove them by right-clicking on a node. You can select a node and change its parameters using the controls beneath the Graph by clicking on it. The selected node is shown as a solid blue square, while the other nodes only show an outline.
Note
The first node represents the start of the envelope, and the last node represents the end of the release phase. The first and the last nodes share the same level.
Slope: Adjusts the shape of the envelope in the respective segment. You can click and drag the circular handle up and down to set logarithmic, linear, and exponential responses.
Sustain phase: Displays the sustain phase of the envelope. The sustain phase can be played back as a loop when Loop is activated, or play for as long as a trigger is active when Release is activated. The segment before the sustain phase represents the attack phase. The segment after the sustain phase represents the release phase.
Sustain markers: Display and edit the start and end points of the sustain phase. You can drag the sustain markers left and right in order to attach them to different nodes. They cannot be attached to the first and the last node.
Zoom: Sets the time scale of the Graph. You can click on - to zoom out, and on + to zoom in. When Sync is activated, Zoom also sets the resolution of the musical grid that the nodes snap onto.
Time scale: Shows the time scale of the Graph in seconds. When Sync is activated, it shows musical intervals. You can scroll in the Graph by clicking and dragging the time scale, or fit the envelope in the Graph by double-clicking on the time scale.
Input Level
The Input Level Modifier generates a control signal based on the incoming input level. This is commonly called an “envelope follower” as the signal tracks changes in amplitude. The most common application for this is to control filters; this is already built in to the AutoFilter component. However, a subtle use of this Modifier can be used to make components like the amplifiers sound much more realistic.
This Component contains the following parameters and controls:

Sidechain: Allows the user to trigger the Envelope with an external source signal. Auto must be activated to use Sidechain.
Attack: Sets how long the control signal takes to reach its target value (from 1 to 978ms). Setting the attack time too short can create pops when the signal first kicks in; increasing Attack can soften this effect.
Decay: Sets how long the control signal takes to fall back to its initial setting in the absence of an input signal (from 10 to 9863ms).
Offset: Sets the control signal’s minimum value. By default, the control signal covers a range from –1 to +1, with 0 as the midpoint. When Offset is at maximum, the baseline is 0.
Level: Sets the overall strength of the control signal.
LFO
The term LFO (Low Frequency Oscillator) refers to a periodic waveform at a subsonic rate. As a Modifier, this is useful to create constantly changing parameter values.
This Component contains the following parameters and controls:

Play: Resets the LFO and starts its cycle from the beginning.
Auto: Activates automatic reset based on the input signal. When you play a note on your instrument, the LFO detects the corresponding peak in the signal and starts its cycle from the beginning.
S.C.: Restarts the Envelope with an external source signal. Auto must be activated to use Sidechain.
Smooth: Adjusts the amount of smoothing applied to the Random waveform. This control is only available if Random is selected using the Waveform selector. By adjusting the amount of smoothing, you can remove sudden parameter changes and create fluid yet random modulation.
Rate: Sets the LFOs frequency in the range of 0.01 Hz to 10.24 Hz. When Tempo Sync is activated, Rate is set in note values.
Tempo Sync: Synchronizes the LFO to the tempo of the Metronome. When activated, Rate is set in note values.
Waveform selector: Selects between sine, triangle, square, saw tooth, and random waveforms.
Waveform display: Displays the selected waveform and provides controls for setting the reset phase position (horizontal slider below the display) and the level offset (vertical slider to the right of the display).
Step Sequencer
The Step Sequencer generates a stepped control signal with rhythmic values from 1/4 notes to 1/32nd notes, arranged in a 16 step sequence. Active steps produce a trigger intended to create rhythmic effects, synchronized to the tempo of the Metronome.
This Component contains the following parameters and controls:

Steps: Adjusts the length of the sequence by reducing the number of steps.
Tempo: Sets the rhythmic value, effectively changing the speed at which the buttons are triggered. Available options are 1/4, 1/8, 1/16, and 1/32 notes.
Legato: Ties adjacent steps to each other, thus creating longer steps.
Attack: Controls how long the control signal takes to reach its maximum value after having been triggered (from 4 to 1233ms).
Decay: Controls how long the control signal takes to reach its minimum value after having been triggered (from 4 to 2197ms)
Offset: Increases all control signal values as the control when turned up.
Width: Sets the length of the control signal, when triggered. When fully clockwise, the width equals the note-value set as Resolution.
Sequence buttons: Set the rhythm of the sequence. You can activate or deactivate steps by clicking them. Active steps in the sequence are highlighted in blue. The current step is highlighted in orange.