Space page
Learn how to use the Space page in Claire, which lets you configure a reverberation and a delay unit for your instrument.
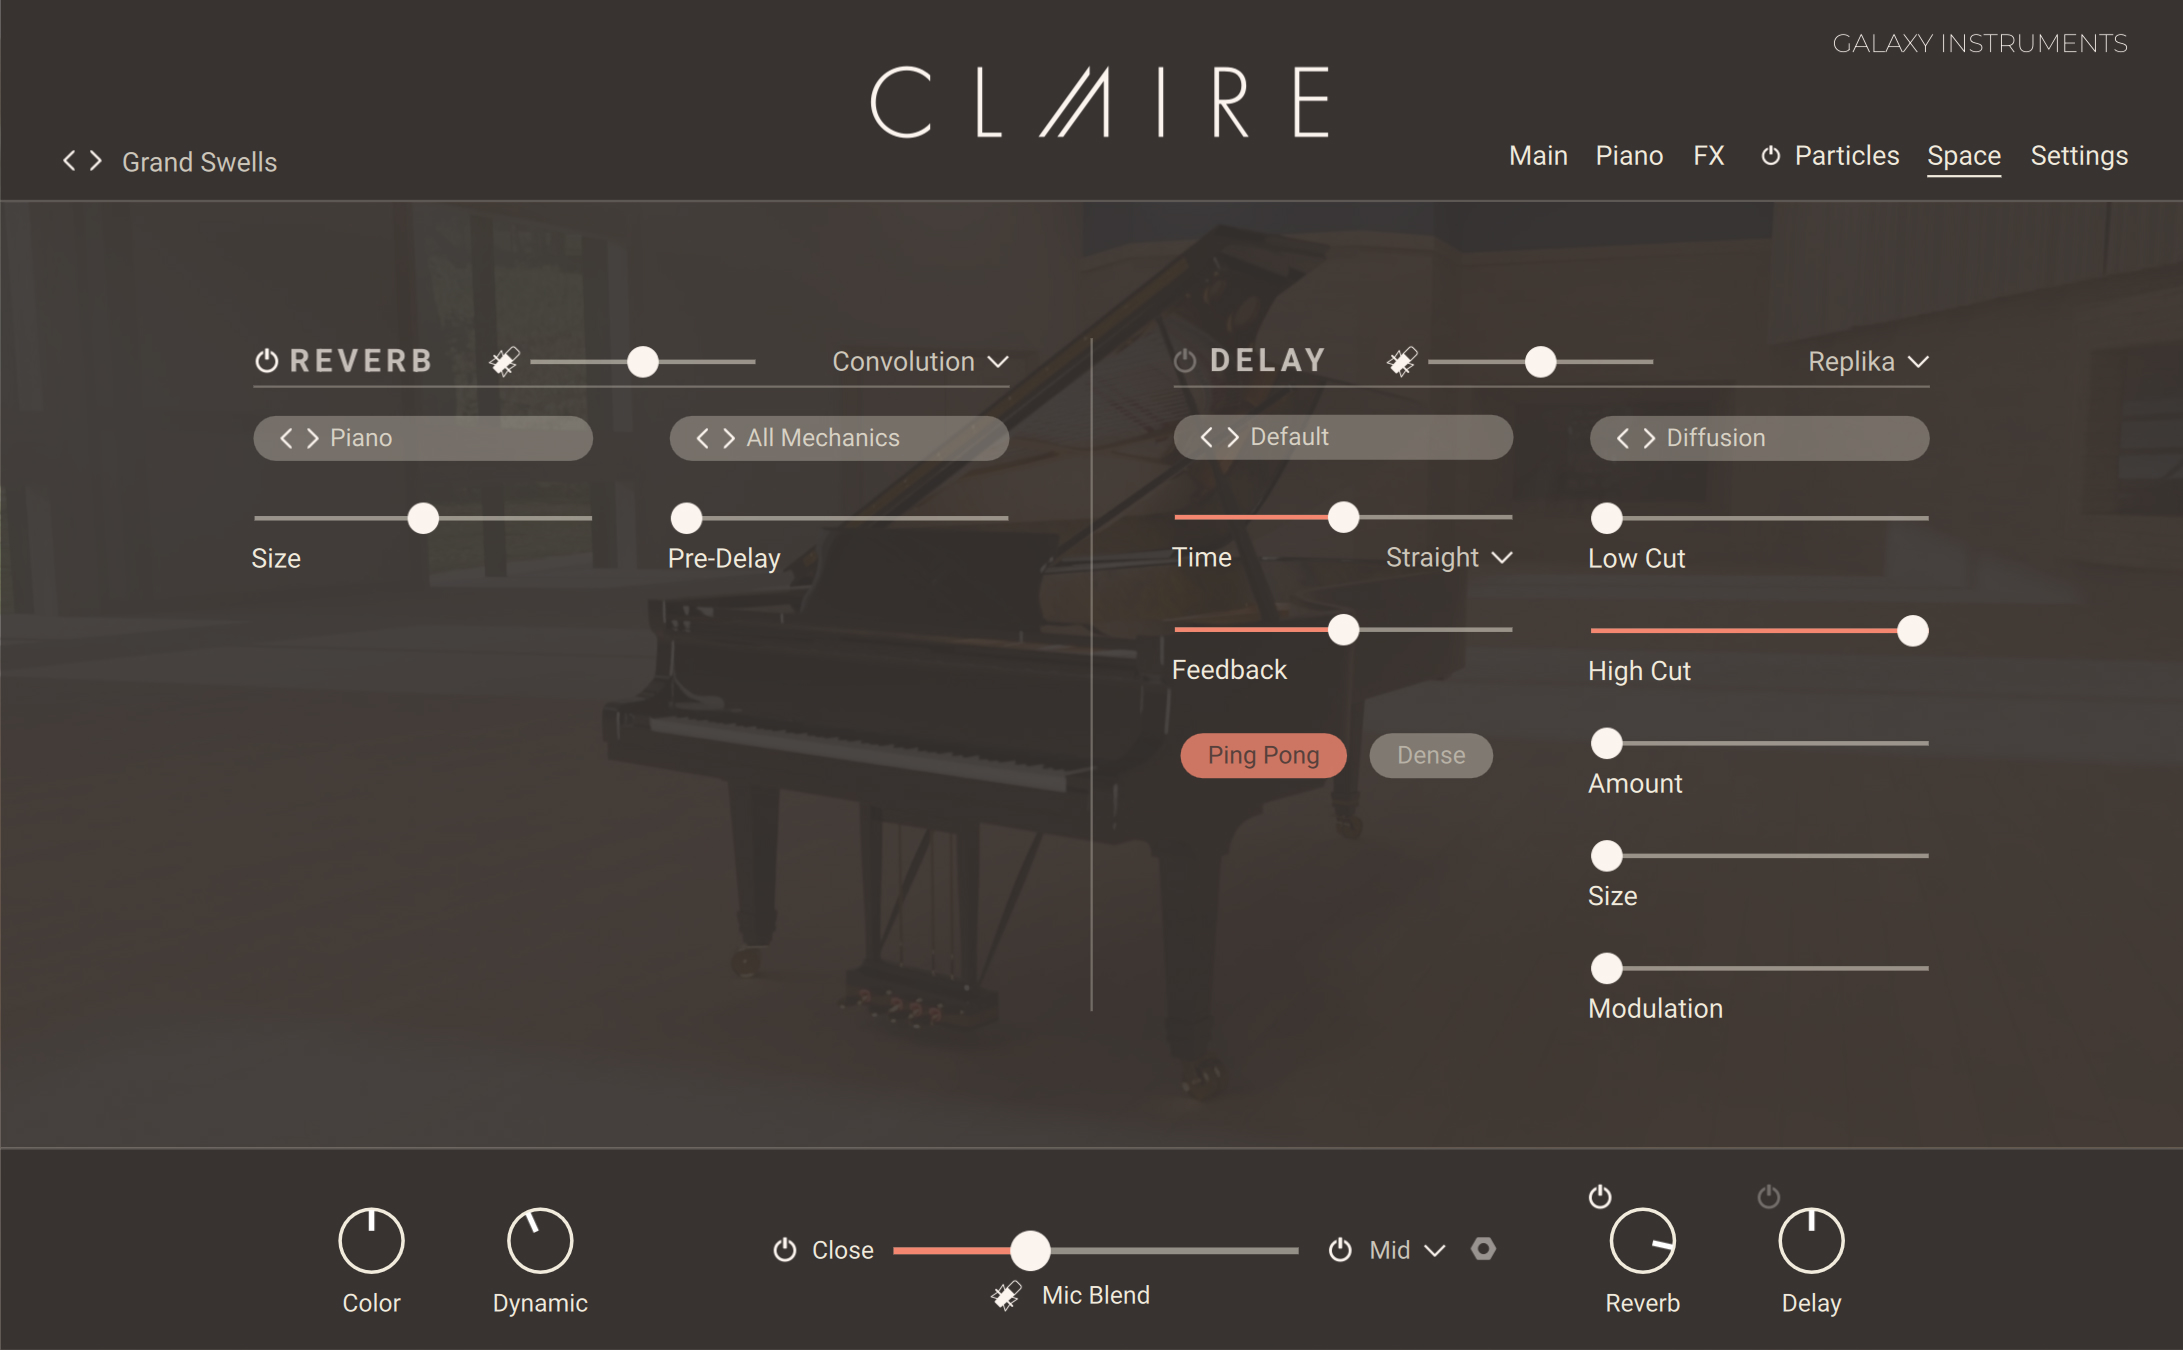
The Space page lets you configure a reverberation and a delay unit for your instrument.
Click Space at the top right of the instrument to open the Space page.

The Space page is split into two sections:
Note
The effects in this page affect only the main piano sound. Other effects dedicated to the particles are available in the Effects section of the Particles page. Refer to Effects section for more information.
Reverb
The Reverb section allows you to apply a reverb effect to the main piano sound.
At the top of the Reverb section, the following three controls are available:
 |
Reverb On/Off switch: Turns the reverb on or off. This has the same effect as the Reverb On/Off switch in the Performance controls at the bottom of the window. Refer to Claire overview for more information.
Reverb Mic Blend fader: Adjusts a dedicated blend between the close microphones and the room microphones for the signal sent to the reverb unit. This fader lets you adjust a different microphone blend for the reverb unit than for the main instrument sound, which is set in the Performance controls at the bottom of the window. Refer to Mic Blend controls for more information.
Reverb Engine menu: Selects from three Reverb engines: Convolution, Algorithmic, and Plate. The reverb parameters below will depend on the selected engine.
Note
You can adjust the overall amount of reverb applied to your instrument using the Reverb knob located in the Performance controls at the bottom of the instrument. Refer to Claire overview for more information.
Convolution reverb
By selecting Convolution in the Reverb Engine menu, you activate the Convolution reverb. The convolution reverb uses impulse responses of various vintage reverb units, halls, rooms, and other objects and places to recreate those acoustic situations.
The Convolution reverb contains the following controls:
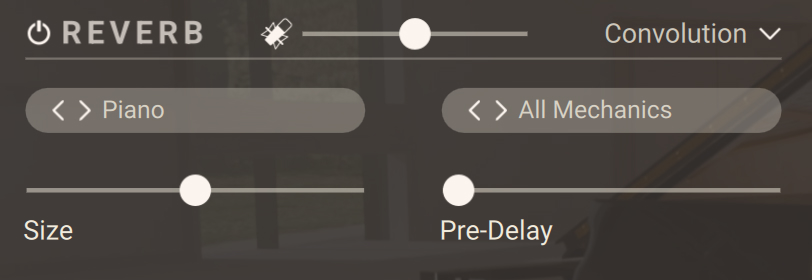 |
Category selector (left menu): Selects the category of impulse responses. You can also click the little arrows on the left to switch to the next or previous entry from the menu.
IR selector (right menu): Selects an impulse response from the selected category. You can also click the little arrows on the left to switch to the next or previous entry from the menu.
Size: Adjusts the size of the reverb effect by lengthening or shortening the selected impulse response.
Pre Delay: Adjusts the delay before the reverb starts.
Algorithmic reverb
By selecting Algorithmic in the Reverb Engine menu, you activate the Algorithmic reverb.
The Algorithmic reverb contains the following controls:
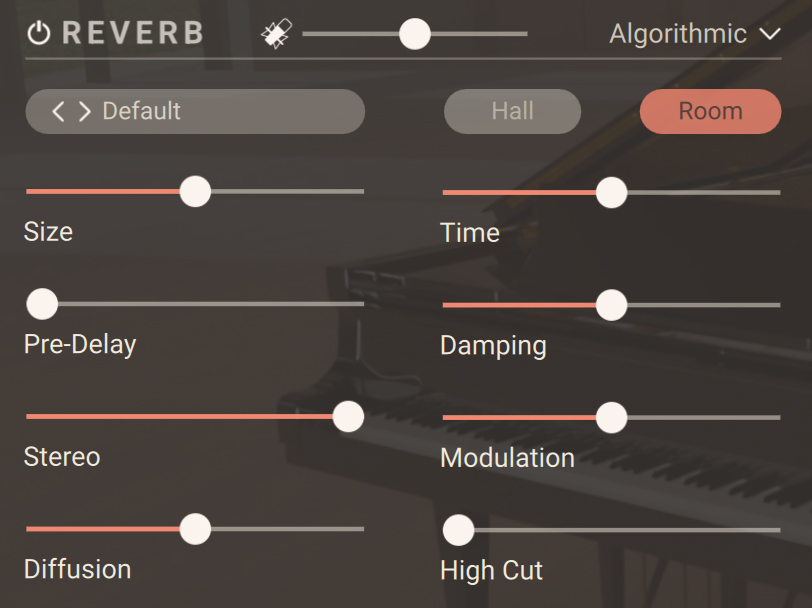 |
Preset selector: Selects from various predefined settings for the effect. You can select a preset by clicking on the left and right arrows, or open the drop-down menu by clicking on the preset name.
Hall/Room selector: Selects between two reverberation modes simulating the sound character of a hall or a room.
Size: Adjusts the size of the hall or room simulated by the reverb effect. Higher values replicate larger spaces.
Time: Adjusts the duration of the reverb effect.
Pre-Delay: Introduces a short amount of delay before the reverb takes effect.
Damping: Adjusts the amount of absorption in the room simulated by the reverb effect. Higher values result in more absorption.
Stereo: Controls the stereo image of the reverb effect. Higher values result in a wider stereo image.
Modulation: Adjusts the amount of modulation applied to the reverb effect. At full left, no modulation is applied.
Diffusion: Adjusts the density of the reflections in the room simulated by the reverb effect.
High Cut:: Cuts the high-frequency content of the reverb signal.
Plate reverb
By selecting Plate in the Reverb Engine menu, you activate the Plate reverb.
The Plate reverb contains the following controls:
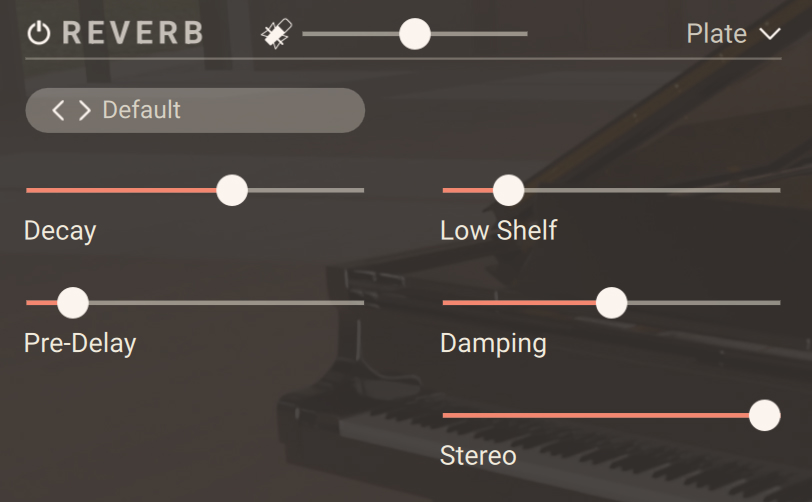 |
Preset selector: Selects from various predefined settings for the effect. You can select a preset by clicking on the left and right arrows, or open the drop-down menu by clicking on the preset name.
Decay: Adjusts the duration of the reverb effect.
Low Shelf: Attenuates or amplifies the low-frequency content of the reverb signal.
Pre-Delay: Introduces a short amount of delay before the reverb takes effect.
Damping: Adjusts the amount of absorption in the room simulated by the reverb effect. Higher values result in more absorption.
Stereo: Controls the stereo image of the reverb effect. Higher values result in a wider stereo image.
Delay
The Delay section allows you to apply a delay effect to the main piano sound.
At the top of the Delay section, the following three controls are available:
 |
Delay On/Off switch: Turns the delay on or off. This has the same effect as the Delay On/Off switch in the Performance controls at the bottom of the window. Refer to Claire overview for more information.
Delay Mic Blend fader: Adjusts a dedicated blend between the close microphones and the room microphones for the signal sent to the delay unit. This fader lets you adjust a different microphone blend for the delay unit than for the main instrument sound, which is set in the Performance controls at the bottom of the window. Refer to Mic Blend controls for more information.
Delay Engine menu: Selects from three Delay engines: Replika, Twin Delay, and Psyche Delay. The delay parameters below will depend on the selected engine.
Note
You can adjust the overall amount of delay applied to your instrument using the Delay knob located in the Performance controls at the bottom of the instrument. Refer to Claire overview for more information.
Replika
By selecting Replika in the Delay Engine menu, you activate the Replika delay. The Replika delay is a full-featured delay unit based on the Native Instruments Replika XT delay plug-in. Notably, it includes the five delay styles from Replika XT: Modern, Analog, Vintage, Tape and Diffusion, each with its own unique sound and behavior.
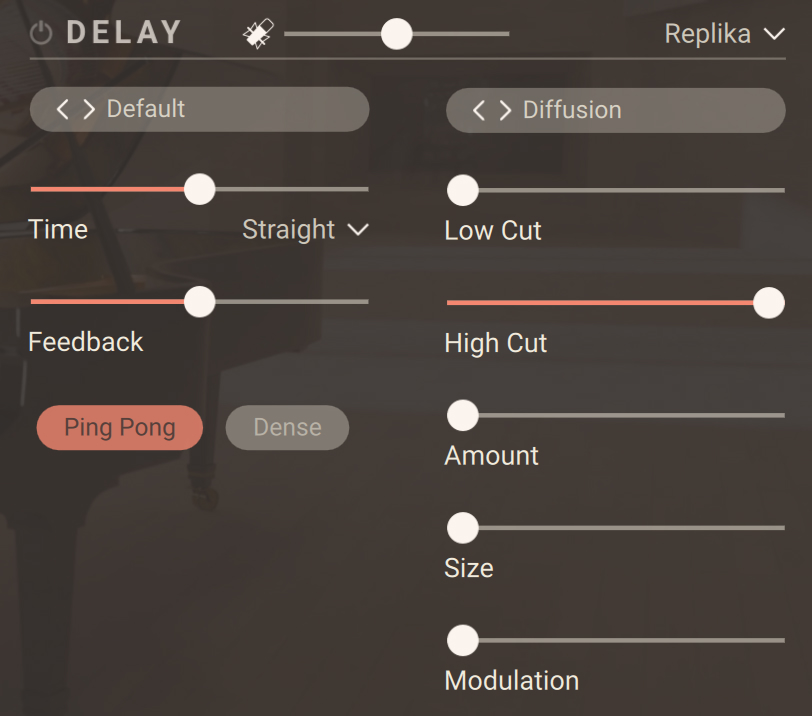
The Replika delay contains the following controls:
 |
Note
The controls in the top row of the Delay section (Delay On/Off switch, Mic Blend fader, and Delay Engine menu) are common to all types of Delay. For more information on them, refer to Delay.
Preset selector (left menu): Selects from various predefined settings for the effect. You can select a preset by clicking on the left and right arrows, or open the drop-down menu by clicking on the preset name.
Type selector (right menu): Selects between five different delay styles that determine the basic sound character. The last three controls of the delay vary with each type.
Modern: Clean and defined delay with adjustable, tube-like saturation. The built-in modulation changes the delay time periodically. This shifts the timing and pitch of the delay signal, adding depth and movement to the sound. Unlike the built-in modulation, manual adjustments of the delay time do not alter the pitch of the delay signal.
Analogue: Dark and hazy emulation of BBD (Bucket Brigade Device) delays, which include old analogue studio effects as well as many contemporary guitar pedals. The sound of the delay depends on the delay time: As the delay time is increased, the delay repeats will become darker, with more noise and distortion being introduced to the signal. The built-in modulation changes the delay time periodically. This shifts the timing and pitch of the delay signal, adding depth and movement to the sound.
Tape: Textured and lively emulation of classic tape delays. It gives you full control over their unique properties, including the amount of saturation, the age of the tape, and the intensity of flutter.
Vintage: Warm and crunchy emulation of early digital delay effects. The sound of the delay depends on the delay time. As the delay time is increased, the delay repeats will become grittier, with more digital artifacts being introduced to the signal. The built-in modulation changes the delay time periodically. This shifts the timing and pitch of the delay signal, adding depth and movement to the sound.
Diffusion: Clean delay combined with a unique reverb effect. It can be used to create a wide range of different ambiences, from tight and resonant to unnaturally vast spaces.
Time: Adjusts the delay time. Depending on the selected Sync mode, the delay time is either freely adjusted in milliseconds or synchronized to Kontakt’s global tempo, which is the tempo of your DAW is Kontakt is running as a plug-in.
Sync Mode menu: Selects between four modes that determine the behavior of the Time control.
Free: The delay time can bee freely adjusted in milliseconds.
Straight: The delay time can be adjusted in even note divisions (1/16, 1/8, 1/4, etc.) relative to Kontakt’s global tempo.
Dotted: The delay time can be adjusted in dotted note divisions (1/16d, 1/8d, 1/4d, etc.) relative to Kontakt’s global tempo.
Triplets: The delay time can be adjusted in triplet note divisions (1/16t, 1/8t, 1/4t, etc.) relative to Kontakt’s global tempo.
Feedback: Adjusts the level of the signal that is being fed back to the delay's input. Increasing the feedback level creates more delay repeats that decay over time. Feedback levels of 100 % and above are possible, allowing the delay repeats to build up until the point of self-oscillation.
Low Cut: Attenuates low-frequency content in the feedback path of the delay using a low-cut filter. With the slider at full left, the filter is off. Moving it to the right raises the cutoff frequency of the filter, resulting in a brighter tone of the delay.
High Cut: Attenuates high-frequency content in the feedback path of the delay using a high-cut filter. With the slider at full right, the filter is off. Moving it to the left lowers the cutoff frequency of the filter, resulting in a darker tone of the delay.
Ping Pong: Turns Ping Pong mode on or off. In Ping Pong mode, the delay repeats are panned hard left and right in an alternating pattern.
The remaining controls depend on the delay type selected in the Type selector, as described below.
Type: Modern
Stereo: Switches between stereo and mono operation for the built-in modulation. When activated, the modulation between the left and the right stereo channels is offset in time, resulting in a wide stereo effect. When deactivated, the modulation affects both the left and the right stereo channels in the same way.
Depth: Adjusts the amount of built-in modulation applied to the delay time.
Rate: Adjusts the speed of the built-in modulation.
Saturation: Adds tube-like saturation at the delay input. With the control at full left the saturation is bypassed, moving it to the right pushes the sound from subtle warmth to overdrive. The amount of saturation depends on the input level.
Type: Analogue
Stereo: Switches between stereo and mono operation for the built-in modulation. When activated, the modulation between the left and the right stereo channels is offset in time, resulting in a wide stereo effect. When deactivated, the modulation affects both the left and the right stereo channels in the same way.
Depth: Adjusts the amount of built-in modulation applied to the delay time.
Rate: Adjusts the speed of the built-in modulation.
BBD Type: Selects one of four BBD delay models: Clean, Warm, Dark, Grunge. The character of the four models ranges from subtle filtering and distortion (Clean, Warm) to a highly degraded sound (Dark, Grunge).
Type: Tape
Noise: Switches the tape hiss on or off. The amount of hiss depends on the Tape Age control.
Saturation: Adjusts the amount of tape saturation from a clean sound to overdrive.
Tape Age: Enhances the characteristics of an aging tape, like limited high-frequency response and hiss (depending on the Noise button’s state).
Flutter: Increases the effects introduced by mechanical imperfections of the tape delay’s motor and tape transport, resulting in pitch variations over time.
Type: Vintage
Stereo: Switches between stereo and mono operation for the built-in modulation. When activated, the modulation between the left and the right stereo channels is offset in time, resulting in a wide stereo effect. When deactivated, the modulation affects both the left and the right stereo channels in the same way.
Depth: Adjusts the amount of built-in modulation applied to the delay time.
Rate: Adjusts the speed of the built-in modulation.
Quality: Selects one of four quality settings for the delay: High, Medium, Low, Crunch. The High setting has a bright, subtly textured sound. Medium and Low sound darker and grittier. Crunch has a bright sound but also introduces a lot of digital artifacts to the signal.
Type: Diffusion
Dense: Switches between two density settings for the reflection pattern of the reverb effect. When activated, the reflection pattern is dense and washed out. When deactivated, the reflection pattern is sparse with a granular quality.
Amount: Adjusts the amount of diffusion applied to the delay signal, resulting in a reverb effect. High settings make the delay appear out of sync, so low settings are recommended if the rhythmic timing of the delay is essential.
Size: Adjusts the swell, reflection pattern and decay of the reverb effect, giving the impression of differently sized spaces.
Modulation: Adjusts the depth and speed of modulation applied to the diffusion, shifting the timing and pitch of the reflections for a wide reverb effect.
Twin Delay
By selecting Twin Delay in the Delay Engine menu, you activate the Twin delay. The Twin delay combines two parallel delay channels for advanced stereo effects. The two delays are dedicated to the left and right stereo channel, respectively. You can use them to create rhythmic echoes that bounce through the stereo image.
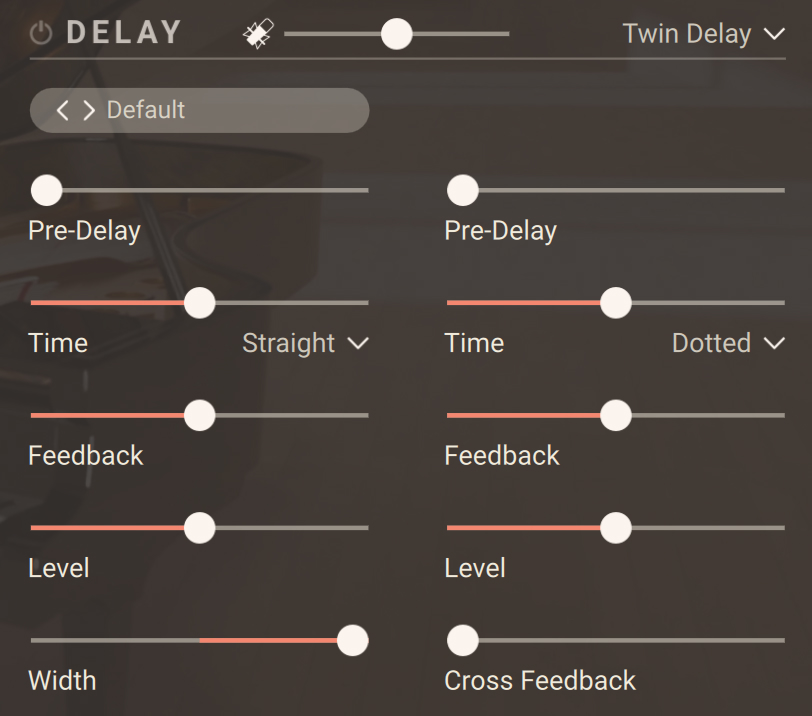
The Twin delay contains the following controls:
 |
Note
The controls in the top row of the Delay section (Delay On/Off switch, Mic Blend fader, and Delay Engine menu) are common to all types of Delay. For more information on them, refer to Delay.
Preset selector: Selects from various predefined settings for the effect. You can select a preset by clicking on the left and right arrows, or open the drop-down menu by clicking on the preset name.
The following controls are available for each of the left and right delay channels independently:
Pre-Delay: Adjusts the duration of the initial delay added to the channel. This predelay is independent of the Time control and does not affect the delay repeats. To achieve classic ping-pong echoes, set the same Time for both channels and increase the Pre-Delay on one of them.
Time: Adjusts the delay time. Depending on the selected Sync mode, the delay time is either freely adjusted in milliseconds or synchronized to Kontakt’s global tempo, which is the tempo of your DAW is Kontakt is running as a plug-in.
Sync Mode menu: Selects between four modes that determine the behavior of the Time control.
Free: The delay time can bee freely adjusted in milliseconds.
Straight: The delay time can be adjusted in even note divisions (1/16, 1/8, 1/4, etc.) relative to Kontakt’s global tempo.
Dotted: The delay time can be adjusted in dotted note divisions (1/16d, 1/8d, 1/4d, etc.) relative to Kontakt’s global tempo.
Triplets: The delay time can be adjusted in triplet note divisions (1/16t, 1/8t, 1/4t, etc.) relative to Kontakt’s global tempo.
Feedback: Adjusts the amount of channel output that is sent back into the channel input. Moving Feedback to the right increases the number of delay repetitions.
Level: Adjusts the output level of the delay channel.
The following controls act globally and affect both delay channels simultaneously.
Width: Adjusts the stereo image of the delay signal. At center position, the signal is mono. Turning the control to the right increases the width of the stereo image. Turning the control to the left increases the width of the stereo image and flips the left and right stereo channel.
Cross Feedback: Adjusts the amount of cross-feedback, which feeds the left channel output back into the right channel input and vice versa.
Psyche Delay
By selecting Psyche Delay in the Delay Engine menu, you activate the Psyche Delay. The Psyche Delay is a stereo delay effect that produces a range of atmospheric ambient echoes and reverse effects reminiscent of the so-called backwards tape sound of the 1960s.
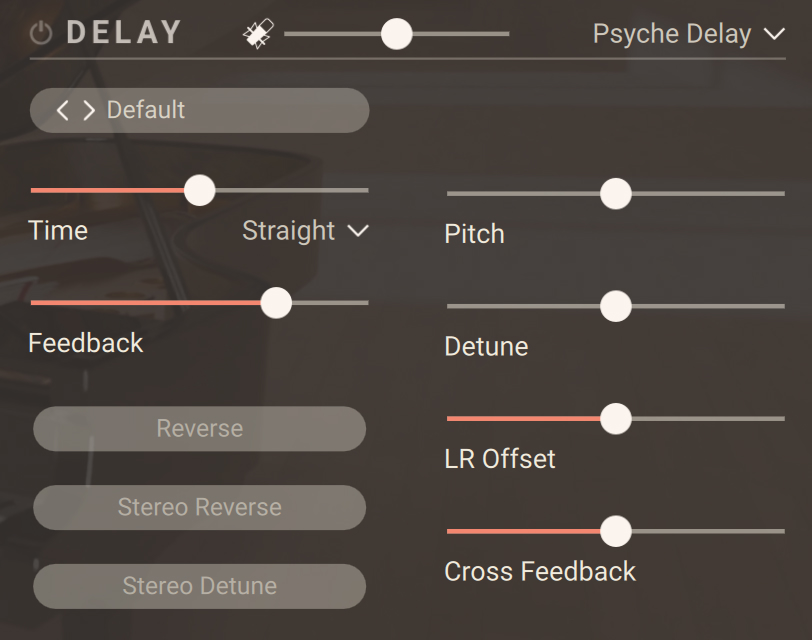
The Psyche Delay contains the following controls:
 |
Note
The controls in the top row of the Delay section (Delay On/Off switch, Mic Blend fader, and Delay Engine menu) are common to all types of Delay. For more information on them, refer to Delay.
Preset selector: Selects from various predefined settings for the effect. You can select a preset by clicking on the left and right arrows, or open the drop-down menu by clicking on the preset name.
Time: Adjusts the delay time. Depending on the selected Sync mode, the delay time is either freely adjusted in milliseconds or synchronized to Kontakt’s global tempo, which is the tempo of your DAW is Kontakt is running as a plug-in.
Sync Mode menu: Selects between four modes that determine the behavior of the Time control.
Free: The delay time can bee freely adjusted in milliseconds.
Straight: The delay time can be adjusted in even note divisions (1/16, 1/8, 1/4, etc.) relative to Kontakt’s global tempo.
Dotted: The delay time can be adjusted in dotted note divisions (1/16d, 1/8d, 1/4d, etc.) relative to Kontakt’s global tempo.
Triplets: The delay time can be adjusted in triplet note divisions (1/16t, 1/8t, 1/4t, etc.) relative to Kontakt’s global tempo.
Feedback: Adjusts the amount of delay output that is sent back into the delay input. Moving Feedback to the right increases the number of delay repetitions.
Reverse: Reverses the playback of subsequent delay repeats.
Stereo Reverse: Removes the reverse effect from the right stereo channel, thus only delay repeats on the left channel are reversed.
Stereo Detune: Applies the Detune effect to both the left and right stereo channel.
Pitch: Adjusts the pitch of the echo repeats in the range of -12 to +12 semitones. Combined with Feedback you can use this to create progressively harmonized echo cascades.
Detune: Adjusts the pitch of the echo repeats on the left stereo channel in the range of -50 to +50 cents. Combined with Feedback and Cross Feedback you can use this to create progressively detuned echo cascades.
LR Offset: Enhances the stereo image of the delay by adding a timing offset between the left and right channels.
Cross Feedback: Adjusts the amount of cross-feedback, which feeds the left channel output back into the right channel input and vice versa.