FX Editor
The FX Editor allows you to customize the effects chain of any preset and build your own effects chains for your custom user presets. Activate or deactivate a loaded effect, replace effects from the dropdown menus and quickly change the order of effects with drag and drop. Additionally, you can assign loaded effects parameters to a macro control, refer to Macros Editor for more information.
From classic time-based effects like reverb, delay and chorus, to dynamic effects, saturation, amp emulations and more, the FX view encourages creativity and provides controls that determine the behavior of the FX unit and allow you to further define the character of your sound. 40s VERY OWN DRUMS contains three different types of effects; Insert FX Overview, Global FX Overview and Send FX Overview. Each FX page is designed for different functions and best use cases, which will be described in the overviews below.
Insert FX Overview
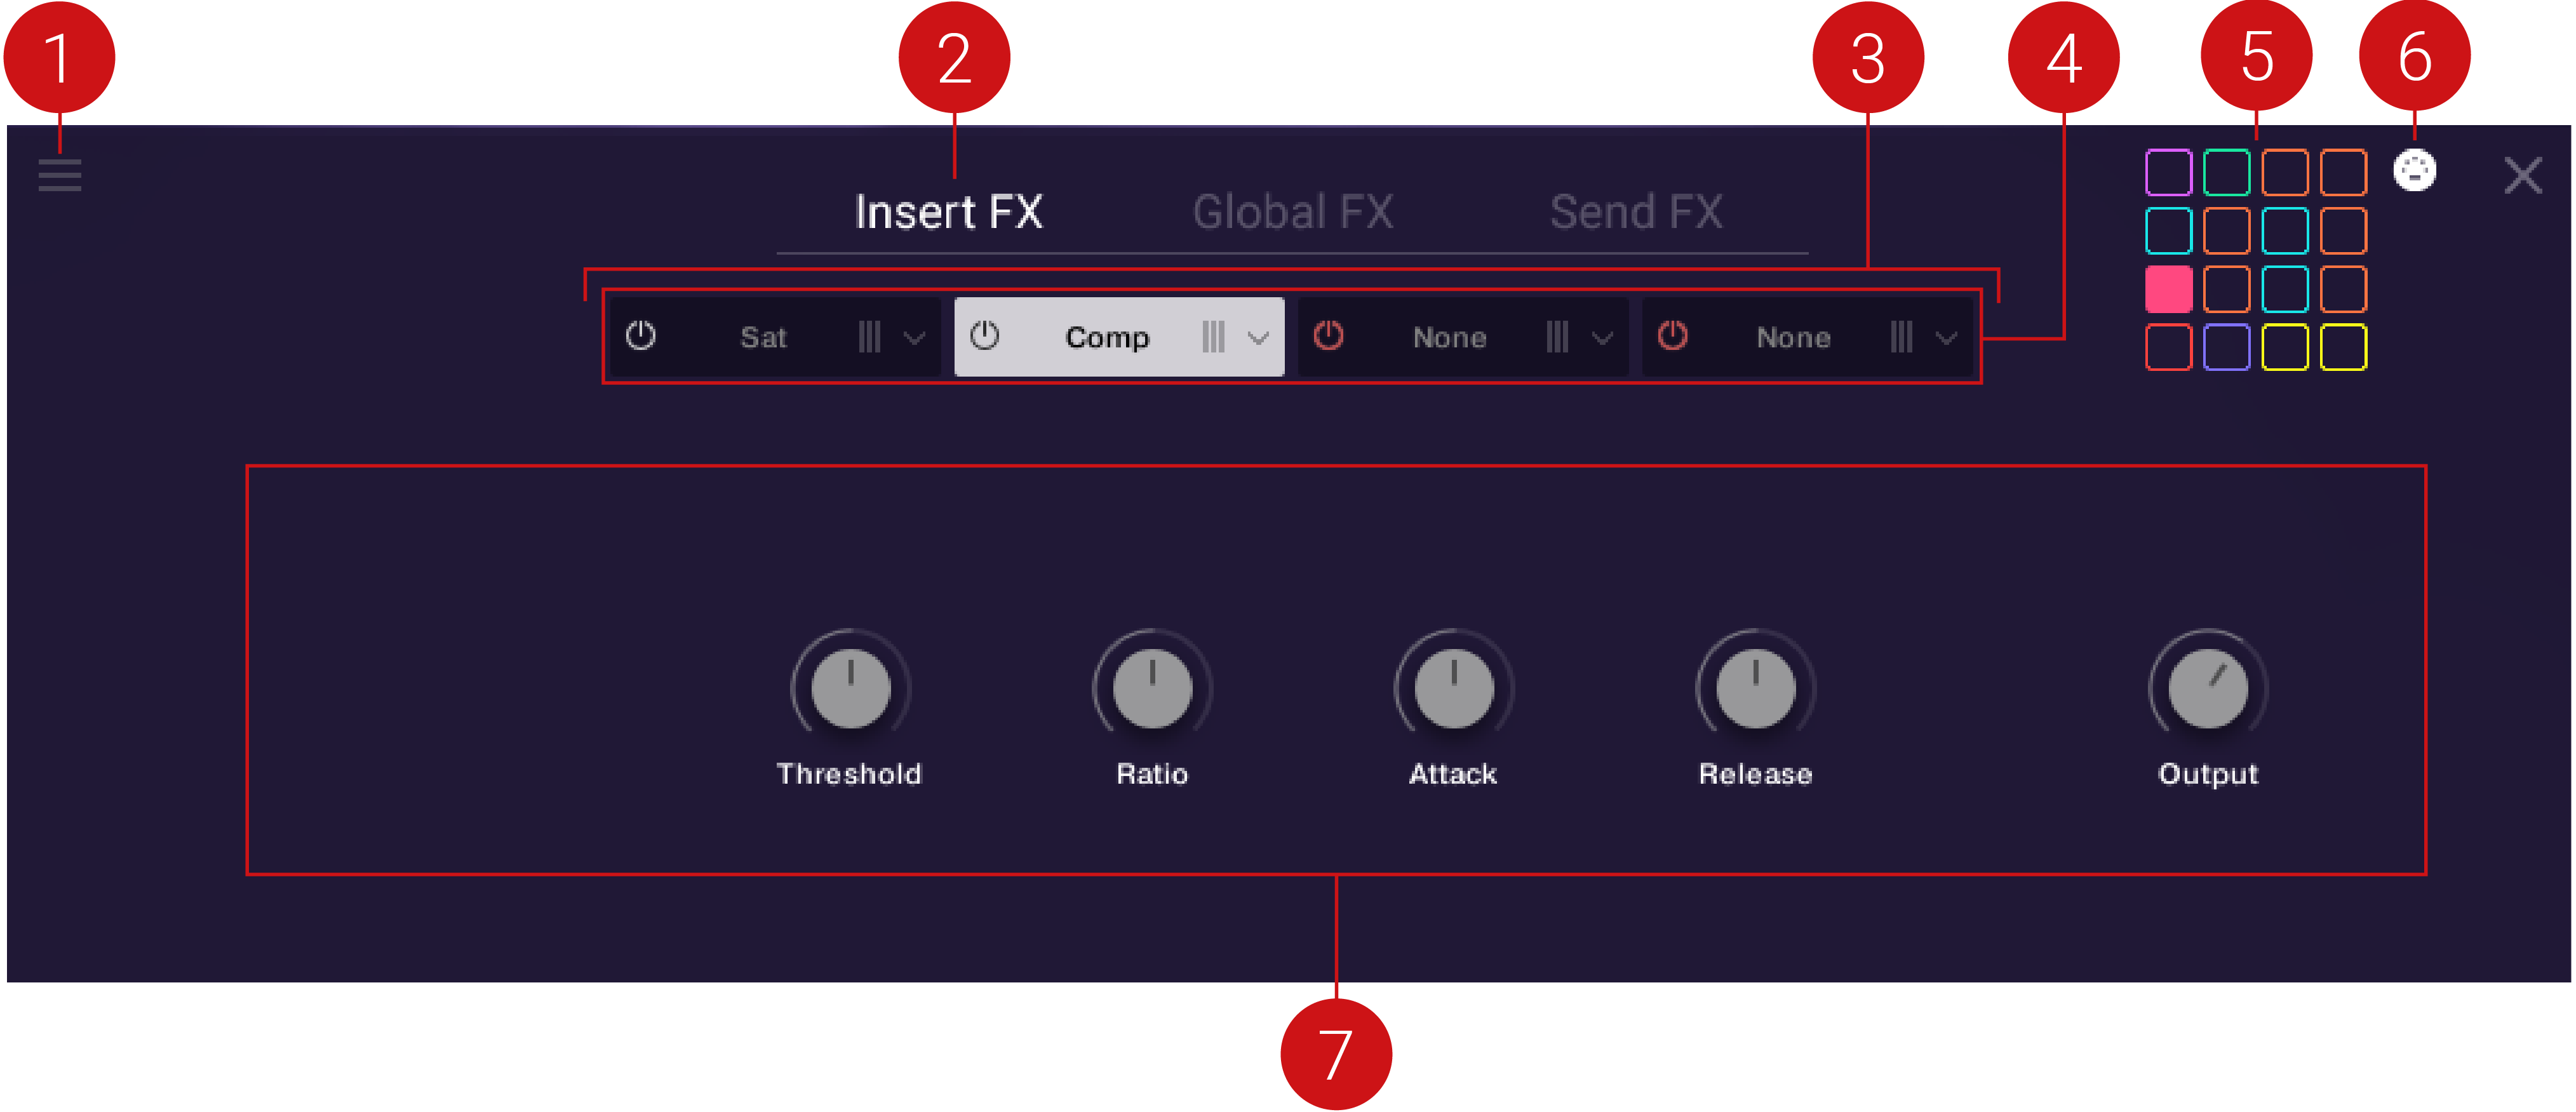
The Insert FX section provides a range of Kontakt effects that can be directly added on to your individual drum sounds. Four FX unit slots are available for each pad, and will process the signal of the selected pad in the order of their placement in the FX chain. When a pad is selected, its FX chain and FX units will be displayed, and you can quickly move between different pads using the Pad Select buttons in the top right corner.
As Insert FX are specific to each sound source, they can be used for corrective purposes, for example using an EQ to contour sounds and cut certain frequencies so they sit better in the mix. Dynamic tools can also be used here to help tame sounds that are sticking out, to help create a more well balanced mix. Creative effects can have significant impact on the individual sounds of your kit and are a way to tailor you kit to suit your drumming style and musical sound. Saturators, amp emulations, choruses, flangers and phasers are all available and should be experimented with across your kit. These effects ultimately shape the sonic character of the sound sources and contribute significantly to the distinct coloration of the different drum sounds.
The Insert FX contains the following elements and controls:

FX Preset Menu: Enables you to save, load and clear your FX unit and FX chain presets. Also allows you to reset FX units to their default state. For more information, refer to Managing FX Presets.
FX Tabs: Displays the Insert FX, Global FX and Send FX tabs. Select the Insert FX tab to display the related controls and parameters for editing.
FX Chain: Represents the effects chain i.e., the order of the effects for the selected drum sound. You can change the order of the effects by clicking + dragging an FX unit left or right.
FX Units: Represents each effect within the FX Chain. Switch the effect on and off by clicking the power button. Use the drop-down menu on the right of each unit to select an effect. The controls for the selected FX unit are displayed below in the parameter display area. For more information on each effect, refer to the KONTAKT manual available from the Help menu, or online at the Native Instruments website here.
Pad Select: Selects a pad for editing. The selected pad is represented by a filled color and the Insert FX applied to this pad sound are displayed.
MIDI Pad Select: When activated, pad selection is determined by MIDI note input. Activating the control allows you to select a pad for editing from your MIDI device, and is useful to play the pad as you adjust the relative Insert FX controls.
FX Parameter Controls: This area displays the parameter controls for the selected effect. Each effect unit has a different range of controls that are specific to its function. For more information on the FX and their related controls, refer to the KONTAKT manual available from the Help menu, or from the Native Instruments website here.
Global FX Overview
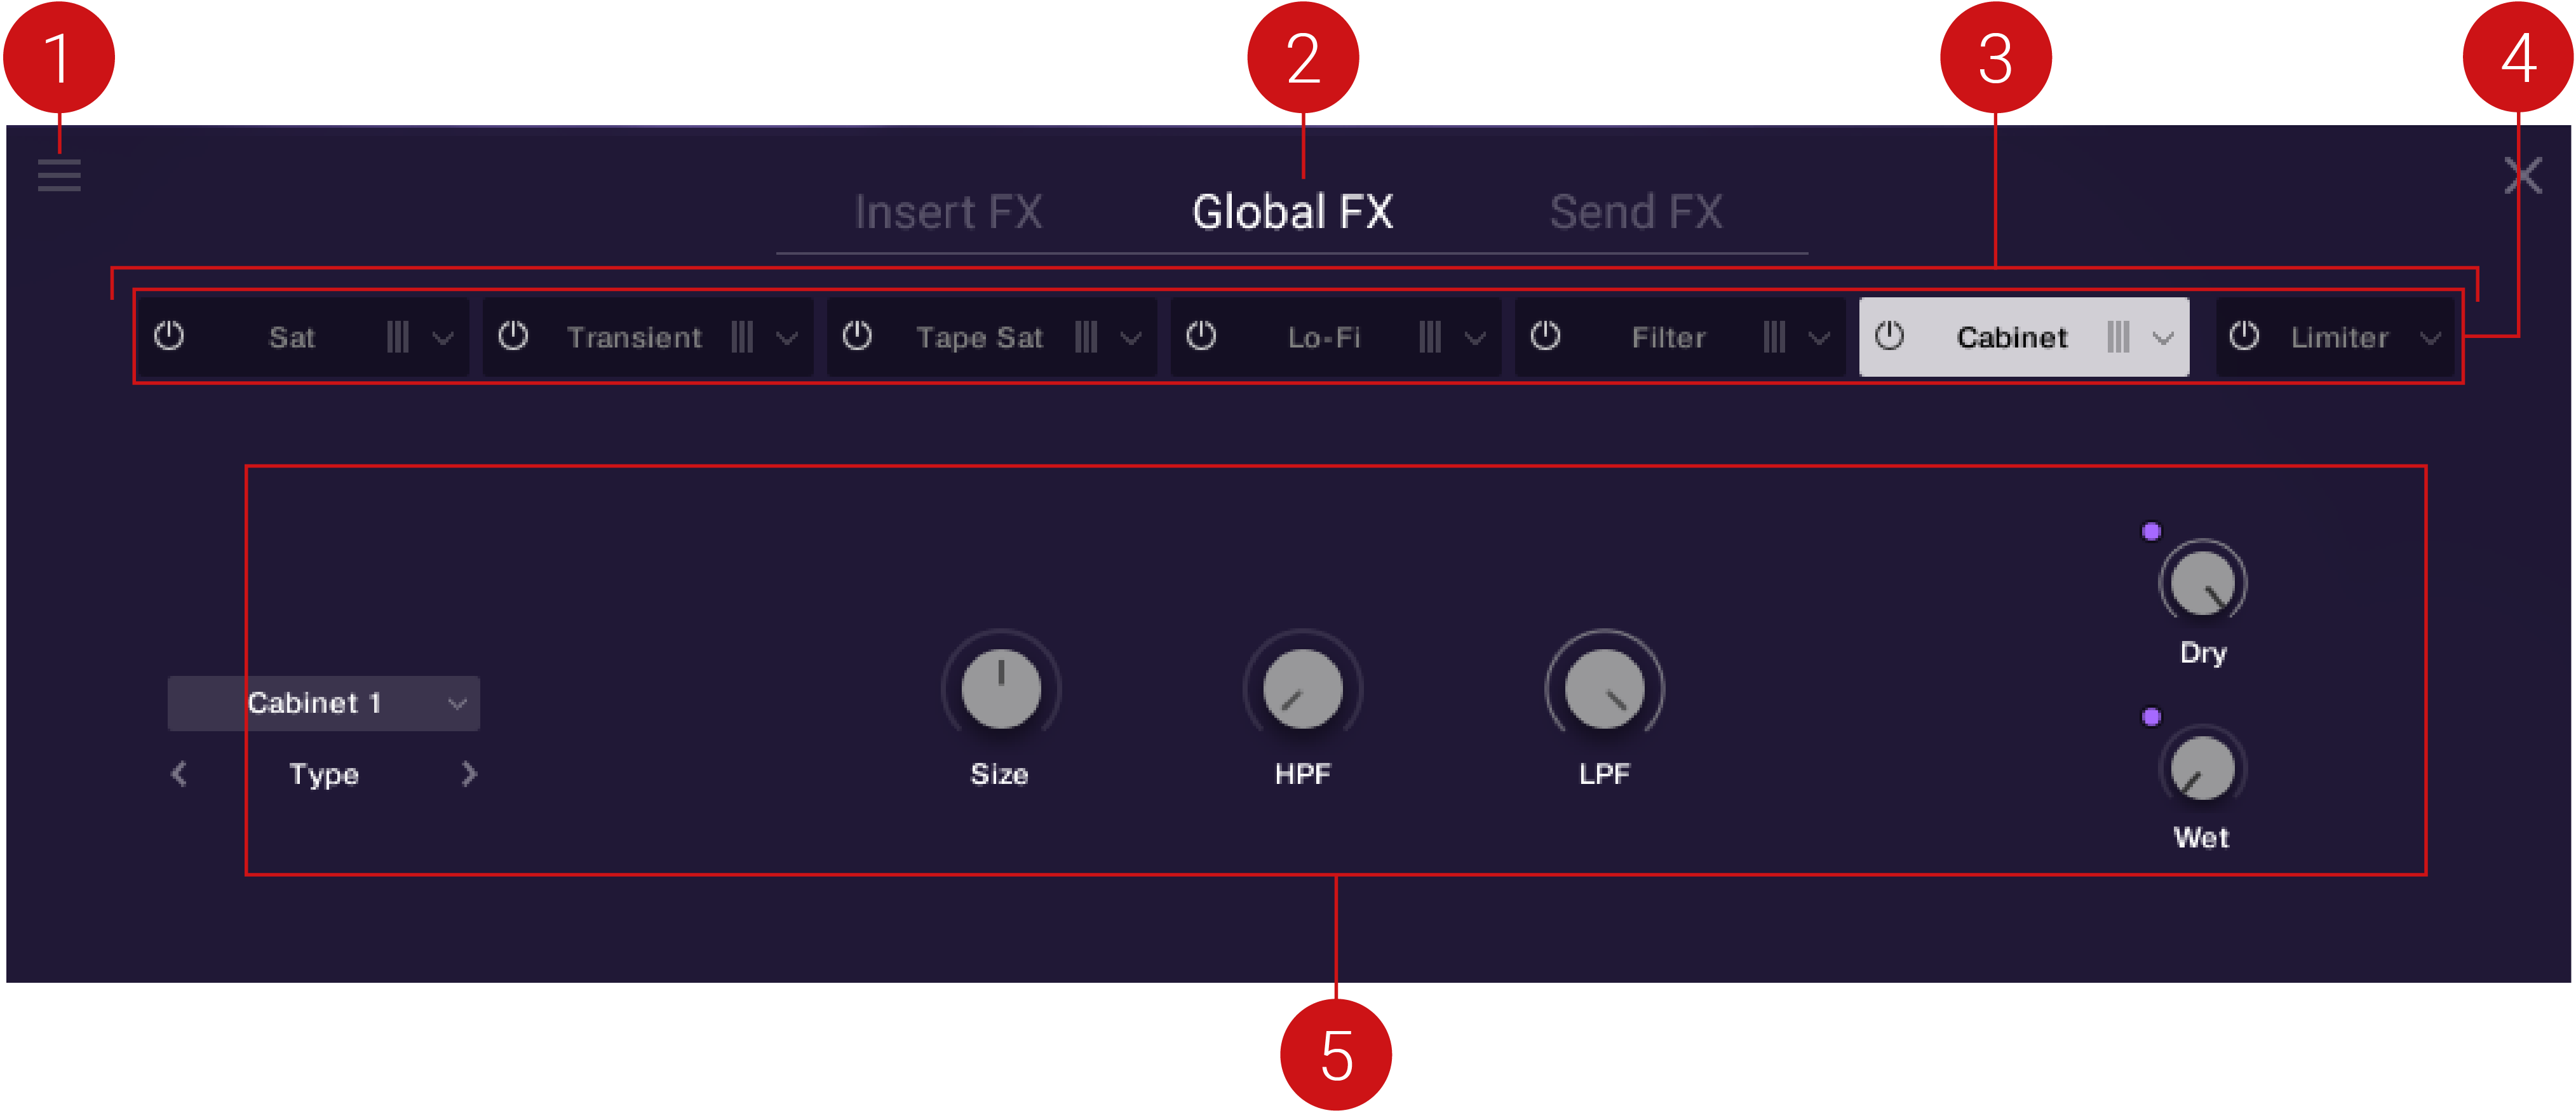
The Global FX chain operates on the summed output signal of all Insert FX and Send FX—unless Bypass Master FX is selected as the output of a sound. The chain is comprised of seven FX units which act as the final processor chain of your signal before the main output. The Global FX process your entire drum kit in the order of their placement in the chain.
Effects in this chain should be applied with the intention of operating on the full drum kit in its entirety, considering how the effect will impact all drum sounds. Typical applications include applying a limiter or compressor to the final output of your drum kit. A limiter can be used to ensure that the signal level stays below 0 dB to avoid digital clipping, and to increase the overall perceived volume of the signal. Adding compression to the final signal path can add cohesion between various instruments, working like a glue that balances and binds sounds together.
The Global FX contains the following elements and controls:

FX Preset Menu: Enables you to save, load and clear your FX unit and FX chain presets. Also allows you to reset FX units to their default state. For more information see, Managing FX Presets.
FX Tabs: Displays the Insert FX, Global FX and Send FX tabs. Select the Insert FX tab to display the related controls and parameters for editing.
FX Chain: Represents the effects chain i.e., the order of the effects for the selected drum sound. You can change the order of the effects by clicking + dragging an FX unit left or right.
FX Units: Represents each effect within the FX Chain. Switch the effect on and off by clicking the power button. Use the drop-down menu on the right of each unit to select an effect. The controls for the selected FX unit are displayed below in the parameter display area. For more information on each effect, refer to the KONTAKT manual available from the Help menu, or online at the Native Instruments website here.
FX Parameter Controls: This area displays the parameter controls for the selected effect. Each effect unit has a different range of controls that are specific to its function. For more information on the FX and their related controls, refer to the KONTAKT manual available from the Help menu, or from the Native Instruments website here.
Send FX Overview
In contrast to the Insert FX, the Send FX work in parallel, and only receive signals that you explicitly send to them from the Send controls for each pad, found in the Kit View.
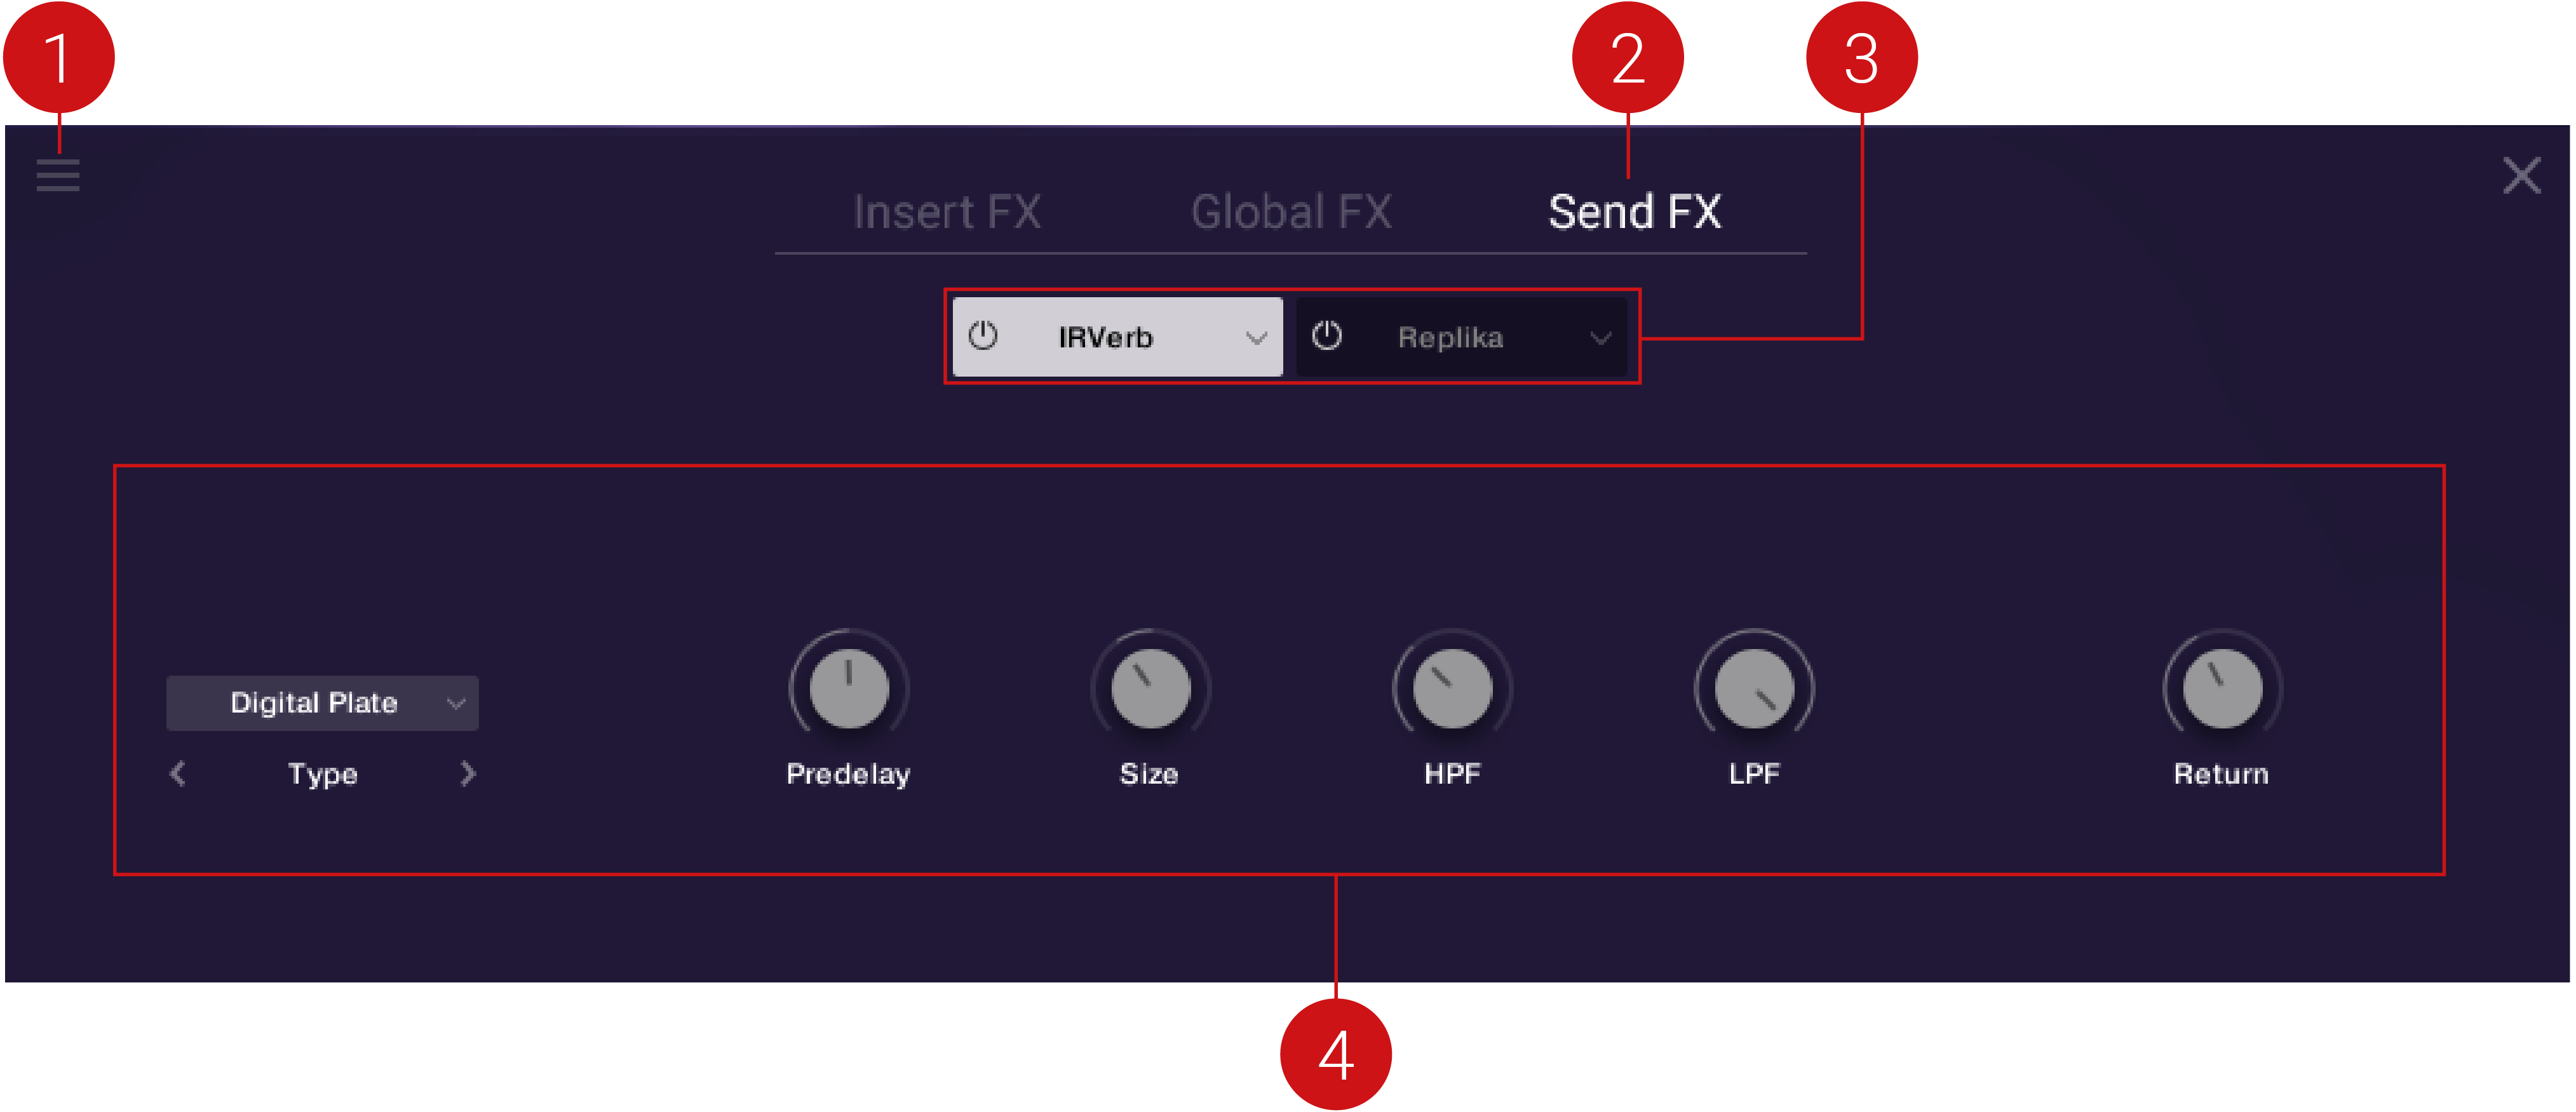
Four reverb effects and two delay effects are available for selection in the Send FX section. Reverbs and delays are the most typically used Send effects, as you may want to send different levels from different instruments but control the device as a single effect unit. The amount of signal that’s being sent to the effect is called the send level, and the effect’s output level is called the return level. The Return control is found to the far right of each Send FX unit, and adjusts the return level for that effect,
The Send FX contains the following elements and controls:

FX Preset Menu: Enables you to save, load and clear your FX unit and FX chain presets. Also allows you to reset FX units to their default state. For more information see, Managing FX Presets.
FX Tabs: Displays the Insert FX, Global FX and Send FX tabs. Select the Insert FX tab to display the related controls and parameters for editing.
FX Units: Represents the two Send FX units. Switch the effect on and off by clicking the power button. Use the drop-down menu on the right of each unit to select an effect. The controls for the selected FX unit are displayed below in the parameter display area. For more information on each effect, refer to the KONTAKT manual available from the Help menu, or online at the Native Instruments website here.
FX Parameter Controls: This area displays the parameter controls for the selected effect. Each effect unit has a different range of controls that are specific to its function. For more information on the FX and their related controls, refer to the KONTAKT manual available from the Help menu, or from the Native Instruments website here.
Managing FX Presets
While FX settings are automatically saved with each snapshot, the FX Preset Management allows you to save FX unit and FX chain presets separately and load them onto other sounds. The menu also includes a clear function that removes any loaded FX unit or FX chain, and an option to reset an FX unit to its default values.
The following workflows demonstrate how to save, load, reset and clear your FX units and chains:
Saving an FX Preset
To save an FX preset:
Click FX to enter the FX view.
Click the FX Preset Management icon in the top left corner.
Select Save FX unit preset... or Save FX unit preset...
Enter a name for your preset.
Click Save.
Caution
Any macro assignments made to effects parameters are not stored in the effects unit or effects chain presets.
Loading an FX Preset.
To load an FX preset:
Click FX to enter the FX view.
Click the FX Preset Management icon in the top left corner.
Select Load FX unit preset... or Load FX chain preset....
Select a preset file.
Click Load.
Note
Loading an FX preset will overwrite any current user preset being used with the Snapshot.
Resetting an FX Unit
To reset an FX unit:
Click FX to enter the FX view.
Select the FX unit you want to reset.
Click the FX Preset Management icon in the top left corner.
Select Reset FX unit.
The FX unit will be restored to its default settings.
Clearing FX
To clear an FX unit or FX chain:
Click FX to enter the FX view.
Select the FX unit or FX chain you want to clear.
Click the FX Preset Management icon in the top left corner.
Select Clear FX unit or Clear FX chain.
The loaded FX will be removed and None will be displayed in the FX unit(s).
Caution
A few parameters require some processing latency so they will not respond in real-time. These are Cabinet/IRVerb Size, HPF and LPF.