Global Concepts
In this section you are introduced to the global concepts of Traktor.
In this section you are introduced to the global concepts of Traktor.
Tempo Synchronization
Traktor provides several ways to synchronize tempo between decks. You can synchronize tempo manually by using the tempo faders and the tempo bend buttons on the decks. However, you can also synchronize tempo automatically by pressing the SYNC button on the decks.
To understand how to work with tempo synchronization in Traktor, this section will introduce you to the principles of MASTER and SYNC, and related functions.
Master Clock
The Master Clock is a central component which coordinates tempo and beat synchronization of decks, loops, tempo-based effects, and external applications via MIDI Clock function.

Master Clock in the Master Control panel.
Tempo Master and Tempo Master Assignment
Whether you are beat-matching manually or syncing between several decks, Traktor always defines a master tempo source, the Tempo Master, to which other decks, effects, and loops can be synced. You can assign it manually, or you can let Traktor assign it automatically to any deck. There can only be one Tempo Master at a time.
Manual Tempo Master Assignment
When you want to assign the Tempo Master manually, you need to disable automatic Tempo Master assignment (AUTO mode) using the AUTO button in the Master Control panel.

AUTO Mode deactivated.
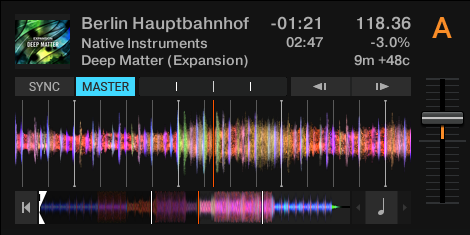
When AUTO mode is deactivated, you can assign any deck to be the Tempo Master by pressing the MASTER button on the deck.

Deck A is the Tempo Master.
If you are using a complex deck setup, you can also use the Master Clock as Tempo Master by using the MASTER button in the Master Control panel. With the Master Clock as Tempo Master you can sync all decks to the Master Clock and adjust the tempo globally.

Master Clock is the Tempo Master.
When a deck is synced to a Tempo Master, the tempo for the synced deck cannot be adjusted manually. This can only be changed by the Tempo Master.
Automatic Tempo Master Assignment
You can let Traktor assign the Tempo Master automatically by enabling AUTO mode using the AUTO button in the Master Control panel. When AUTO mode is activated and you start playback on any deck, that deck will automatically become the Tempo Master. As soon as the track of the current Tempo Master deck ends or is stopped manually, the synced deck automatically becomes the new Tempo Master. This continues until no other track is synced to the Tempo Master. As soon the current track stops playing, then the Master Clock automatically becomes the new Tempo Master.
Customizing Tempo Master Behavior
You can customize the behavior of your decks in AUTO mode in the Transport page in the Preferences. You can define if only Track decks or Stem Decks can be the Tempo Master (Remix Decks excluded). This can be useful in a typical workflow where Remix Decks are always synced to a running Track deck and not the other way around.
You can also define only on-air decks can be the Tempo Master. This is useful in a workflow where decks that are actually playing to the main output should respond to the logic of tempo master and sync.
Sync Modes
Traktor provides two different modes for track synchronization of which you can choose in the Transport Page in the Preferences. These are BeatSync and TempoSync.
BeatSync
BeatSync is the most reliable way to synchronize tracks in Traktor. BeatSync will always maintain tempo and phase synchronization between decks. This means, whatever action you perform, for example, scratching or beat jumping, the playback will always remain synchronized to the beat of the Master deck or Master Clock.
TempoSync
TempoSync ensures the tempo is locked but not the phase. This means, there can be offsets in the beat synchronization when performing transport operations, for example, scratching or beat jumping. In this case the SYNC buttons will change appearance and the phase meter will show an offset.
The behavior of TempoSync can be beneficial for DJs who rely on manual beat-matching. If two synced tracks are out of phase, you can manually adjust the phase by pitch bending.
In TempoSync you can always pitch bend on the phase while the tracks are playing. This is not possible with BeatSync since the phase is locked accordingly to the Beatgrid and not to the beat.
For more information about the Sync Mode preferences, refer to Preferences – Transport Page.
Beatgrid
Traktor offers both automatic and manual functions to detect and set the correct tempo and beat measures of a track, both making together the so-called Beatgrid of that track. This information is needed to make correct use of the Sync function, quantized beat jumps as well as snapping Hotcues and loops to the beat of the track. Beatgrids are defined by one or more Grid Markers, each one setting the tempo until the following Grid Marker. This allows you to define multiple tempos within a track.
Traktor's Analyze function will automatically set a single Grid Marker with a constant tempo for the entire track. This gives reliable and very accurate results for the vast majority of tracks. If necessary, you can further improve the accuracy of the automatic analysis by choosing a tempo range matching your genre using Preferences > Analyze Options > BPM Range. For more information, refer to Preferences – Analyze Options Page.
You can also manually adjust the Beatgrid to fit your needs. For more information, refer to Adjusting Beatgrids.
Note
The Grid Markers and the resulting Beatgrid are independent from the Cue Points set in your tracks. After having imported your tracks, deleting Cue Points does not affect the underlying Beatgrid.
Harmonic Mixing
In this section, you will learn about Harmonic Mixing and the Open Key notation that Traktor uses to help you harmonically mix your tracks.
When mixing tracks, you notice that some track combinations fit well together and create a pleasing musical blend. More often than not, this is due to the fact that these track combinations are in the same key. The technique of Harmonic Mixing previously relied on either knowing the key of tracks or using additional software to identify it. Traktor detects the keys for you automatically. Key can quickly be utilized in the selection process of identifying harmonically complimentary tracks and avoiding key clashes.
For more information on working with Key Lock, refer to Working with Key Lock.
Open Key Notation
The Open Key notation basically applies a number scale that reflects the 12 tonic scales. It also identifies major scale tracks with a d value, whereas minor scale tracks contain an m value in their abbreviation.
Note
In order to use Open Key notation, the setting Open Key must be selected in the Displayed in Traktor drop-down menu on the Analyze Options Preference page. For more information, refer to Preferences – Analyze Options Page.
In the Browser, analyzed tracks contain values in the Key field such as 11d, 12m, 7d, and so on. For 'Harmonic Mixing', tracks in the same key will tend to yield the best mixing results, for example, 11d to 11d. Likewise, mixing songs that are of the same scale (major or minor), and adjacent numerical value. If, for example, you are playing a track with a key of 1m, you can also use tracks with keys of 2m or 12m. Although 3m and 11m are near to 1m, so they would not work so well.
It is possible to mix tracks of opposing key, which is mixing from a track in a major to a minor key, for example, mixing track 5d to 5m or vice versa. You will notice that there is a change in mood when this occurs. In this scenario, it is best to experiment with suitable tracks to identify sections that lend themselves for transitions to take place, for example, a percussive outro.
Key Lock and Color-Coding
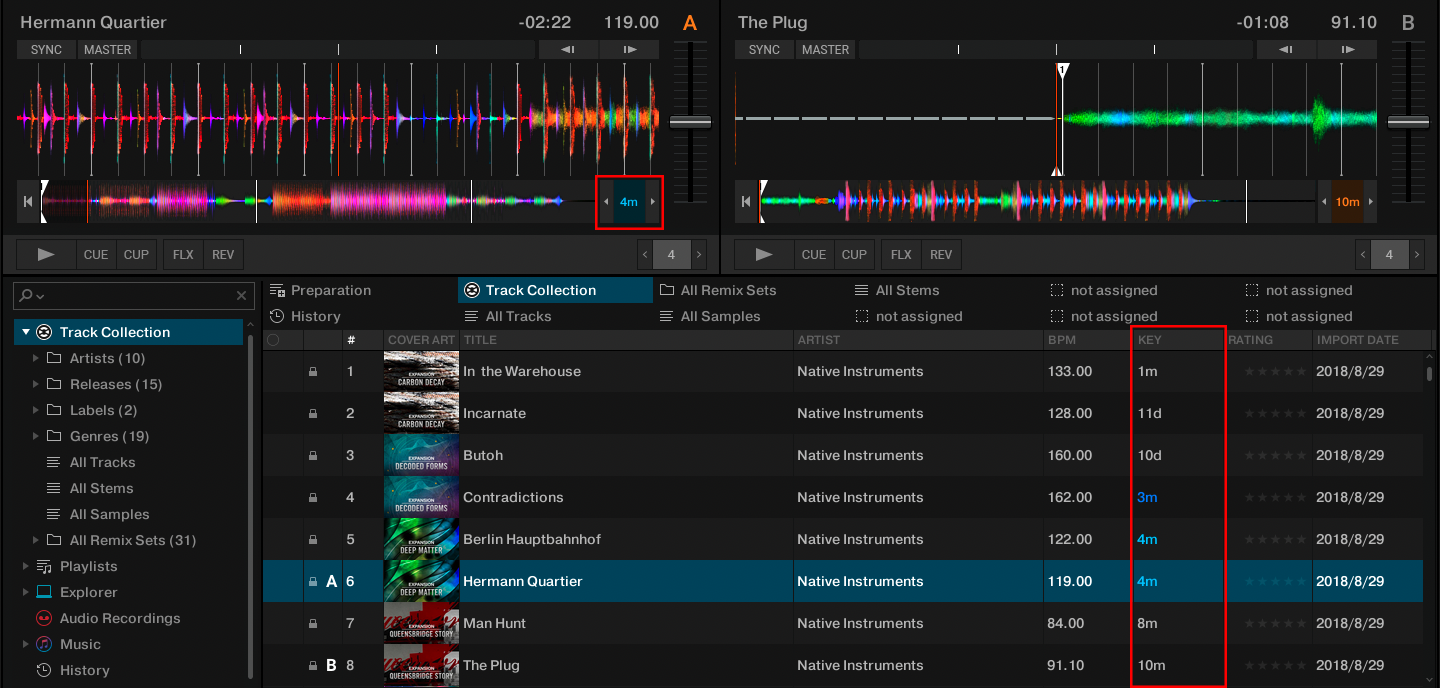
Usually, when you change a track's tempo you will also change its key. However, it is possible to lock the original key of the track so that you can change the tempo without changing the key. When you lock the original key using the Key Lock button in the Stripe, Traktor displays the track's original key in the Key Lock button and highlights it in the respective color.

The Key Lock buttons display different keys in their respective color.
If the key for the track in the Master deck is locked, the Browser highlights the tracks with the matching keys in the Key column with the same color code. This way you can instantly identify tracks that are in harmony with the track playing.

The Browser offers tracks which harmonically match the track playing in the Master deck.
Transposing Locked Keys in Semitones
It is possible to transpose the locked key in semitones using the semitone up and down buttons next to the Key Lock button in the Stripe. This is useful, for example, if you want to transpose the key of the next track to make it match the track in the Master deck. The offset to the original key will then be displayed in the Key Lock button.
For more information, refer to Transposing the Original Key in Semitones .
Enabling Tooltips
In Traktor, you can enable tooltips which give you instant information about the control element you currently hover with the mouse. Tooltips are available for control elements, for areas on the user interface, and for the options in the Preferences dialog. You can enable the tooltips in the header.
To enable the tooltips:
Click the tooltips button in the header.

The Tooltip button illuminates blue indicating the tooltips are activated. When you now hover a control element, you are presented with the corresponding tooltip.
