Settings
Use the Settings view to change how MODULAR ICONS responds to MIDI or a keyboard. Velocity, Key Range, Pitch Bend and Glide are set globally, or for each layer.
In the Settings view, you can change how MODULAR ICONS responds to your keyboard or MIDI. These settings include Velocity, Note Priority, Key Range, Pitch Bend Range, and Glide, all of which can be assigned to affect the instrument globally or separately for each layer. The settings made here are saved in Snapshots unless stated otherwise.
Overview of the Settings View
The Settings view contains the following elements and controls:
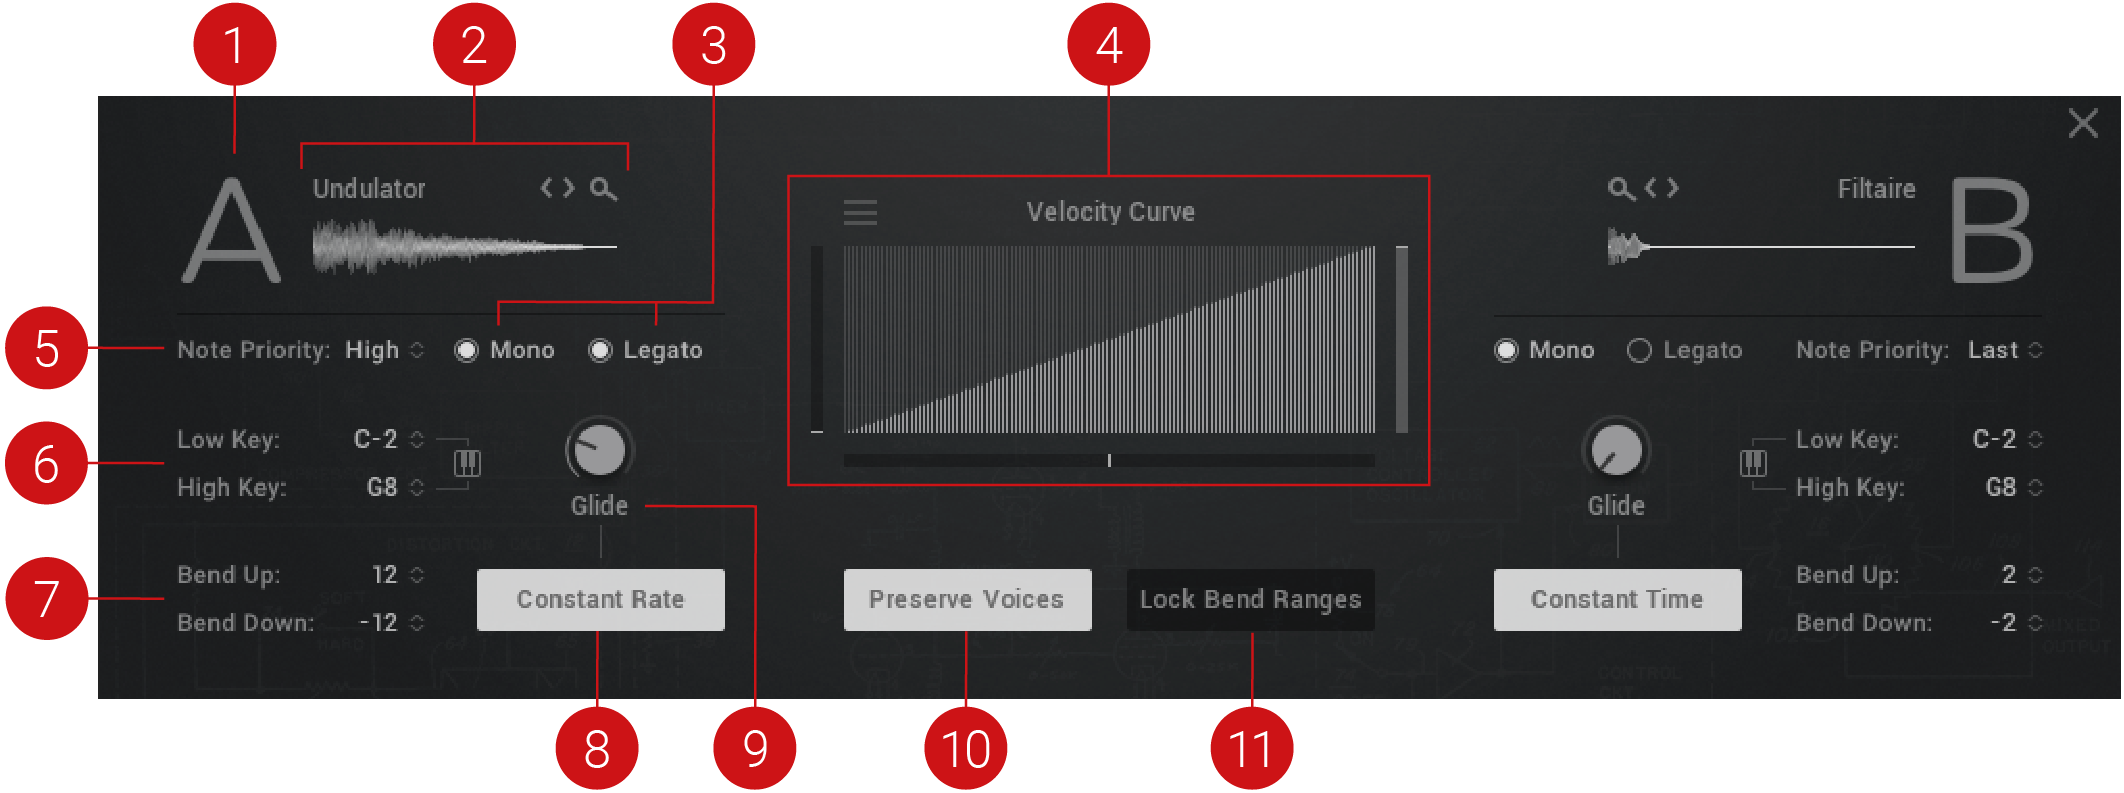
The Settings View
Layer: Click the A icon to turn the layer on and off. Turning the layer off will purge all samples from memory and reduce CPU usage. When the layer is turned off, the icon is dimmed.
Browser: To open the Browser, click on the sound source name, the waveform display, or the Browser icon (magnifying glass icon). This gives you access to all sound sources available for layers A and B. To browse and load sound sources without opening the Browser, click the arrow icons (<>) to move through the list of sound sources.
Play Mode: This set of controls defines the play mode, as follows:
Mono: Monophonic mode retrigger sets the notes to behave like a monophonic synthesizer, meaning only one note can be triggered at a time. This is useful when you want to recreate an authentic monophonic synthesizer sound, especially when used in combination with Legato and Glide. You can change the Mono settings for both layers simultaneously by pressing [Alt] / [Opt] + clicking and dragging your mouse.
Legato: The legato playing technique typically allows for smooth, seamless transitions between notes. If Legato is turned on and detached notes are played, each attack will still be retriggered, but when overlapping notes are played, the pitches will change without new attacks, for a Legato response.
Velocity Curve: Sets your defined Velocity Curve for the keyboard to adjust the velocity response to your playing style. For more information, refer to Velocity Curve.
Note Priority: Determines what note has priority when more than one note is played in mono or mono legato mode. You can change the Note Priority settings for both layers simultaneously by pressing [Alt] / [Opt] + clicking and dragging your mouse. The following note priority settings are available:
Last: Gives priority to the last note played. With last note priority, priority is based on the order in which keys are played
Low: Gives priority to the lowest note played. With low note priority, new notes that are lower in pitch than ones being already played replace currently playing notes from the highest on up. Low note priority is most common on monophonic vintage synths.
High: Gives priority to the highest note played. New notes that are higher in pitch than ones already being played replace currently playing notes from the lowest on up. Setting one layer to low note priority and the other to high note priority allows you to simulate the duophonic behavior of certain vintage synths.
Key Range: This allows you to set the highest and lowest key in the range for the current layer. This could, for example, be used to set the left side of the keyboard to play layer A sound and the right-side to play layer B, or to blend the layers anywhere on the keyboard necessary. To set the key range use the following settings:
Low Key: Sets the low key limit for layer A or B.
High Key: Sets the low key limit for layer A or B
Learn Key Range via MIDI: Click this icon to set the key range for the selected layer via MIDI. Then set the range by pressing the high and low key range on your MIDI keyboard or device. By pressing [Ctrl] / [Cmd] + clicking the icon you can reset the key range to the default setting.
Bend Range: You can set the pitch bend wheel range for layers A and B individually or for both of the two layers using your MIDI keyboard, based on your playing preference. The range is up to 24 semitones (2 octaves). Many musicians use a range of 2 semitones (a whole step) as this is the bend range of many acoustic instruments. For more special effects, you may wish to set a wider range. You can set the bend range using Bend Up and Bend Down:
Bend Up: Sets the pitch bend up range for layer A or B.
Bend Down: Sets the pitch bend down range for layer A or B.
Constant Rate/Time: Switches the Glide mode between a Constant Rate or a Constant Time setting for the glide as follows:
Constant Rate: The glide between notes has a constant rate of change regardless of intervals played, which makes glides between intervals take more time than glides on smaller intervals.
Constant Time: The glide between notes have a constant time (duration) regardless of intervals played.
Glide: This causes the pitch of a note to glide up or down from the pitch of the previously played note. Glide speed is set using the Glide knob. If the Glide knob is set to the far-left position, glide has no effect. In the far-right position, the glide is in full effect. Use Glide in combination with the Glide Mode button. You can change the Glide settings for both layers simultaneously by pressing [Alt] / [Opt] + clicking and dragging your mouse.
Preserve Voices: Preserve Voices mode allows only one voice to be played per key. This is a global control and as such is not stored in Snapshots.
Lock Bend Ranges: Locks pitch bend ranges across all Snapshots. This is a global control and as such is not stored in snapshots.
Velocity Curve
The Velocity Curve Shaper allows you to define the velocity curve for the keyboard and adjust the velocity response to your playing style. The Velocity Curve has two modes of operation; in the default mode, the Velocity Curve is set using the Curve Slope and Curve Table controls. In User mode, the table becomes a free canvas for you to draw within. You can edit the curve by clicking and dragging your mouse across the table, and then save your curves as presets, to recall at another time.
Velocity Curve Shaper
The Velocity Curve Shaper contains the following controls:
 |
The Velocity Curve Shaper
Velocity Curve Menu: This menu defines the operation of the Velocity Curve and allows you to save and recall your Velocity Curve presets. For more information, refer to Managing Velocity Curve Presets.
Velocity Curve Table: This area displays your velocity curve. When in User mode, this area is used to draw a customized curve shape by clicking + dragging your mouse.
Velocity Curve minimum value: Use the vertical slider on the left of the Curve Table to set the minimum value of the velocity curve. Pressing [Alt] / [Opt] + dragging the mouse will set minimum and maximum to the same value. Press [Ctrl] / [Cmd] + click to set to the minimum value.
Velocity Curve maximum value: Use the vertical slider on the right of the Curve Table to set the maximum value of the velocity curve. Pressing [Alt] / [Opt] + dragging the mouse will set minimum and maximum to the same value. Press [Ctrl] / [Cmd] + click to set to the maximum value.
Velocity Curve slope: Use the horizontal slider directly underneath the Curve Table to set the slope of the velocity curve.
Note
All Velocity Curve controls are global and are not stored in Snapshots! If you want to save a velocity curve, refer to Managing Velocity Curve Presets.
User Velocity Curve
The User Velocity Curve Shaper contains the following controls:
 |
The User Velocity Curve Shaper
Velocity Curve Menu icon: Oefines the operation of the Velocity Curve and allows you to save and recall your Velocity Curve presets. For more information, refer to Managing Velocity Curve Presets.
Velocity Curve Table: When in User mode, this area is used to draw a customized curve shape by clicking + dragging your mouse.
Reset Table icon: Resets the Velocity Curve Table to its default linear curve.
Editing the Velocity Curve
The following workflows demonstrate how to edit the Velocity Curve in the two different operating modes:
Editing the Velocity Curve Shaper
To edit the Velocity Curve:
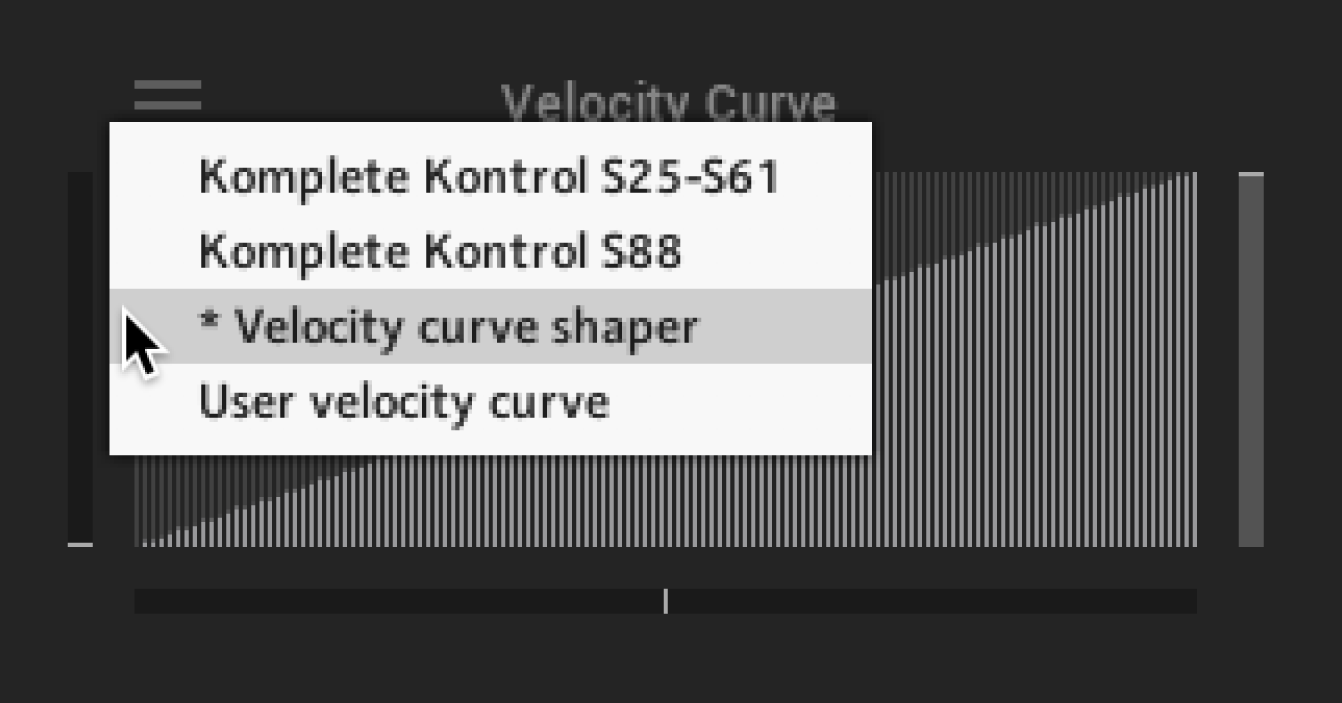
1. Selecting the Velocity curve shaper option from the menu
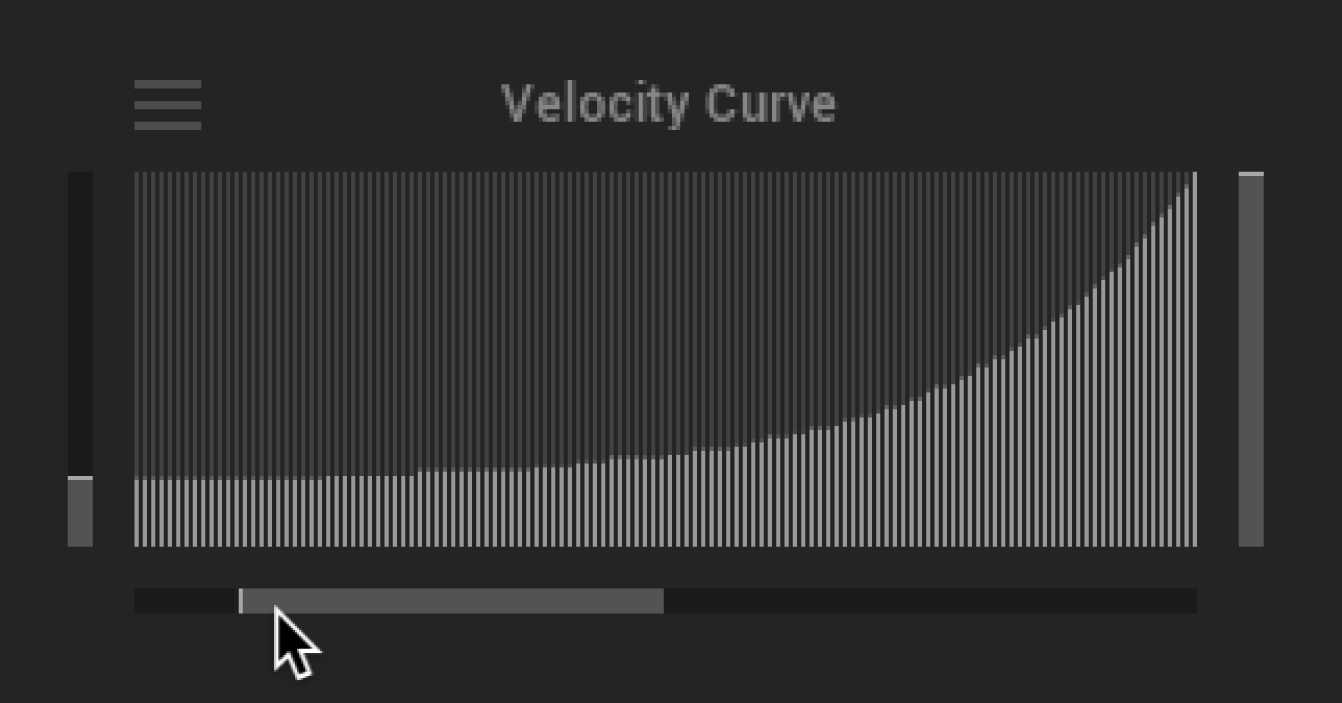
2. Drawing a velocity curve using the sliders
Click the settings icon to enter the Settings view.
Click the Velocity Curve Menu icon in the top left corner.
Select Velocity curve shaper.
Use the three sliders to create a curve.
Editing the User Velocity Curve
To create a User Velocity Curve:
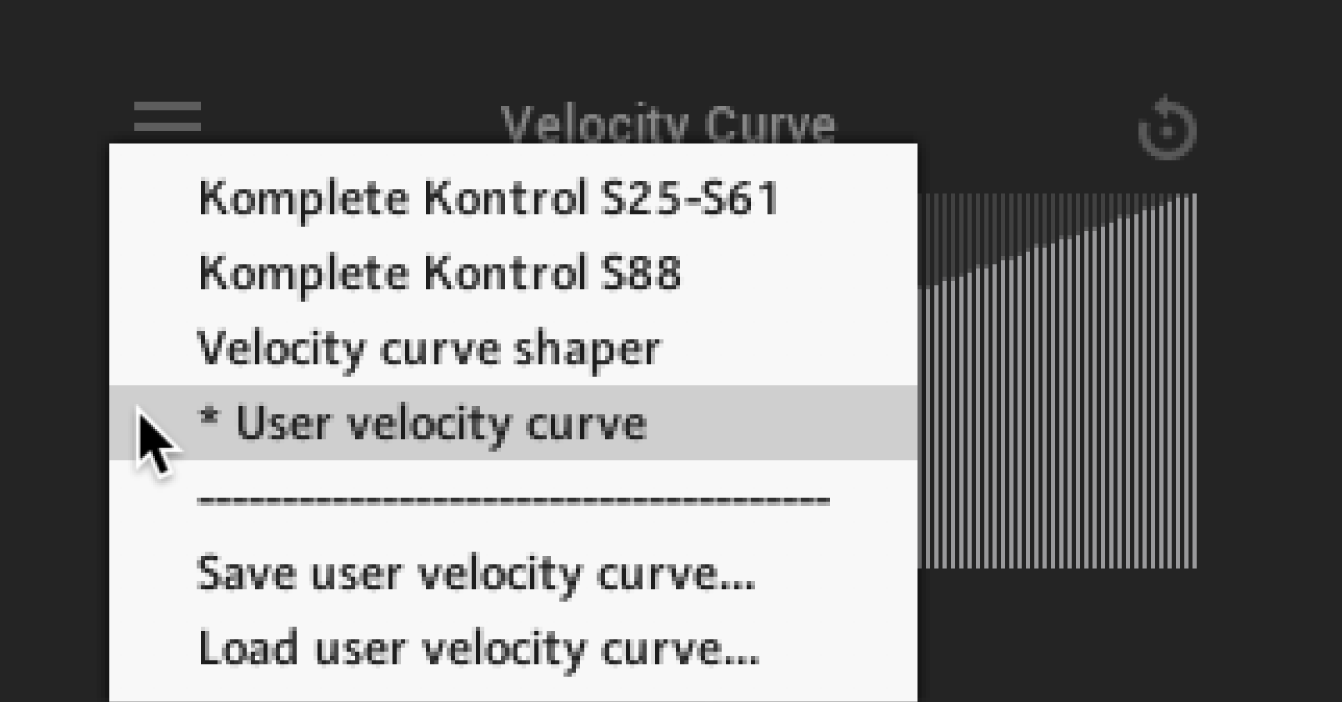
1. Selecting the User velocity curve option from the menu.
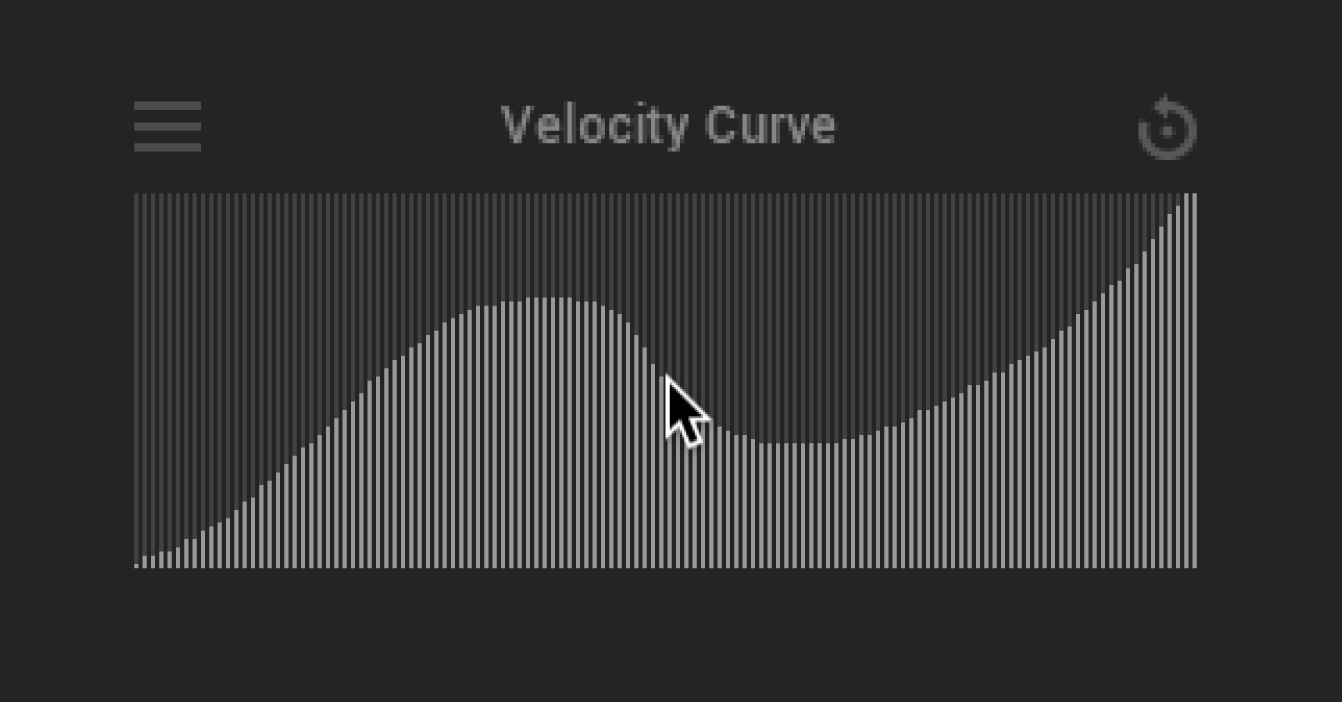
2. Drawing a velocity curve using a computer mouse.
Click the settings icon to enter the Settings view.
Click the Velocity Curve Menu icon in the top left corner.
Select User velocity curve.
Click + drag your computer mouse to draw a velocity curve shape.
Managing Velocity Curve Presets
Using the Velocity Curve Preset menu, you can manage all your custom Velocity curve presets. The following workflows demonstrate how to save and load your presets from the Settings view.
 |
Options to Save and Load User presets in the Velocity Curve menu
Saving a Velocity Curve Preset
To save a Velocity Curve preset:
Click the Settings button (cog icon) to enter the Settings view.
Click the Velocity Curve menu icon, on the top left corner of the Velocity Curve.
Select User velocity curve.
Make changes to your preset.
Select Save user velocity curve...
Enter a name for your preset and click Save.
The User velocity curve preset is saved as an .nka file.
Loading a Velocity Curve Preset
To load a Velocity Curve preset:
Click the Velocity Curve Preset menu icon in the top left corner of the Velocity Curve.
Select Load user velocity curve....
Select the User velocity curve preset you want to load.
Click OK.
The Velocity Curve preset is loaded into the Velocity Curve Table.