Working with Maschine+
This section covers basic set-up operations, including file management and the settings menu, for working with Maschine+.
This chapter holds useful information for your everyday work with Maschine+.
Using the Library
The Library enables you to download and install products, view installed products, and check your Native Instruments account for updates of products you own.
Downloading Content to Your Library
The Library enables you to download and install all of your plug-ins and content from your Native Instruments account using your Native ID.
Updating Installed Products
The Library enables you to view any available updates for the products you have already installed.
Viewing Products Installed in Your Library
The Library provides a list of all products installed on your Maschine+.
Settings Overview
The Settings page lets you specify various preferences to customize your Maschine+. Using the 4-D encoder, you can access different categories presented as "tiles" to set preferences for the Maschine+, such as recording options, audio card configuration, network access, and MIDI. Using the Settings page you can also update the operating system of your Maschine+, access your library to download, install, and update your plug-ins, and switch between Stand-alone and Controller modes.
To select open the Settings panel and select options:
Press SETTINGS to open the Settings panel.
Move the 4-D encoder in any direction to select a category, or use Buttons 5 and 6.
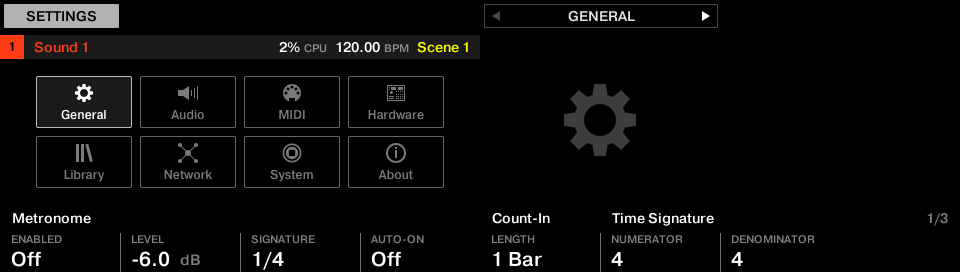
The Setting page with General settings selected
The Settings page contains the following categories:
General: Contains all of the global settings for Maschine+. This includes settings for the Metronome, Count-in, Quantize, Project reload, Scene/Section, and Colors. For more information, refer to General Settings.
Audio: Contains settings related to your audio interface. This can be used to configure the internal or external audio interface for Maschine+. For more information, refer to Audio Settings.
MIDI: Allows you to set up the MIDI input and output ports for Maschine+. This page also includes MIDI Sync, Clock Offset, and Ableton Link. For more information, refer to MIDI Settings.
Hardware: Enables you to customize how the pads react to your playing, adjust the brightness of the displays, and set the sensitivity of the knobs. For more information, refer to Hardware Settings.
Library: Provides an overview of the plug-ins installed on your device and enables you to use your Native ID to download, install, and update new plug-ins. For more information, refer to Library Settings.
Network: Provides an overview of available Wi-Fi networks. Here you see which network you are connected to and choose to connect, disconnect, or enable Airplane mode. For more information, refer to Network Settings.
System: Allows you to update the operating system of your Maschine+, switch to Storage mode or Controller mode, and reset your device. For more information, refer to System Settings.
About: Provides an overview of the System version and firmware installed on your Maschine+. You can also use this page to view a list of Maschine+ credits and select whether you want to enable or disable usage data tracking. For more information, refer to About Settings.
General Settings
General contains all of the global settings for Maschine+. This includes settings for the Metronome, Count-in, Quantize, Project reload, Scene/Section, and Colors.
To display the General page:
Press SETTINGS.
Use the 4-D encoder to select General.
Use the Page buttons to select a page.
Use the Knobs 1–8 to change settings.
The General page provides the following options:
General Settings (Page 1)
Setting | Description |
|---|---|
Metronome | |
ENABLED | Activates/deactivates the metronome. A metronome is a device used by musicians that marks time at a selected rate by giving a regular tick in beats per minute. |
LEVEL | Adjusts the volume level of the metronome. |
TIME | Selects the time interval between each tick of the metronome. By default the metronome indicates quarter notes (1/4). |
AUTO-ON | Automatically turns on the metronome when you start recording a Pattern. When you start recording a Pattern, the metronome is automatically activated. When you exit recording the metronome returns to its state before the recording (this can be on or off). The Auto-on option does not affect the Count-in: Even if Auto-on is deactivated, the metronome turns on when you press SHIFT + REC to start the Count-in. |
Count-In | |
LENGTH | Sets the duration of the Count-in, for instance, how long the metronome will sound before the recording actually starts. |
Time Signature | |
NUMERATOR | Sets the number of beats in a measure. For example, in 4/4, there are 4 beats per measure. |
DENOMINATOR | Sets which type of note receives one beat. If the denominator is a 4, a quarter note counts as one beat; if the denominator is an 8, an eighth note counts as one beat; if the denominator is a 16, a 16th note counts as one beat, and so on... |
General Settings (Page 2)
Setting | Description |
|---|---|
Project | |
RELOAD | Automatically reloads the last Project on startup. |
AUTO BACKUP | Autosaves your work to prevent the loss of important changes in the event Maschine+ quits unexpectedly. If Maschine+ quits unexpectedly a dialog will appear when you restart, asking if you want to use the autosaved version of your project. If you choose not to use this, Maschine+ opens the last manually saved version of the project. |
Quantize | |
MODE | Automatically quantize your input as you record. Select one of the following Input Quantization modes: None: Input Quantization is deactivated. Events you play or record on the Pads are not quantized. Record: Input Quantization is applied only when you record the Pads. Play/Rec: Input Quantization is applied both when you play on the pads and when you record them. In Play/Rec mode, quantization while playing is slightly different from the quantization applied while recording: When recording, all events are quantized to the closest step, possibly ahead of the event. When playing, events occurring in the first half of the steps are left untouched (since you cannot bring them forward in the timeline) whereas events occurring in the second half of the steps are quantized to the next step. |
Scene/Section | |
DUPLICATE | Selects how the Duplicate function will operate when duplicating Scenes. Scene Only: Only the Scene is duplicated. The result is a new unlinked Scene with the same Patterns referenced. Scene and Patterns: The Scene itself and additionally all Patterns are duplicated. The new Scene and Patterns are now completely independent from the originals. |
LINK WHEN DUPL | Creates a linked copy of a Section when using the Duplicate function. By default this feature is deactivated. When activated, the Duplicate function will create a linked copy of a Section. A linked copy will automatically be updated when any instance of a linked Section is edited. This way, you don’t need to keep track of which Section is the “original.” |
Pattern | |
LENGTH | Sets the default length of a Pattern. |
GROW | Sets the default of Auto-growing Patterns on or off. Auto-Growing Patterns enables you to record patterns of an undefined length. This means you can quickly capture an idea without having to set a pattern length in advance. Simply begin recording and the length of the pattern will grow until you stop recording. When you have finished recording, any silence at the end of the pattern will automatically be trimmed to the nearest Bar (quantization can be adjusted via Grid settings). |
General Settings (Page 3)
Setting | Description |
|---|---|
Colors | |
SCENE | Selects the default color for your Scenes. In the menu, you can select the desired color from the 16-color palette or White (default setting). The color selected as default is highlighted in the menu. If you select Auto, each Scene will have a different default color. |
GROUP | Selects the default color for your Groups. In the menu, you can choose the desired color from the 16-color palette. The color selected as default is highlighted in the menu. If you select Auto (default setting) each Group will have a different default color. |
SOUND | Selects the default color for your Sounds. In the menu, you can choose the desired color from the 16-color palette. The color selected as default is highlighted in the menu. If you select Auto each Sound will have a different default color. If you select Use Group (default setting) Sounds will by default mirror the color of the Group to which they belong. |
LOAD COLORS | Enables you to load Color settings with your Maschine files (Projects, Groups, Sounds, etc.). If you turn off Load with Colors (On by default), saved colors will not be used next time you load files. The default colors set in this Colors page will be used instead. |
Audio Settings
The Audio page contains settings related to your audio interface. This can be used to configure the internal or an external audio interface for Maschine+. The right-hand display provides an overview of the current status of your audio inputs and output, including the measurement of latency.
To display the Audio page:
Press SETTINGS.
Use the 4-D encoder to select Audio.
Use the Page buttons to select a page.
Use the Knobs 1–8 to change settings.
Audio Settings page 1 provides the following options:
Setting | Description |
|---|---|
Interface | |
DEVICE | Selects available the internal, or external audio devices when they are connected to the USB A ports. The following external devices from Native Instruments are supported:
For more information on these products, refer to the Native Instruments website: https://www.native-instruments.com/en/catalog/komplete/audio-interfaces/ |
Audio Settings pages 2 to 6 provide the following options:
Setting | Description |
|---|---|
Input Routing | |
1–8 | Allows you to select which inputs on your audio interface should be used for the four stereo inputs of Maschine+. Select the inputs of your audio interface on the right column by clicking the fields: you will be presented with all of the available Inputs across several pages. The choices made here will, for example, determine which inputs can be used when sampling external sources. |
Output Routing | |
1–16 | Represents a list of the 16 stereo outputs from Maschine+ across several pages: you can assign them to the outputs of your audio interface. Output routing ports are spread across pages 3–8 of the Audio settings. |
MIDI Settings
The MIDI settings page allows you to set up the MIDI input and output ports for Maschine+. This page also includes MIDI Sync, MIDI Change, Clock Offset, and Ableton Link settings.
To display the MIDI page:
Press SETTINGS.
Use the 4-D encoder to select MIDI.
Use the Knobs 1–8 to change the settings.
Page 1 of the MIDI settings contains the following settings:
Setting | Description |
|---|---|
MIDI Sync | |
MODE | Selects the MIDI Sync mode preference:
|
CLOCK OFFSET | Compensates for delay that may occur during MIDI data transmission. Delayed MIDI Clock data will cause external devices to respond too late, thus making your track sound out of sync. By adjusting the Clock Offset value, you can set an amount of latency to be compensated (in milliseconds). Maschine+ will then send MIDI Clock events ahead of time as defined. Clock Offset is not available when MIDI Sync Mode is set to Off. |
MIDI Input | |
DEFAULT | Enables you to play your Sound(s) via MIDI notes, for example, from a MIDI keyboard. By default and without any configuration, incoming MIDI notes on any MIDI port and any MIDI channel, or via USB, will trigger the pitch of the focused Sound. In addition, you can select that a Sound receives no MIDI input and define the default setting for MIDI input by selecting the Default MIDI Input Mode preference. Select one of the following MIDI input mode options:
|
Link | |
ENABLED | Enables the Ableton Link protocol by default. Applications that support Ableton Link can join a Link session when connected to the same network. For more information on Ableton Link, refer to Syncing Maschine+ using Ableton Link. |
Input Devices | |
SELECT | Displays a list of all available MIDI inputs of your Maschine+. Use STATUS to activate/deactivate each input. |
STATUS | Displays the current status of the MIDI input device selected in SELECT. Here you can activate/deactivate the selected MIDI input. |
Output Devices | |
SELECT | Displays a list of all available MIDI outputs of your Maschine+. Use STATUS to activate/deactivate each input. |
STATUS | Displays the current status of the MIDI output device selected in SELECT. Here you can activate/deactivate the selected MIDI output. |
Page 2 of the MIDI Settings contains the following:
MIDI Change | |
TYPE | Selects the type of MIDI Change item you want to trigger using Notes or Program Change MIDI messages from an external MIDI device. Scene: Selects Scenes as the item to be triggered via MIDI note or Program Changes messages. Section: Selects Sections as the item to be triggered via MIDI note or Program Changes messages. Lock: Selects Lock snapshots as the item to be triggered via MIDI note or Program Changes messages. For more information on MIDI Change, refer to MIDI Change. |
TRIGGER | Selects the type of trigger you want to use to change Scenes, Sections, or Lock snapshots from an external MIDI device. None: Removes any selection as the trigger for MIDI Change messages, effectively turning the feature off. Note: Selects MIDI Note messages as the trigger for MIDI Changes. Program Change: Selects Program Changes Note messages as the trigger for MIDI Changes. |
SOURCE | Selects the external input device used to trigger MIDI Change. The name of your external device will appear here. Note that the external MIDI device must first be selected and activated in the Input Devices section on page one of the MIDI settings. For more information, refer to the SELECT and STATUS entries in the table above. |
CHANNEL | Selects the MIDI channel number Maschine+ will receive MIDI notes or Program Change messages. Your external MIDI device sending the messages must be set to the same MIDI channel for Maschine+ to receive these messages. |
System Settings
The System settings enable you to update the Maschine+ operating system, switch to Storage mode to exchange data between the SD card in Maschine+ and your computer, or enter Controller mode to use Maschine+ as a controller for the Maschine software running on a computer.
You can also find National options to reset your Maschine+and manually scan for system updates using the SHIFT button.
To display the System settings page:
Press SETTINGS.
Use the 4-D encoder to select System.
Use the Buttons 1–8 to change settings.
Press SHIFT to see additional settings.
The Device page provides the following settings:
Setting | Description |
|---|---|
STORAGE | Accesses the SD card within your Maschine+ when connected via USB. In this mode, you can transfer content between Maschine+ and your computer. For more information on Storage mode, refer to Using Maschine+ in Controller Mode. |
CONTROLLER | Activates Controller mode. In Controller mode Maschine+ can be used as a controller for the Maschine software, where the connected computer performs all processing. It is possible to start exchange Project files and samples between Maschine+ and your computer using Storage mode. This means you could effectively, for example, start a Project on Maschine+ and then finish later on your computer using the Maschine software. To use Controller mode, your Maschine+ must be connected via USB to a computer running the latest Maschine software. For more information on Controller mode, refer to Stand-Alone and Controller Mode. |
UPDATE | Updates the Maschine+ operating system whenever a new version is available. When connected to Wi-Fi, Maschine+ automatically checks for updates when the System page is accessed. Press Button 8 to install system updates when they become available. TipMaschine software and Maschine+ are constantly being developed. To receive new features and improvements, it is recommended that you install the latest update. |
Here are the additional settings that are available when pressing SHIFT:
Setting | Description |
|---|---|
RESET | Resets your Maschine+ to its default settings. CautionPressing RESET will erase all of your settings and preferences. This action cannot be undone. |
SCAN | Manually scans for system updates. |
Library Settings
The Library page provides an overview of the plug-ins installed on your device and enables you to use your Native ID to download, install, and update plug-ins from your Native Instruments account.
It also contains access to the User button. Here you can add and remove directory locations on external drives. The content of these directories will then appear under the User tab of the Browser. Refer to Accessing User Content.
To display the Library settings page.
Press SETTINGS.
Use the 4-D encoder to select Library.
Use the Buttons and Knobs 1–8 to change settings.
The Library page provides the following settings when FACTORY (Button 2) is selected:
Setting | Description |
|---|---|
Products | |
SHOW | Shows a list of products that are installed, available to install, or update:
|
The Library page provides the following settings when USER (Button 3) is selected:
Setting | Description |
|---|---|
REMOVE (Button 7) | Removes directory locations you no longer want to access on external drives. Removing a directory means its content will no longer appear in the User section of the Browser. |
ADD (Button 8) | Adds specific directory location on connected external drives. Use Adding a directory means its content will appear in the User section of the Browser. Folders with a checkmark or hyphen indicate those already added to Maschine+. |
Note
For information on updating the Maschine+ operating system, refer to System Settings.
Hardware Settings
The Hardware Settings page enables you to customize how the pads react to your playing, adjust the brightness of the displays, and set the sensitivity of the knobs.
To display the Hardware page:
Press SETTINGS.
Use the 4-D encoder to select Hardware.
Use the Knobs 1–8 to change settings.
The Hardware page provides the following settings:
Setting | Description |
|---|---|
Pads | |
SENSITIVITY | Adjusts how sensitive the pads respond to your touch. This sets the minimum threshold at which a “hit” is registered. |
SCALING | Determines how your playing is translated into velocity values: starting from Soft 3 (a soft touch is enough to get a big velocity value) through Linear to Hard 3 (you really have to hit the pad hard to get a big velocity value). |
LEDs | |
BRIGHTNESS | Adjusts the brightness of the pads and buttons. |
Touchstrip | |
SHOW POSITION | Shows the playhead position within a Pattern or song:
|
Display | |
BRIGHTNESS | Adjusts the brightness of both displays. |
Outputs | |
MAIN | Routes the Line Out L/R to the Phones output. This allows you to listen to the same audio output channel via the line output and headphone output simultaneously, for example, use this if you want to listen to the main out via speakers and listen to the main out via headphones. |
Touch-Sensitive Knobs | |
AUTO-WRITE | Activates / deactivates the Touch Auto-write option. Touch Auto-write can be very useful if you want to re-record modulation for a parameter at a constant value. With Touch Auto-write activated, you only need to keep a finger on a parameter Knob (1–8): The current modulation value is recorded as long as you touch the Knob, automatically replacing any old modulation events at the position in the Pattern. |
Network Settings
The Network settings page contains options related to connecting Maschine+ to a Wi-Fi network. Before you make a connection, a list of available Wi-Fi networks is displayed. Connecting to a network enables you to download plug-ins to your library from your Native Instruments account (refer to Library Settings), update the system, and connect to an Ableton Link session (refer to MIDI Settings) so you can sync to external devices.
To display the Network settings page:
Press SETTINGS.
Use the 4-D encoder to select Network.
Use the Buttons and Knobs 1–8 to change settings.
The Network page provides the following settings:
Buttons
Setting | Description |
|---|---|
CONNECT | Connects Maschine+ to the selected network. Use the 4-D encoder to select a network, then press Button 8 (CONNECT) to log on to that network. You will need the network credentials to log on. |
REFRESH | Refreshes the list of available Wi-Fi networks. Press Button 5 (REFRESH) to update the list. |
DISCONNECT | Disconnects from the current Wi-Fi connection. Press Button 8 (DISCONNECT) to disconnect. |
Knobs
Setting | Description |
|---|---|
Airplane Mode | |
Enabled | Activates or deactivates Airplane mode. When activated, this mode suspends Wi-Fi network signal transmission from Maschine+, effectively disabling the network service. As the name suggests, this mode is for use in environments where you cannot use Wi-Fi. |
Tip
For more information on connecting to Wi-Fi networks and Ableton Link, refer to Connecting to Wi-Fi and Syncing Maschine+ using Ableton Link.
About Settings
The About page provides an overview of the System version, Maschine version, and firmware installed on your Maschine+. You can also use this page to view a list of Maschine+ credits and select whether you want to disable usage data tracking.
To display the About page:
Press SETTINGS.
Use the 4-D encoder to select About.
Use the Knobs 1 to 8 to change settings.
The About page provides the following settings:
Buttons
Setting | Description |
|---|---|
CREDITS | Press Button 8 to see a list of Maschine+ credits. In no particular order, this list includes everyone that has contributed to the development, and sound design of Maschine+. Use Knob 8 to scroll through the list. |
Knobs
Setting | Description |
|---|---|
Usage Data | |
TRACK | Turn Knob 1 to activate or deactivate Usage Data Tracking. Usage Data Tracking technology enables Maschine+ to automatically track anonymous usage data that you can choose to share with us. All users should keep Data Tracking activated as it provides a valuable tool for understanding the performance of Native Instruments products when they are used in real-life situations. The data sent to Native Instruments is 100% anonymous and will not affect performance. For more detailed information about Usage Data Tracking, refer to the following Knowledge Base article on the Native Instruments website: https://support.native-instruments.com/hc/en-us/articles/209545029. |