The Browser
In addition to loading instruments, KONTAKT PLAYER's Browser allows you to quickly organize and navigate through any number of files.
The Browser allows you to quickly organize and navigate through any number of files that can be used in KONTAKT PLAYER. It display a convenient overview of various aspects of the currently selected Instrument. The Browser be used to navigate through your file system to locate and load KONTAKT PLAYER Instruments, and also manage and browse the contents of your Libraries. It allows you to assign host and MIDI automation sources to Instrument parameters and to drag and drop items from the Browser into the Rack.
To display The Browser:
Select the Browser option from the Workspace menu.
The Browser panel will appear on the left side of the Rack.
 |
The Browser
Libraries Tab
The Libraries Tab provides direct access to all KONTAKT libraries installed on your computer.
 |
Refresh: Reloads the list of libraries.
Manage Libraries: Opens the Library tab in the Options dialog. There you can hide or show libraries, open Native Access to install new libraries, and manage existing installations. For more information, refer to Libraries Tab.
A-Z: Sorts the libraries alphabetically. When deactivated, the Library tab reverts to the previous custom sorting.
Search field: Allows you to enter a search string in order to find particular libraries within the Library tab.
Instr Nav (Instrument Navigation): Shows or hides the Instrument Navigator pane at the bottom of the Browser.
Instruments: Displays all Instruments included in the library.
Function Menu: Opens a drop-down menu with additional library options. For more information, refer to Function Menu.
Loading and Saving Instruments and Multis
To load an Instrument or a Multi, click the Instruments or Multis button and navigate through the library structure like in the lower pane of the Files tab.
When using KONTAKT PLAYER libraries, you can save your own Instruments and Multis to the original library or to any custom location. When saving your own variations to the original location of your library, these Instruments and Multis will also appear in the Libraries tab.
Library Activation
Libraries are activated through Native Access, but it is possible to quickly open Native Access to activate a specific library from the KONTAKT PLAYER Library Browser.
After installing a library, open KONTAKT PLAYER.
Locate the library in the Libraries tab of the Browser.
Click on the Activate button on the respective library and a log-in screen will open.
Native Access will open and prompt you to enter a serial number for the library.
Enter a serial number and click Activate.
Your library will now be activated and ready to play.
Files Tab
This section of the Browser allows you to navigate your file system in a tree-based way, which will be immediately familiar if you’re accustomed to your operating system’s file browsers and selectors. It consists of two main panes and an audition toolbar at the bottom of the section. There is an optional third pane, the Instrument Navigator, which you can toggle via the InstrNav button just below the tabs. This pane is also available on the Libraries tab, refer to Libraries Tab.
Click the horizontal splitter bars that separate the panes and drag them up or down in order to change the height of the respective panes.
 |
The Files tab of the Browser pane provides a file system navigator
Upper (Container) Pane
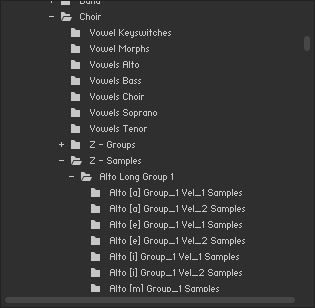
The upper pane shows all container objects on your computer in a tree structure. The term "container" encompasses all items that contain other objects, such as volumes (like hard disks, CD-ROMs or network places), folders and monolithic sampler files that serve as "virtual folders" (more on this later). A + icon next to an object indicates that there are further objects contained within, which are not currently being shown. Display those by clicking the + icon. Conversely, clicking the - icon next to an object hides all its contents from the tree view.

The upper pane of the File Browser displays a navigable tree structure of your file system.
Middle (Objects) Pane
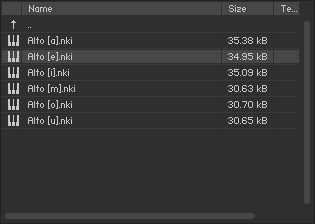
Whenever a container object that you have selected in the upper pane contains items which can be used in KONTAKT PLAYER, these will show up in the middle pane. In contrast to the multi-dimensional tree structure of the upper pane, this list is always flat and does not span multiple folders. In addition to relevant files, folders (if any) will also show up in this list and can be navigated to via double-clicking. The first item of the list will usually be the parent directory, indicated with an arrow icon. This means you don’t need to use the upper pane to navigate through folders, although it’s usually faster and more convenient.

The middle pane of the File Browser, displaying a number of Samples, their file sizes, native tempos, and modification dates.
Information on the displayed items is spread across four columns; in addition to the file name, size and modification date, there’s also a tempo column that indicates the native tempo of sliced loops. You can change the width of these columns by clicking and dragging the separator bars between their labels. Clicking on a column label will change the sort order of the list according to the respective value and clicking on the same label again will reverse the ordering direction.
Once you have found one or more items that you want to use in KONTAKT PLAYER, there are several ways to load them:
Double-click a Multi file (.nkm) or drag it from the Browser into the Rack to load it; KONTAKT will ask you whether you want to replace your current Multi or merge the one you’ve selected with the existing Multi.
Double-click an Instrument file (.nki) or drag it from the Browser onto a free space in the Rack to add it to your current Multi. KONTAKT will assign a MIDI channel according to the MIDI channel assignment for loaded patches setting in the Options dialog. This also works with multiple Instruments.
Drag an Instrument onto an existing Instrument Header in your Rack to make it replace the respective Instrument. KONTAKT will keep the MIDI channel setting of the previous Instrument.
Audition Strip
The Audition Strip allows you to listen to audio files prior to loading them. This feature works with audio files and sliced loops that you select in the lower pane of the Browser. Note that when auditioning sliced loops, they will not be played in their native tempo (which is being displayed in the Browser list), but in the current tempo of your host or, if you’re running KONTAKT in stand-alone mode, the tempo that’s set in the Master Editor.
The Audition Strip contains the following controls:

The Audition Strip allows you to play any Sample that you select in the Browser.
Volume slider: This slider adjusts the sample playback level.
Play button: This button plays the selected sample once or, if a sample is currently being auditioned, stops the playback.
Auto button: When activated, KONTAKT will automatically play a sample once when you click it.
Refresh and Eject Buttons
Just below the Browser tabs, you’ll see a series of function buttons and drop-down menus that are specific to the currently visible tab. On the Files tab, this row starts on the left side with a Refresh button, depicted by a circled arrow.

Browser refresh and eject button.
Whenever the File Browser has not yet picked up changes that recently occurred in your file system, such as newly installed or removed sample libraries, you can force an update of the file display by clicking this button.
The button next to the Refresh symbol allows you to eject your computer’s CD/DVD drive(s) from within KONTAKT. Just select the drive in the upper pane and click this button to eject it.
Database Tab
What good is a sampler if you can’t find the files you want, and find them quickly? That’s what KONTAKT’s Database is all about. The Database stores and manages information about all KONTAKT-relevant items that exist on your system, no matter whether these files are stored on hard disks or on network volumes.
As such, the Database’s purpose is similar to the File Browser described earlier in this chapter. It has a fundamentally different approach, though: While the File Browser is primarily concerned with the “hard facts” of your data — their directory paths, file names, and types, the Database employs a more user-friendly metadata system to keep track of your files. “Metadata” is a catch-all term for information that’s not strictly required for using a file, but facilitates its management within a large set of other files. When a brick-and-mortar library puts tags inside its books that inform you about the general topic of the book, where it can be found in the catalogue, and when it has to be returned, it’s adding metadata to their assets; in reference to this, the process of adding metadata to files or other records is generally being referred to as “tagging” in the computing world.
A well-tagged sample library relieves you of the burden of having to deal with directory paths, internal library structures and file naming conventions all the time: Instead, you can simply express queries like “show me all marimbas” or “show me sounds suitable for a drum & bass production” and immediately access the matching objects. Of course, this requires that the majority of the content in your collection has been tagged in some way or other in the first place. It goes without saying that the KONTAKT sound library comes with extensive predefined metadata, and we expect developers of commercial libraries to adopt this practice for their future products. Content from existing sample libraries, whether they were made with a previous version of KONTAKT or have been converted from other formats, has to be tagged manually before you can manage it with the Database; obviously, this is also true for your own material.
You can find all functions that pertain to the Database on the Database tab of the Browser. In the remainder of this section, we’ll describe all of its functions in detail.
Database Overview
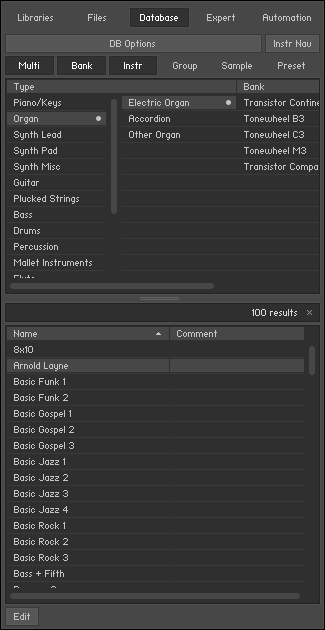
In its default state, the Database tab of the Browser appears as a two-section view. The upper section as the Attribute List; the lower one is called the Results List. Both sections always operate in unison: The Results List contains a continuously updated list of all objects in the Database that match the search conditions you define in the Attribute List.

The Database Tab
From top to bottom, you can see the control buttons, the type switches, the Attribute List, the text search bar, the Results List, and the Edit button.
At the top of the Database tab, you’ll find a row of control buttons that serve various purposes:
The DB Options button opens the Database tab of the Options dialog, where you can set various options that define how the Database will be populated with data.
The Instr Nav button toggles the visibility of the Instrument Navigator, which will appear at the bottom of the tab and is explained in section 12.1.3.
On top of the Attribute List, you’ll find a number of type buttons; these narrow any search query down to certain kinds of KONTAKT objects (such as Multis, Banks or Instruments), so that you won’t get distracted with results that have no relevance to your task at hand.

Object Type Filter buttons
The Results List will only show objects of the types that are highlighted in this bar. You can toggle the Multi, Bank and Instrument buttons independently; searching for Groups, Samples or Script and effects presets excludes the other options, as these change what’s being displayed the Attribute List.
Between the Attribute List and the Results List, you’ll find a text input bar that allows you to search for keywords inside the current Results List. Note that this will only refine the search query that’s defined by the selected values in the Attribute List; thus, if you want to search for a keyword within the entire Database, you should first make sure that nothing is selected in the Attribute List.
Finally, the Edit button at the bottom of the Database tab lights up whenever you select one or more entries from the Results List; clicking on it will switch the Database tab into edit mode, where you can assign attributes to the selected objects or define your own attributes and attribute sets. We’ll explain these functions later in this section.
Automation Tab
When you need to control a parameter of an Instrument from outside KONTAKT PLAYER, for example, using a sequencer’s automation system or MIDI controller data generated by an external fader box, you can easily pick and assign the appropriate automation source from the Automation tab of the Browser.
 |
The MIDI Automation page displays a list of assignable MIDI controllers at the top, and details of the selected assignment at its bottom.
At the top of the Automation tab, two buttons allow you to switch between the list of automation sources that are provided by your host and MIDI controllers. Assigning a source to a parameter works the same way in both lists, so the described concepts and process for working with MIDI automation can be applied to the host automation workflow.
Assign automation by selecting a source from the list and dragging it onto a knob whose parameter you want to automate. If you want to assign a fader of a keyboard or a MIDI controller, but you are unsure which controller number is correct, just move the fader when the MIDI automation list is visible and KONTAKT PLAYER will flash a red dot next to the respective list entry when it receives any MIDI controller data. This allows you to quickly spot and assign the appropriate controller.
Tip
Multiple parameters can be assigned to the same automation source. This allows you to control multiple aspects of your Instrument with a single controller, such as increasing the brightness of an Instrument in combination with the loudness. Also note that modulation wheels usually send MIDI Controller #1, while volume controls send #7.
You can edit assignments and their parameters by selecting them in the list. If the selected item is assigned to one or more parameters, these will show up in the list below. At the bottom of the pane, you can adjust some parameters of the assignment that is selected in the lower list:
From % / To %: Adjusts the range of the assigned parameter. By default, automation controllers are mapped in a way that makes them cover the whole available range of the parameter. By changing these values, you can alter the scaling of the assignment so that the automation values are mapped to a limited range of the assigned parameter. This allows you to automate the section of the parameter’s range with finer resolution.
Soft Takeover: Avoids sudden parameter jumps that can happen if received automation data is different from the current value of the assigned parameter. If you activate this button, the assigned parameter will not be changed until an automation value is received that matches the parameter’s current value. A typical example would be the assignment of an external fader to a filter’s cutoff parameter; if the filter cutoff is currently set to 50% and you slowly move the fader upwards, KONTAKT will softly pick it up as soon as it reaches its mid-point.
Remove: Deletes the automation assignment selected in the lower list.
Assigning MIDI Controllers in the Browser
If you are unable to assign MIDI controllers as described in MIDI Learn, there is an alternative way:
Make sure at least one instrument is loaded and set to the MIDI port and channel of your hardware controller.
Click the Automation tab in the Browser.
Select the MIDI Automation sub-tab.
Turn a knob or move a slider on your hardware controller.
In the Browser pane, you should see a flash next to the CC# that is used by your external controller; in addition, the MIDI symbol in the Instrument header should flash.
If this does not work, open the Options dialog.
Select the MIDI tab.
Select Inputs. Check if your MIDI hardware is selected as input for the same port you have assigned the instrument in question to.
If the MIDI input is setup correctly, drag and drop the MIDI CC# you wish to use onto the parameter you wish to control.
The MIDI Controller is assigned to the parameter.

MIDI controller reception in KONTAKT PLAYER
Removing MIDI Controller Assignments
To remove an assignment made to a specific controller:
Click the Automation tab in the Browser.
Select the MIDI Automation sub-tab.
Find the MIDI control whose assignment you wish to remove, either by searching, or by moving the control and seeing which number in the list is highlighted with the lightning bolt symbol.
Select the control in the list and click the Remove button.
The MIDI controller assignment is removed.


