Controller integration
Komplete Kontrol supports MIDI controllers from a growing list of manufacturers so you can use them to control your instrument and effect plugins with NKS integration. NKS (Native Kontrol Standard) enables automatic mapping of the knobs on your controller to plugin parameters as soon as you load a preset in Komplete Kontrol. You do not have to manually configure a mapping or assign knobs using MIDI learn.
Tip
Our Kontrol keyboards are deeply integrated with both Komplete Kontrol and Kontakt, offering an immersive experience for browsing and playing instruments using NKS, as well as DAW control.
Setting up MIDI controller integration
You can set up integration for your MIDI controller directly in Komplete Kontrol.
Open the Komplete Kontrol plugin in your DAW. Alternatively, you can open the Komplete Kontrol stand-alone application.
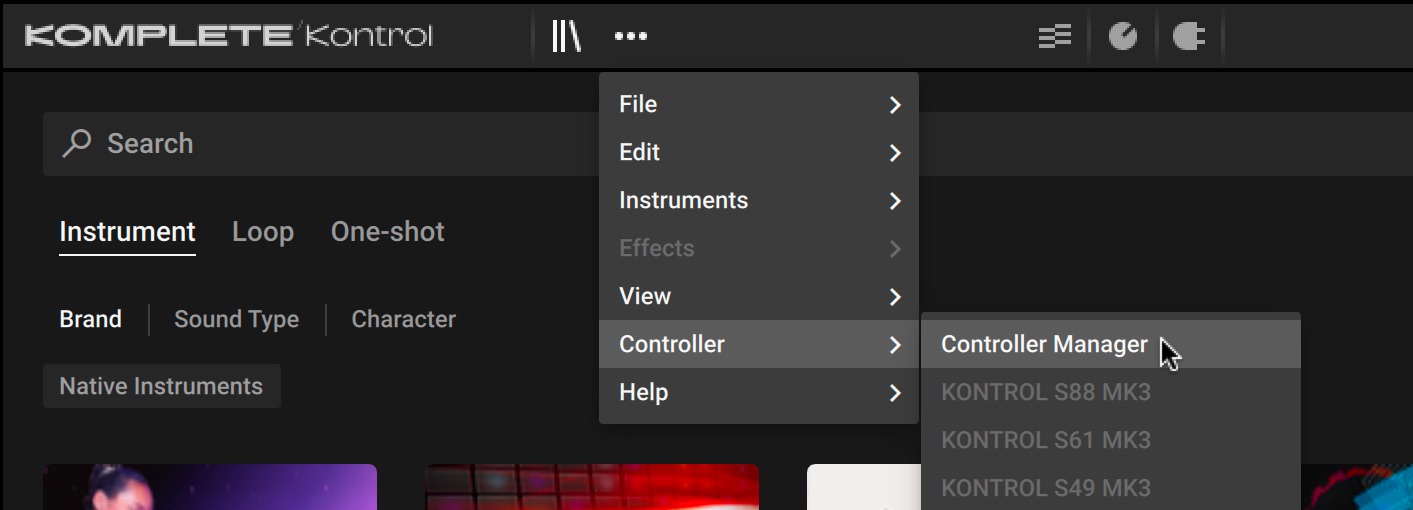
Open the main menu in the header and select Controller Manager from the Controller sub-menu.
Note
Controller Manager is not accessible when you have an NI Kontrol keyboard connected to the computer.
Follow the required steps to connect your controller to Komplete Kontrol: Supported MIDI controllers
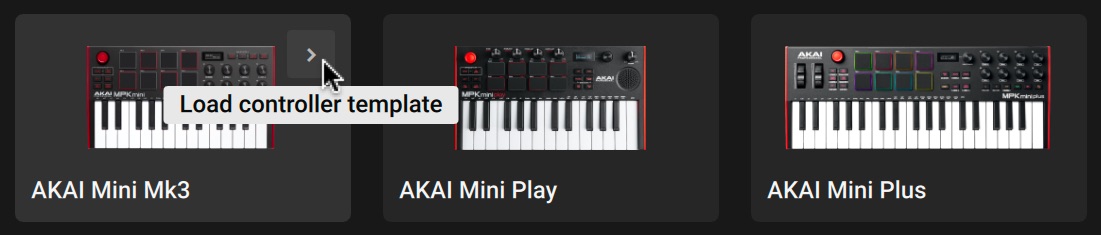
Once your controller is connected to Komplete Kontrol, double-click its entry in the Controller Manager to load the configuration in Komplete Kontrol. Alternatively, you can hover the mouse over your controller and click the arrow icon to load the configuration.
Your controller is configured in Komplete Kontrol. The icon in the header shows the brand of your controller.

Supported MIDI controllers
The following MIDI controllers are supported in Komplete Kontrol. For each MIDI controller you will find information about the required configuration steps and an overview of the controller mapping.
Tip
If you are using a Native Instruments Kontrol keyboard, learn more about its deep integration with Komplete Kontrol in the Kontrol MK3 user guide.
Akai Pro MPK249/261
Configure your Akai Pro MPK249/261 for use with Komplete Kontrol, and learn about the controls you can use on your controller.
Device setup
Follow the steps below to connect your Akai Pro MPK249/261 MIDI controller to Komplete Kontrol.
Make sure your MIDI controller is connected to your computer.
Load the preset called 30 Generic and switch to Bank C on your Akai Pro MPK249/261.
In your DAW, make sure that the Komplete Kontrol plugin receives MIDI from your MIDI controller.
Set the MIDI input of the track hosting Komplete Kontrol to the MIDI controller.
Set record arm active for the track so it receives MIDI.
Your MIDI controller is now connected to Komplete Kontrol and you can now load the respective configuration template in the software.
Note
If Komplete Kontrol does not respond to your controller, check if your DAW is intercepting MIDI messages (for example, by mapping them to its own controls) and refer to the user guide of your DAW for more information about its MIDI configuration.
Mapping
The following overview shows you how the controls on your keyboard are mapped to plugin parameters in Komplete Kontrol.
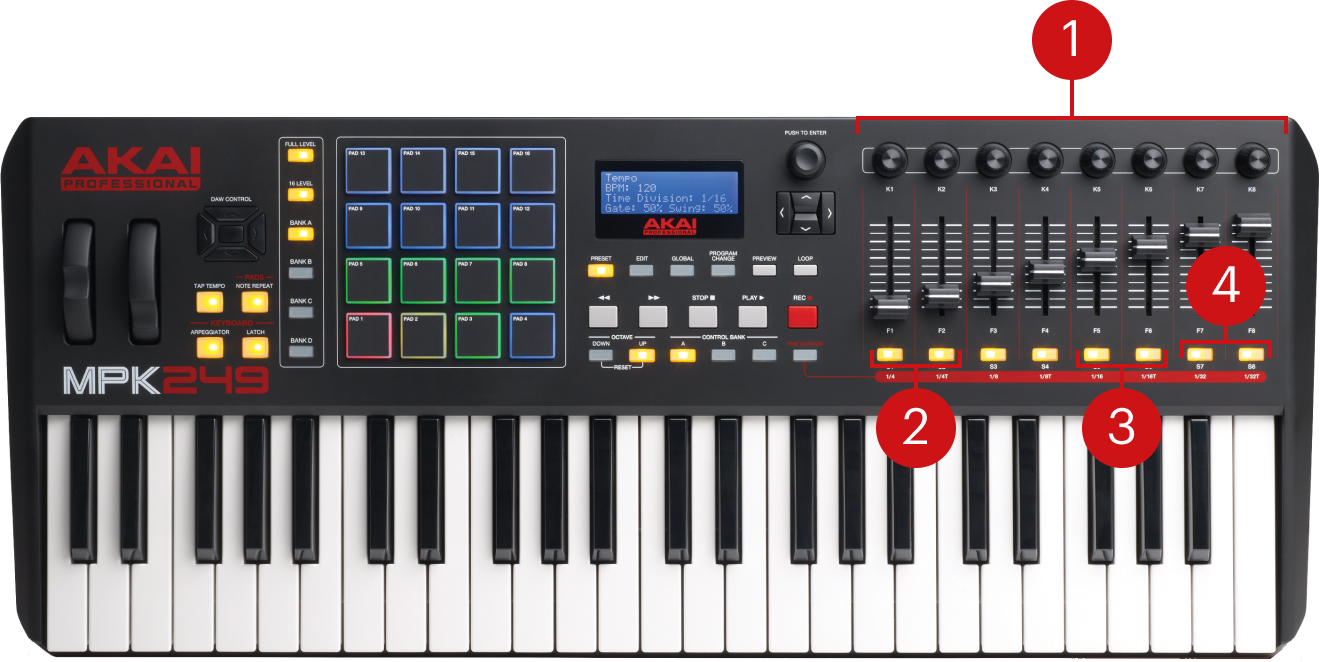
Control knobs: Adjust eight plugin parameters according to the selected page.
Select plugin preset: Switch to the previous/next preset for the selected plugin slot in Komplete Kontrol.
Select plugin slot: Select the previous/next plugin slot in Komplete Kontrol.
Select parameter page: Switch to the previous/next page of plugin parameters mapped to the knobs.
Akai Pro MPK Mini MK3
Configure your Akai Pro MPK Mini MK3 for use with Komplete Kontrol, and learn about the controls you can use on your controller.
Device setup
Follow the steps below to connect your Akai Pro MPK Mini MK3 to Komplete Kontrol.
Make sure your MIDI controller is connected to your computer.
Load the preset called MPC on your Akai Pro MPK Mini MK3 and press CC to activate MIDI CC mode for the pads.
In your DAW, make sure that the Komplete Kontrol plugin receives MIDI from your MIDI controller.
Set the MIDI input of the track hosting Komplete Kontrol to the MIDI controller.
Set record arm active for the track so it receives MIDI.
Your MIDI controller is now connected to Komplete Kontrol and you can now load the respective configuration template in the software.
Note
If Komplete Kontrol does not respond to your controller, check if your DAW is intercepting MIDI messages (for example, by mapping them to its own controls) and refer to the user guide of your DAW for more information about its MIDI configuration.
Mapping
The following overview shows you how the controls on your keyboard are mapped to plugin parameters in Komplete Kontrol.
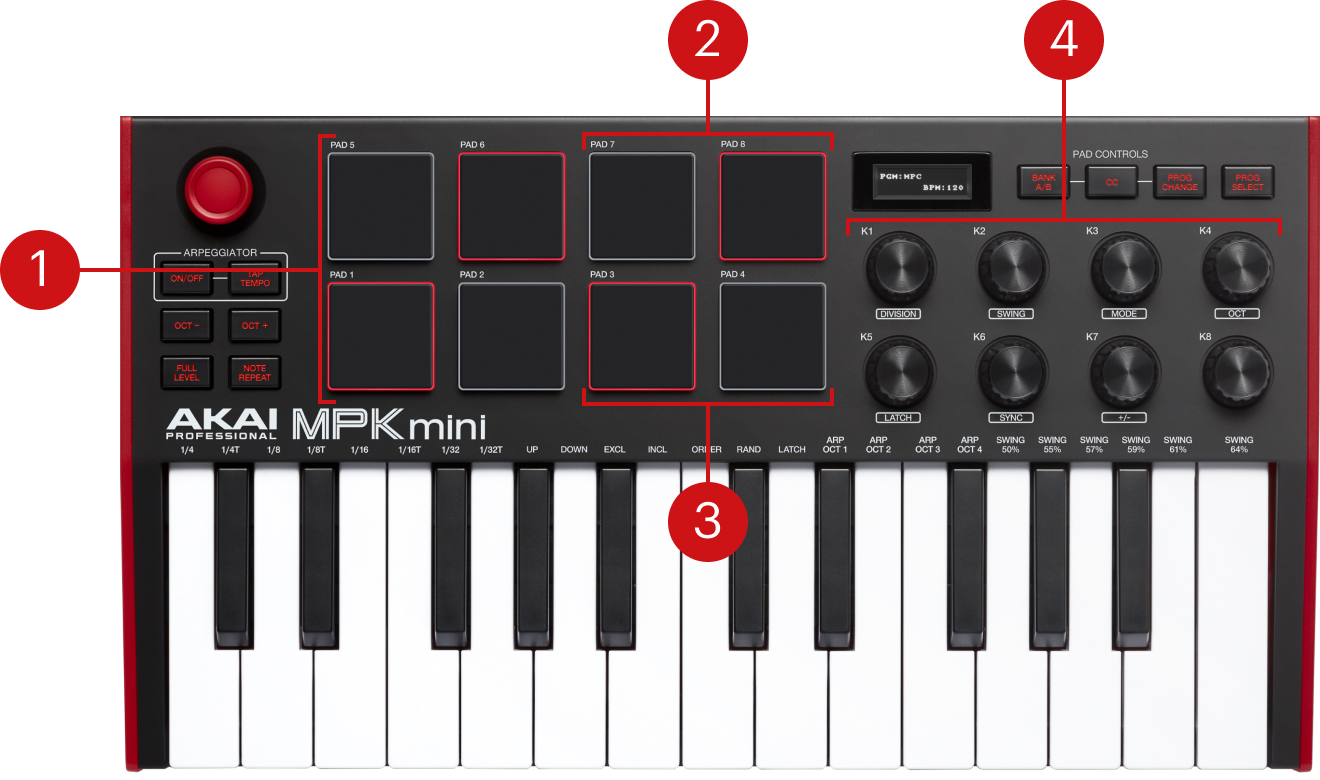
Select plugin preset: Switch to the previous/next preset for the selected plugin slot in Komplete Kontrol.
Select plugin slot: Select the previous/next plugin slot in Komplete Kontrol.
Select parameter page: Switch to the previous/next page of plugin parameters mapped to the knobs.
Control knobs: Adjust eight plugin parameters according to the selected page.
Akai Pro MPK Mini MK4
Configure your Akai MPK Mini MK4 for use with Komplete Kontrol, and learn about the controls you can use on your controller.
Device setup
Follow the steps below to connect your Akai MPK Mini MK4 to Komplete Kontrol.
Make sure your MIDI controller is connected to your computer.
Load an unmodified User preset (USER1-13) on your Akai Pro MPK Mini MK4 and press CC to activate MIDI CC mode for the pads.
In your DAW, make sure that the Komplete Kontrol plugin receives MIDI from your MIDI controller.
Set the MIDI input of the track hosting Komplete Kontrol to the MIDI controller.
Set record arm active for the track so it receives MIDI.
Your MIDI controller is now connected to Komplete Kontrol and you can now load the respective configuration template in the software.
Note
If Komplete Kontrol does not respond to your controller, check if your DAW is intercepting MIDI messages (for example, by mapping them to its own controls) and refer to the user guide of your DAW for more information about its MIDI configuration.
Mapping
The following overview shows you how the controls on your keyboard are mapped to plugin parameters in Komplete Kontrol.
Select plugin preset: Switch to the previous/next preset for the selected plugin slot in Komplete Kontrol.
Select plugin slot: Select the previous/next plugin slot in Komplete Kontrol.
Select parameter page: Switch to the previous/next page of plugin parameters mapped to the knobs.
Control knobs: Adjust eight plugin parameters according to the selected page.
Akai Pro MPK Mini Play
Configure your Akai Pro MPK Mini Play for use with Komplete Kontrol, and learn about the controls you can use on your controller.
Device setup
Follow the steps below to connect your Akai Pro MPK Mini Play to Komplete Kontrol.
Make sure your MIDI controller is connected to your computer.
Load the preset called MPC on your Akai Pro MPK Mini Play.
In your DAW, make sure that the Komplete Kontrol plugin receives MIDI from your MIDI controller.
Set the MIDI input of the track hosting Komplete Kontrol to the MIDI controller.
Set record arm active for the track so it receives MIDI.
Your MIDI controller is now connected to Komplete Kontrol and you can now load the respective configuration template in the software.
Note
If Komplete Kontrol does not respond to your controller, check if your DAW is intercepting MIDI messages (for example, by mapping them to its own controls) and refer to the user guide of your DAW for more information about its MIDI configuration.
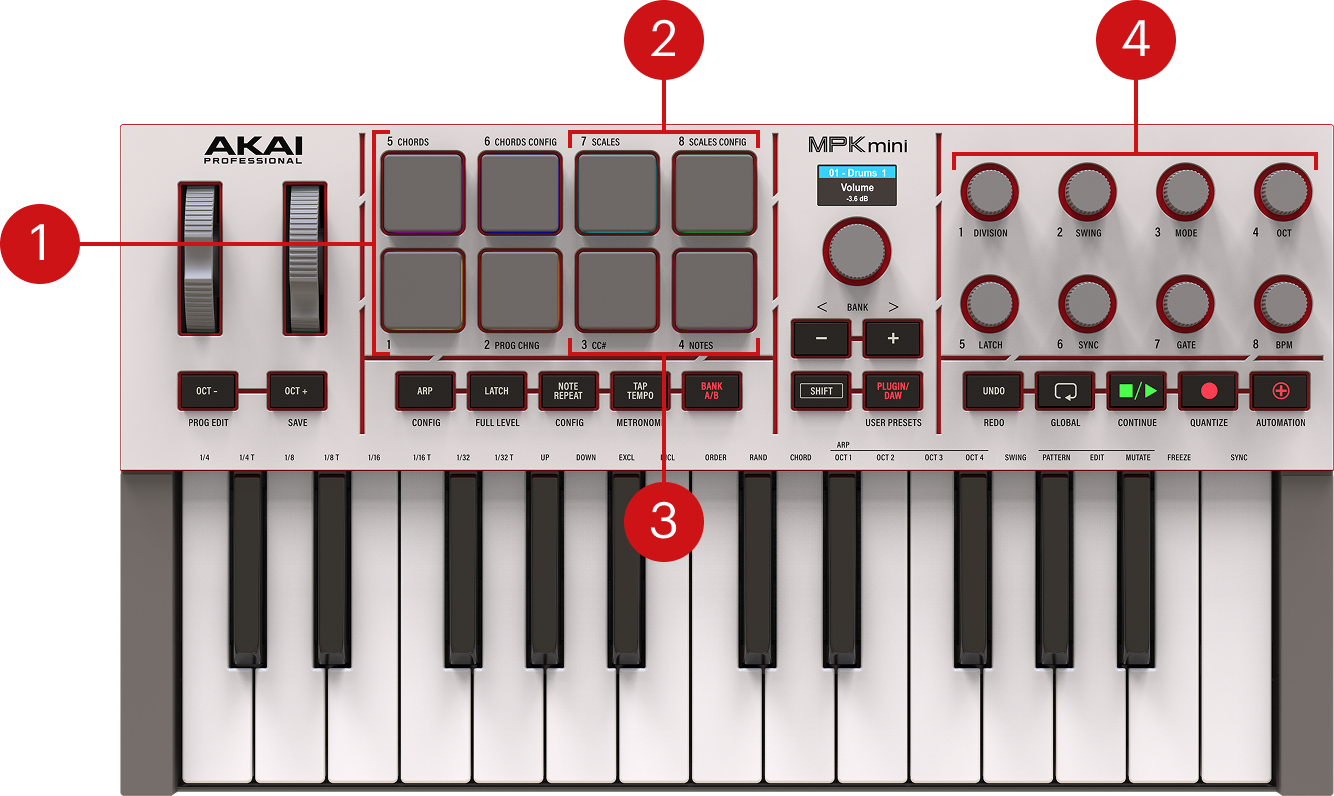
Mapping
The following overview shows you how the controls on your keyboard are mapped to plugin parameters in Komplete Kontrol.

Control knobs: Adjust four plugin parameters.
Toggle control knobs: Map the four control knobs to plugin parameters 1-4 or 5-8, respectively.
Akai Pro MPK Mini Plus
Configure your Akai Pro MPK Mini Plus for use with Komplete Kontrol, and learn about the controls you can use on your controller.
Device setup
Follow the steps below to connect your Akai Pro MPK Mini Plus to Komplete Kontrol.
Make sure your MIDI controller is connected to your computer.
Load the preset called MPC on your Akai Pro MPK Mini Plus.
In your DAW, make sure that the Komplete Kontrol plugin receives MIDI from your MIDI controller.
Set the MIDI input of the track hosting Komplete Kontrol to the MIDI controller.
Set record arm active for the track so it receives MIDI.
Your MIDI controller is now connected to Komplete Kontrol and you can now load the respective configuration template in the software.
Note
If Komplete Kontrol does not respond to your controller, check if your DAW is intercepting MIDI messages (for example, by mapping them to its own controls) and refer to the user guide of your DAW for more information about its MIDI configuration.
Mapping
The following overview shows you how the controls on your keyboard are mapped to plugin parameters in Komplete Kontrol.
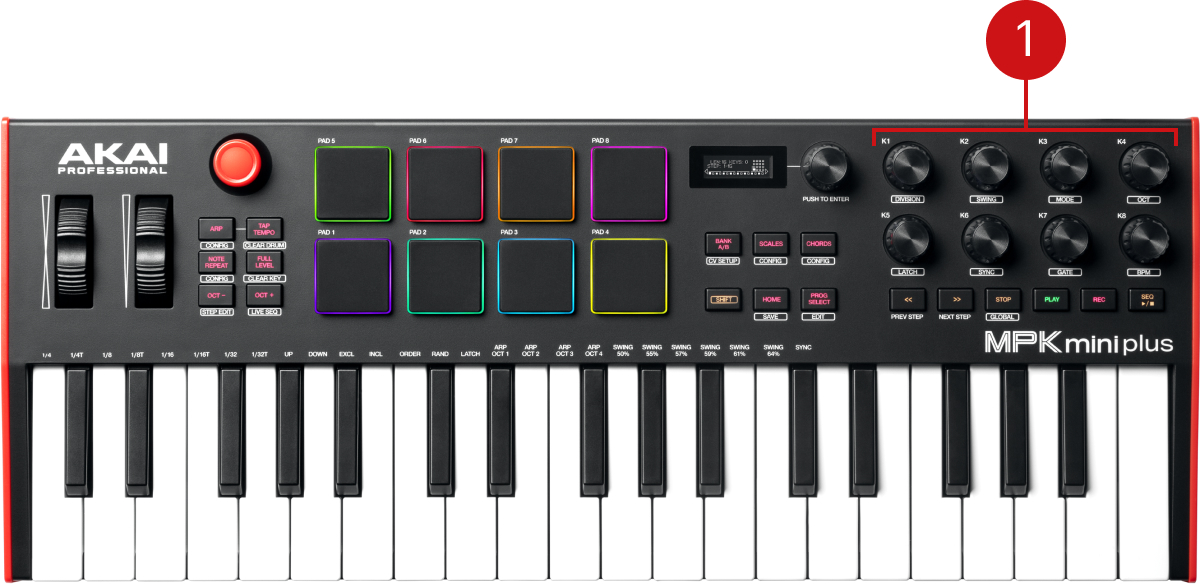
Knobs: Adjust eight instrument or effect parameters.
Arturia KeyLab 49/61 Mk3
Configure your Arturia KeyLab 49/61 Mk3 for use with Komplete Kontrol, and learn about the controls you can use on your controller.
Device setup
Follow the steps below to connect your Arturia KeyLab 49/61 Mk3 to Komplete Kontrol.
Make sure your MIDI controller is connected to your computer.
Open Arturia's MIDI Control Center and store the Factory Template Komplete Kontrol to one of the User Device Memories.
Switch to that Program on your KeyLab using the Prog Button and make sure to be in Pad Bank A (set by default).
In your DAW, make sure that the Komplete Kontrol plugin receives MIDI from your MIDI controller.
Set the MIDI input of the track hosting Komplete Kontrol to the MIDI controller.
Set record arm active for the track so it receives MIDI.
Your MIDI controller is now connected to Komplete Kontrol and you can now load the respective configuration template in the software.
Note
If Komplete Kontrol does not respond to your controller, check if your DAW is intercepting MIDI messages (for example, by mapping them to its own controls) and refer to the user guide of your DAW for more information about its MIDI configuration.
Mapping
The following overview shows you how the controls on your keyboard are mapped to plugin parameters in Komplete Kontrol.

Select plugin preset: Switch to the previous/next preset for the selected plugin slot in Komplete Kontrol.
Select parameter page: Switch to the previous/next page of plugin parameters mapped to the knobs.
Select plugin slot: Select the previous/next plugin slot in Komplete Kontrol.
Control knobs: Adjust eight plugin parameters according to the selected page.
Arturia KeyLab Essential 49/61 Mk3
Configure your Arturia KeyLab Essential 49/61 Mk3 for use with Komplete Kontrol, and learn about the controls you can use on your controller.
Device setup
Follow the steps below to connect your Arturia KeyLab Essential 49/61 Mk3 to Komplete Kontrol.
Make sure your MIDI controller is connected to your computer.
Open Arturia's MIDI Control Center and store the Factory Template Komplete Kontrol to one of the User Device Memories.
Go to the Device Settings tab and set the corresponding User Preset to Enabled in the Programs Section.
Switch to that Program on your KeyLab Essential using the Prog button and make sure to be in Pad Bank A (set by default).
In your DAW, make sure that the Komplete Kontrol plugin receives MIDI from your MIDI controller.
Set the MIDI input of the track hosting Komplete Kontrol to the MIDI controller.
Set record arm active for the track so it receives MIDI.
Your MIDI controller is now connected to Komplete Kontrol and you can now load the respective configuration template in the software.
Note
If Komplete Kontrol does not respond to your controller, check if your DAW is intercepting MIDI messages (for example, by mapping them to its own controls) and refer to the user guide of your DAW for more information about its MIDI configuration.
Mapping
The following overview shows you how the controls on your keyboard are mapped to plugin parameters in Komplete Kontrol.

Select plugin preset: Switch to the previous/next preset for the selected plugin slot in Komplete Kontrol.
Select parameter page: Switch to the previous/next page of plugin parameters mapped to the knobs.
Select plugin slot: Select the previous/next plugin slot in Komplete Kontrol.
Control knobs: Adjust eight plugin parameters according to the selected page.
Arturia MiniLab 3
Configure your Arturia MiniLab 3 for use with Komplete Kontrol, and learn about the controls you can use on your controller.
Device setup
Follow the steps below to connect your Arturia MiniLab 3 to Komplete Kontrol.
Make sure your MIDI controller is connected to your computer.
Open Arturia's MIDI Control Center and store the Factory Template Komplete Kontrol to one of the User Device Memories.
Go to the Device Settings tab and set the corresponding User Preset to Enabled in the Programs Section.
Switch to that Program on your MiniLab using Shift + Pad 3 and make sure to be in Pad Bank A (set by default).
In your DAW, make sure that the Komplete Kontrol plugin receives MIDI from your MIDI controller.
Set the MIDI input of the track hosting Komplete Kontrol to the MIDI controller.
Set record arm active for the track so it receives MIDI.
Your MIDI controller is now connected to Komplete Kontrol and you can now load the respective configuration template in the software.
Note
If Komplete Kontrol does not respond to your controller, check if your DAW is intercepting MIDI messages (for example, by mapping them to its own controls) and refer to the user guide of your DAW for more information about its MIDI configuration.
Mapping
The following overview shows you how the controls on your keyboard are mapped to plugin parameters in Komplete Kontrol.

Control knobs: Adjust eight plugin parameters according to the selected page.
Select plugin preset: Switch to the previous/next preset for the selected plugin slot in Komplete Kontrol.
Select parameter page: Switch to the previous/next page of plugin parameters mapped to the knobs.
Select plugin slot: Select the previous/next plugin slot in Komplete Kontrol.
Korg Keystage 49/61
Configure your Korg Keystage 49/61 for use with Komplete Kontrol, and learn about the controls you can use on your controller.
Device setup
Follow the steps below to connect your Korg Keystage 49/61 to Komplete Kontrol.
Make sure your MIDI controller is connected to your computer.
Load the preset called Program 0 / Scene wavestate on your Korg Keystage 49/61.
In your DAW, make sure that the Komplete Kontrol plugin receives MIDI from your MIDI controller.
Set the MIDI input of the track hosting Komplete Kontrol to the MIDI controller.
Set record arm active for the track so it receives MIDI.
Your MIDI controller is now connected to Komplete Kontrol and you can now load the respective configuration template in the software.
Note
If Komplete Kontrol does not respond to your controller, check if your DAW is intercepting MIDI messages (for example, by mapping them to its own controls) and refer to the user guide of your DAW for more information about its MIDI configuration.
Mapping
The following overview shows you how the controls on your keyboard are mapped to plugin parameters in Komplete Kontrol.

Knobs: Adjust eight instrument or effect parameters.
M-Audio Hammer 88 Pro
Configure your M-Audio Hammer 88 Pro for use with Komplete Kontrol, and learn about the controls you can use on your controller.
Device setup
Follow the steps below to connect your M-Audio Hammer 88 Pro to Komplete Kontrol.
Make sure your MIDI controller is connected to your computer.
Load the preset called Preset 16 and switch to Mode MIDI (bank 1) on your M-Audio Hammer 88 Pro.
In your DAW, make sure that the Komplete Kontrol plugin receives MIDI from your MIDI controller.
Set the MIDI input of the track hosting Komplete Kontrol to the MIDI controller.
Set record arm active for the track so it receives MIDI.
Your MIDI controller is now connected to Komplete Kontrol and you can now load the respective configuration template in the software.
Note
If Komplete Kontrol does not respond to your controller, check if your DAW is intercepting MIDI messages (for example, by mapping them to its own controls) and refer to the user guide of your DAW for more information about its MIDI configuration.
Mapping
The following overview shows you how the controls on your keyboard are mapped to plugin parameters in Komplete Kontrol.
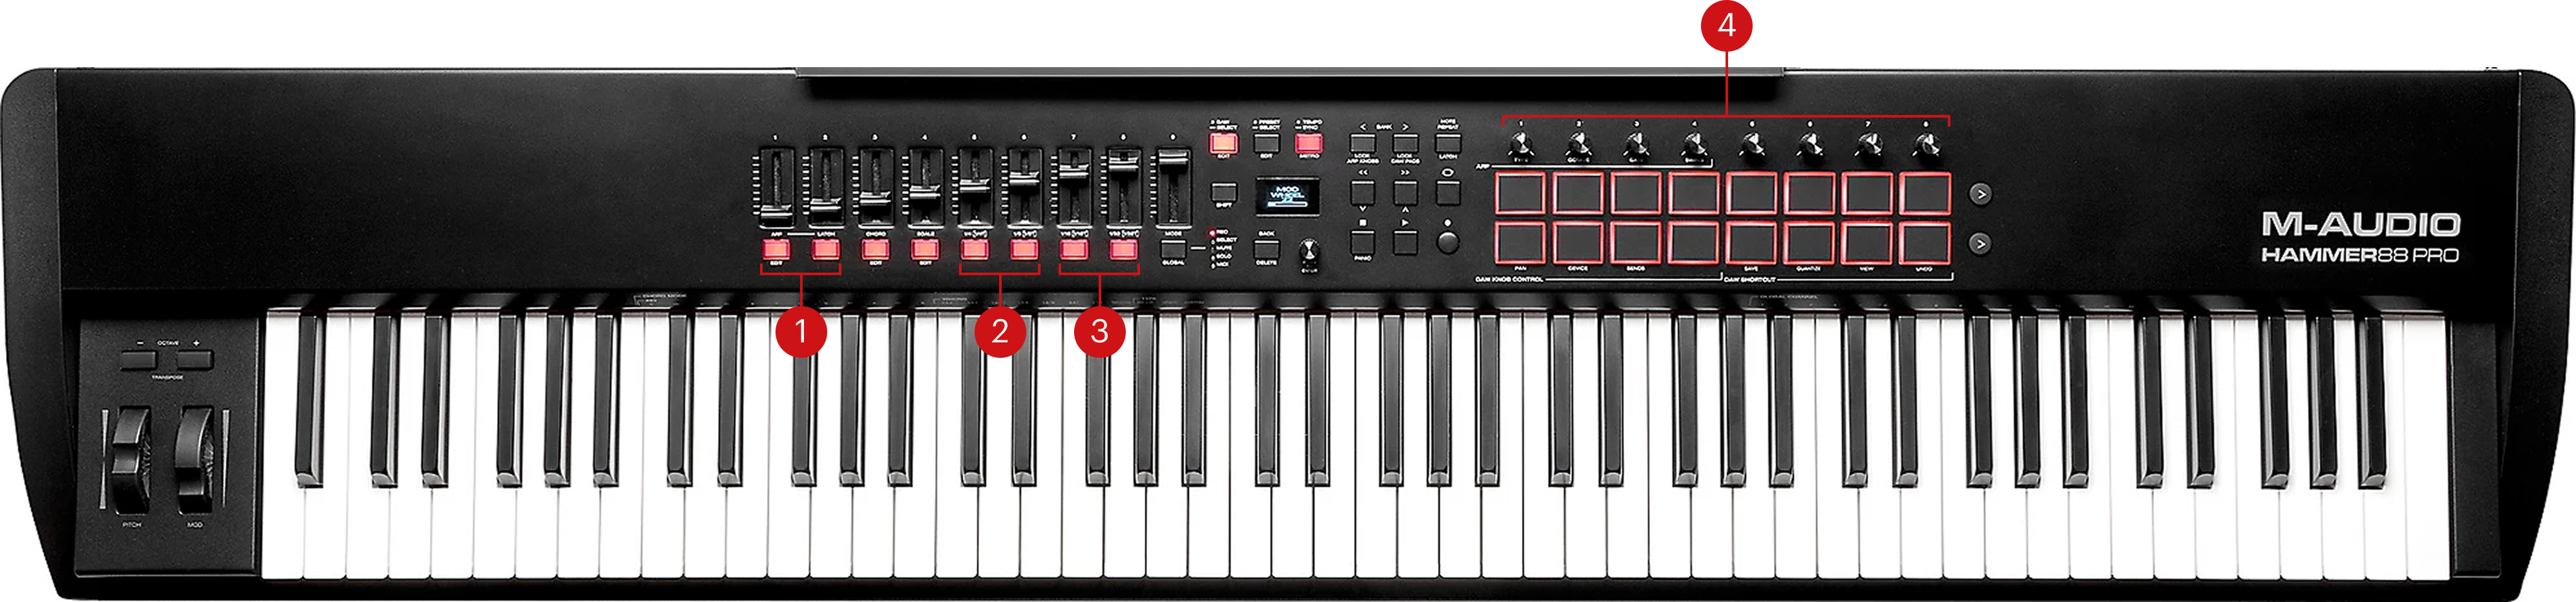
Select plugin preset: Switch to the previous/next preset for the selected plugin slot in Komplete Kontrol.
Select plugin slot: Select the previous/next plugin slot in Komplete Kontrol.
Select parameter page: Switch to the previous/next page of plugin parameters mapped to the knobs.
Control knobs: Adjust eight plugin parameters according to the selected page.
M-Audio Oxygen 25 MKV
Configure your M-Audio Oxygen 25 MKV for use with Komplete Kontrol, and learn about the controls you can use on your controller.
Device setup
Follow the steps below to connect your M-Audio Oxygen 25 MKV to Komplete Kontrol.
Make sure your MIDI controller is connected to your computer.
Load the preset called Preset P01 on your M-Audio Oxygen 25 MKV.
In your DAW, make sure that the Komplete Kontrol plugin receives MIDI from your MIDI controller.
Set the MIDI input of the track hosting Komplete Kontrol to the MIDI controller.
Set record arm active for the track so it receives MIDI.
Your MIDI controller is now connected to Komplete Kontrol and you can now load the respective configuration template in the software.
Note
If Komplete Kontrol does not respond to your controller, check if your DAW is intercepting MIDI messages (for example, by mapping them to its own controls) and refer to the user guide of your DAW for more information about its MIDI configuration.
Mapping
The following overview shows you how the controls on your keyboard are mapped to plugin parameters in Komplete Kontrol.
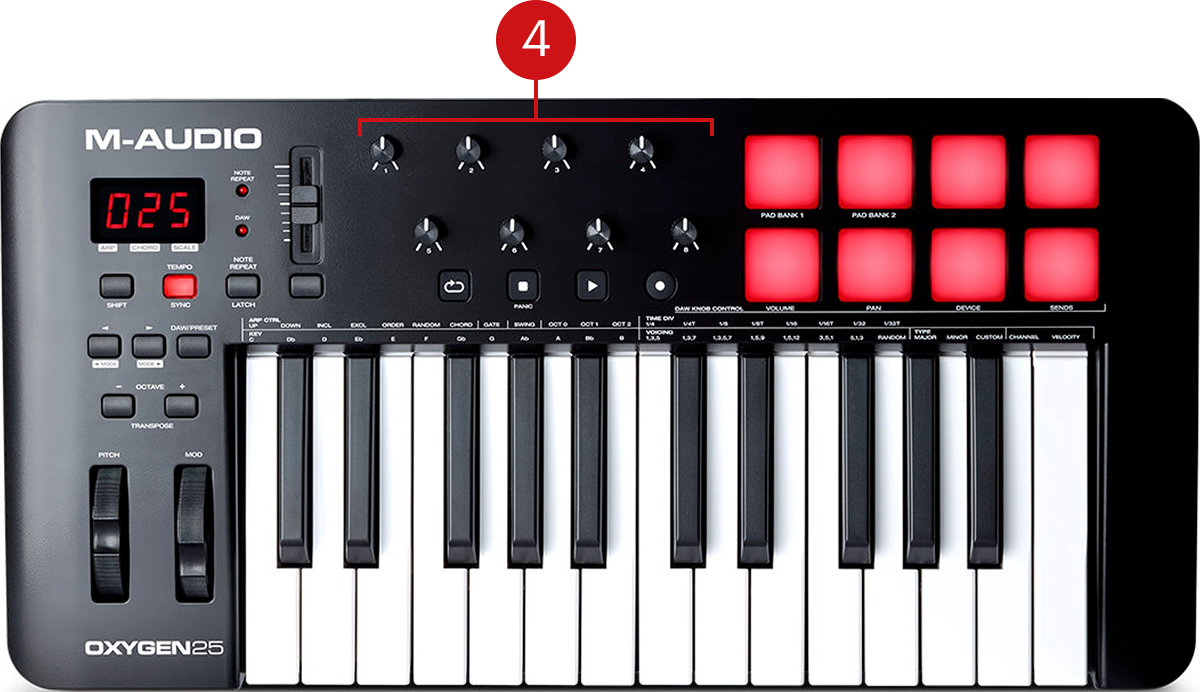
Control knobs: Adjust eight plugin parameters according to the selected page.
M-Audio Oxygen 49/61 MKV
Configure your M-Audio Oxygen 49/61 MKV for use with Komplete Kontrol, and learn about the controls you can use on your controller.
Device setup
Follow the steps below to connect your M-Audio Oxygen 49/61 MKV to Komplete Kontrol.
Make sure your MIDI controller is connected to your computer.
Load the preset called Preset P01 on your M-Audio Oxygen 49/61 MKV.
In your DAW, make sure that the Komplete Kontrol plugin receives MIDI from your MIDI controller.
Set the MIDI input of the track hosting Komplete Kontrol to the MIDI controller.
Set record arm active for the track so it receives MIDI.
Your MIDI controller is now connected to Komplete Kontrol and you can now load the respective configuration template in the software.
Note
If Komplete Kontrol does not respond to your controller, check if your DAW is intercepting MIDI messages (for example, by mapping them to its own controls) and refer to the user guide of your DAW for more information about its MIDI configuration.
Mapping
The following overview shows you how the controls on your keyboard are mapped to plugin parameters in Komplete Kontrol.
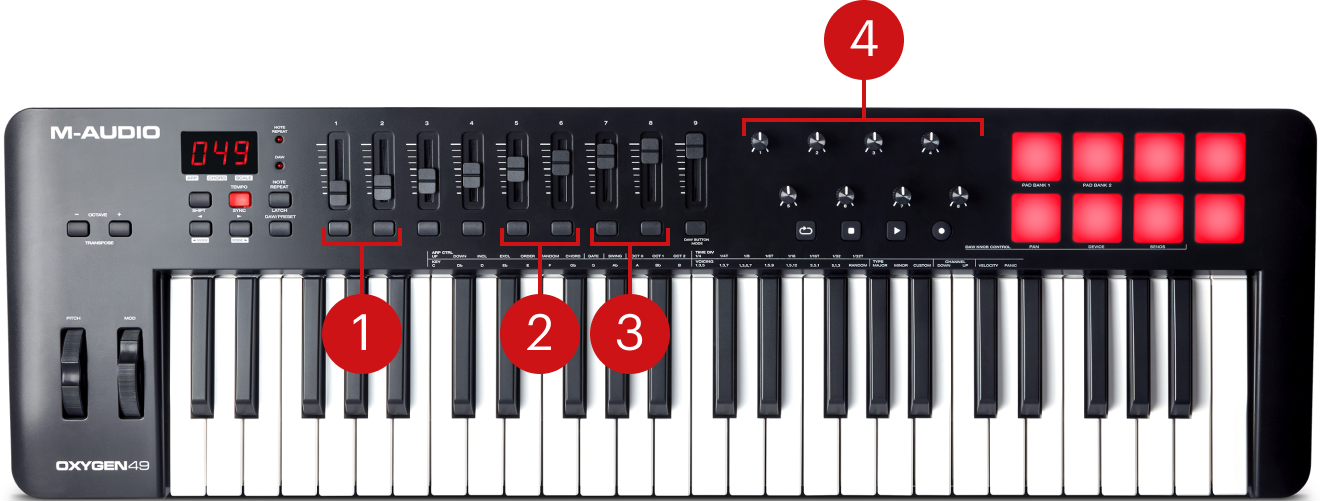
Select plugin preset: Switch to the previous/next preset for the selected plugin slot in Komplete Kontrol.
Select plugin slot: Select the previous/next plugin slot in Komplete Kontrol.
Select parameter page: Switch to the previous/next page of plugin parameters mapped to the knobs.
Control knobs: Adjust eight plugin parameters according to the selected page.
M-Audio Oxygen Pro 25
Configure your M-Audio Oxygen Pro 25 for use with Komplete Kontrol, and learn about the controls you can use on your controller.
Device setup
Follow the steps below to connect your M-Audio Oxygen Pro 25 to Komplete Kontrol.
Make sure your MIDI controller is connected to your computer.
Load the preset called Preset 16 on your M-Audio Oxygen Pro 25.
In your DAW, make sure that the Komplete Kontrol plugin receives MIDI from your MIDI controller.
Set the MIDI input of the track hosting Komplete Kontrol to the MIDI controller.
Set record arm active for the track so it receives MIDI.
Your MIDI controller is now connected to Komplete Kontrol and you can now load the respective configuration template in the software.
Note
If Komplete Kontrol does not respond to your controller, check if your DAW is intercepting MIDI messages (for example, by mapping them to its own controls) and refer to the user guide of your DAW for more information about its MIDI configuration.
Mapping
The following overview shows you how the controls on your keyboard are mapped to plugin parameters in Komplete Kontrol.
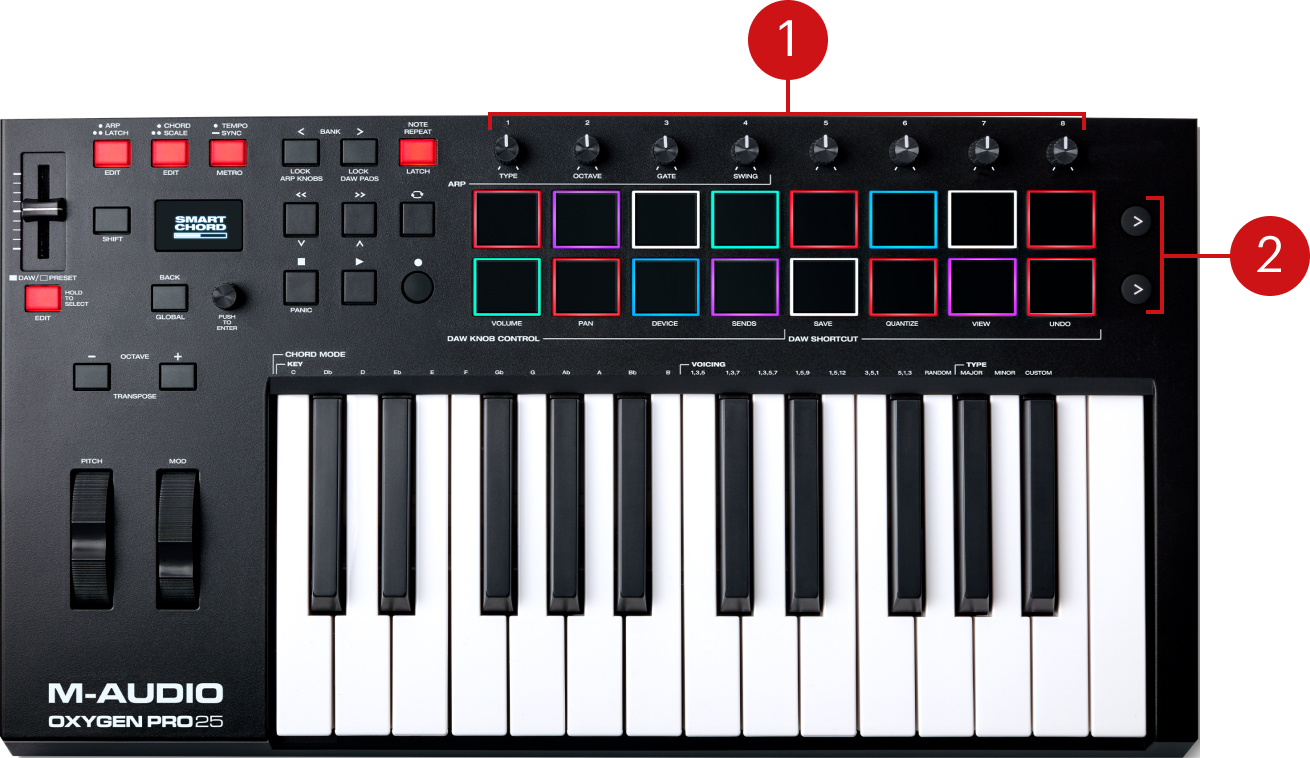
Control knobs: Adjust eight plugin parameters according to the selected page.
Select parameter page: Switch to the previous/next page of plugin parameters mapped to the knobs.
M-Audio Oxygen Pro 49/61
Configure your M-Audio Oxygen Pro 49/61 for use with Komplete Kontrol, and learn about the controls you can use on your controller.
Device setup
Follow the steps below to connect your M-Audio Oxygen Pro 49/61 to Komplete Kontrol.
Make sure your MIDI controller is connected to your computer.
Load the preset called Preset 16 and switch to Mode MIDI (bank 1) on your M-Audio Oxygen Pro 49/61.
In your DAW, make sure that the Komplete Kontrol plugin receives MIDI from your MIDI controller.
Set the MIDI input of the track hosting Komplete Kontrol to the MIDI controller.
Set record arm active for the track so it receives MIDI.
Your MIDI controller is now connected to Komplete Kontrol and you can now load the respective configuration template in the software.
Note
If Komplete Kontrol does not respond to your controller, check if your DAW is intercepting MIDI messages (for example, by mapping them to its own controls) and refer to the user guide of your DAW for more information about its MIDI configuration.
Mapping
The following overview shows you how the controls on your keyboard are mapped to plugin parameters in Komplete Kontrol.
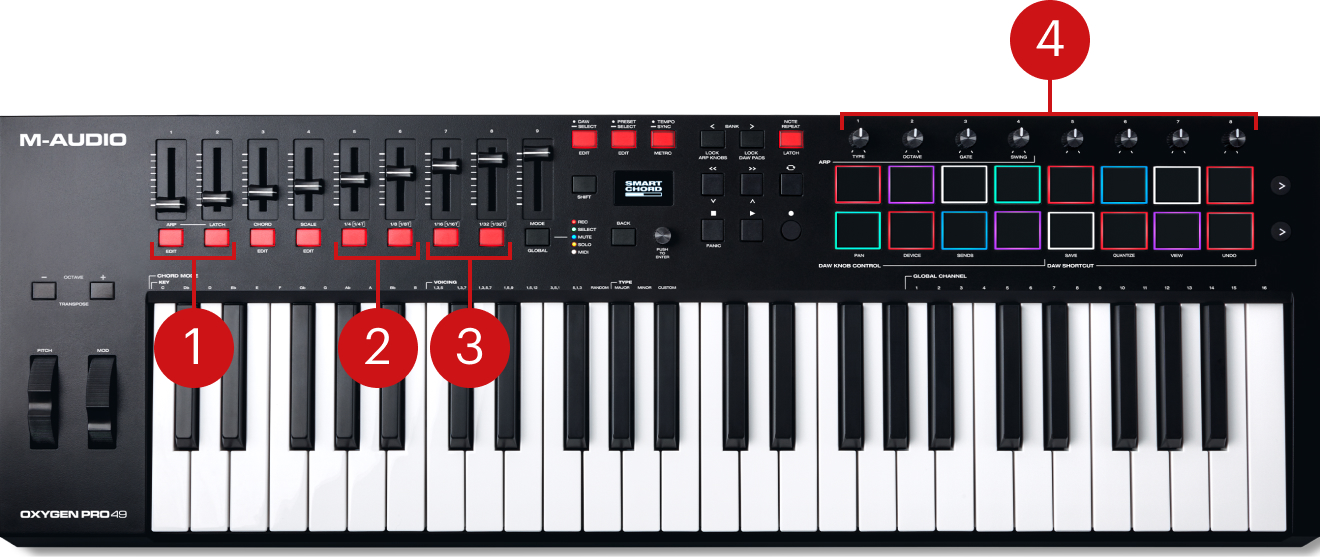
Select plugin preset: Switch to the previous/next preset for the selected plugin slot in Komplete Kontrol.
Select plugin slot: Select the previous/next plugin slot in Komplete Kontrol.
Select parameter page: Switch to the previous/next page of plugin parameters mapped to the knobs.
Control knobs: Adjust eight plugin parameters according to the selected page.
M-Audio Oxygen Pro Mini
Configure your M-Audio Oxygen Pro Mini for use with Komplete Kontrol, and learn about the controls you can use on your controller.
Device setup
Follow the steps below to connect your M-Audio Oxygen Pro Mini to Komplete Kontrol.
Make sure your MIDI controller is connected to your computer.
Load the preset called PRST - 12 on your M-Audio Oxygen Pro Mini.
In your DAW, make sure that the Komplete Kontrol plugin receives MIDI from your MIDI controller.
Set the MIDI input of the track hosting Komplete Kontrol to the MIDI controller.
Set record arm active for the track so it receives MIDI.
Your MIDI controller is now connected to Komplete Kontrol and you can now load the respective configuration template in the software.
Note
If Komplete Kontrol does not respond to your controller, check if your DAW is intercepting MIDI messages (for example, by mapping them to its own controls) and refer to the user guide of your DAW for more information about its MIDI configuration.
Mapping
The following overview shows you how the controls on your keyboard are mapped to plugin parameters in Komplete Kontrol.
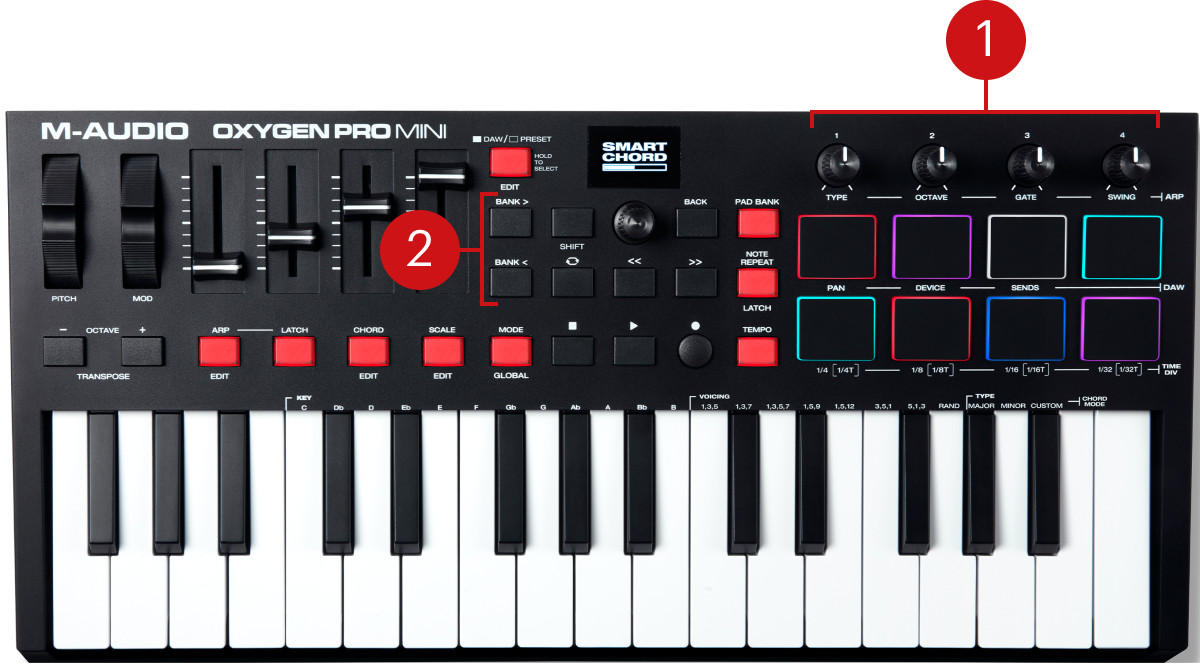
Control knobs: Adjust four plugin parameters.
Toggle control knobs: Map the four control knobs to plugin parameters 1-4 or 5-8, respectively.
Nektar Impact LX25/49/61 MK3
Configure your Nektar Impact LX25/49/61 MK3 for use with Komplete Kontrol, and learn about the controls you can use on your controller.
Device setup
Follow the steps below to connect your Nektar Impact LX25/49/61 MK3 to Komplete Kontrol.
Make sure your MIDI controller is connected to your computer.
Make sure the Inst button your Nektar Impact LX25/49/61 MK3 is active.
In your DAW, make sure that the Komplete Kontrol plugin receives MIDI from your MIDI controller.
Set the MIDI input of the track hosting Komplete Kontrol to the MIDI controller.
Set record arm active for the track so it receives MIDI.
Your MIDI controller is now connected to Komplete Kontrol and you can now load the respective configuration template in the software.
Note
If Komplete Kontrol does not respond to your controller, check if your DAW is intercepting MIDI messages (for example, by mapping them to its own controls) and refer to the user guide of your DAW for more information about its MIDI configuration.
Mapping
The following overview shows you how the controls on your keyboard are mapped to plugin parameters in Komplete Kontrol.
Control knobs: Adjust eight plugin parameters according to the selected page.
Browse Up/Down: Switch to the previous/next preset.
Shift + Browse Up/Down: Switch to the previous/next plugin slot in Komplete Kontrol.
Page + Browse Up/Down: Switch to the previous/next page of instrument or effect parameters mapped to the knobs.
Novation 49/61SL MKIII
Configure your Novation 49/61SL MKIII for use with Komplete Kontrol, and learn about the controls you can use on your controller.
Device setup
Follow the steps below to connect your Novation 49/61SL MKIII to Komplete Kontrol.
Make sure your MIDI controller is connected to your computer.
Load the template 1 MIDI on your Novation 49/61SL MKIII.
In your DAW, make sure that the Komplete Kontrol plugin receives MIDI from your MIDI controller.
Set the MIDI input of the track hosting Komplete Kontrol to the MIDI controller.
Set record arm active for the track so it receives MIDI.
Your MIDI controller is now connected to Komplete Kontrol and you can now load the respective configuration template in the software.
Note
If Komplete Kontrol does not respond to your controller, check if your DAW is intercepting MIDI messages (for example, by mapping them to its own controls) and refer to the user guide of your DAW for more information about its MIDI configuration.
Mapping
The following overview shows you how the controls on your keyboard are mapped to plugin parameters in Komplete Kontrol.
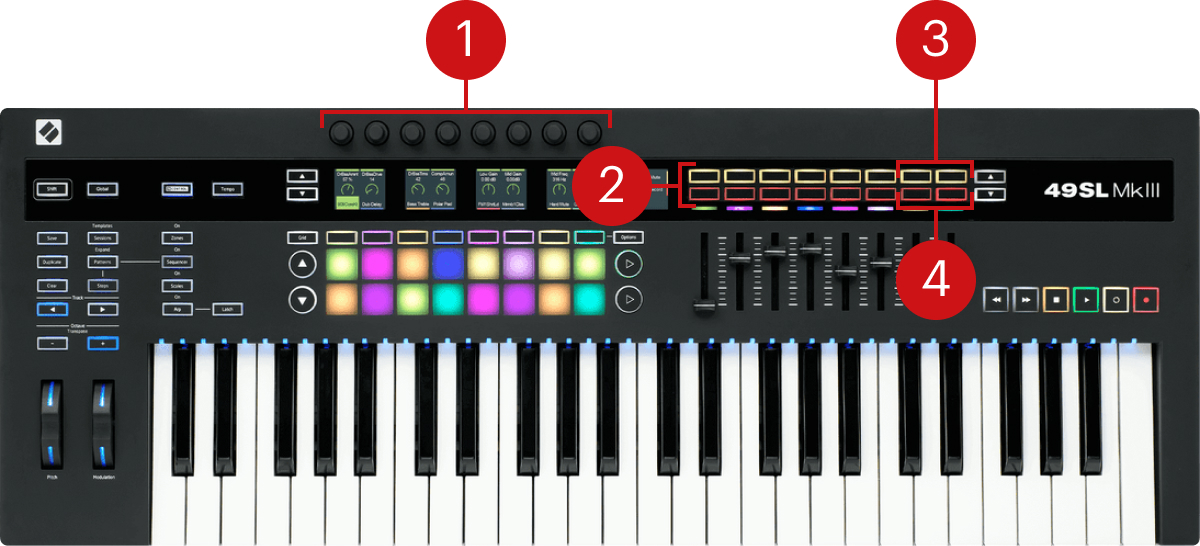
Control knobs: Adjust eight plugin parameters according to the selected page.
Select plugin preset: Switch to the previous/next preset for the selected plugin slot in Komplete Kontrol.
Select plugin slot: Select the previous/next plugin slot in Komplete Kontrol.
Select parameter page: Switch to the previous/next page of plugin parameters mapped to the knobs.
Novation FLkey 37
Configure your Novation FLkey 37 for use with Komplete Kontrol, and learn about the controls you can use on your controller.
Device setup
Follow the steps below to connect your Novation FLkey 37 to Komplete Kontrol.
Make sure your MIDI controller is connected to your computer.
Use the Novation Components web app to send Custom Mode Komplete Kontrol to your device. Then switch the knobs to Pots Custom and the pads to Pads Custom on your Novation FLkey 37.
In your DAW, make sure that the Komplete Kontrol plugin receives MIDI from your MIDI controller.
Set the MIDI input of the track hosting Komplete Kontrol to the MIDI controller.
Set record arm active for the track so it receives MIDI.
Your MIDI controller is now connected to Komplete Kontrol and you can now load the respective configuration template in the software.
Note
If Komplete Kontrol does not respond to your controller, check if your DAW is intercepting MIDI messages (for example, by mapping them to its own controls) and refer to the user guide of your DAW for more information about its MIDI configuration.
Mapping
The following overview shows you how the controls on your keyboard are mapped to plugin parameters in Komplete Kontrol.
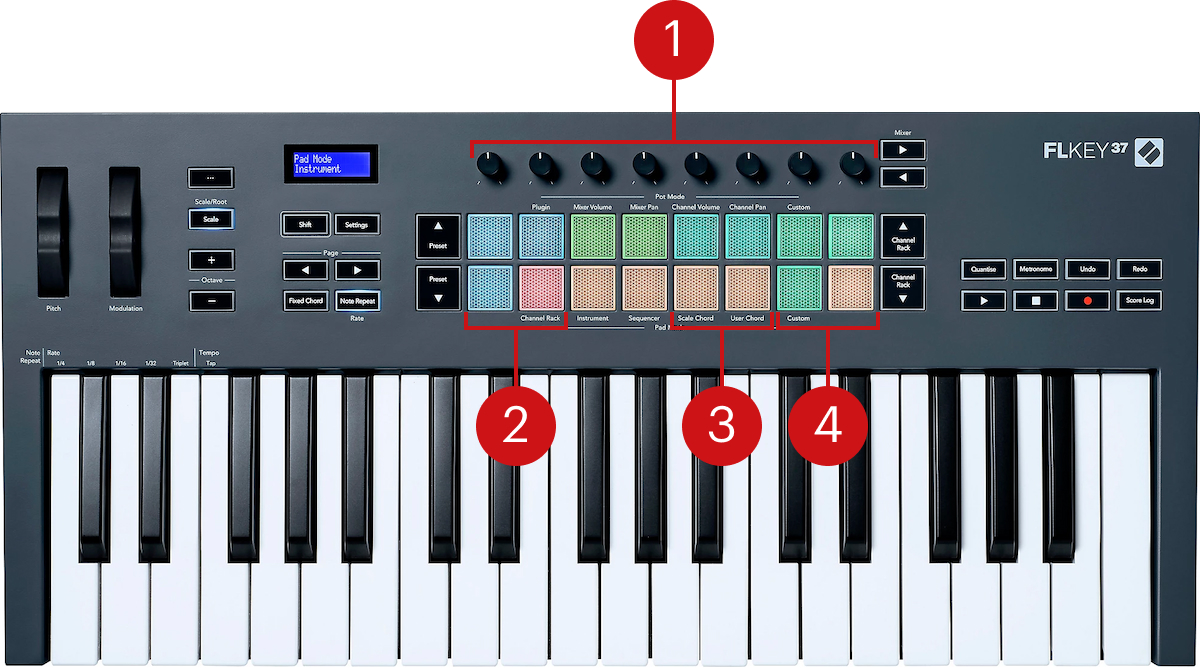
Control knobs: Adjust eight plugin parameters according to the selected page.
Select plugin preset: Switch to the previous/next preset for the selected plugin slot in Komplete Kontrol.
Select plugin slot: Select the previous/next plugin slot in Komplete Kontrol.
Select parameter page: Switch to the previous/next page of plugin parameters mapped to the knobs.
Novation FLkey Mini/49/61
Configure your Novation FLkey Mini/49/61 for use with Komplete Kontrol, and learn about the controls you can use on your controller.
Device setup
Follow the steps below to connect your Novation FLkey Mini/49/61 to Komplete Kontrol.
Make sure your MIDI controller is connected to your computer.
Use the Novation Components web app to send Custom Mode Komplete Kontrol to your device. Then switch the knobs to Pots Custom and the pads to Pads Custom on your Novation FLkey Mini/49/61.
In your DAW, make sure that the Komplete Kontrol plugin receives MIDI from your MIDI controller.
Set the MIDI input of the track hosting Komplete Kontrol to the MIDI controller.
Set record arm active for the track so it receives MIDI.
Your MIDI controller is now connected to Komplete Kontrol and you can now load the respective configuration template in the software.
Note
If Komplete Kontrol does not respond to your controller, check if your DAW is intercepting MIDI messages (for example, by mapping them to its own controls) and refer to the user guide of your DAW for more information about its MIDI configuration.
Mapping
The following overview shows you how the controls on your keyboard are mapped to plugin parameters in Komplete Kontrol.
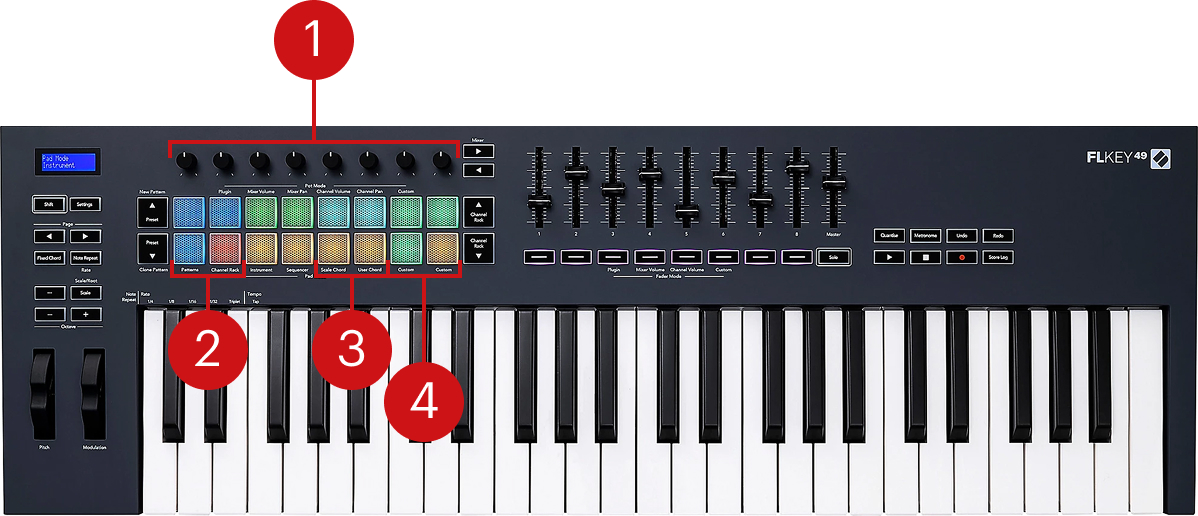
Control knobs: Adjust eight plugin parameters according to the selected page.
Select plugin preset: Switch to the previous/next preset for the selected plugin slot in Komplete Kontrol.
Select plugin slot: Select the previous/next plugin slot in Komplete Kontrol.
Select parameter page: Switch to the previous/next page of plugin parameters mapped to the knobs.
Novation Launchkey Mini MK3
Configure your Novation Launchkey Mini MK3 for use with Komplete Kontrol, and learn about the controls you can use on your controller.
Device setup
Follow the steps below to connect your Novation Launchkey Mini MK3 to Komplete Kontrol.
Make sure your MIDI controller is connected to your computer.
Use the Novation Components web app to send Custom Mode Komplete Kontrol to your device. Then switch the knobs to Pots Custom and the pads to Pads Custom on your Novation Launchkey Mini MK3.
In your DAW, make sure that the Komplete Kontrol plugin receives MIDI from your MIDI controller.
Set the MIDI input of the track hosting Komplete Kontrol to the MIDI controller.
Set record arm active for the track so it receives MIDI.
Your MIDI controller is now connected to Komplete Kontrol and you can now load the respective configuration template in the software.
Note
If Komplete Kontrol does not respond to your controller, check if your DAW is intercepting MIDI messages (for example, by mapping them to its own controls) and refer to the user guide of your DAW for more information about its MIDI configuration.
Mapping
The following overview shows you how the controls on your keyboard are mapped to plugin parameters in Komplete Kontrol.
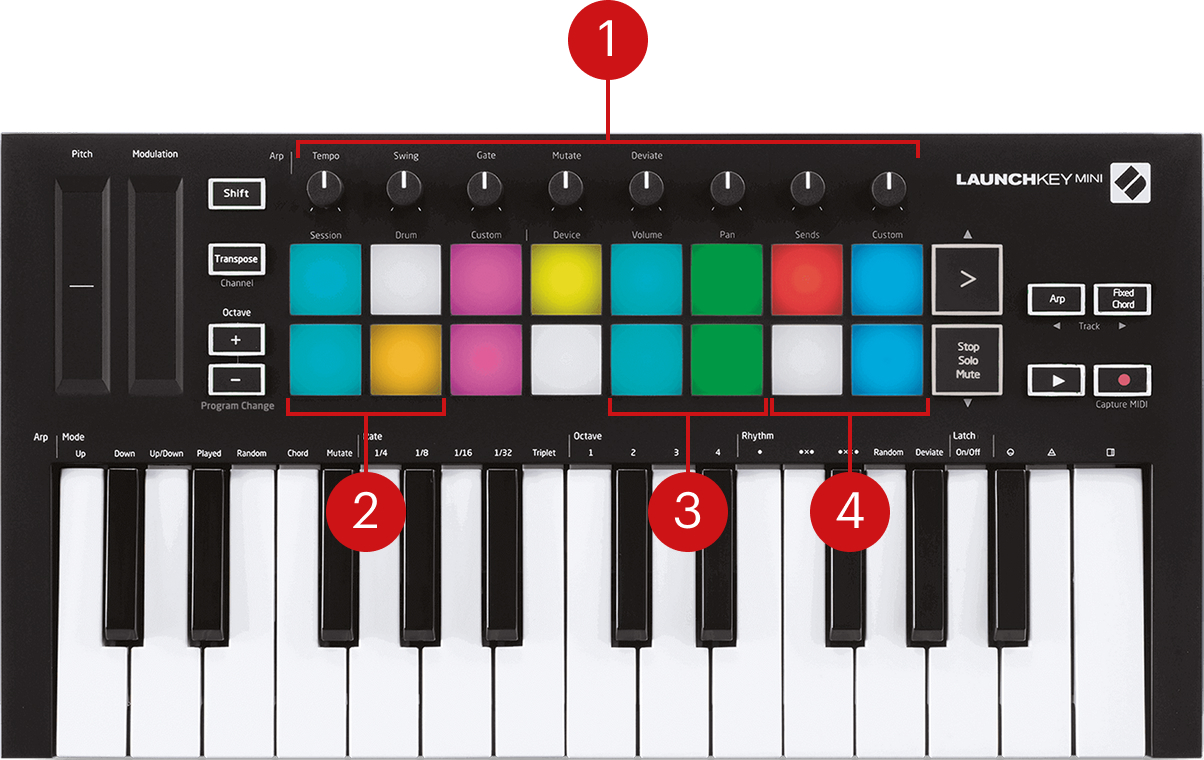
Control knobs: Adjust eight plugin parameters according to the selected page.
Select plugin preset: Switch to the previous/next preset for the selected plugin slot in Komplete Kontrol.
Select plugin slot: Select the previous/next plugin slot in Komplete Kontrol.
Select parameter page: Switch to the previous/next page of plugin parameters mapped to the knobs.
Novation Launchkey Mini 25/37 MK4
Configure your Novation Launchkey Mini 25/37 MK4 for use with Komplete Kontrol, and learn about the controls you can use on your controller.
Device setup
Follow the steps below to connect your Novation Launchkey Mini 25/37 MK4 to Komplete Kontrol.
Make sure your MIDI controller is connected to your computer.
Switch the knobs to Pots Custom 1 and the pads to Pads Custom 3 CC Switches on your Novation Launchkey Mini 25/37 MK4.
In your DAW, make sure that the Komplete Kontrol plugin receives MIDI from your MIDI controller.
Set the MIDI input of the track hosting Komplete Kontrol to the MIDI controller.
Set record arm active for the track so it receives MIDI.
Your MIDI controller is now connected to Komplete Kontrol and you can now load the respective configuration template in the software.
Note
If Komplete Kontrol does not respond to your controller, check if your DAW is intercepting MIDI messages (for example, by mapping them to its own controls) and refer to the user guide of your DAW for more information about its MIDI configuration.
Mapping
The following overview shows you how the controls on your keyboard are mapped to plugin parameters in Komplete Kontrol.
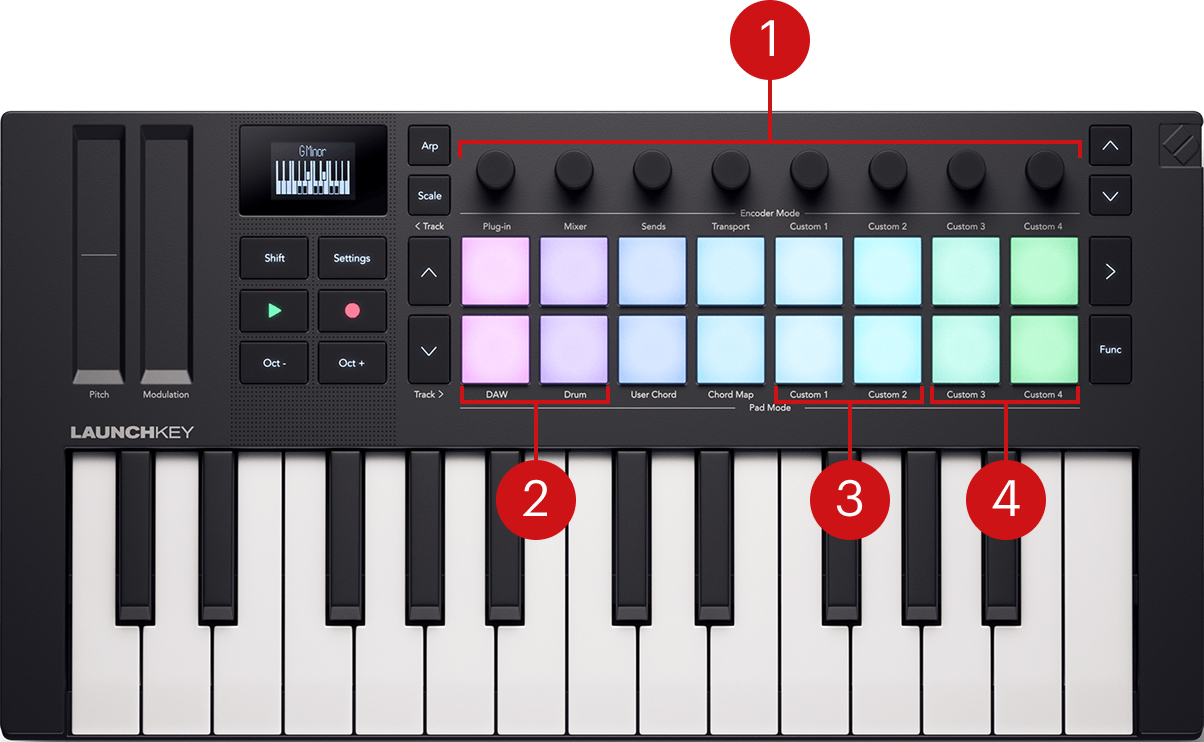
Control knobs: Adjust eight plugin parameters according to the selected page.
Select plugin preset: Switch to the previous/next preset for the selected plugin slot in Komplete Kontrol.
Select plugin slot: Select the previous/next plugin slot in Komplete Kontrol.
Select parameter page: Switch to the previous/next page of plugin parameters mapped to the knobs.
Novation Launchkey 25/37/49/61/88 MK3
Configure your Novation Launchkey 25/37/49/61/88 MK3 for use with Komplete Kontrol, and learn about the controls you can use on your controller.
Device setup
Follow the steps below to connect your Novation Launchkey 25/37/49/61 MK3 to Komplete Kontrol.
Make sure your MIDI controller is connected to your computer.
Switch the knobs to Pots Custom 1 and the pads to Pads Custom 3 CC Switches on your Novation Launchkey 25/37/49/61/88 MK3.
Note
Novation Launchkey 25 MK3: First use the Novation Components web app to send Custom Mode Komplete Kontrol to your device.
In your DAW, make sure that the Komplete Kontrol plugin receives MIDI from your MIDI controller.
Set the MIDI input of the track hosting Komplete Kontrol to the MIDI controller.
Set record arm active for the track so it receives MIDI.
Your MIDI controller is now connected to Komplete Kontrol and you can now load the respective configuration template in the software.
Note
If Komplete Kontrol does not respond to your controller, check if your DAW is intercepting MIDI messages (for example, by mapping them to its own controls) and refer to the user guide of your DAW for more information about its MIDI configuration.
Mapping
The following overview shows you how the controls on your keyboard are mapped to plugin parameters in Komplete Kontrol.
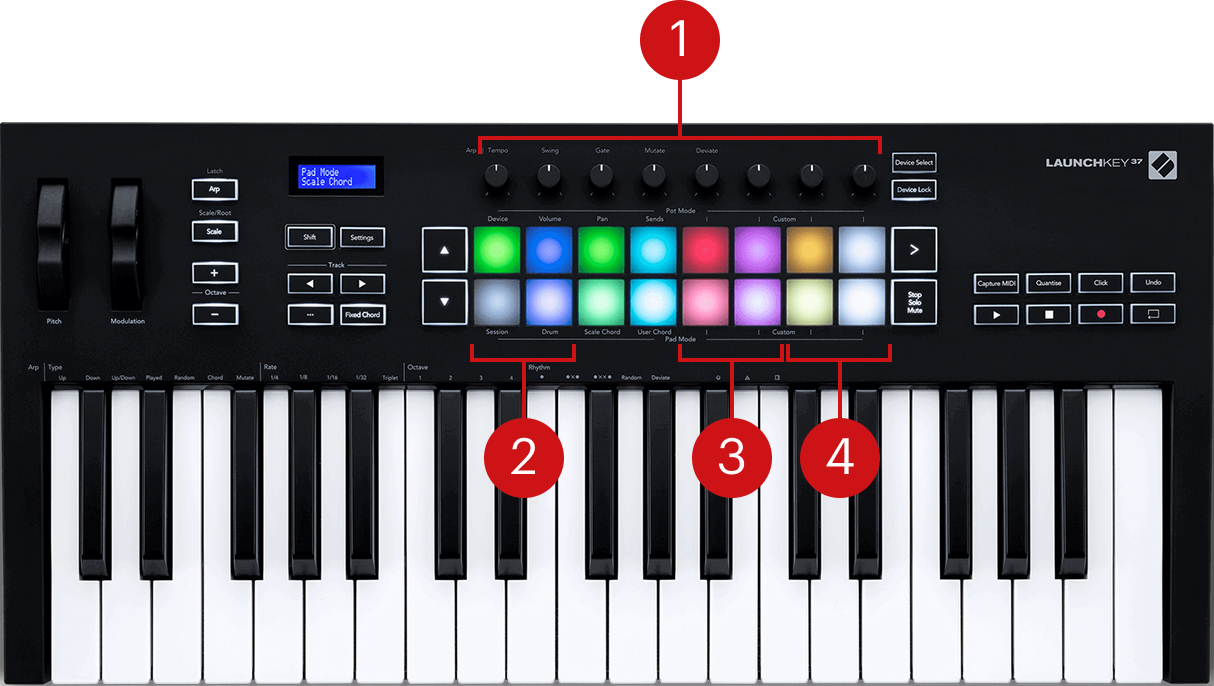
Control knobs: Adjust eight plugin parameters according to the selected page.
Select plugin preset: Switch to the previous/next preset for the selected plugin slot in Komplete Kontrol.
Select plugin slot: Select the previous/next plugin slot in Komplete Kontrol.
Select parameter page: Switch to the previous/next page of plugin parameters mapped to the knobs.
Novation Launchkey 25/37/49/61 MK4
Configure your Novation Launchkey 25/37/49/61 MK4 for use with Komplete Kontrol, and learn about the controls you can use on your controller.
Device setup
Follow the steps below to connect your Novation Launchkey 25/37/49/61 MK4 to Komplete Kontrol.
Make sure your MIDI controller is connected to your computer.
Switch the knobs to Pots Custom 1 and the pads to Pads Custom 3 CC Switches on your Novation Launchkey 25/37/49/61 MK4.
In your DAW, make sure that the Komplete Kontrol plugin receives MIDI from your MIDI controller.
Set the MIDI input of the track hosting Komplete Kontrol to the MIDI controller.
Set record arm active for the track so it receives MIDI.
Your MIDI controller is now connected to Komplete Kontrol and you can now load the respective configuration template in the software.
Note
If Komplete Kontrol does not respond to your controller, check if your DAW is intercepting MIDI messages (for example, by mapping them to its own controls) and refer to the user guide of your DAW for more information about its MIDI configuration.
Mapping
The following overview shows you how the controls on your keyboard are mapped to plugin parameters in Komplete Kontrol.
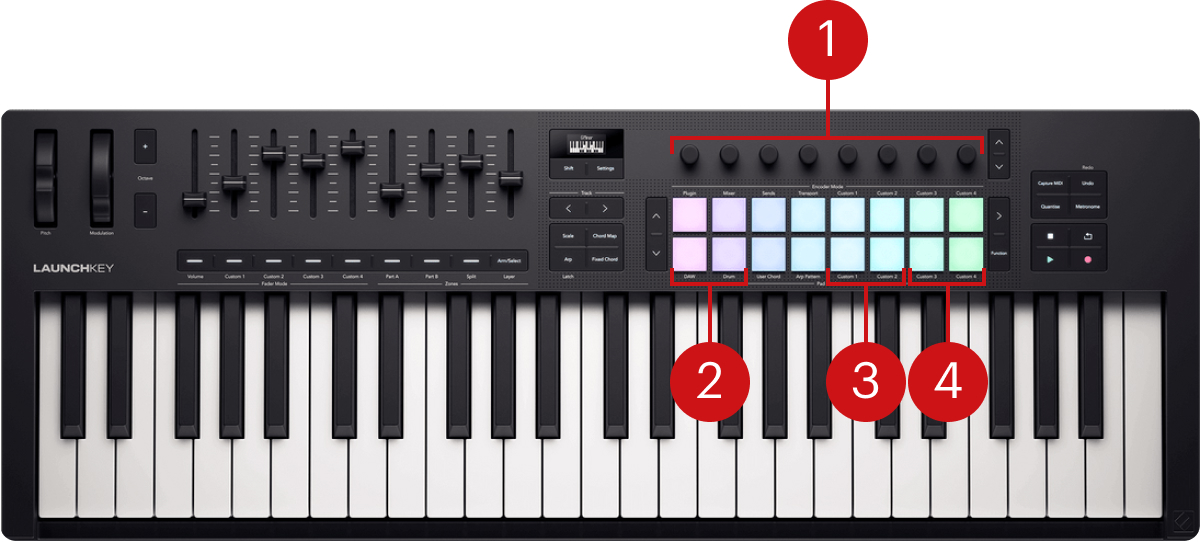
Control knobs: Adjust eight plugin parameters according to the selected page.
Select plugin preset: Switch to the previous/next preset for the selected plugin slot in Komplete Kontrol.
Select plugin slot: Select the previous/next plugin slot in Komplete Kontrol.
Select parameter page: Switch to the previous/next page of plugin parameters mapped to the knobs.