Tips and Tricks
Learn about various tips and tricks from the developers of Icon Bass, to create realistic, yet polished sounds.
Last, but not least, the developers would like to share a couple of tips to help you get the most out of Icon Bass:
Use the Melody Instrument to enhance the Pattern Playback
The melody feature makes it possible to add melodic fills to spice up an otherwise repetitive performance: Load the Melody.nki and switch the default mode on the Playback page to Pattern. Now, you can perform patterns just like in the regular instrument, but holding down a melody keyswitch will enable you to add monophonic or polyphonic fill-ins or variations to the pattern performance. The instrument will create smooth transitions between patterns and melody notes whenever possible.
Create Natural Transitions
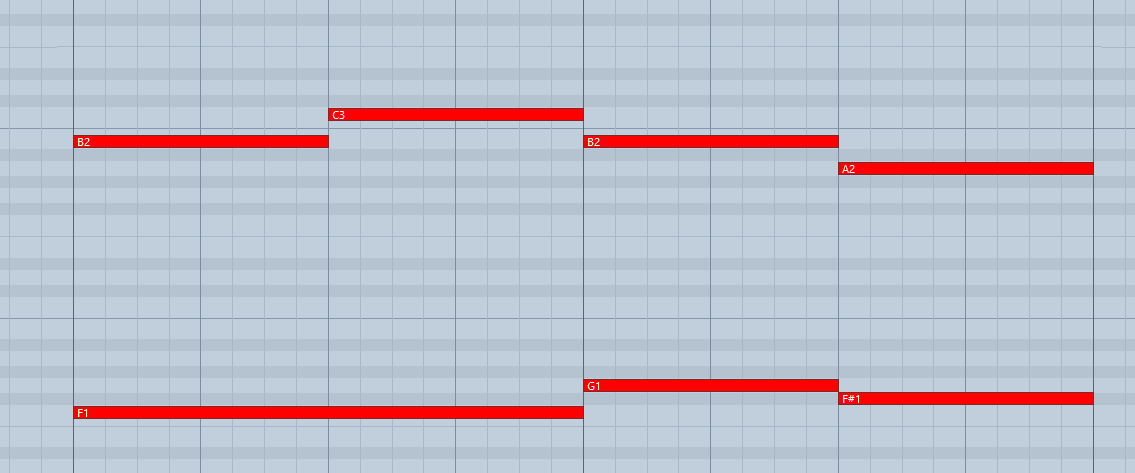
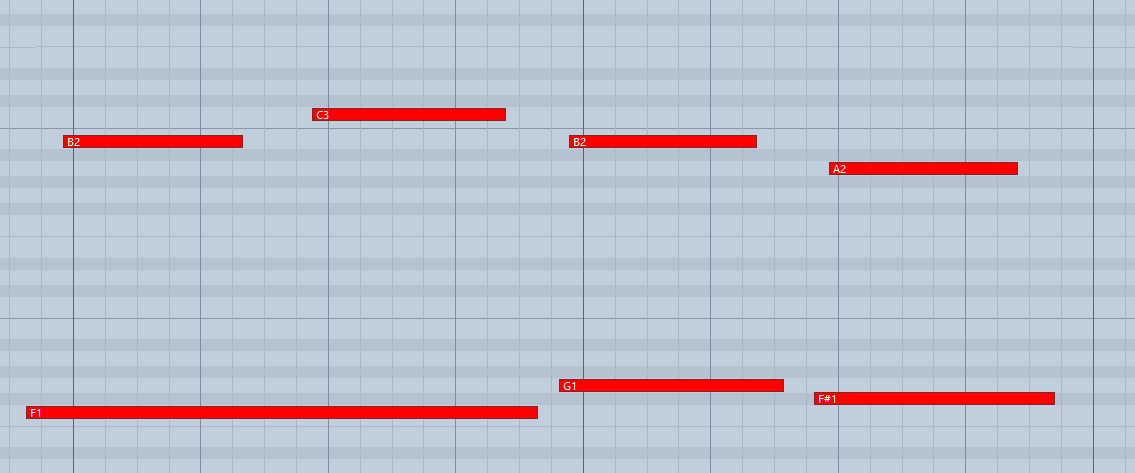
To create realistic sounding transitions between different pitches or patterns, do not quantize your keyboard performance. Instead, make sure that all pitch and pattern changes are played slightly ahead of the beat. This way, Icon Bass can anticipate that a pitch or pattern change is about to take place and perform the transition in the most natural way. Depending on the note progression, an appropriate fret noise is added automatically. These natural transitions would be impossible if you quantized your MIDI data. Triggering the patterns before the beat will not make the performance sound out of time, as the timing is bound to the internal metronome of your sequencer. Also make sure that notes do not overlap, because an overlap would technically mean that two pitches are played at the same point in time.

Bad: Quantized MIDI data will cause the pitch changes to happen too late for the fret noises to be played back; this will not create realistic transitions.

Good: MIDI notes placed ahead of the quantized position will result in realistic sounding transitions. Note that the keyswitches are triggered slightly before the actual notes.
Combining Patterns Creatively
We spent a lot of time making transitions between patterns and notes as smooth and natural as possible. Therefore, if you switch between patterns that have a similar playing style but different rhythms, the transitions will very likely sound as smooth as if the resulting rhythm would have actually been performed this way. So instead of sticking to a single repetitive pattern for a long time, you can enhance realism by switching back and forth between patterns to add variations here and there. In most cases, adding minor rhythmical changes at the end of the second bar does the trick.
Creating Custom Groove Variations
If you'd like to add variations to spice up a pattern using the technique described above, you might find yourself in a situation where the beginning of a pattern contains the bit of rhythmical variation you'd like to use at the end of another pattern. You can move the variation into place by clicking the wrench button (refer to The Pattern Inspector for more information) to open the Pattern Inspector and shift the pattern to the desired position. Another way to get there is to use the End Step feature: shorten the pattern to e.g. 8 steps (two quarter notes). Although the resulting pattern will be very short and thus will sound pretty repetitive in itself, it will contain a predictable rhythm that you can use to add a variation to another pattern.
Using Authentic Humanization
The Humanize knob on the Playback page does not simply add random offsets to approximate realism. Instead, it recreates the actual timing of the bassist when performing the patterns during the recording session. Even if subtle, the Original setting sounds more akin to a real bassist playing the instrument. Adding small amounts of Shuffle, slightly increasing the Timing Shift, and shifting the accentuation of patterns towards the downbeat or backbeat with the Feel control can greatly improve how the groove of the bass fits in with the other instruments of an arrangement.
Using the Impact Slider as a Drama Controller
When moving towards a quiet passage in your song, move the impact slider to the left. As you approach the chorus, slowly move it to the right. If applied correctly, this makes the virtual musician play towards a certain musical event, e.g. the chorus or a break. You can also use the pitch wheel to smoothen the transition between patterns which are played at different volumes.