Header and Presets
The header provides global functions related to preset management and plug-in behavior.
The header provides global functions related to preset management and plug-in behavior.
It consists of the following menus and and settings:
 |
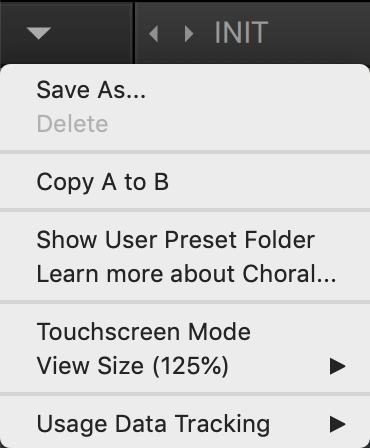
Main menu: Provides you with options for managing user presets and adjusting the plug-in's visual appearance. For more information, refer to Main Menu.
Preset menu: Allows you to access all factory and user presets. For more information, refer to Loading Presets.
A/B Comparison switch: Allows you to compare two sets of settings, called A and B. For more information, refer to Comparing Parameter Settings.
NI logo: Opens the About screen, which shows the version number of the plug-in.
Loading Presets
CRUSH PACK includes a wide range of factory presets that make full use of its features. You can put them to use in your music right away, or explore their sound and settings to familiarize yourself with the effect.
All presets can be loaded directly from the user interface by using the Preset menu, including your own user presets.
Click the left and right arrows on the left side of the Preset menu to cycle through all presets and load them one after the other.

Alternatively, you can load presets from a list that is organized in categories.
Click the Preset menu.

The Preset menu shows a list of all available presets. Various categories of factory presets and user presets are available in separate submenus.
Click an entry in the list.
The corresponding preset is loaded and can be used.
Tip
The INIT preset contains basic settings that are useful as a starting point for creating your own effect sounds.
Quick Access List
Below the Factory Presets and User Presets you'll find the Quick Access list. If you load a preset from the User Presets submenu, the next time you open the Preset menu the Quick Access list will show all user presets. If you load a preset from the Factory Presets submenu, the next time you open the Preset menu the Quick Access list will show all factory presets.
Comparing Parameter Settings
The A/B Comparison switch can help you to fine-tune your settings. It is located to the right of the Preset menu in the Header:
 |
The A/B Comparison switch in the Header.
It features two temporary memory slots A and B that you can use to quickly switch between two sets of parameter settings. This makes it easy to compare different settings and find the ones you like.
To use the A/B Comparison switch:
Create an effect sound you like. All parameter settings are automatically saved to slot A.
Click on B to switch to the second slot. When you switch to slot B for the first time, it automatically takes over all the settings from slot A.
Adjust parameters to create an alternative effect sound. All settings are automatically stored in slot B.
Click A and B to switch between the two variations of your effect sound.
The sound changes according to the selected set of parameter settings.
If you want to overwrite the settings saved in the other slot with the settings saved in the currently selected slot, open the Main menu by clicking on the arrow symbol in the left corner of the Header and select Copy A to B or Copy B to A, respectively.
Tip
When you have found an effect sound you like, you can save the settings from the currently selected memory slot of the A/B Comparison switch as a preset. For more information about saving presets, refer to Managing User Presets.
Managing User Presets
If you have created an effect sound you want to keep for later use, you can save it to the User Preset folder. All presets in the User Preset folder are available under User Presets in the Preset menu, enabling you to access your personal library of effect sounds directly from the user interface.
 |
A User preset in the Preset menu
Saving a New User Preset
To save a user preset:
Open the Main menu by clicking on the arrow symbol on the left corner of the Header and select Save as….
Enter a new name for your preset in the Save New Preset dialog box.
Click OK to finish the process and close the dialog box.
Your user preset is saved in the User Preset folder.
Deleting a User Preset
You can delete the current user preset via the Main menu.
Note
Factory presets cannot be deleted.
To delete the current user preset:
Open the Main menu by clicking on the arrow symbol on the left corner of the Header and select Delete.
User Preset Folder
The User Preset folder contains all of your saved user presets. You can copy, delete or change the name of user presets directly in the folder on your hard drive.
Note
The plug-in needs to be reloaded in order to reflect any changes made in the User Preset folder.
To show the User Preset folder on your hard drive, open the Main menu by clicking on the arrow symbol in the left corner of the Header and select Show User Preset Folder.

