Sound Editor
Use the Sound Editor in 40s VERY OWN KEYS to control the tuning, pan and volume of soundsources, apply lo-fi effects and filtering, and customize the modulation sources.
The Sound Editor contains all controls related to the selection and editing of sound sources. Adjust the tuning, pan, and volume of the sound sources, apply lo-fi effects and filtering to each layer, and customize the modulation sources. You can edit each layer separately, or both simultaneously using Layer Link. If you're searching for some inspiration, try the randomize feature and see where it takes you.
Sound Editor Overview
The Sound Editor contains the following elements and controls:
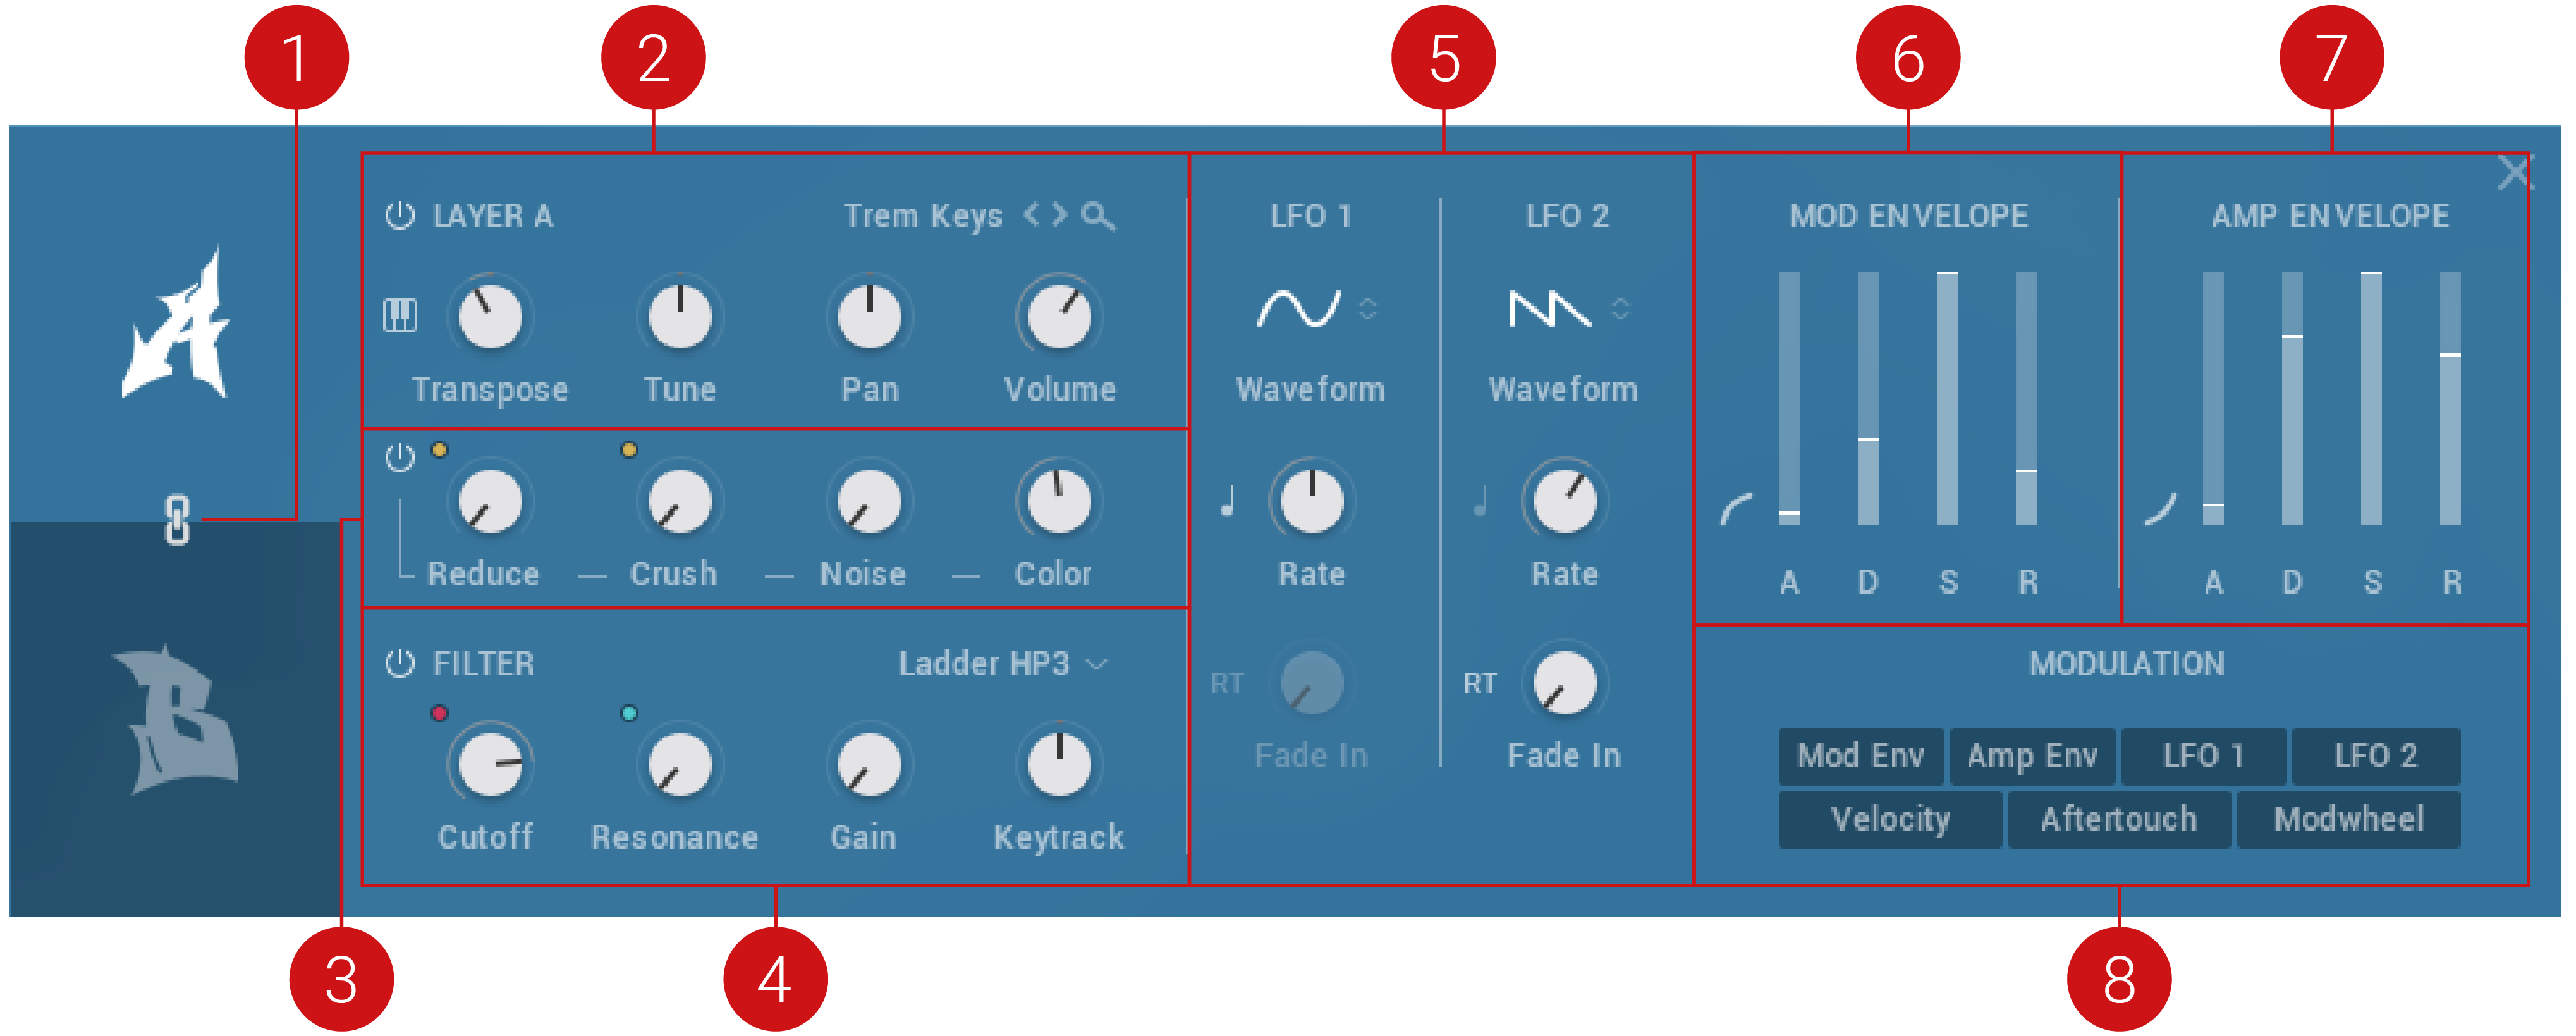
The Sound Editor
Layer Link: When activated, layers A and B are linked. Any edits performed in the selected layer will also be applied to the other layer. Press [Ctrl] / [Cmd] + click the Layer Link button to instantly set all parameters on the layers to match. Layer linking does not apply when assigning or moving macros, and some wavetable and lo-fi effects parameters will not be matched.
LAYER: This includes all sample settings such as tuning, pan, and volume. For more information, refer to Layer.
EFFECTS: Adds various digital artifacts, like quantization noise or aliasing, to your layer. For more information, refer to Effects.
FILTER: Adjust the brightness of the sound and determine how this changes across the range of the keyboard. There are a range of filter types available, each providing a different sound characteristic. For more information, refer to Filter.
LFO: Provides controls relating to the function and behavior of the two Low-Frequency Oscillators. LFOs produce periodic modulation, which can be used to modulate various parameters in the Sound and Effects Editors. For more information, refer to LFO.
MOD ENVELOPE: Adjusts how the modulation is applied to a sound over time. For more information, refer to Modulation Envelope.
AMP ENVELOPE: Adjusts how the amplitude of a sound changes over time, from the moment the note is played to its release. For more information, refer to Amp Envelope.
MODULATION: Selects a Modulation Source from which you can send modulation to various parameters. Once the Modulation Source is selected, sliders appear next to the available parameters to adjust the amount of modulation applied. For more information, refer to Modulation.
Layer
The Layer section sets the foundation of the sound. Here you can select a sound source, set key tracking and adjust the base pitch. Additionally, you can place the sound source in the stereo field and adjust its volume.
The Layer section contains the following controls and settings:
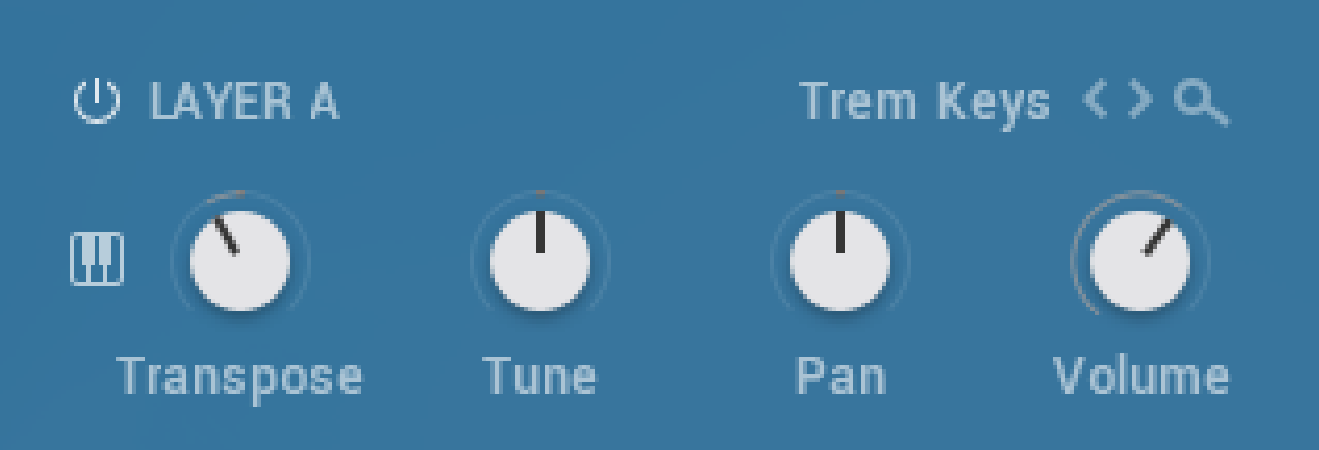 |
The Layer controls in the Sound Editor
Layer On/Off: Switches the layer on or off. Click the Layer On/Off icon to deactivate the layer, indicated when the icon lights up. Hold [Ctr] / [Cmd] + click the icon to change the opposite layer from its current state.
Key Tracking (keyboard icon): Tracks the pitch of incoming MIDI messages. When switched off, middle C will be played regardless of which notes are input, however, this fixed pitch can be changed by using the Transpose control. When switched on, the full keyboard range can be played.
Transpose: Shifts the incoming MIDI notes to transpose the sound source's keyboard range of +/-60 semitones (5 octaves). Press [Alt] / [Opt] and drag to quantize the knob adjustments in octaves.
Tune: Adjusts the tuning of the sound source in cents in the range of -36/+36 semitones. [Alt] / [Opt] and drag will quantize the adjustments to semitones.
Pan: Adjusts the panning for the current layer. When the knob is turned left the layer is panned left, and when turned right the layer is panned right.
Volume: Adjusts the volume for the current layer.
Sound Source Browse: Click the arrow icons (<>) to step through sounds for the selected layer. Click the Browser icon (magnifying glass) to open the Browser and search from the full list of sound sources. For more information, refer to Browser Overview.
Effects
The Effects section provides various effects that can be added to the sample or wavetable sound source. When a sample is selected, the effects add various digital artefacts, like quantization, noise, and aliasing, to your sound layers. When a wavetable sound source is selected, the effects relate to the readout, playback, and harmonic content of the wavetable. These effects ultimately shape the sonic character of the sound sources and contribute significantly to the distinct coloration of the instrument.
Lo-fi Sample Effects
When a sample is selected as a sound source, the following controls are available:
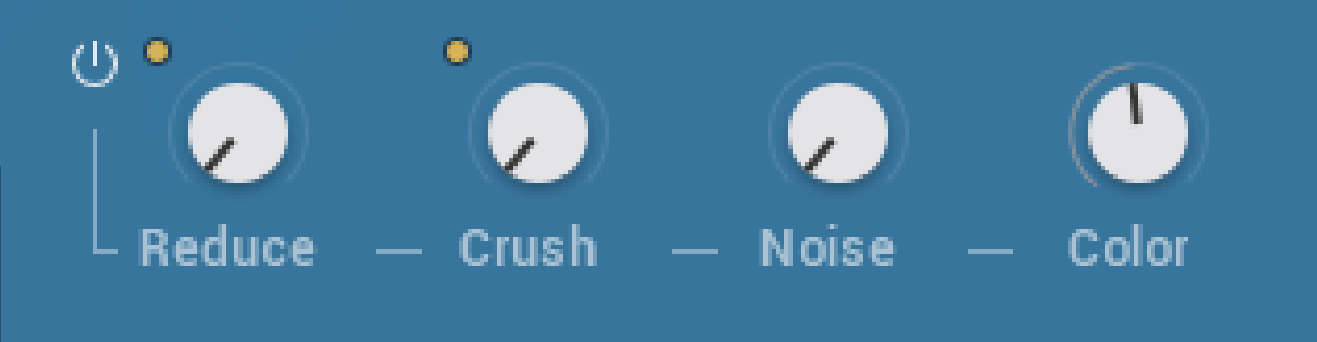 |
The Lo-fi Sample Effects in the Sound Editor
Effects On/Off: Switches the Effects section on or off.
Reduce: Re-samples the signal to an adjustable sample rate. The re-sampling is done without any kind of (usually mandatory) low-pass filtering, which causes all kinds of wonderful aliasing artifacts. The sample rate goes all the way down to 50 Hz, which will omit most of the original signal. When the control is in the left-most position there is no reduction. Turning the control right reduces the sample rate.
Crush: Re-quantizes the signal to an adjustable bit depth. Fractional bit levels (such as 12.4 bits) are possible and can add a significant gritty quality to the sound. Audio CDs have a quantization depth of 16 bits, old samplers' frequently used 8 or 12 bits, and 4 bits evoke memories of countless children’s toys. When the control is turned fully left, no effect is applied to the signal. Turning the control right reduces the bit rate.
Noise: Adds hiss to the audio signal. Turning the control from left to right increases the noise level.
Color: Adjusts the frequency characteristic of the noise and acts as a low-pass filter. Turning the control from left to right increases the amount of filtering applied to the Noise parameter.
Lo-fi Wavetable Effects
When a wavetable is selected as a sound source, the following controls are available:
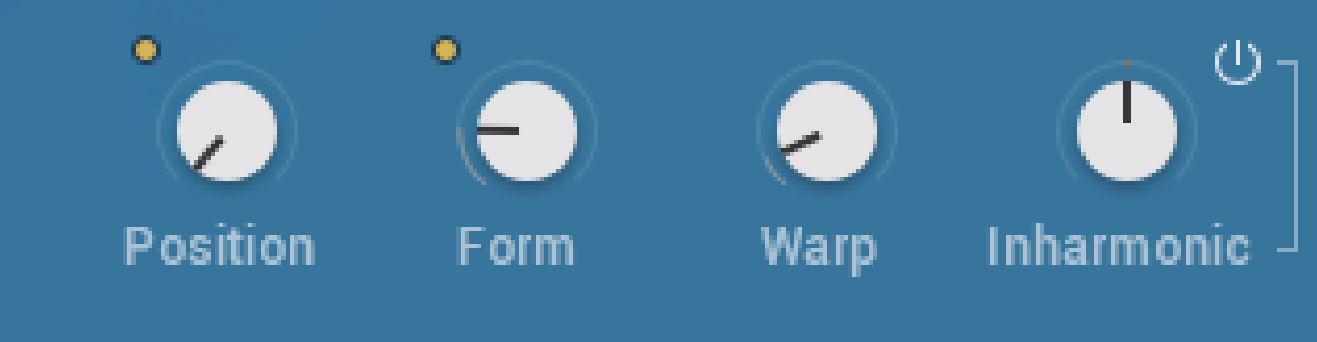 |
The Lo-fi Wavetable Effects in the Sound Editor
Position: Morphs between the waveforms included in the loaded wavetable. Modulate this with an LFO for more interesting results.
Form: Adjusts the amount of waveshaping applied to the phase of the oscillator.
Warp: Selects one of 14 types of waveshaping that is applied to the wavetable's phase. This fundamentally changes the way the wavetable is read out, therefore bending and warping the resulting waveform.
Inharmonic: Adds a second oscillator which can be detuned against the first one to produce inharmonic sounds. Turning the control left and right adjusts the amount of detuning in Hertz.
Inharmonic On/Off: Switches the Inharmonic effect on or off. Switching Inharmonic off can help reduce CPU load.
Filter
Filters take the basic, raw sound of the samples and subtracts frequencies, changing the harmonic content and thereby the character of the sound. This change can be varied over time using modulation to produce more dynamic, animated timbres.
40s VERY OWN KEYS offer filters from KONTAKT, each providing their own unique characteristics, as well as low-pass, notch, high-pass, and band-pass modes.
The Filter section contains the following controls and settings:
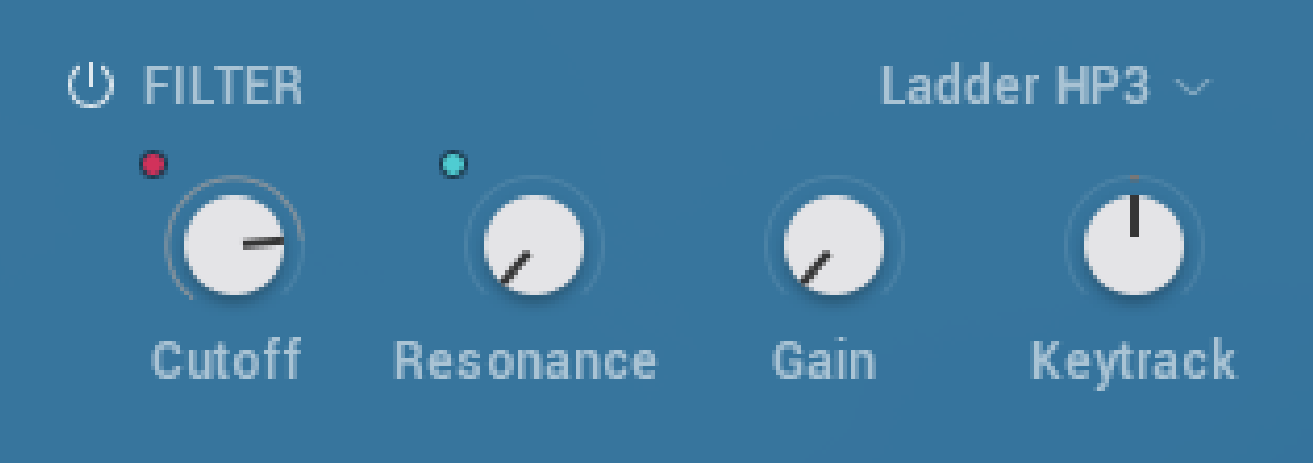 |
The Filter in the Sound Editor
Filter On/Off: Switches the layer filter on or off. Click the Filter On/Off icon to deactivate the filter, indicated when the icon is highlighted.
Filter Type: Selects a filter type from the drop-down menu. For an overview of each filter type, refer to the KONTAKT 6 Manual, available here.
Lowpass filters attenuate harmonics and signals above the cutoff frequency.
Highpass filters attenuate signals below the cutoff frequency.
Bandpass filters attenuate signals above and below the cutoff frequency.
Peak/Notch filters are the inverse of a bandpass filter, as they only remove signals around the cutoff frequency, but allow the signals above and below it to pass through. A peak filter is like a very narrow bandpass.
Multi filters offer a selection of filter types in either parallel or serial routings.
Vocal/Formant filters emulate various resonances of the human vocal tract rather than focus on completely subtracting parts of the frequency spectrum.
Cutoff: Allows certain frequencies of the sound source to be heard while others are filtered out. The frequencies that are filtered out will depend upon the filter type you have selected.
Resonance: Increases the amplitude around the cutoff frequency. Using this allows you to boost the narrow band of frequencies.
Gain: Boosts the output of the filter, making it possible to add makeup gain to the post-filter signal level or even overdrive the filter output and add harmonic distortion.
Keytrack: Sets the amount of modulation from the keyboard to the filter’s cutoff frequency. In simple terms, setting a value here means that the higher the note played on the keyboard, the more the filter opens. This adds 'brightness' to a sound as higher notes are played, which is useful in replicating the typical behavior of acoustic instruments.
LFO
LFOs are special-purpose oscillators that produce frequencies below the range of human hearing. They are typically used for periodic modulation to produce changes in sound, such as vibrato (periodic pitch modulation) and tremolo (periodic volume modulation). In 40s VERY OWN KEYS, the LFOs can be assigned to a variety of controls to make periodic changes to parameters over time.
40s VERY OWN KEYS features two LFOs, that offer a variety of waveforms and can be free-running or synced to the host tempo and retriggered on keypress. Each LFO can be assigned to multiple parameter controls. When selecting an LFO in the Modulation section, all possible modulation destinations are indicated with sliders, which determine the amount of modulation applied. For more information on using modulation, refer to Modulation.
The LFOs contain the following controls and settings:
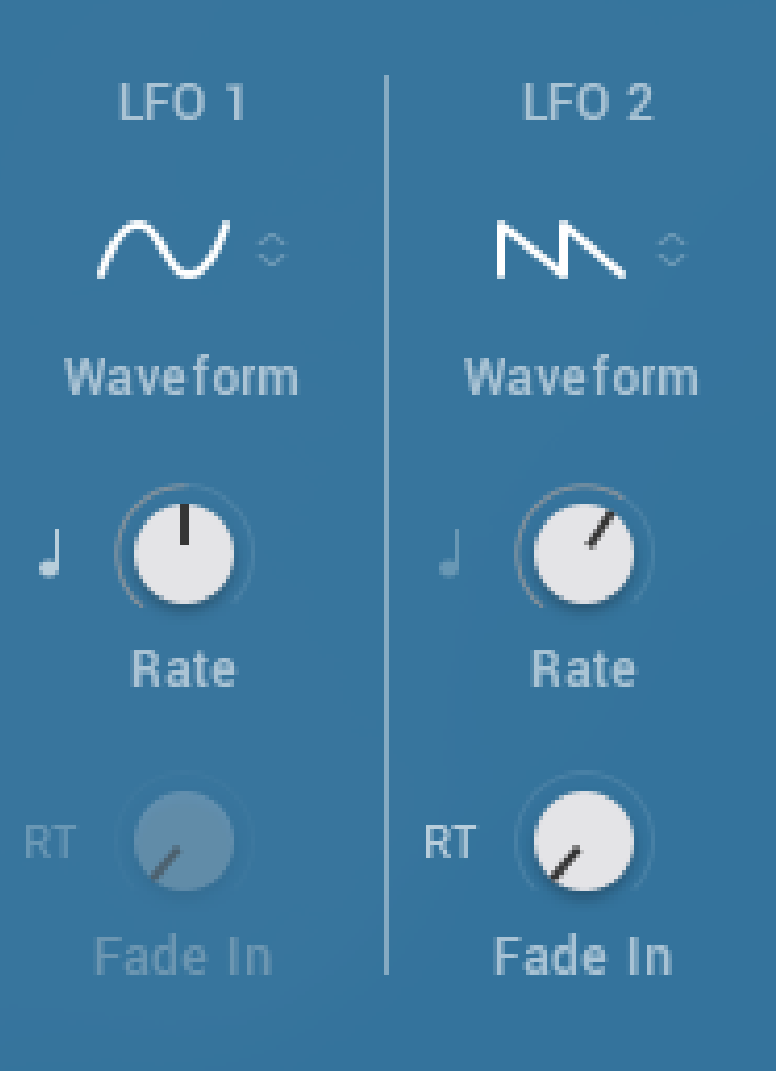 |
The LFOs in the Sound Editor
Waveform: Selects the waveform for the LFO. The available waveforms are Sine, Triangle, Sawtooth, 5% Pulse, 15% Pulse, 25% Pulse, 33% Pulse, Square, 66% Pulse, 75% Pulse, 85% Pulse, 95% Pulse, Random, Multi.
Tempo Sync: Synchronizes the speed of the LFO to your host tempo, or an external MIDI clock. When Tempo Sync is on, the Rate control will display how many notes of this value will make up the duration of one cycle. When inactive, the Rate control operates in Hz rather than rhythmic divisions.
Rate: Adjusts the frequency of this LFOs output signal in Hz (cycles per second). Values range from 0.01 Hz (one cycle in 100 seconds) to around 210 Hz.
RT (Retrigger): When activated, the LFO waveform will be restarted at the same position each time a note is received. When inactive, the LFO will run, without reacting to incoming notes.
Fade In: If this value is greater than zero, the LFO will not start the waveform immediately when a note is received, but rather smoothly ramp it up over a time of up to 10 seconds. This parameter is only available when RT is activated.
Modulation Envelope
The Modulation Envelope is used to shape the contour of the destination over time by giving you control over its attack, decay, sustain, and release stages. It provides flexibility by allowing you to freely assign it to multiple destinations at once and control the amount of modulation applied. Additionally, the Modulation Envelope provides additional control for defining its attack curve.
The Mod Envelope contains the following controls:
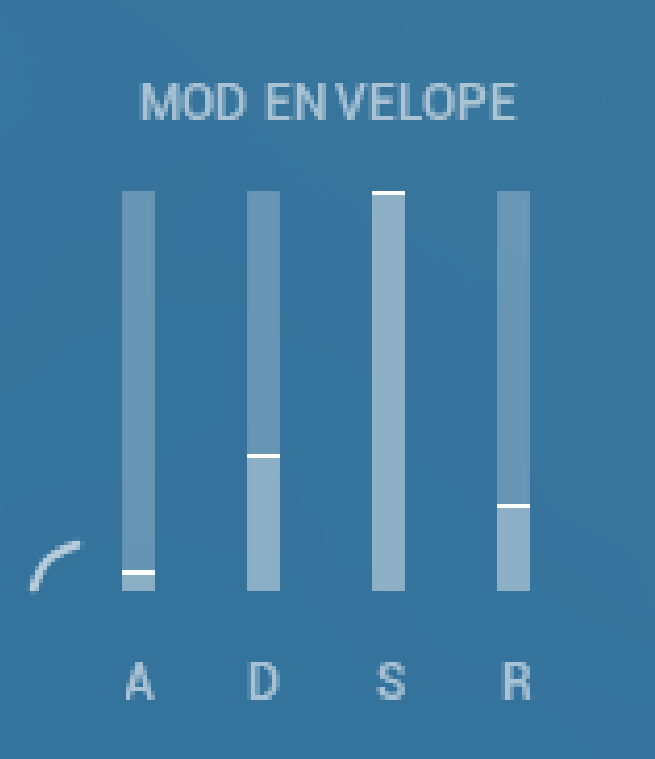 |
The Modulation Envelope in the Sound Editor
Attack Curve: Defines the shape of the attack portion of the envelope. Use in combination with the A (Attack Time) to define how the modulation starts after a key is pressed. Click and drag the curve upward or downward to change its shape.
A (Attack Time): Adjusts the time it takes once a key is pressed, for the envelope to reach the peak level. This control can be used to create modulation with a fast or slow fade-in. Turned fully left, the envelope will start immediately.
D (Decay Time): Adjusts the time it takes for the envelope to fall from the attack's maximum level to the level defined by the Sustain control. Turning the knob right increases the Decay Time.
S (Sustain Level): Sets the modulation level that the envelope remains at while the key is held down, after the Decay Time has expired.
R (Release Time): Adjusts the amount of time it takes for the envelope to fall from the set Sustain Level and fade to zero, once the key is released. It can be used to create modulation with a short or long fade-out.
Amp Envelope
The Amp Envelope has a dedicated four-stage envelope generator that is used to shape the volume of a sound over time. The attack, decay, sustain, and release sliders determine the contour of the volume from when the key is first pressed to its eventual fade out, and an additional attack curve allows you to define the shape of the attack stage.
The Amp Envelope contains the following controls:
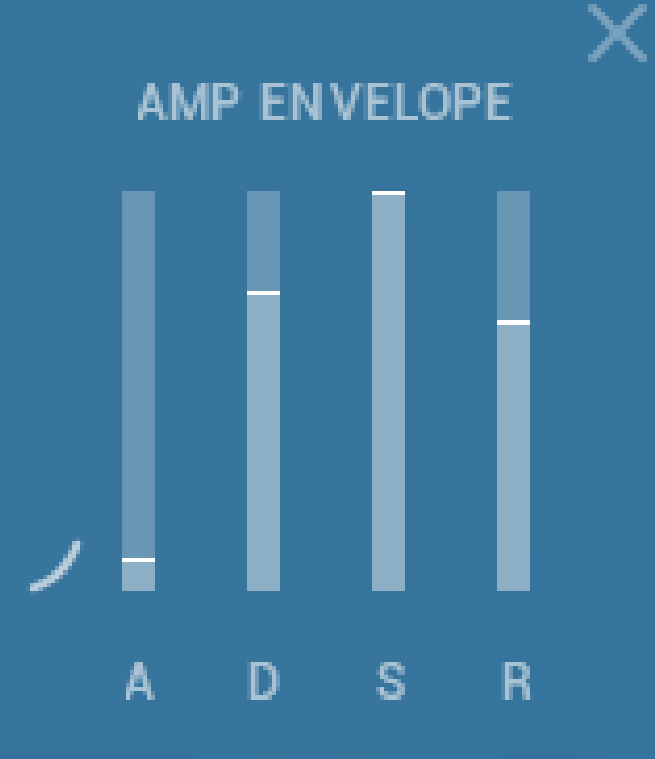 |
The Amp Envelope in the Sound View
Attack Curve: Defines the shape of the attack portion of the envelope. Use in combination with A (Attack Time) to define how the sound starts after a key is pressed. Click + drag the curve upward or downward to change its shape.
A (Attack Time): Adjusts the time it takes once a key is pressed, for the volume to climb from zero to full volume. It can be used to create a sound with a slow fade-in.
D (Decay Time): Adjusts the time it takes for the volume to fall from its initial full volume to the level set by the Sustain control while a key is held down.
S (Sustain Level): Sets the volume level that the envelope remains at while the key is held down, after the Decay Time has expired.
R (Release Time): Adjusts the time it takes for the volume to fall from the Sustain Level to zero once the key is released. It can be used to create sounds that have a short or long fade-out.
Modulation
Modulation adds movement to your sound by changing parameters over time. When you apply modulation to controls, the controls change their value according to the shape of the modulation signal. There are many sources for modulation, one of the most basic being an envelope. When triggered by a note event, the envelope produces a single contour that can be used to change controls over the course of a note. LFOs provide cyclical, periodic changes that occur at a set rate.
Modulation can also be applied manually by assigning Velocity, Aftertouch, or a Modwheel as the source. This provides a tangible form of expression that can add dynamics and variation to a sound as you're playing. For example, you could set the modulation wheel on your keyboard as the source to control the effects, or use the velocity of your key playing to control the amount of filter cutoff.
The Modulation section contains the following controls:
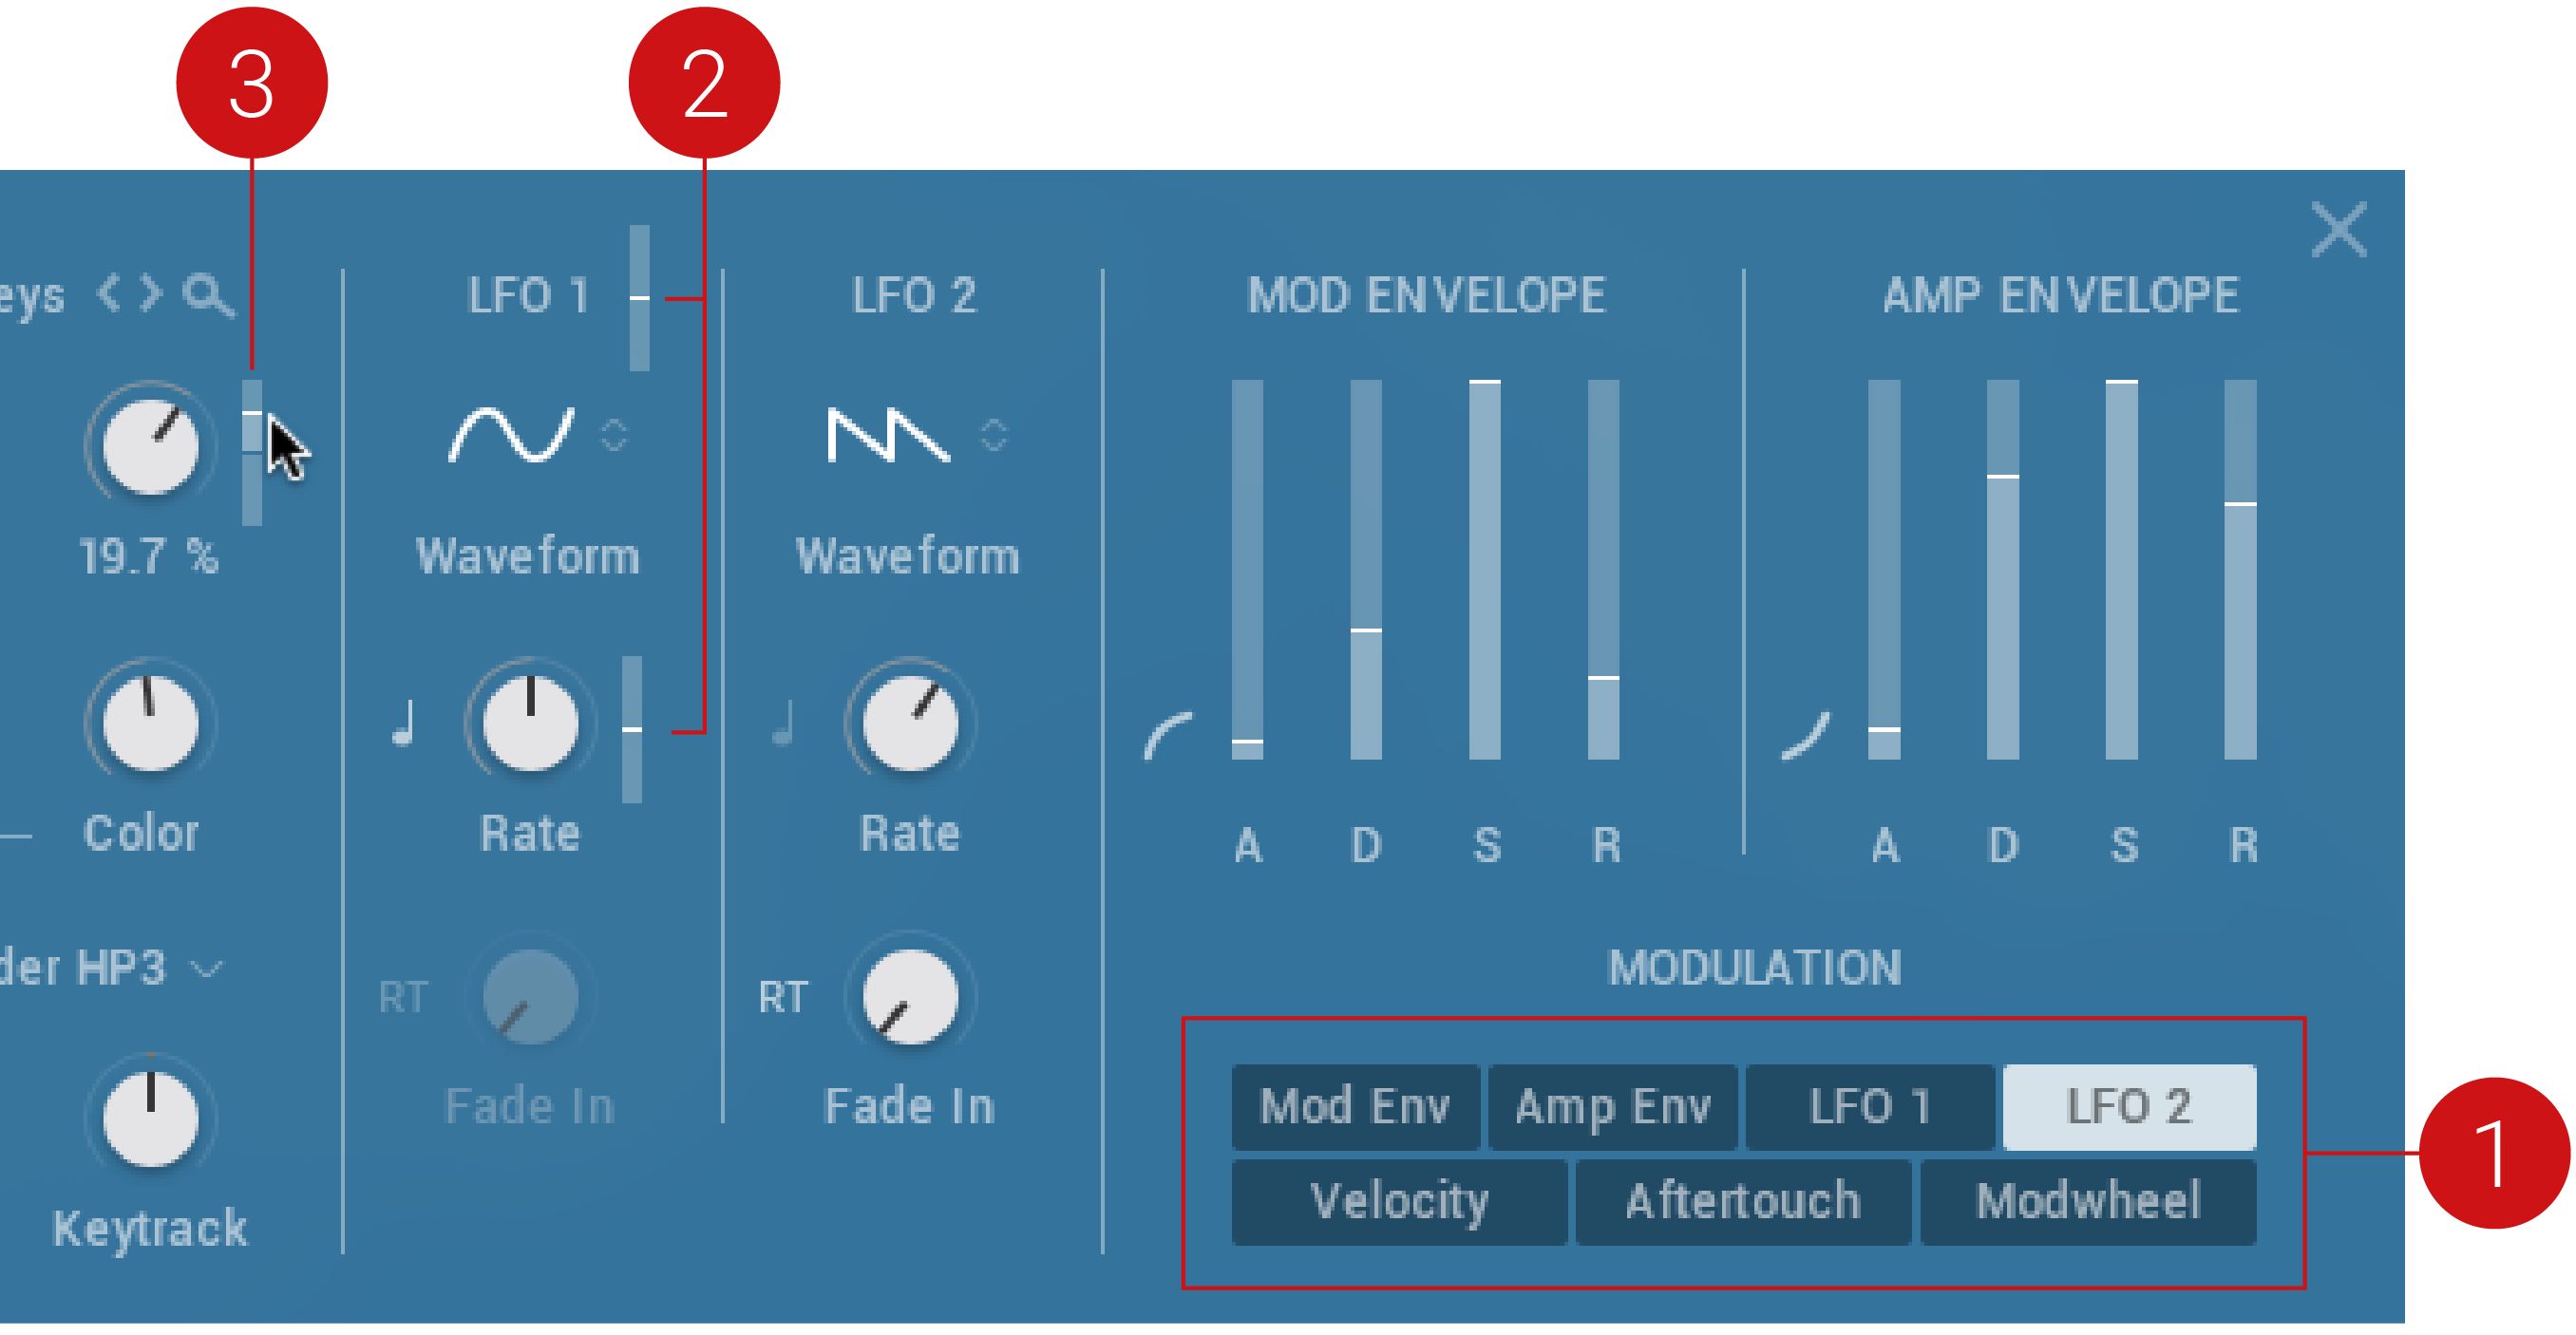 |
Applying modulation to the Volume parameter, with LFO 2 selected as the Modulation Source.
Modulation Source: Selects a target source from the seven Modulation Sources that allows you to apply modulation to various other parameters. The Modulation Sources include a Mod Envelope, Amp Envelope, LFO 1, LFO 2, Velocity, Aftertouch and Modwheel. Hold [Ctr] / [Cmd] + click the Modulation Source button to reset all modulation assignments to their default value.
Modulation Sliders: When a Modulation Source has been selected, sliders appear next to the relevant parameter controls that are available for modulation.
Modulation Amount: Use the sliders to set the amount of modulation applied to a parameter. This determines the strength of the modulation applied from the selected Modulation Source. Click + drag the mouse up and down to set the amount. The value range is -100% to 100%.