Kit Editor
The Kit Editor displays all controls related to the selection and editing of the individual drum sounds that make up your kit. Here you can search for sounds in the Browser and access parameters that determine the playback behaviour of these sounds. You can also load and rearrange your Insert FX and adjust the Send amount of your individual drum sounds to the Send FX units.
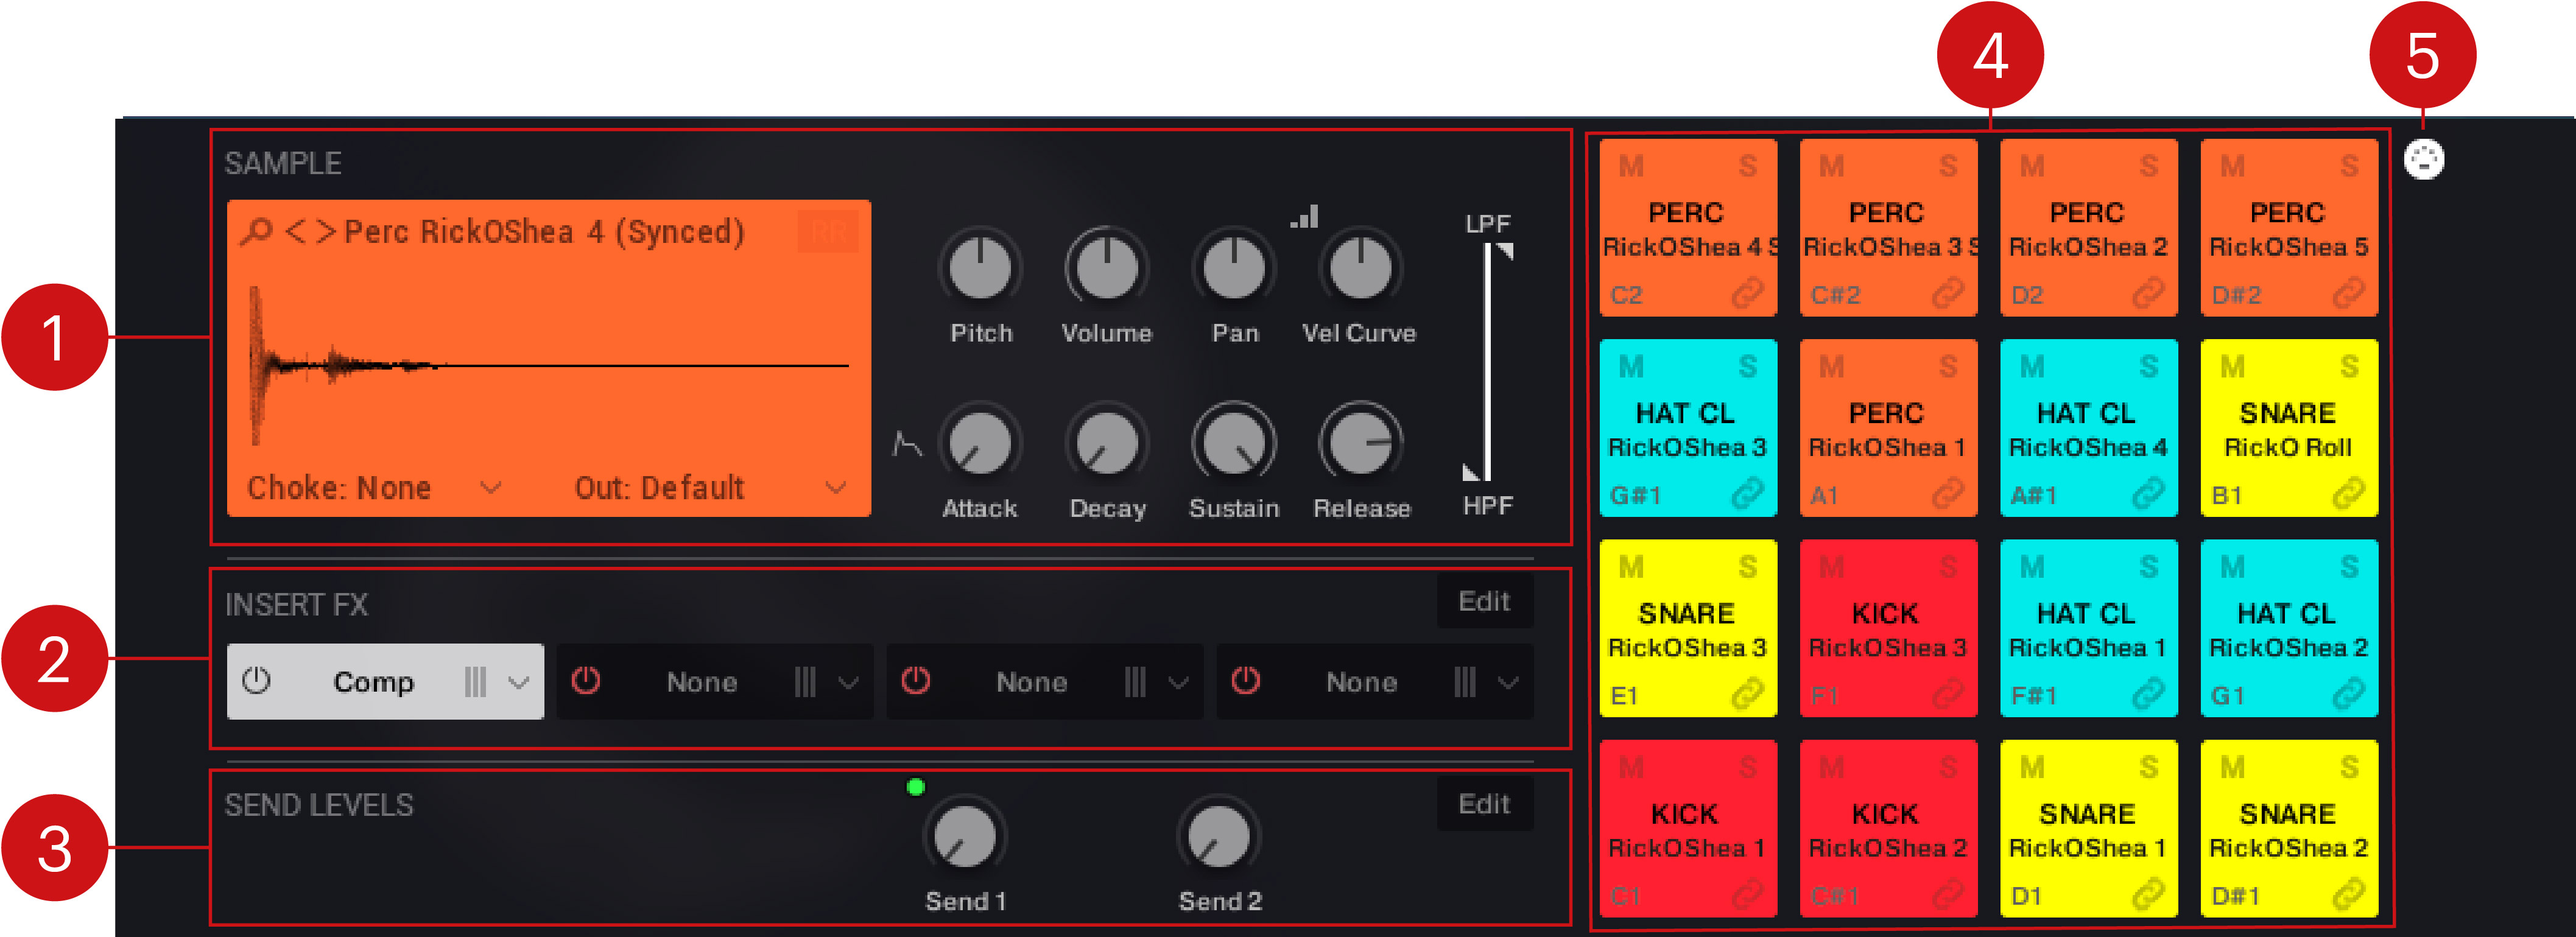
The Kit Editor contains the following sections and controls:

SAMPLE: Provides controls for parameters including pitch, volume, pan, velocity, envelopes, and filter. For more information, refer to Sample.
INSERT FX: Displays the Insert FX chain for the currently selected pad. From this view, you can load FX from the Insert FX menu and turn the individual FX units on or off. You can also reorder the FX chain by clicking + dragging. Clicking the Edit button will take you to the Insert FX page, where you can access the parameters controls that make up each unit. For more information, refer to Insert FX Overview.
SEND LEVELS: Provides the Send Level controls for the two Send FX units. Turning the control right sends the currently selected pad to the corresponding Send FX unit. Clicking the Edit button will take you to the Send FX page, where you can access the parameter controls of the two Send FX units. For more information, refer to Send FX Overview.
PADS: Displays the 16 pads that contain the individual drum sounds that make up your kit. Here you can solo and mute sounds, trigger pads, and have a visual overview of what sound sources are being used in your kit. For more information, refer to Pads.
MIDI Pad Select: When activated, pad selection is determined by MIDI note input. Activating the control allows you to select a pad for editing from your MIDI device.
Sample
The Sample section sets the foundation of your drum sounds. Here you can select a sound source, set the Pitch and adjust the Volume. Additionally, you can place the sound source in the stereo field using Pan, to ensure that all instruments can be heard. You might want to pan your drum kit like a typical acoustic kit, with Kick and Snare centered, and Toms, Hi-Hats, Crash and Ride panned accordingly. Alternatively you can use the Pan control as a creative effect that allows you send percussion and FX in any direction you wish. Use the Attack, Hold and Decay envelope controls to shape the contour of the volume of the sound over time. This allows you to adjust the snappiness of the sound's onset, and determine the length of the sound's tail, or the time it takes for sounds to fade out.
Choke and Out routing options provide further flexibility and control over your drum mix. Using choke groups on parts of your drum kit helps to reduce the overlapping of certain drum sounds. You might choose to group certain hi-hat sounds together so that one sound with a longer Decay time, is cut off when another hi-hat sound is triggered. This creates further space in your mix, and creates tighter sounding drums. Use the Out setting to bypass the Global FX section for certain pads. This also helps to keep you drums sounding tight and controlled, whilst still being able to make full use of the Global FX.
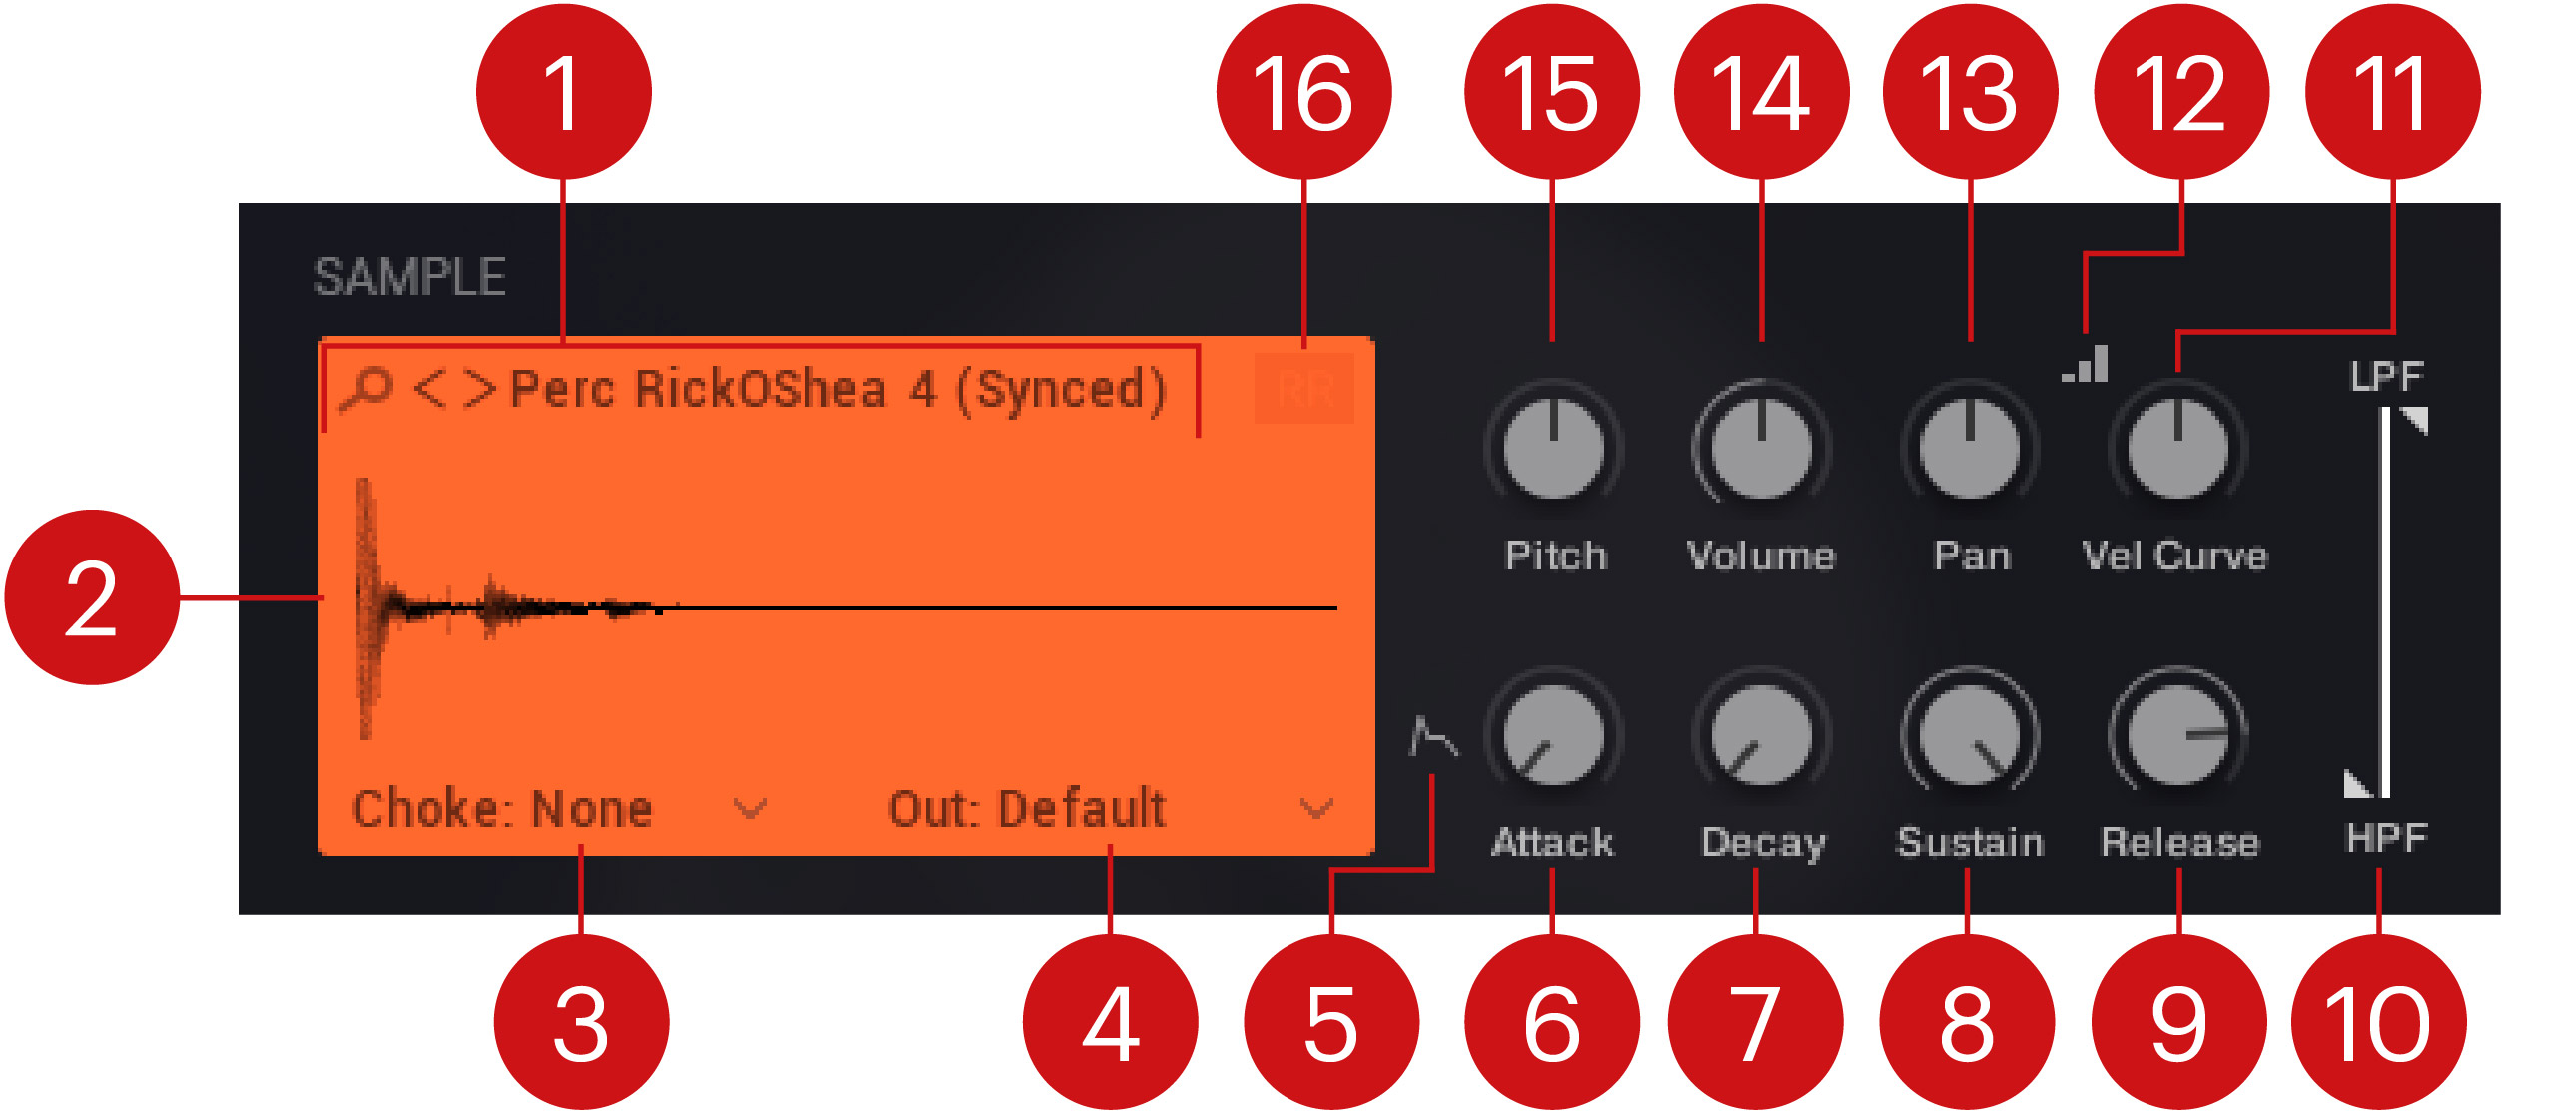
The Layer section contains the following controls and settings:

Sound Browse: Click the Browser icon (magnifying glass) or sound name to open the Browser and search from the full list of sound sources. Click the arrow icons (<>) to browse and load sounds for the currently selected pad. For more information, refer to Browser.
Waveform Display: Displays a visual representation of the loaded sound. Clicking the waveform will open the browser for the currently selected pad.
Choke: Selects one of four available choke groups (Group A-D) for the currently selected pad. Select none if you do not want to assign the pad to a choke group. When sounds that are group together are triggered, they cut each other off, reducing overlapping. This helps keeps your drum sounds tight and leaves more room space in your drum mix.
Out: Selects the output for the currently selected pad. When Default is selected, the pad is routed to the main instrument output. Select Bypass Master FX to route the pad to the main instrument output whilst bypassing the Global FX. Other output options allow you to route the pad to any of the available individual audio outputs.
Amp Envelope Mode: Toggles between AHD (Attack, Hold, Decay) and ADSR (Attack, Decay, Sustain, Release) envelope mode for the currently selected pad. The availability of envelope parameters depend on the selected mode.
Attack: Adjusts the time it takes once a key is pressed for the envelope takes to reach the peak level. Turned fully left, the envelope will start immediately. As you turn the control right, the Attack becomes longer, and your sound will have a smoother start. A fast Attack is necessary for achieving a snappy drum sound.
Decay: Adjusts the amount of time it takes to fall from the attack's maximum Peak level. Turned fully left, the Decay stage will start immediately, and turning the knob right increases the Decay time.
Sustain: Sets the amplitude of the sustain stage.
Release: Adjusts the time it will take the envelope to fall from its sustain level back to zero after the key has been released.
LP/HPF: Adjusts the LP (low-pass) and HPF (high-pass filter) that is applied to the sound source. This is a quick way to tame high and low frequencies of a sound source without the need for the detailed control of an EQ or filter effect.
Velocity Sensitivity/Curve: Adjusts the Vel>Amp and the Velocity Curve of the currently selected pad. Both controls are always active and you can move between the two by pressing the Velocity Adjust Mode button, above and left of the knob. Vel>Amp determines how much note velocity affects the volume of the sound, and Velocity Curve adjusts the velocity curve of the sound.
Velocity Adjustment Mode: Toggles between settings of the velocity amount and the velocity response curve. Both settings are always active.
Pan: Adjusts the panning of the currently selected pad. At center position the sound is panned directly at center. Values range from 0-100% L (left) and 0-100% R (right).
Volume: Adjusts the volume for the currently selected pad.
Pitch: Adjusts the tuning of the sound source in cents in the range of -36/+36 semitones. Hold [Alt] / [Opt] to quantize the adjustments to semitones.
Round Robin: Switches round-robin shuffling on or off. When on, the pad will shuffle between different sampled variations of the loaded sound. Not all sounds offer round-robin functionality, in which case the RR icon will appear dimmer.
Browser
To open to Browser, click the magnifying glass icon or sample name in the Kit view.
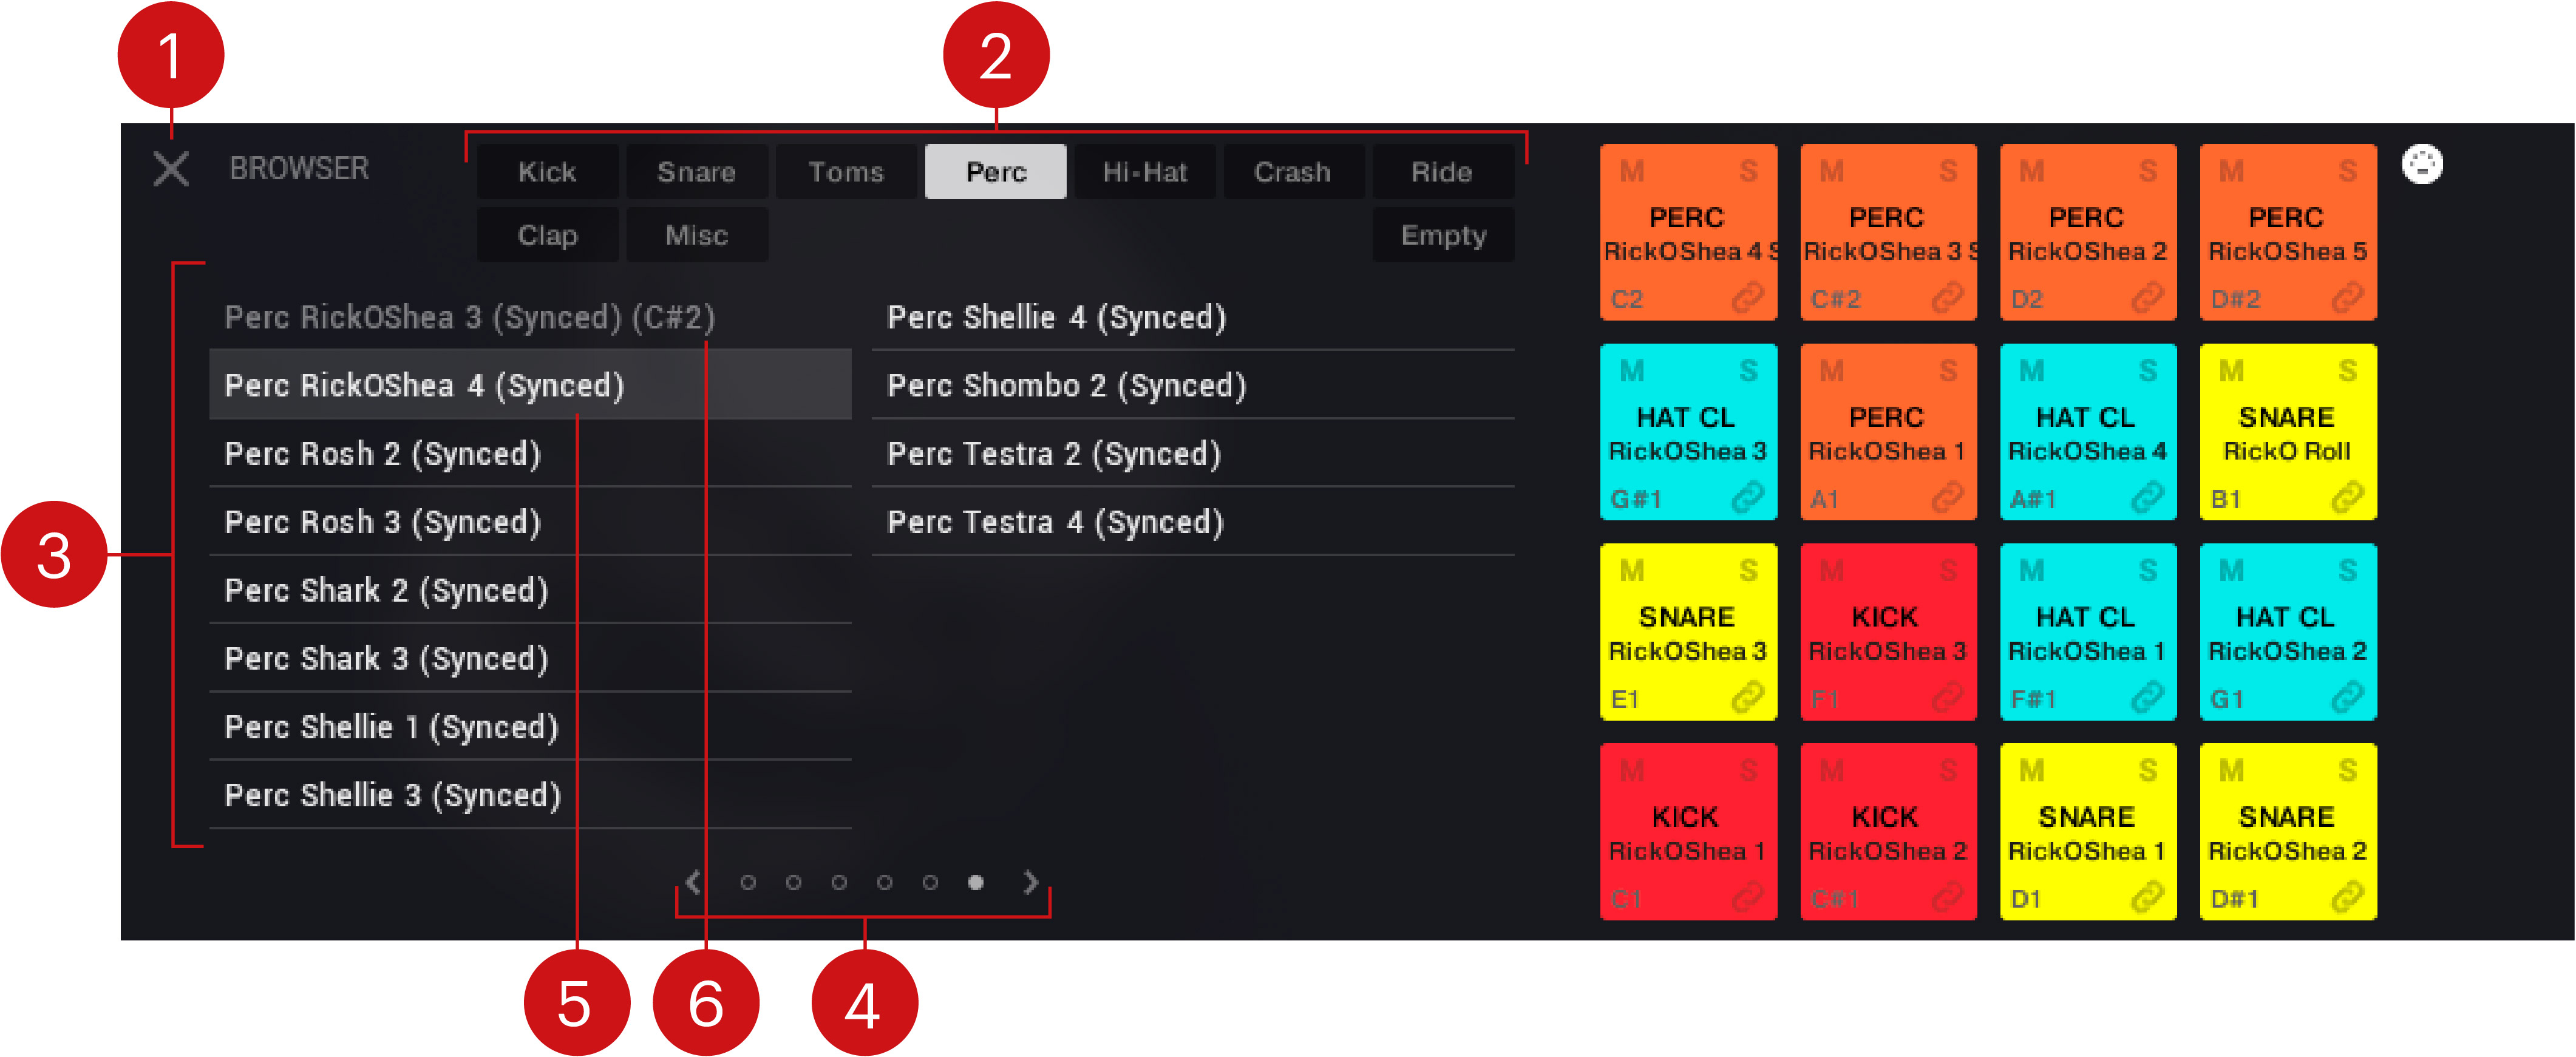
The Browser contains the follow features and controls:

X: Exits the Browser and returns to the Kit view.
Sound Category: Selects the sound category for the currently selected pad. Click on the category to view the available samples.
Sound Sources: Lists the samples that are available in each sound category. Click a sound source to select it for the current layer.
Pages: Provides access to the different pages of the Browser. Click the dot symbols to open the corresponding page of sound sources, or use the arrow icons (<>) to browse through each page.
Current Sound: The currently selected sound is highlighted.
Used Sounds: Sound sources that are already being used in the kit appear dimmed out.
Pads
The 16 pads represent the individual drum sounds that make up your kit. Each pad contains a sound source that you can edit in the Sample section. The pads allow you to trigger, solo, and mute sounds, and provide a visual overview of what type of sounds make up your kit.
The Pads section contains the following controls:
 |
MIDI Note: Displays the corresponding MIDI note to the respective pad. Play the corresponding note on your MIDI device to trigger that specific drum sound.
M (Mute): Switches Mute on or off for the audio output of the currently selected pad. Press [Ctrl] / [Cmd] +click M to exclusively mute a pad when multiple pads are muted.
S (Solo): Switches Solo on or off for the audio output of the currently selected pad. Press [Ctrl] / [Cmd] +click S to exclusively solo a pad when multiple pads are soled.
Sound Category/Name: Displays the Sound Category and Sound Source name of the respective pads.
MIDI Pad Select: Switches MIDI Pad Select on or off. When activated, pad selection is determined by MIDI note input. Activating the control allows you to select a pad for editing from your MIDI device, and is useful if you wish to play the pad as you adjust the relative sound editing controls.