- SESSION GUITARIST - ELECTRIC MINT Manual
- Navigating ELECTRIC MINT
Navigating ELECTRIC MINT
The following sections describe the different browsers and pages in ELECTRIC MINT. These include the Pattern Inspector, Song Browser, Pattern Browser, Guitar Settings, Amps & Effects, and Playback pages.
The Pattern Inspector
Modify the length, start position, volume, and tempo of any ELECTRIC MINT pattern using the Pattern Inspector.
The Pattern Inspector provides access to various parameters that will modify the length, start position, volume, and tempo of any pattern. The values of the Pattern Inspector will always refer to the selected pattern. In other words, if you select a different pattern, the Pattern Inspector will adapt its content accordingly.
To show or hide the Inspector Panel:
Click on the wrench icon button.

The Pattern Inspector opens.

The Pattern Inspector contains the following settings and controls:
Shift: Edit this value to shift the selected pattern's start (entry) position. Alternatively, you can drag the pattern's rhythm display left or right.
End: Edit this value to reduce the selected pattern's length so that it will loop earlier. Alternatively, you can drag the terminating flag left or right.
Tip
You can use the End Step feature very creatively. For example, you can trim a 4/4 signature pattern by eight 16th snippets, so that it will perfectly fit a 3/4 signature. You can also trim any pattern to odd signatures, such as 5/8 or 7/8. Combined with the Start Shift feature, you have very powerful tools to create whole new patterns and feels (e.g., start-shift a constant eighths pattern from on-beats to off-beats, etc.). Be creative!
Tempo: With the three tempo choices in the drop-down menu, you can switch the selected pattern's tempo from normal (1:1) to half time (1/2) or double time (×2). Please note that there is also a global time scaling feature on the Playback page (refer to The Playback Page). Its tempo factor will be multiplied by each pattern's individual tempo factor.
Tip
With slow host tempos, switching a pattern to half time may not work if the actual relative tempo falls below the limit of ca. 65 bpm.
Style (available for patterns only): From this drop-down menu, you can select three different playing techniques: open, muted and flageolet, each played with fingers or plectrum. For some of the patterns, you can also choose a pre-defined mixture of them (mixed). Choose Original to hear the pattern in its original state.
Fret Pos (available for patterns only): Change this value to make the virtual guitarist play in higher fret positions, which typically results in a more mellow tone.
Vol: Change this value to adjust the volume of the selected pattern, ranging from -24 dB up to +24 dB in 0.1 dB increments.
The Song Browser
Combine patterns and presets into Songs. Quickly find and load Songs via the Song Browser.
In ELECTRIC MINT, a Song is a preset that contains up to eight related patterns along with a factory sound preset as well as some settings of the Playback page. The patterns contained in a Song are loaded into the pattern slots.
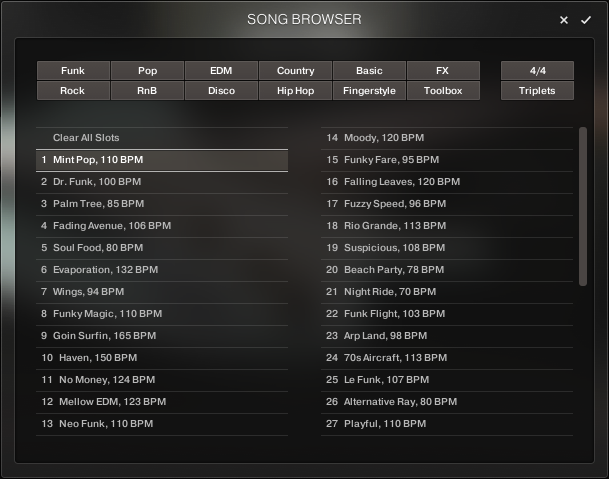
The Song Browser
Note
If you want songs to apply their recommended sound settings, activate the Link to Song feature in the top right box. If you deactivate this feature, the current sound settings won't be changed when you load a song.
To browse songs and then load a Song:
Click on the current song name; this will open the Song Browser.

Use the attribute buttons at the top of the browser to filter the list of displayed Songs by various attributes or styles. To show all Songs, deselect all attribute buttons, which can also be accomplished by pressing [Alt] + clicking any button.

Clicking on the name of the name of a song preset will play back an audio preview of the respective song and its sound preset. Unlike pattern prelisten, the prelisten tempo of a song will not follow the host sequencer. Instead, the pattern will be played back at its recommended tempo.
To load a Song, double-click its name or click on the tick button. If you wish to exit the Song Browser without changing anything, click on the X button instead.

Tip
Alternatively, you can cycle through the included Songs, without entering the Song Browser, by clicking on the triangular arrows to the left and right of the current Song name.
The Pattern Browser
The Pattern Browser lets you find the right patterns for your song. You can filter by attributes or tap in a rhythm that fits your style.
Since a preset Song might not meet your exact needs, you might wish to change a slot's pattern, or load additional patterns into specific slots. Click on the magnifying glass icon right next to any pattern to open the Pattern Browser.
 |
Clicking the magnifying glass icon will open the Pattern Browser.
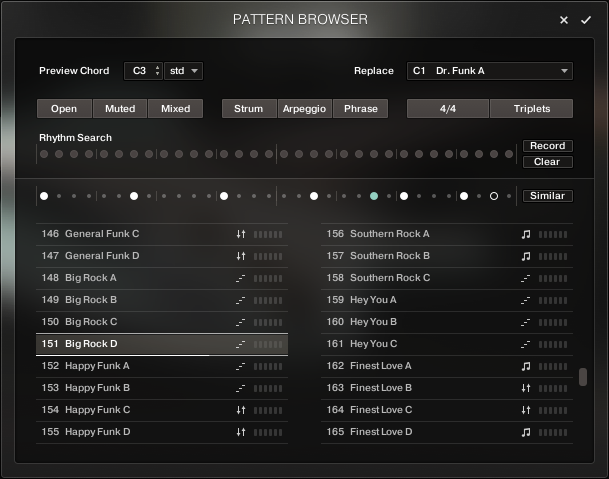
The Pattern Browser
The top area of the Pattern Browser holds a series of buttons that you can use to refine your search, including a Rhythm Search strip, which is a very powerful tool for finding patterns that match your custom rhythm. The body of the Pattern Browser contains a list of all patterns matching the current search criteria. If the list is too long to fit the screen, you can scroll through the list by dragging the scroll handle on the right up or down.
Note
The Rhythm Search strip is merely a tool to find pre-recorded patterns in the pattern library. It is technically impossible to create your own patterns by entering a certain rhythm, so, despite its look, the Rhythm Search strip should not be confused with a step sequencer.
To search a pattern by attributes (and not by rhythm), make sure the Rhythm Search strip is cleared. If it is not, click the Clear button next to the strip. Then refine your search by selecting any of the attributes, such as Muted, Phrase, 4/4, etc. If you want to bypass a category (such as Open/Muted/Mixed), deselect all attributes of that category. Consequently, you would need to deselect all attributes to display all patterns.

To search a pattern by attributes and rhythm, first, select/deselect the desired attributes as described above. Then, enter the rhythm you are looking for into the Rhythm Search strip. With each new rhythm snippet that you enter, the pattern list will be refreshed in real-time, sorted by the similarity of the desired rhythm to the rhythm of all patterns available in the library, in descending order.

Tip
There is a powerful shortcut feature to quickly enter a repeating pattern into the Rhythm Search strip: enter the beginning of the pattern and then [Alt] + click on the position of the first repetition. Furthermore, if you [Alt] + click on the first snippet, all other snippets will be activated/deactivated.
To 'tap in' a rhythm: first press the Record button and hear the metronome count-in. Then start playing a rhythm on your MIDI keyboard or click on the 'Tap' button. You can start at any time, so you can also start with a pickup beat. After 2 bars the recording will automatically stop, and the search results will be listed.
The rhythm search algorithm is very powerful. It will compare the rhythm defined in the Rhythm Search strip not only to the rhythm of the other patterns from start but also from any possible shifted starting position. This way, patterns with specific start shift offsets might be revealed as musically matching-patterns which otherwise would simply be overlooked. If the perfect start shift offset is different from 0, the value is appended to the pattern name. Upon loading a pattern, that offset will automatically be applied and entered into the Pattern Inspector (refer to The Pattern Inspector). Also, the Rhythm Search algorithm will rate accents higher than non-accentuated snippets. So, if you're searching for accents following a certain rhythm, try entering the accents only.
Tip
If you cannot find the desired rhythm straight away, chances are that you can create that particular rhythm by separately searching for the first and second half of the rhythm of a desired pattern, loading the two halves into two different slots, and combining them during playback. Alternatively, you can load the same pattern into two different slots and adjust the Start Shift of one of them, in order to shift accents to the desired positions.
To search for patterns similar to the selected one, you would need to search for patterns with a rhythm similar to the selected pattern's rhythm. Instead of entering and copying the rhythm manually, you can simply transfer the rhythm of the selected pattern into the Rhythm Search strip by clicking on the Similar button.

This will start a search and put the selected pattern at the very top of the listed results, since that pattern matches its own rhythm a 100 percent, of course. Rhythmically similar patterns will be listed subsequently.
To play a preview of a pattern, click on any of the listed patterns. This will also display the pattern's rhythm structure in the second strip. The preview playback will sync to the host tempo and transport position if the transport is running. However, only one selectable pitch can be previewed. Incoming MIDI notes will be ignored.
To stop the preview playback, simply click on the playing pattern again or, if the host transport is running, stop it.
To change the preview chord, select a pitch and a chord type in the top drop-down menus or value dragger.

To load a pattern, simply double-click the pattern or click the tick button. (If you want to cancel the process, click the X button instead.)

To load a pattern to a different slot than the currently selected one, choose one of the eight available pattern slots from the drop-down menu in the upper right corner. Confirm by clicking the tick button, or double-click the respective pattern.

The selected pattern will now be loaded into the selected slot; a previous pattern of that slot will be replaced. The pattern browser will be closed.
The Guitar Settings Page
Adjust the sound of the guitar itself via the Guitar Settings Page. From drive and brightness controls to mic positions and additional recording noises.
Click on the Guitar Settings tab (at the bottom of the instrument) to display the Guitar Settings page. This page provides controls that you can use to adjust the sound of the guitar itself, whereas the Amps & FX page provides virtual effects, such as amplifiers, EQ, or reverb. This page is divided into several sections, each of which is described below.
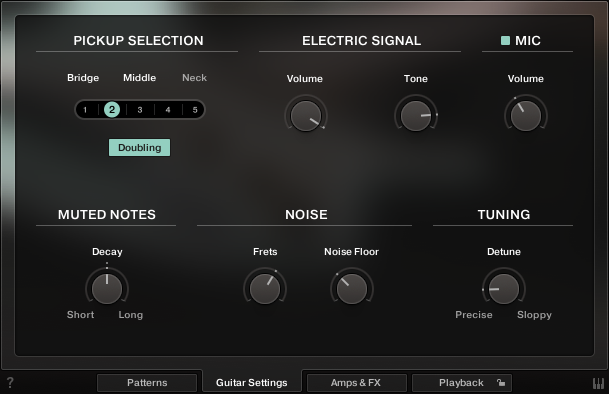
The Guitar Settings Page
Pickup selection: Use the pickup selector to choose either the bridge pickup, middle pickup, neck pickup, or positions in between those pickups. The bridge pickup provides a brighter sound with a stronger attack, while the neck pickup sounds softer.
Electric Signal Volume and Tone: Use these controls to adjust the volume and brightness of the guitar signal.
Mic: In addition to the pickup signal, you can dial in the acoustic signal of a microphone that was mounted directly above the strings. The pickup signal and the mic signal are mixed down to a single bus and are sent to the sound processors found on the Amps & FX page for further processing.
Muted Notes Decay: You can set the decay time of muted melody notes and muted arpeggio patterns by adjusting the Decay control. To adjust the decay in real-time, right-click to assign a MIDI controller to this knob. This way, it is possible to emulate continuous progressions from very short notes to a gradually longer decay or vice versa.
Fret Noise: Use this knob to adjust the volume of fret noises, which are automatically added upon changing pitches. When playing melodies or pattern pitch changes, the instrument emulates fingering noises and the ringing of the section of the strings between the saddle and the left hand of the guitarist.
Noise Floor: Use this knob to raise the noise floor. The noise floor is switched off while the instrument is not playing.
Tuning: Use this knob to detune the guitar.
Tip
Moderate levels of noise floor, fret noises, and detune can help add realism and create a more tangible guitar sound. Note that some of the included effects like amp emulations and delays may add additional noise, even if the noise control is turned all the way down.
Tip
If you prefer to use external amp simulations instead of using the effects provided on the Amps & FX page, keep in mind that stereo doubling requires two individual signal chains, i.e. one amp simulation for the left output channel and another one for the right output channel. If in doubt, listen to the stereo width: If the stereo doubled signal collapses to mono when applying external effects, the signal path is not “true stereo”.The Amps & FX Page
The Amps & FX Page
Apply various studio effects to the signal. Learn how to build an effects chain to polish your ELECTRIC MINT sound.
Clicking on the Amps & FX tab (at the bottom of the instrument) will open a page where you can apply several studio effects to the signal.
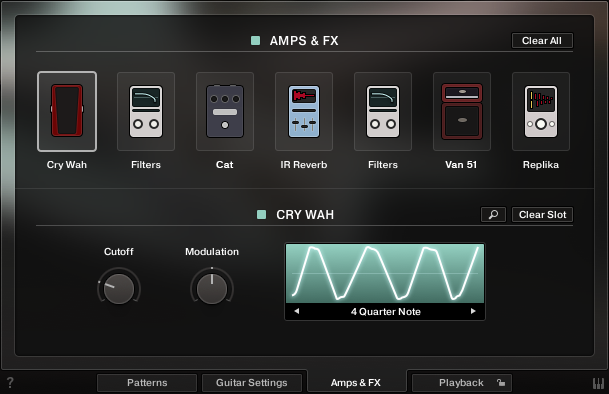
The Amps & Effects Page
The effects chain displays the currently loaded effects. Clicking an effect icon displays its settings in the inspector section below.
To change the order of the effects, simply drag and drop the respective icon in the effects chain left or right.
To bypass an effect, click the yellow square button next to its name.
To bypass the entire effects chain, click on the yellow square to the left of the Amps & Effects page title. Please consider that the effects still require processing power, unless the effects chain is cleared.
To clear the entire effects chain, click on the Clear All button in the upper right corner and confirm.

Tip
If you want to process the unaltered direct signal with external effect plugins, you can save CPU resources by clearing the entire FX chain. Keep in mind that if stereo doubling is activated, two individual signal chains are required, i.e., one amp simulation for the left output channel and another one for the right output channel. If in doubt, listen to the stereo width: If the stereo doubled signal collapses to mono when applying external effects, the signal path is not “true stereo”.
To remove an effect, click on the Clear Slot button on the right-hand side.

To load a different effect into the current slot, click the magnifier icon next to the inspector heading or click the magnifier icon that appears when hovering the name of an effect slot. This will open the AMPS & FX BROWSER. In that browser, click on the desired effect to load it into the selected slot. If the effect slot wasn’t empty, the loaded effect will automatically replace the previously loaded one.
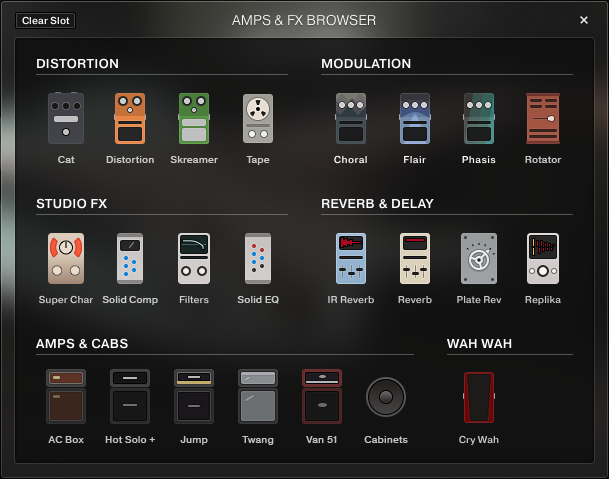
The Amps & Effects Browser
Note
For greater sonic versatility, the included amp models do not include speaker models. Instead, you can freely combine each amp model with each virtual speaker cabinet. Therefore, to simulate a traditional guitar amplifier, make sure that an amp model is always followed by a virtual speaker cabinet in a separate effect slot. It is advisable to study some of the included presets for reference.
The Playback Page
Manipulate the way in which patterns are played back in ELECTRIC MINT, from swing to humanization and different sync modes.
Clicking on the Playback tab (at the bottom of the instrument) will open the Playback page. This page contains settings that affect the way the patterns are played back. This page is divided into several sections, each of which is described below.
To exclude the Playback settings from Songs or snapshots, click the lock icon on the Playback tab at the bottom of the instrument (refer to Locking Parameters When Loading Snapshots or Songs).
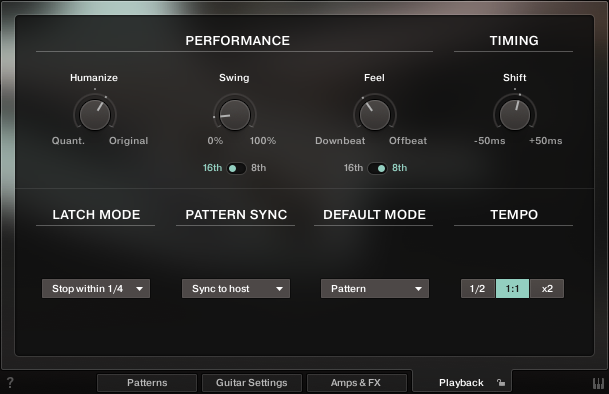
The Playback Page
Humanize: Use the Humanize knob to set the amount of quantization added to all patterns. In the right position, the timing of the original performance will remain unaltered. At the left position, the performance will be fully quantized.
Swing: Use the Swing knob to set the amount of swing added to each pattern. You can select between a 16th note or a 8th note base via the switch below.
Feel: Use the Feel control to shift accents in a pattern from the downbeat to the offbeat and vice versa. Make sure the correct time base is selected (16th or 8th notes).
Note
If the Swing or Feel knobs don't affect the playback, it is very likely that either a triplet pattern is selected, or the respective time base has to be changed from 16th to 8th notes.
Timing Shift: Increase the offset for a laid back feel or decrease the offset to have the virtual guitar play ahead of the beat.
Latch Mode: After you have released all keys, the pattern playback will automatically stop within the note duration specified in the Latch Mode drop-down menu.
Tip
The slightly delayed stopping of the playback enables the engine to perform smooth transitions from one pitch to the next, even if the incoming MIDI notes are not played as a seamless legato performance. However, if you want to stop the performance at a specific position in the arrangement, e.g., to perform a break, it is advisable to trigger one of the “ending keys” (G#1, A1, Bb1) at the desired position.
Pattern Sync: Use the drop-down menu to select one of two available sync modes.
Sync to host: With this mode selected, pattern playback will start in sync with your host sequencer. As ELECTRIC MINT is based on two-bar patterns, make sure to start your song on bar one or any other uneven bar number (e.g. bar 3, bar 5, bar 17).
Start on a key: With this mode selected, pattern playback will start from the beginning as soon as the first note is being played, ignoring the current host playback position. As long as the playback does not get interrupted (refer to LATCH MODE above), this shifted performance will be retained even if you subsequently play notes.
Default Mode (melody instrument): In the melody instrument, you can combine melodic playing and pattern playback into one cohesive performance. When set to Melody, you can play melodies by default, and holding down a pattern keyswitch will temporarily trigger a pattern. When set to Pattern, the instrument will perform patterns by default, and holding down one of the melody keyswitches will temporarily allow you to play melodies (for more information, refer to Combining Melodies and Patterns).
Tempo: Here, you can select between three tempo ratios 1⁄2 (half time), 1:1 (normal time), or ×2 (double time), which will globally affect the pattern playback speed relative to the host tempo. Please note that there is also a local time scaling feature available for each pattern (refer to The Pattern Inspector). The individual patterns' tempo factors will each be multiplied by the global tempo factor.
Note
With slow host tempos, switching the global tempo to half time may not work if the actual relative tempo falls below the limit of around 65 bpm.